Microsoft Office Groove 2007 shows you a lot about how useful well-engineered software can be. For the most part, Office Groove 2007 is straightforward to understand and use. Its basic features—the Discussion tool or Issue Tracking tool that you use in a standard workspace, for example—provide a range of capabilities that facilitate the exchange of ideas and information. Features such as these are some of the reasons that Groove 2007 makes collaborative work go smoothly. Don’t be surprised if you come to rely on Groove more and more after you first start working with it.
In this chapter, you’ll learn about some of the other features in Groove 2007 that you can use to share information and manage your communications—with other people and between computers. You’ll learn how to use Groove to set up a folder on your computer so that you can share and synchronize files in that folder with other people and your other computers. You’ll also learn about the communication and messaging tools that Groove provides and about managing the list of Groove contacts. Finally, you’ll learn a little something about how to build your own Groove forms that you can add to and use in your workspaces.
Note
For more information about the Discussion tool, the Issue Tracking tool, and other features of a standard Groove workspace, see Chapter 6.
Office Groove 2007 provides several different tools for sharing files. As you saw in Chapter 6, one of the tools included in a standard workspace is the Files tool, which workspace members can use to store files that they’re working on in common and need to refer to regularly. Groove 2007 also can synchronize files that are stored in a Microsoft Windows SharePoint Services document library.
Another way in which you can share files with coworkers, members of a group, or among different computers that you use is with a file-sharing workspace. A file-sharing workspace lets you specify or create a folder that’s part of the Windows file system as a location that you can use on any computer on which you’ve set up your Groove account. For example, you can set up a file-sharing workspace on your desktop computer at work and on the notebook computer that you take on the road. When you’re online, Groove takes care of updating the files stored in the folder (either automatically or at your request) so that the list of files and their state are in sync.
You can invite other people to share the files stored in the folder as well. Everyone who you invite to use a file-sharing workspace has access to the files and the content that they contain. Figure 7-1 shows a file-sharing workspace along with the Synchronization Tasks and File And Folder Tasks task panes that you use to manage the workspace.

Note
For more information about setting up your Groove account on more than one computer, see "Using Your Groove Account on a Second Computer".
You can create a file-sharing workspace while working in an Explorer window in Windows or from Groove by using the New Workspace command. Here are the steps for creating a file-sharing workspace from an Explorer window in Windows Vista:
Open the folder you want to use and keep synchronized in a file-sharing workspace.
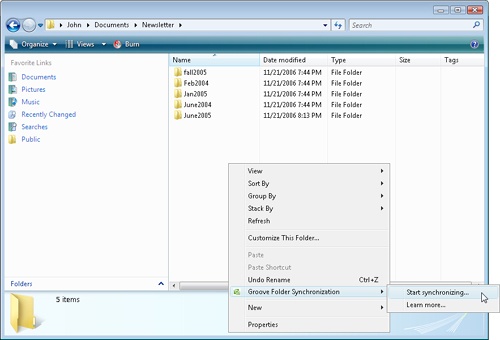
Right-click in the folder list area, point to Groove Folder Synchronization, and then click Start Synchronizing as shown here:
Click Yes to confirm the operation, and you’ll see the Synchronization Tasks and File And Folders Tasks task panes shown earlier in Figure 7-1.
Note
In Windows XP, the steps for setting up a file-sharing workspace from an Explorer window are essentially the same. In the window, click Folder Sync on the toolbar. In the task pane that appears, click Start Synchronizing. You’ll then see the task panes that you use to manage the file-sharing workspace.
Here are the steps you follow to set up a file-sharing workspace from the Groove Launchbar:
On the File menu, point to New, and then click Workspace.
In the Create New Workspace dialog box, shown next, click File Sharing, and then click OK.
Note
You can enter a name for the file-sharing workspace in step 2, but you don’t have to. As you’ll see in the next step, Groove presents you with several choices for specifying the folder you want to use. If you pick a folder that is already on your computer, the file-sharing workspace will use the name of that folder.
In the dialog box shown here, select an option for creating the folder, and then click OK.
If prompted, select a location for creating a folder, or select a current folder, and then click OK.


The Synchronization Tasks task pane (shown earlier in Figure 7-1) provides commands that let you work with and manage a file-sharing workspace. For example, to invite someone to share this folder, click Invite Someone, and then you’ll see the dialog box shown in Figure 7-2.

From here, you follow the same steps as those for inviting someone to join a standard workspace. Select or enter the name (or e-mail address) of the person or persons you want to invite, type a message if you want, and then click Invite. Assuming that the people you invite accept your invitation (and you confirm their acceptance), the file-sharing workspace is added to the workspace list in the new member’s Launchbar (or your own list of workspaces, if you are the invitee). To start working with the files in the workspace, new members first need to download them.
Note
To remove a member from a file-sharing workspace, right-click the member’s name in the Synchronization Tasks task pane, and then click Uninvite. You must be a workspace manager to remove a member from a workspace.
Note
For information about inviting someone to be a member of a standard workspace, see "Inviting Workspace Members and Assigning Member Roles".
The files and data in a file-sharing workspace are not downloaded automatically from the inviter’s computer after you accept the invitation. You first need to specify a folder on your computer where the workspace will be located and then specify whether you want to download the data immediately (assuming that another member of the file-sharing workspace is online so that your computer has access to the files) or to download only links. If you choose to download only links, the file-sharing workspace on your computer will list the files in the workspace, and you can download the content of the files later when you need to work with a specific file.
Groove offers a default choice about which option to use, depending on how much data is contained in the file-sharing workspace when you accept the invitation. If the workspace contains 100 files or more, or if any one file is 100 megabytes (MB) or larger, the manual download option is presented as the default option. Otherwise, the option to download the content immediately is suggested as the default. The dialog box that you use is shown in Figure 7-3.

Figure 7-3. After you accept an invitation to a file-sharing workspace, use this dialog box to specify a folder to use on your computer and to download the data that’s being shared.
If you download the files immediately (Fetch Everything), Groove goes to work, and copies of the files are created in the location you specified. If you choose the manual option (Only Fetch Links), when you need to work with a file, select it, and then in the File And Folder Tasks task pane, click Download This File. When a file is added to a file-sharing workspace, before it is downloaded it is displayed with a download indicator (a small arrow) and is listed with the file type Microsoft Office Groove Remote File rather than Microsoft Office Excel Worksheet, for example, as you can see in Figure 7-4.

Figure 7-4. You can choose to download files immediately (automatically) or manually when you need to work with them.
Once you’re up and running in a file-sharing workspace, you can choose options for how to keep the folder synchronized. For example, you might have elected to download all the data immediately when you first joined. You can maintain that approach for the files that are added to the workspace in the future, or you can switch to downloading files manually. To manage the download settings for the synchronized folder, click Edit This Folder’s Download Settings in the File And Folder Tasks task pane. You’ll see the dialog box shown in Figure 7-5.

Figure 7-5. Editing the download properties for a folder in a file-sharing workspace lets you choose when to update the folder.
Sadly, the pleasant idea of fetching a file—the word Groove uses when you first join a file-sharing workspace (see Figure 7-3)—is replaced with less lyrical terms. In Figure 7-5, for example, the download settings are set to Manual Download. If you select the Manual Download setting for a file-sharing workspace, you should keep in mind that you’ll then need to take care of downloading all the files that other members add to the folder, as well as new files you add to the folder on other computers that you use. You can switch to Full Automatic Download, the recommended approach for keeping up with changes in the files you’re sharing between computers and with others, or take the middle road and specify a size limit, in megabytes, for changes that are automatically downloaded. Specifying a size limit might be helpful in cases in which a number of large graphics files are included in a file-sharing workspace or lots of Microsoft PowerPoint slides, which tend to be larger than Microsoft Word, Microsoft Excel, or other types of files.
You can specify that updates for any particular file in the synchronized folder be downloaded automatically so that the file stays current whenever another member saves changes to that file. To select a download option for a file, select the file, click Show This File’s Properties in the File And Folder Tasks task pane, and then select the Automatically Keep This File Up To Date option.
The following list summarizes other operations that you’ll perform from time to time when you’re working with a file-sharing workspace:
Managing alerts. By selecting Set Alerts For This Folder, you can control whether Groove alerts you when changes to the folder occur—when a file is added, for example, or a file is updated. Seeing alerts are a yes-or-no proposition here: you either see them or you don’t. You can’t, for example, see alerts for changes but not see alerts for additions.
You’re given somewhat greater control over the alerts about unread information in a workspace. To set these alerts, click Show Properties For in the Synchronization Tasks task pane, and then click the Alerts tab, shown in Figure 7-6. You can associate a sound with an alert, for example, or set an alert for when a member enters the workspace. You can use the slider to specify whether you receive no alerts, have Groove display an icon to mark unread content, or have Groove display an alert (with a further option for Groove to dismiss alerts if you ignore them.)
Figure 7-6. Managing alerts for unread information and member presence lets you keep tabs on workspace activities.
Note
For more information about working with Groove alerts, see "Managing Groove Alerts".
Folder permissions. Workspace permissions as they relate to a folder (see "Inside Out: File-Sharing Roles and Permissions") are managed by clicking Show This Folder’s Properties in the File And Folder Tasks task pane and then clicking the Permissions tab. On this tab, you can update the permissions for the three workspace roles—Manager, Participant, and Guest—controlling which roles can and cannot conduct the list of activities shown in Figure 7-7.

