A simple one-line border may do the trick when you are interested only in a box that sets items off from surrounding text. If you want to use a border as a design element on your page, you can use the Borders And Shading dialog box, shown in Figure 10-9, to tailor the selections to create a more sophisticated effect. The Borders And Shading dialog box gives you the option of choosing from a variety of looks for your border (including 3-D and shadow effects). You can also change the style, color, and width of a border’s lines, or create a partial border—a border along the top and bottom, for example—by selecting the line segments you want to include.

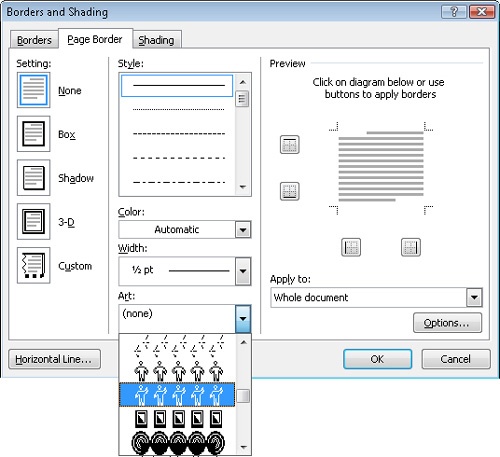
Figure 10-9. The Borders And Shading dialog box enables you to specify border types and border placement as well as line styles, colors, and widths.
To create a customized border, place the insertion point where you want the border to start or select the element you want to apply a border to. For example, if you want to add a border to a paragraph that lists your corporate Web site and contact information, select that paragraph. You can then open the Borders And Shading dialog box in one of these ways:
On the Home tab, in the Paragraph group, click the arrow beside the Border button and then click Borders And Shading.
Click the Page Layout tab. In the Page Background group, click Page Borders, and then click the Borders tab in the Borders And Shading dialog box.
Word offers some basic border settings that you can use, although you can create an almost unlimited number of combinations by adjusting the style, color, width, line, and shading settings. The Borders And Shading dialog box provides three tabs: Borders, Page Border, and Shading. Here’s a quick overview of important border and shading options included on these tabs.
The Borders tab (shown in Figure 10-9) contains options you can use to set the border style, color, and width. The Borders tab also has options for partial borders (for example, you can use the Preview area to indicate which edges of the selected item you want to assign a border to.
The Page Border tab includes the same options you’ll find on the Border tab, with one addition: The Art list at the bottom of the center section enables you to add special border art to the pages in your document (see Figure 10-10).
The Shading tab enables you to put a background color or pattern behind selected text.
The Setting option is the first major choice you’ll probably make when you use the Borders And Shading dialog box. This option controls the overall look of the border itself. The Setting options depend on whether you’re adding a border to a table or to standard text. If you’re working with standard text (a paragraph or a heading, for example), you can choose from the following border setting options:
None. Shows no border around selected text and objects; this is the default
Box. Encloses the selection in a simple line box
Shadow. Outlines the selection with a box and adds a drop shadow below and to the right of the selection
3-D. Creates a three-dimensional effect for the border, making it appear to "stand out" from the page
Custom. Enables you to configure the Preview area so you can choose and customize the line segments you want to include in your border
If you’re working with a table or selected table cells, the Borders tab appears as it’s shown in Figure 10-11. You can choose among the following border setting options:
None. Shows no border around the table or selected cells
Box. Encloses the table or selected cells in a simple box
All. Outlines the entire table or selected cells, including borders between cells; this is the default border setting for a table or table cells.
Grid. Outlines a table or selected cells with a heavier exterior border and lighter interior borders
Custom. Enables you to configure the Preview area so that you can choose and customize the line segments you want to include in your border

Note
You can mix and match border types to achieve the effect you want. For example, you can add borders to part of a table and hide borders in other parts to create the appearance of underlined text when creating "fill-in-the-blanks" type forms. You can further combine border options, such as color and line widths, to make borders visually appealing.
To apply one of the Setting options shown in the Borders And Shading dialog box, select text or table cells or click in the paragraph, table, image, or other element that you want to format. Then display the Borders And Shading dialog box and click a Setting selection on the Borders tab. If you don’t want to make any additional customizations to the border, you can simply click OK to return to your document. The border will be added to the current text, table, or selected object. If the cursor was positioned in a new blank paragraph before you displayed the Borders And Shading dialog box, the border will appear around the insertion point and will expand as you type. The border will surround paragraphs you add, images, tables, and other elements. To end the expansion of the border, either click outside the formatted area or press Enter at the end of the formatted area, and then use the Border button to format the new blank paragraph marker with the No Border setting.
Note
If you add a border and decide you really don’t like it, you can do away with it immediately by clicking Undo on the Quick Access Toolbar at the top of the Word window or by pressing Ctrl+Z. You can also use the Border button in the Paragraph group on the Home tab and apply No Border to clear the border lines.
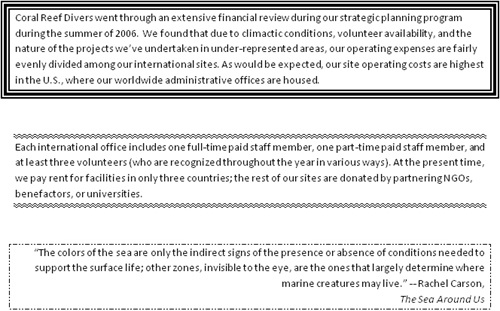
Word 2007 provides 24 line styles that you can use to create border effects. From simple, straight lines to dotted, double, and triple lines, you can create a variety of looks by changing line styles. Figure 10-12 shows a few examples of borders created with different line styles.
To choose a line style for a border, display the Borders And Shading dialog box and select a line style in the Style list on the Borders tab. The Preview section shows the effect of your choices. Set any other border choices you want and then click OK. The document is updated with your changes.
When you first start adding lines and borders to your publication, Word uses the Automatic color by default (which will be black if you are using the standard Windows color scheme). But you have many other colors at your disposal. To specify border colors, follow these steps.
Click in or select the elements you want to format with border colors. If the content already has a border and you only want to color the lines, you can retain the current border and apply a color.
Click the Home tab. In the Paragraph group, click the arrow beside the Border button and then click Borders And Shading.
On the Borders tab of the Borders And Shading dialog box, select a Setting option and line style if you’re creating a new border. If you’re working with an existing border, you can make any changes that you want.
Open the Color list to display the color palette, as shown in Figure 10-13.
Select the color you want to use, or, if you don’t see the color you were hoping for, click More Colors. The Colors dialog box appears, which you can use to find or mix the color you want.

If you’re creating a new border, the color setting will be reflected in the Preview area immediately. If you’re adjusting the color setting for an existing border, you need to click each line in the Preview area to apply the color setting. In this way, you can control the line color for each border line.
Note
The color palette is divided into two sections. The Theme Colors section provides colors from the document theme and the Standard Colors section offers primary colors. Clicking More Colors displays the Colors dialog box so that you can choose from a wide range of colors or create your own custom color. Any color that you select other than those offered in the Theme Colors section will not be swapped if the document theme colors change.
When you need to match colors, choosing accurate border colors can become an especially important issue. For times like these, you should modify or create a new document theme. This will enable you to you create the custom colors once and they can be made available to any document. For more on customizing document themes, see the Word 2007 online help.
When you create a simple border, the default line width is ½ point, which is a simple, thin line. If you want to create a more dramatic effect—whether you leave the line black or use color—you can change the width of the line. To change the line width, display the Borders And Shading dialog box, click the Width arrow, and then select the width you want. Available point sizes range between ¼ point and 6 points.
Note
You can use line widths to create a special effect for partial borders. For example, to add a wide line above and below content, select the area you want to enclose between the lines, display the Borders And Shading dialog box, and then click the Custom Setting option. Select a line style, click the Width arrow, and choose a larger point size, such as 3 points. In the Preview section, click the top horizontal edge of the preview page. A line is added to the top border. Next, click the bottom horizontal edge of the preview page, and then click OK. Word adds the thick line border above and below the selected area.