
What’s a Variable?
The variables that we use in writing code are the very same variables that we learned about in school. Take the following equation for example:
a2 + b2 = c2
I’m sure you’ve seen this before; it’s the Pythagorean theorem and it’s pretty useful for finding the length of one side of a right-angle triangle if we know any of the other two sides. The letters a, b, and c are the names for numerical data, in this case the letter c is used for the hypotenuse while a and b are the other two sides of the triangle. We can also call these letters variables. Variables are quite simply containers for information. In programming, variables have a name that tells us what data the variable might contain and they have a type that determines what kind of information the variable can hold, and finally they have a value whether we know what it is or not.
We can use variables to assign human-readable names for things like pin numbers or useful values. They can also be used to store numbers that constantly change while our code is actively running. This can be useful for setting up counters, performing calculations, or for passing new values to and from functions. To properly use a variable, we need to start with declaring the variable. After that, we should also talk about good variable names, the various types of variables, and a few other things related to working with variables.
Declaring Variables
When setting up a new variable, we need to at the very least determine two pieces of information: the variables data type and its name. This process is called declaring a variable where we will hold a place open in the Arduino’s memory to store our information. Declaring a variable is as simple as indicating the data type followed by a unique name for the variable. The following are some examples of simple variable declarations:
int x;


int myVariable;


int time;
The sort of data that can be stored in a variable, and what can be done with it, is determined by the variable’s data type. The data type that is chosen is very important later on when it affects what we can and cannot do with it. In the previous examples, we are declaring integer data types, signified by the int keyword, a useful data type for numerical data. After establishing the data type, we need a clear variable name that tells us in plain English what the variable does. As a general rule of thumb, it should be descriptive, but not overly cumbersome. Take the following examples:
int r;


int red;


int redLEDConnectedToPin9;
Each of these three variable names is technically correct, but naming our variable red instead of the letter r is generally easier to understand. Single-letter variable names, with a few exceptions, are often harder to read and make sense of; for example, a lowercase l (L) looks an awful lot like the uppercase I (I), or even the number 1 (1). The extreme case, redLEDConnectedToPin9, is generally too verbose and makes reading, as well as writing, the code somewhat tedious.
Where these previous examples simply declare the variable data type and variable name, it is also possible to assign a value to a variable when we declare it in a single statement. In our example sketch, we did this in the following line:
int red = 9;
Here we are declaring the variable named red as an integer data type and assigning the value 9 to that variable name using the assignment operator to be discussed shortly. While the Arduino compiler will still hold a place open in its memory for a variable even if we do not assign it a value, it is generally a good idea to assign a value in the variable declaration even if that value is 0.
Variable Names
We can name a variable pretty much anything we want, but there are a few rules we need to follow. First of all, function and variable names can only contain letters, underscores, numbers, or the dollar sign. Spaces or odd characters like the @ or & are not allowed and the first character cannot be a number. White space is not allowed inside a variable name, as generally when white space is allowed, you could have one space or hundreds and it wouldn’t matter. This white space includes new lines from hitting the Return or Enter keys, or indents from the space bar or Tab key. Considering this, the variable names myVariable, mYvAlUe, DELAY_TIME, and value1 are all valid names. Conversely, the variable names 1stValue, delay time, and time&money are not valid names for a variable.
Now some of these names may not be the most readable, which is why many Arduino programmers have adopted certain naming guidelines or conventions. Naming conventions are generally controversial in programming circles, and they are not specifically required when defining your own unique names, but they can make code easier to read in the big scheme of things.
For example, we can have a variable name with multiple words but, because we cannot use spaces inside our variable name, we might want a way to separate each word to make the name easier to read. One possibility is to use an underscore between each word, as in red_led_connected_to_pin_9, a method usually favored by UNIX programmers. Instead, we will use the convention known as camelback notation, as in redLEDConnectedToPin9. Under this convention, the first letter of the first word will be lowercase while the first letter of each subsequent word will be capitalized with no space between each word. Take the following examples:
variable


myVariable


value1


tiltSwitchValue
It’s really your choice how you name your variables and you will often see both types in other people’s sketches, but we feel that camelback notation makes the code easier to read and matches the format the Arduino developers have decided upon for all of the built-in functions in the Arduino library. Likewise, it is the general convention that constants are sometimes written in all caps with underscores in between multiple words, as in the following examples, although we will not adhere strictly to this in naming our own constant variables.
HIGH


INPUT


BLUE_LED
![]() Note Remember that the Arduino language is case-sensitive, so whatever style you adopt, you need to use it consistently throughout your sketch. This also means that any predefined variables or function names that are already a part of Arduino C must be used with exact capitalization.
Note Remember that the Arduino language is case-sensitive, so whatever style you adopt, you need to use it consistently throughout your sketch. This also means that any predefined variables or function names that are already a part of Arduino C must be used with exact capitalization.
One thing to keep in mind is that while there is no maximum or minimum length for variable names, extremely long names start to become rather tedious to type over and over. On the other hand, one-character names are often too cryptic. A few exceptions to this would be the lower case letter i, which is a commonly used variable to indicate an index along with the variable names j and k. Likewise, a, b, c or x, y, z are other sometimes used as short names, often when adding a longer name would not necessarily provide any more information.
Data Types
While there are many data types available to the Arduino, for the moment we will start with the numerical types that use either whole numbers or floating-point numbers. Numeric data types are available in two varieties: signed and unsigned. Unsigned variables will always contain positive values, whereas signed variables can express numbers with a negative value. Usually most data types default to signed data types, but can be changed using the unsigned variable qualifier described later.
The integer data type is Arduino’s primary variable data type for storing numbers; it can be used to store numerical values between -32,768 and 32,767. These values need to be whole numbers such as 42, 28,000, or -32, and can not include values with decimal points. Integer-type variables consume 16 bits or 2 bytes of our available 32 kilobytes of program memory—why this is important will become clearer when we discuss memory in Chapter 8. Integer variables can be declared with the int keyword, as follows:
int myVariable;
If you look at enough examples of Arduino code, you’ll start to see that integers are a commonly used data type. For the most part, we will stick with this convention except where it makes more sense to choose another data type. Part of the reason for carefully choosing the proper data type for the job is that all numerical data types, including integers, will roll over in one direction or another when they exceed the minimum or maximum capacity. So given the following example:
x = 32767;

x = x + 1;
The variable x will now contain the value -32,768, as the integer exceeded its maximum capacity and rolled over to its minimum capacity and started again there. Remember that this also works both ways—so if x = -32768; and the following line is x = x - 1; then x will be equal to 32,767.
As far as integers are concerned, there is only one value between 3 and 5, which is of course 4 because integers work in whole numbers. In contrast, floating-point numbers, expressed as the float data type, are capable of expressing fractions of a number using a decimal point and can be used to represent a multitude of values between 3 and 5, such as 3.14159, 4.25, or 5.0. Floats use 32 bits of memory and, like integers, can express values that are positive, negative, or zero. To declare a floating-point variable, we use the float keyword; and if assigning a value, we will also need to include a decimal point—even if the digit after the decimal point is 0. The following are two examples of float declarations:
float pi = 3.14159;

float circle = 360.0;
Because the Arduino lacks any dedicated hardware to manage floating-point math, floats are slow to process and may not yield the most accurate results. With only about 6 or 7 digits of precision, the expression z = 12.0 / 5.0 will yield 2.4000000953 instead of 2.4. While extremely helpful in certain situations, it is best to avoid floats where possible, especially in timing critical applications.
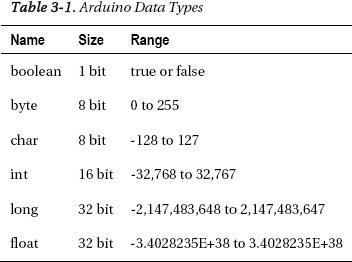
In addition to integers and floats, there are numerous other data types available on the Arduino. Byte, an 8-bit data type, can store values between 0 and 255. Unlike integers and floats, bytes are unsigned so that when a byte exceeds 255, it rolls over to 0. Bytes can be useful if we need to save some memory or are pretty sure we won’t have a problem with data roll over.
byte dataPin = 11;
Other data types include the 32-bit long, which is the big brother of the integer, and the 1-bit boolean data type that only stores two values—either true or false. In Table 3-1 there are some of the various data types available to the Arduino platform, some of which we will cover in more depth later in the book.
Variable Qualifiers
As discussed earlier, variables will behave in certain ways based on the properties of their data type. By using variable qualifiers, it is possible to modify the behavior of certain variables in ways that will fundamentally change how we work with them. For example, the const or constant variable qualifier makes the value of a variable a read-only constant that cannot be changed once the value has been assigned. This could be useful in our sketch, so instead of the variable declaration reading as follows:
int red = 9;
We could write the line like this:
const int red = 9;
We use the const keyword at the beginning of a variable declaration to define a variable as a constant value to prevent us from inadvertently changing the variable’s value later in the code. This is useful if we know that, as in the example, the pin number of the red LED will never change. If we attempt to assign a new value to the constant variable red, we will be reminded with a friendly compiler error. The constant qualifier is also useful for reducing the amount of memory that is needed by the code while it’s running. Don’t worry too much about that now; we will talk more about memory usage later in Chapter 8.
You might find examples of code that use the #define preprocessor directive instead of const, as in the line #define red 9. The constant qualifier is generally the preferred method of the Arduino development team over the #define preprocessor directive for defining constant variables. This is because the constant qualifier can be checked for errors and will follow all of the rules of variables, including variable scope defined momentarily, while not creating any potential conflicts with the Arduino library.
As briefly mentioned before, certain data types are either signed or unsigned. To modify the range of a few of the data types we could use the unsigned qualifier and the unsigned keyword, making them store positive-only values. This qualifier is beneficial for increasing the positive range of variables or for indicating to the reader of the code that the value expected will never be negative. For example:
unsigned int maxThreshold = 1024;
By placing the unsigned keyword in front of the integer variable declaration, the variable maxThreshold may now only store positive values in the range of 0 to 65,535. Table 3-2 provides a list of unsigned variable data types and their modified ranges.
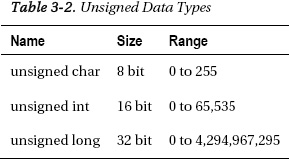
You will notice that an unsigned char has the same value range as the byte although, for this range of values, byte is the preferred data type. Also keep in mind that unsigned data types will roll over just like their signed brethren when they exceed their minimum or maximum values.
In addition to unsigned and const, there are other variable qualifiers that we will revisit in later chapters, as they are needed.
Predefined Constants
In addition to user defined constant variables, the Arduino development environment uses its own predefined constants. The first of these constants defines the Boolean logic states based on logical truth tables using two states: true and false. The false condition is easily defined as being 0 or sometimes off. On the other hand, true is, in many ways, anything other than false. In this sense, true could be 1, or ‘on,’ but it could also be 5, -42, or even 64,000. Unlike our other constants, true and false always appear in lowercase.
Our other pairs of constants, which you have already seen some of, are generally used as part of the Arduino’s digital I/O capabilities and will be discussed in more depth in later. These constants define the operation of the digital pins as either INPUT or OUTPUT using the pinMode() function, or define the pin levels as being HIGH or LOW, roughly equivalent to pin states of +5 volts and 0 volts, or on and off respectively.
Variable Scope
While we have so far been discussing how variables are declared, where we declare variables is as important as how we declare them. The location of a variable declaration in the larger sketch determines where that variable can be used, or what is known as variable scope.
const int red = 9;
This variable from our previous example is declared outside the setup() and loop() functions at the beginning of the source code. This is known as a global variable and can be used by all functions in the sketch regardless of location. If, however, this variable was declared inside the setup() function, it would become a local variable and would be unavailable to loop() or any other functions. Local variables can also be used inside for loops, commonly as counters, where only that statement can use it and not the rest of the function. In fact, it is entirely possible for one variable name to be used in two different manners depending on where those variables are declared and used. However, if we attempt to access a variable outside of its scope, we will receive another one of those friendly reminders in the form of a compiler error letting us know where we went wrong.
Because writing code for Arduino C is a little different from normal C source code, specifically in our use of the setup() function to perform one time only tasks, we will often use global variables to define pin numbers, set up thresholds, or define constants, so that all functions in a sketch can use the same values. This would not generally be the case with code written for other platforms, but it works for us.