
SD Library
In the last chapter, we very briefly introduced the idea of using the program memory of the Arduino microcontroller to keep large chunks of data from taking up too much room in RAM. Instead, we could use additional external hardware to read and write to an SD memory card. SD or Secure Digital flash memory cards are the very same wafer-thin memory cards used by cameras, mp3 players, and other devices. The SD library is a relative newcomer to the standard Arduino libraries and the list of functions and associated libraries would make our conversations of the LiquidCrystal library and the PROGMEM functions seem like a leisurely stroll in the park in comparison. Rather than a comprehensive analysis of the library in the few remaining pages of this chapter, we are going to take a quick look at reading and writing values to the card using as few functions as we can get away with.
To get access to an SD card, we need some hardware in the form of a breakout board or shield that will connect the card to the appropriate pins on the Arduino board. Adafruit Industries makes a nice compact microSD card breakout that can be wired up to the Arduino with only a handful of wires, while SparkFun Electronics has an inexpensive shield available that plugs directly into the Arduino board. Instead, we are going to use and recommend the Arduino Ethernet Shield, which in addition to having the hardware necessary for accessing a microSD card, also has Ethernet hardware built-in for future projects that open up the possibility for exploring Arduino Internet connectivity. The Arduino Ethernet Shield is convenient to use in that it plugs right into the pin headers on the Arduino board while still giving us access to all of the I/O pins not used by the devices on the shield.
In addition to the Ethernet Shield, we need to have a properly formatted microSD card as well. To read up not only on the procedure for formatting the SD card but also some of the differences in the hardware, check out the SD Card Notes page on the Arduino web site at
http://arduino.cc/en/Reference/SDCardNotes. Once we have the hardware in place and a properly formatted microSD card, it’s time to do something with it.
Because just storing data is not that interesting in and of itself, we will use the circuit shown in Figures 9-12 and 9-13 to create a very simple data logger to record an analog sensor input to a text file on the SD card called data.txt. We should start by mentioning a couple of things about the SD card on the Ethernet Shield. The Ethernet device and the SD card are both devices that use the Serial Peripheral Interface or SPI. We won’t be getting into much detail with this protocol in this book, but fortunately for us, the SD library hides much of this interface from us. The Ethernet Shield connects digital pins 11, 12, and 13 to each SPI device with an additional pin needing to be tied to a hardware select pin to enable each device. The Ethernet device is connected to pin 10, the default for one SPI device, so the SD card has been connected to pin 4. In our code, we need to configure pin 10 as an output even though we are not using the Ethernet part of the shield for this example.
For the rest of our hardware, the sensor we will be using is the TEMT6000 breakout board from SparkFun to measure ambient light levels, although any other analog sensor would work as well. We will also use the Serial Monitor so that we can see the status of opening and writing to the file on the SD to tell us if something has gone wrong, what data is being written to the card, and when the file has been closed. Every time the Arduino is reset, it will open the file on the card and continue to update the values on the card for another round.
Once we know we can write files to the card, we will try out another sketch that reads values from the same text file on the card and outputs those values to a simple LED connected to a PWM pin—basically, a larger version of our Flicker Sketch from the last chapter. Because the SD card is connected to pins 4, 11, 12, and 13, and we can’t use pin 10, we will connect our single LED to pin 9. Like the rest of the example code in this chapter, however, these sketches are not meant to be full-fledged projects and this is especially the case with the SD library. Think of these examples as proof-of-concept ripe for future exploration and expansion. So, let’s get started.

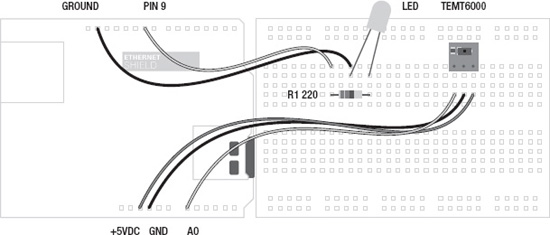
Figure 9-13. SD illustration
Example Code: SD Logger
Our first sketch for the SD library in Listing 9-8 will run entirely in the setup() function since it is not necessary to run it in a continuous loop. We start the sketch with a few settings that determine how long we want to record data, specified as runningTime in minutes, and the interval in between sequential readings, specified as interval in milliseconds. We then step through the initialization process providing feedback through the Serial Monitor at every step. Once the SD library is set up, we need to open a file to write our data to, set our clock for the running time, and then we enter a while loop that, for as long as the duration lasts, will print the analog sensor data to both the Serial Monitor and to the file on the SD card at an interval determined at the beginning of the sketch. After the time has expired, the file is closed and the sketch effectively ends. Each time the sketch is restarted, through reset or cycling power, it will continue to amend data to the existing values already in the file. To start over, the file will need to be deleted first.
Listing 9-8. SD Logger Source Code
#include <SD.h>


File file;


const long runningTime = 5;  // time in minutes

const long msMin = 60000;    // milliseconds in 1 minute

const int interval = 2000;   // time in milliseconds


const int sensorMin = 30;

const int sensorMax = 1000;

const int sensor = A0;

const int SDcs = 4;


void setup() {

  Serial.begin(9600);

  Serial.print("Initializing SD card…");

  pinMode(10, OUTPUT);


  if (!SD.begin(SDcs)) {

    Serial.println("initialization failed!");

    return;

  }

  Serial.println("initialization done.");


  file = SD.open("data.txt", FILE_WRITE);


  if (file) {

    while (millis() < (runningTime * msMin)) {

      byte value = map(analogRead(sensor), sensorMin, sensorMax, 0, 255);


      Serial.print("Writing ");

      Serial.print(value, DEC);

      Serial.print(" to data.txt… ");

      file.write(value);

      Serial.println("done.");

      delay(interval);

    }

    file.close();

    Serial.println("File closed.");
} else {
Serial.println("Error opening data.txt.");
}
}
void loop() {}
This sketch builds on concepts elsewhere in this book, including the delay without using the delay() function and the Analog Serial Monitor, however, the SD library’s functions are a little different from the other libraries that we have looked at.
File
The first line we will look at creates an instance of the file that we want to use. It has a very simple syntax, as follows:
File name
Where name is anything you want it to be. This does not have to be the actual file name on the SD card. In our example code, we used the line File file; because it seemed easiest although myFile, dataFile, or any other name that you like could be used here.
SD.begin()
With our file ready to go, we need to initialize the SD library using the SD.begin() function. It too has a basic syntax:
SD.begin(csPin)
This function will default to a CS, or chip select pin of pin 10, so in order to use this function with the Ethernet Shield or any other configuration where the CS pin on the SD card is on any other pin we need to specify that pin number. From our code it is as follows:
if (!SD.begin(sdCsPin)) {
This line contains the SD.begin() function and performs a test to see if the function was successful or not. If the SD card is successfully started, this function will return true while if there was a problem, for example the SD card is not present, it will return false. The if statement in our code will give us an error message and exit the sketch if there is any problem initializing the SD card.
![]() Note Even if we are using a different CS pin from the default pin 10, we need to configure pin 10 as an
Note Even if we are using a different CS pin from the default pin 10, we need to configure pin 10 as an OUTPUT or else the SD library will not properly function.
SD.open()
To be able to write data to a file, we must open it first with the SD.open() function. The syntax for the function follows:
The filename parameter is a character string for the name of the file that we want to access. This name can also include the directory structure on the card using forward slashes, /, to separate directories. If the file does not exist, this function will create it, although the directory must already exist beforehand. This function only works with short file names from the days of yore in an 8.3 format. This means an 8-character name with a 3-character file extension separated by a period, as in datafile.txt.
There are two possible modes for this function: FILE_READ and FILE_WRITE. The default mode for the function when no mode is specified is FILE_READ. This mode will open the specified file at the beginning of the file to be read by the read() function explained later. The FILE-WRITE mode is used to write information to the file beginning at the end of the file. In other words, we read from the beginning of the file and we write to the end of a file. In our example code it is as follows:
file = SD.open("data.txt", FILE_WRITE);
We opened the file data.txt and set it to a FILE_WRITE mode so that we could write data to the file and then attributed this to the instance file that we created earlier. In our next few functions, the instance name file will be used to tell the functions what file to use.
![]() Note Keep in mind that only one file can be opened at a time.
Note Keep in mind that only one file can be opened at a time.
close()
When we are done with the file that we have open, or if we need to open a new file, we must first close the current file using the close() function to save the data that has been written to the SD card. The syntax for this function follows:
name.close();
The specified name is the name of the File instance that we have been working with, as in file.close(); from our example code earlier, and has no further parameters and does not return any data. This function has been called after the data has been written to the file to save the file before moving on.
write()
Used in the sketch to write a data value to the SD card, the write() function has the following syntax:
name.write(data)
The name is the instance of the File class created at the beginning of the code and data can be a numerical value of the byte, char, or string data type. In our example we used the following code:
byte value = map(analogRead(sensor), sensorMin, sensorMax, 0, 255);

file.write(value);
These two lines read a value from an analog input, map those values to a range of 0–255, and assign that value to the byte named value. This value is then written to our file.
print()
Instead of writing numerical data to the SD card, we can use the print() function to print a string of characters to our file instead. This has a similar syntax to write(), as follows:
name.print(data)
Like the print() function for the LiquidCrystal library, data can include any text strings, bracketed by double quotes (“ and ”), and values or variables that include char, byte, int, long, or string data types. Any numerical value sent to the print() function will be converted to a text string, which is why it was necessary to use the write() function in our example so that we can use those values for our next example code.
Example Code: SD Flicker
Now that we have some data collected from our simple data logger stored permanently on our memory card, we can use that data to generate some form of output. The example code in Listing 9-9 will read each byte individually and write that value to the LED connected to PWM pin 9. To smooth things out some, we are using a for loop to fade from one value to the next.
Listing 9-9. SD Flicker Source Code
#include <SD.h>


File file;


const int interval = 10;  // time in milliseconds

const int LED = 9;

const int SDcs = 4;


byte oldValue = 0;


void setup() {

  Serial.begin(9600);

  Serial.print("Initializing SD card…");

  pinMode(10, OUTPUT);


  if (!SD.begin(SDcs)) {

    Serial.println("initialization failed!");

    return;

  }

  Serial.println("initialization done.");

}


void loop() {

  Serial.println("Reading from data.txt. ");

  file = SD.open("data.txt");

  if (file) {

    while (file.available()) {

      byte value = file.read();
if (oldValue < value) {
for (byte i=oldValue; i<value; i++) {
analogWrite(LED, i);
delay(interval);
}
} else {
for (byte i=oldValue; i>value; i--) {
analogWrite(LED, i);
delay(interval);
}
}
oldValue = value;
}
file.close();
Serial.println("File closed.");
} else {
Serial.println("Error opening data.txt.");
}
}
This example is a more complex version of the Flicker sketch presented in Chapter 8. Instead of using an array, we are reading sensor values from our memory card. This has the advantage that we do not need to worry so much about available memory space. Let’s see how we read these values with the functions in the SD library.
available()
Because we may not know how many bytes are available in a particular file, we can use the available() function with the following syntax to find out:
name.available()
Okay, there’s not much to it beyond giving it the name for our File instance, but it does return the amount of bytes that remain available in the file. When we open a file to read from it, we start at the beginning of the file, so we can use the available() function to determine when we have reached the end of the file. We used this function in the following manner:
while (file.available()) {
By placing the function in a while loop, we will continuously execute the following code so long as data is still available in the file that we are reading from.
read()
Now to get the information out of our file, we need to use the read() function. Like many of the other functions in this library, the syntax is minimal, as follows:
name.read()
When called, this function will read one byte from the file and return that value. This function will return data in whatever format it was written in. Because we used the write() function in our SD Logger example, each byte read would be a numerical value that we can use to send to the analogWrite() function later in this sketch. Considering the following line:
byte value = file.read();
Here we assign the byte obtained from the read() function to the byte variable named value. We then use this data to fade our LED according to the value stored in memory.