
Project 10: RFID Reader
In this project we will use the Innovations ID-12 Radio Frequency Identification, or RFID reader to read unique identification numbers from cards, key fobs, stickers, and even little capsules. These tags have circuitry in them that when in proximity to a reader, powers up and broadcasts their unique 12-digit hexadecimal ID number. The reader transmits this data through its serial TX pin in 16-byte packets, one byte at a time. Because these tags are each unique, we can use them to inventory the beer in our fridge or to let only our cats in through our cat door.
The Innovations ID-12 is a common RFID reader that uses 125kHz tags and sends its data over a serial connection at a 9600 bps data rate. Other readers in the company's line include the ID-2 and ID-20, with similar functionality but different ranges and antenna requirements. The pins on the bottom of the device are an unusual spacing that is incompatible with our breadboard. So to make things easier for us, we are using a breakout board supplied by SparkFun Electronics that we have soldered some male pins to before soldering in the reader.
Hooking It Up
By using the breakout board from SparkFun, we can plug the reader into our breadboard easily enough, although, with only one row of open pins available, there is not much room to connect wires. So to make the connections, we are using a little area of the breadboard off to the side to connect common wires like +5VDC and Ground. Past the RFID reader, the only other part to connect is a piezo speaker that we used in our Noisy Cricket project to give us a little audible chirp whenever a card has been read, although an LED would work just as well. The wiring for this is stretching things a little, so double-check the schematic and drawings in Figures 10-3 and 10-4 to make sure the correct connections are being made.
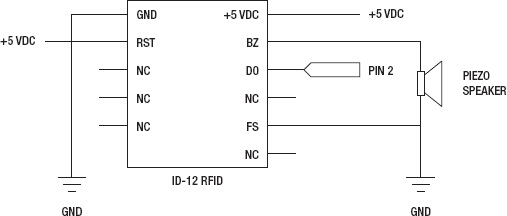
Figure 10-3. RFID Reader schematic
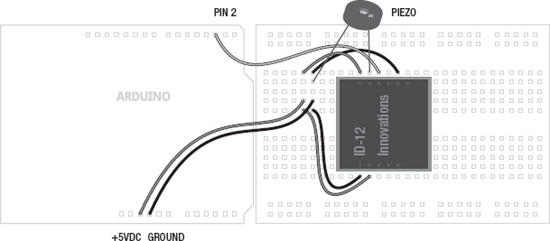
Figure 10-4. RFID Reader illustration
Uploading the Source Code
The source code in Listing 10-2 builds on the basic principals of serial communications that we have been discussing so far, but adds some new wrinkles. First, the reader sends a 16-byte stream of data in the form of hexadecimal ASCII characters each time a tag has been read, but we only really want the unique 12-digit hexadecimal ID number. Second, because this data is sent one byte at a time, we need to read each byte individually and piece it together into a single character string. Finally, we might want to know the tag's ID, compare different tags to known ID numbers, and do certain things based on the tag number. For example, maybe we want to let one cat inside but not the other, or we want our fridge to tell us when we drank the last beer. Following is our source code for this project and a discussion of how it works and the functions that we've used.
Listing 10-2. RFID Reader Source Code
#include <SoftwareSerial.h>


SoftwareSerial rfid(2,3);


char tag01[] = "4500B8F08489";

char tag02[] = "4500B8D36947";


char tagString[13];


void setup() {

  Serial.begin(9600);

  rfid.begin(9600);

}
void loop() {
if (rfid.available()) {
if (getTag()) printTag();
}
}
boolean getTag() {
char startByte = rfid.read();
delay(20);
if (startByte == 2) {
int index = 0;
while (index < 12) {
char incomingByte = rfid.read();
tagString[index] = incomingByte;
index++;
}
}
rfid.flush();
return true;
}
void printTag() {
for (int i=0; i<12; i++) Serial.print(tagString[i]);
Serial.println(compareTags()); }
const char* compareTags() {
if (strncmp(tag01, tagString, 12) == 0) return " Tag 1";
else if (strncmp(tag02, tagString, 12) == 0) return " Tag 2";
else return " Not recognized.";
}
Source Code Summary
To begin with, we need to include the SoftwareSerial library so that we can use it. If we're using a version of the Arduino programming environment prior to 1.0, we need to download and install the library from Mikal Hart's web site (provided later). We then tell the library what to name our instance and what pins we will use. The RFID reader only uses one communication pin, but the library won't let us have an RX pin without a TX pin. We then have a list of known tags that you will definitely want to replace with tags that you own, adding additional arrays as needed. We then set up a place to store the tag that we are currently reading so that we can later compare it to the known tags.
Our normal setup() and loop() functions are as simple as can be, setting up the data rate for both types of serial, and then in the loop() function, checking to see if any data is available. If there is data available, then we make the assumption that a tag has been read. At this point the code calls the getTag() function that will be used to read the incoming 16-byte packet for the tag ID. This packet begins with a start byte that is ignored by our function with the the next 12 bytes to be assigned to the character string tagString[]. The complete format for this packet is as follows:
Start byte (2), 12 bytes (0-9, A-F), Newline (ASCII 10), Return (ASCII 13), End byte (3)
The start of the packet will always contain the ASCII character code for 2 and the end of the packet will be the ASCII code for 3. We check for the start code by reading the first byte after serial is available and compare that to the value 2. After the start byte, we will read the next 12 bytes that will contain one of 16 hexadecimal values including 0 through 9 and the letters A through F. These are added one byte at a time to the tagString[] array, incrementing index each time through the while loop. The remaining three characters, a newline character, carriage return, and the end byte, are unimportant for our purposes and are cleared from the buffer to prevent any problems later.
If everything has been read correctly, the function will return the boolean value true, which is then used to call the printTag() function. This function will print each of the 12 hexadecimal digits to our Serial Monitor so that we can see the value of the tag before printing a call to the compareTags() function. Assuming that we want to do more than just print the value of the tag read, it might be nice to compare that value to known tag IDs. Our last function uses the C function strncmp() (discussed later) to compare the incoming ID with a list of known IDs and will then return a text string or a name for that tag. Rather than returning the text "Tag 1" or "Tag 2", we could as easily change the color of some lighting, print this information to a display, store the information somehow, or even open a door for a cat.
Most of the code should look familiar, even if it appears in a slightly different manner than you might have seen before. We will look at the specific functions of the SoftwareSerial library that are used in our example project that differ from the Serial functions discussed earlier.