Artistic expression is incredibly rewarding, regardless of whether your art is representational or stylized. In either case, you will need to learn to see the different values in your subjects because it is the variation among the light and dark values that creates the illusion of three-dimensional form in your drawings. Drawing the outline defines the object’s shape, but adding the varying values gives a sense of form. Try squinting when you look at your subject to see the various values more clearly; squinting helps eliminate the details and simplify the shapes. In Pat Averill’s depiction of a charming rural scene, you can see how the contrasts between the lights and darks gives both form and dimension to the trees and makes the water wheel appear cylindrical and three-dimensional.

Using Value Studies Creating a value study of your subject can help you identify where to place the lightest and darkest colors in your drawing. In this case, I began with a photocopy of my original color photo to reduce the scene to black and white. The photocopy also obscured some of the details, so I was better able to carefully observe the values in the scene. I found that the lightest values are in the sky, the medium values are in the grass and the flowers, and the darkest values are in the trees and the building. I also sketched in the large masses in the scene to help guide my placement of color later.

Step One I tape a copy of the photo to a window, tape lightweight copy paper over it, and use a graphite pencil to trace just the outlines of the general shapes. Then I transfer the lines to my art paper. Next I begin to add color, using quick, vertical strokes and a light flesh pencil to fill in the lower sky. Then I add a layer of light violet in the same way, overlapping the flesh color a bit. Where I see the light values in the water wheel and in other bright areas, I use a blending pencil with heavy pressure to outline and fill in the shapes; this will cause the subsequent layers of color to appear lighter.

Step Two I use black grape to create shadows in and around the water wheel and the mill, drawing outlines first and then filling them in using medium to heavy pressure. I also add black grape to the base of the distant trees to create shadows above the grass. Next I use a semi-sharp dark green pencil to fill in the background trees with hatch strokes. Then I fill in the grass with a semi-sharp moss green pencil, medium pressure, and hatch strokes. I color the pink flowers and part of the dirt with a semi-sharp dark flesh pencil, medium pressure, and short hatch strokes.
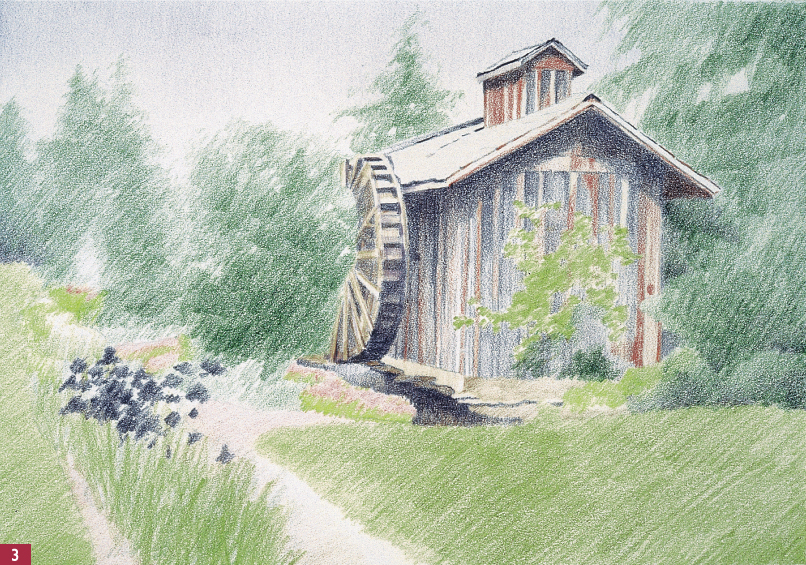
Step Three Next I use a sharp terra cotta pencil to make vertical strokes for the boards on the mill. I apply chartreuse to add warmth to the greens beside the flowers, under the pink flowers, and in a distant flower bed, using short hatch strokes. To create the dirt, I use a sharp raw umber pencil and vertical strokes. With vertical strokes of raw umber, I fill in the water; then I use the same color on the water wheel, making strokes that follow the direction of the wood grain. To create the dark gray wood in the building, I apply several layers of black grape with vertical strokes and medium pressure. Under the roof and in the water shadows, I use a sharp black grape pencil with calligraphic lines (see page 8) to increase the dark value. Then I apply celadon green to the front flower bed foliage, leaving spaces for a few flowers; I apply similar strokes with black grape to create the flowers. To add more warmth to the greens, I layer moss green on the tree against the building and in the flower beds.

Step Four Next I use reusable tack (see page 46) to create texture and dimension within the tree foliage, lifting out and then reapplying various greens. For the dirt, flower foliage, and the yellows in the grass, I use a sharp ochre pencil with vertical strokes and medium pressure. Then I apply vertical strokes of pink madder lake with medium pressure for the pink flowers and over the purple flowers. In the flowers under the tree, I use the same pencil with small circular strokes. For the purple flowers and shadows in the flower bed, I use a dull dark green pencil with quick downward strokes and medium pressure.
Step Five In the warm areas of the trees, I apply moss green. Where I want lighter areas, I lift out color with reusable tack, referring frequently to my photo and my value study to make sure I’m placing the values correctly. In the distant spruce trees, I use a sharp light green pencil with medium pressure and hatch strokes. I apply moss green to the grass with heavy pressure, using strokes that mimic the direction in which the grass grows. I layer terra cotta over the dirt with medium pressure and vertical strokes, leaving the lightest areas alone. In the building and the water wheel, I add dark values with raw umber, following the wood grain. For the rich darks in the trees, I apply a light glaze of Tuscan red, but I leave the highlights untouched.

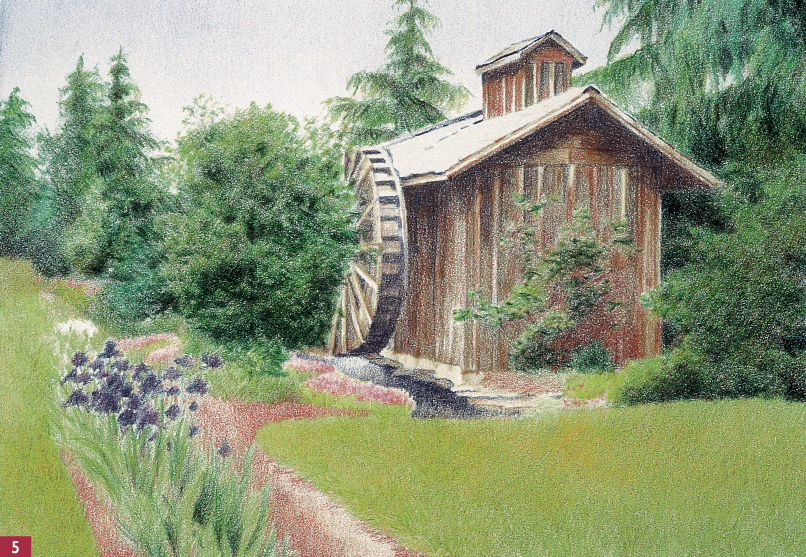
Step Six I add black grape in the trees and then create highlights by removing some pigment with a battery-operated eraser. Then I use ochre and loose “X” strokes to create groups of leaves. To glaze the water wheel and the mill, I lightly apply ochre with cross-hatch strokes. I add a few spots of moss green in the evergreens. Then I apply rose carmine, following the wood grain on the barn and using small circular strokes for the pink flowers. For the roof, I use hatch strokes of raw umber to create the shingles. I lift out color to make a patch of dirt in the grass on the right, and then I apply a glaze of dark green underneath the tree in the same area.

Step Seven With black grape, I create shadows on the water wheel and the building that follow the direction of the wood grain. In the front flower bed, I use a sharp black grape pencil to first outline and then darken the flowers; then I mix in rose carmine to add some dimension. I use ochre, dark green, and moss green in the flower foliage. To extend the grass near the dark flowers, I lift out color with tack and then fill in with moss green, ochre, and dark green. Next I layer dark green in the shadow under the large tree and the deep shadow next to the water wheel. To create subtle reflections of the trees in the water, I add dark green and black grape with vertical strokes and medium pressure. Finally, to unify the colors in the drawing, I lightly glaze Tuscan red over the middle and dark values in the trees, the flower beds, the roof, parts of the grass, and the dirt patch.