
The dataTable component supports the in-cell editing feature to update values within the table without navigating to another page.
In order to enable editing, first we need to set the editable attribute of the table to true. Each column definition that we need to be editable should contain the <p:cellEditor> helper component that will contain two facets to render output components—one to visualize the data for the user and the other to get input data from the user. The in-place editor palette, which is the <p:rowEditor> component, also needs to be rendered in a column of dataTable in order to activate editing with user interaction. Here's the code that encapsulates the discussion in this paragraph:
<p:dataTable id="inCellEditing" var="car"
value="#{dataTableBean.cars}" rowKey="#{car.name}"
editable="true">
<p:column headerText="Year">
<p:cellEditor>
<f:facet name="output">
<h:outputText value="#{car.year}" />
</f:facet>
<f:facet name="input">
<p:inputText value="#{car.year}" />
</f:facet>
</p:cellEditor>
</p:column>
<p:column headerText="Name">
<p:cellEditor>
<f:facet name="output">
<h:outputText value="#{car.name}" />
</f:facet>
<f:facet name="input">
<h:selectOneMenu value="#{car.name}">
<f:selectItems value="#{dataTableBean.carNames}"
var="name" itemLabel="#{name}"
itemValue="#{name}" />
</h:selectOneMenu>
</f:facet>
</p:cellEditor>
</p:column>
<p:column headerText="Actions">
<p:rowEditor />
</p:column>
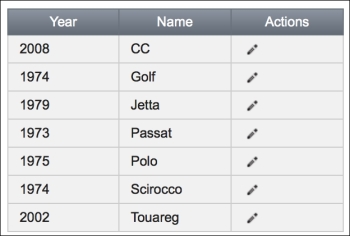
</p:dataTable>The components that reside in the input facet could be an inputText component as well as a selectOneMenu component, which will render a drop-down list for the input. The appearance of a table with output facets will be as follows:
When the pencil icon is clicked on, the table will transit into edit mode and the input facets will be rendered as follows:
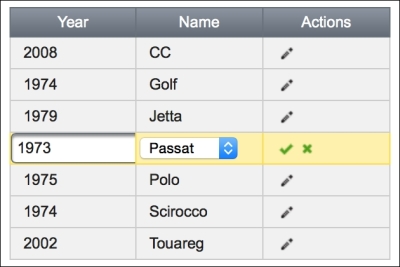
Clicking on the "tick" icon will save the edited row, and clicking on the "cancel" icon will revert all changes.
By default, the edit mode for dataTable is row, where the whole row on the table gets edited. One other possible approach is editing just a cell instead of a whole row. This can be achieved by setting the editMode attribute to cell instead of row. The cell will switch to edit mode when clicked on, and losing focus on the cell triggers an AJAX event to save the changed value.
The editingRow attribute defines whether cell editors of a row should be displayed as editable or not. The definition given next will display rows of cars (as brands) that were manufactured before the year 2000 in edit mode:
<p:dataTable id="editingRowMode" var="car"
  value="#{dataTableBean.cars}"
  rowKey="#{car.name}" editable="true"
  editingRow="#{car.year > 2
000}">
</p:dataTable>The dataTable component supports AJAX behavior events in order to handle the interactions of the user on row editing and cancellation of the editing actions. The definition of the AJAX behavior events should be placed within the table, as shown in the following code snippet:
<p:ajax event="rowEdit" listener="#{dataTableBean.onEdit}"
  update=":form:growl" />
<p:ajax event="rowEditCancel" listener="#{dataTableBean.onCancel}"
  update=":form:growl" />
The onEdit and onCancel methods retrieve org.primefaces.event.RowEditEvent as the parameter. The object that is edited can be retrieved from the event as event.getObject(). The following is the code for this discussion:
public void onEdit(RowEditEvent event) {
  MessageUtil.addInfoMessage("car.edit",
    ((Car) event.getObject()).getName());
}

public void onCancel(RowEditEvent event) {
  MessageUtil.addInfoMessage("car.edit.cancelled",
    ((Car) event. getObject()).getName());
}This recipe is available in the demo web application on GitHub (https://github.com/ova2/primefaces-cookbook/tree/second-edition). Clone the project if you have not done it yet, explore the project structure, and build and deploy the WAR file on application servers compatible with Servlet 3.x, such as JBoss WildFly and Apache TomEE.
The showcase for the recipe is available at http://localhost:8080/pf-cookbook/views/chapter5/dataTableInCellEdit.jsf.
For details about the MessageUtil class, see the Internationalization (i18n) and Localization (L10n) recipe in Chapter 1, Getting Started with PrimeFaces.