
There are several ways to select a row or multiple rows, such as line selection and selection with radio buttons and checkboxes, from the dataTable component. We will cover all the possibilities in this recipe.
To make a single selection possible with a command component, such as commandLink or commandButton, f:setPropertyActionListener can be used to set the selected row as a parameter to the server side:
<p:dataTable id="withCommand" var="car"
  value="#{dataTableBean.cars}"
  selection="#{dataTableBean.selectedCar}">
  <p:column>
    <p:commandButton value="Select" update=":mainForm:display"
      oncomplete="carDialog.show()">
      <f:setPropertyActionListener value="#{car}"
        target="#{dataTableBean.selectedCar}" />
    </p:commandButton>
  </p:column>
  ...
</p:dataTable>
The selection attribute needs to be bound to an instance of the Car reference in order to get the selected data.
Instead of using <f:setPropertyActionListener>, it's also possible to set the selection to the server side by passing a method parameter. The definition of the button and the method is given as follows:
<p:commandButton value="Select" update=":mainForm:display"
  oncomplete="PF('carDialog').show()"
  action="#{dataTableBean.selectCar(car)}" />

public String selectCar(Car car) {
  this.selectedCar = car;
  return null;
}
The Car class is a simple data class that owns two attributes, year and name.
The selectionMode attribute could be used to enable the selection whenever a row is clicked on. Its value should be single for the single selection mode. To select multiple items with the modifier key (which is Ctrl in Windows and Command in Mac OS), selectionMode should be set to multiple and selection needs to be bound to an array of the Car reference.
<p:dataTable id="multipleSelection" var="car"
  value="#{dataTableBean.cars}" rowKey="#{car.name}"
  selection="#{dataTableBean.selectedCars}"
  selectionMode="multiple">
  ...
</p:dataTable>In multiple-selection mode, whenever a row is clicked on, the previous selection gets cleared. This is the default behavior, and it can be customized by setting the rowSelectMode attribute of the dataTable component to the add value. The default value of the attribute is new.
It's possible to select a row with a click and then press commandButton to view the details of the selection in a dialog box. This is possible by defining the rowKey attribute where its value should point to a unique identifier. The button processes dataTable and displays carDialog on completion of the event. The definition is given as follows:
<p:dataTable id="singleSelection" var="car"
  value="#{dataTableBean.cars}" rowKey="#{car.name}"
  selection="#{dataTableBean.selectedCar}"
  selectionMode="single">
  <p:column headerText="Year">#{car.year}</p:column>
  <p:column headerText="Name">#{car.name}</p:column>
  <f:facet name="footer">
    <p:commandButton id="viewButton1" value="View"
      icon="ui-icon-search" process="singleSelection"
      update=":mainForm:display"
      oncomplete="PF('carDialog').show()" />
  </f:facet>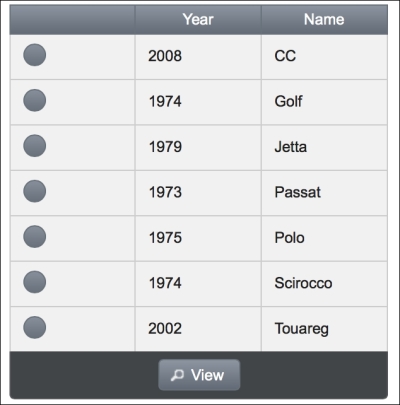
</p:dataTable>The dataTable component supports single-row selection with the help of radio buttons out of the box. This can be achieved by defining a column with the selectionMode attribute set with the single value.
<p:dataTable id="withRadioButton" var="car"
  value="#{dataTableBean.cars}" rowKey="#{car.name}"
  selection="#{dataTableBean.selectedCar}">
  <p:column selectionMode="single"/>
  ...
</p:dataTable>
The table will be rendered as follows:
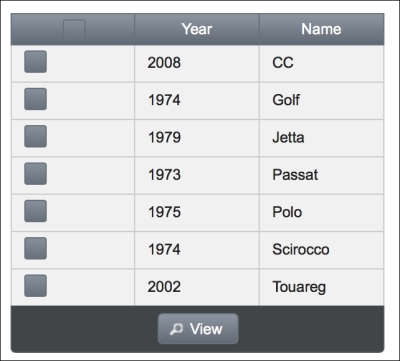
It's very easy to enable multiple-item selection with dataTable by defining a column with the value of the selectionMode attribute set to multiple, as follows:
<p:dataTable id="multipleSelectionCheckbox" var="car"
  value="#{dataTableBean.cars}" rowKey="#{car.name}"
  selection="#{dataTableBean.selectedCars}">
    <p:column selectionMode="multiple" />
  ...
</p:dataTable>
For convenience, the component will also provide a checkbox in the header to select all the checkboxes. The appearance of the table with multiple selection will be as follows:
The dataTable component supports AJAX behavior events on row selection/unselection. The definition of the table, along with the AJAX events, is given here:
<p:dataTable id="ajaxBehavior" var="car" rowKey="#{car.name}"
  value="#{dataTableBean.cars}"
  selection="#{dataTableBean.selectedCar}"
  selectionMode="single">
  <p:column headerText="Year">#{car.year}</p:column>
  <p:column headerText="Name">#{car.name}</p:column>
  <p:ajax event="rowSelect" update=":mainForm:growl"
    listener="#{dataTableBean.onRowSelect}" />
  <p:ajax event="rowUnselect" update=":mainForm:growl"
    listener="#{dataTableBean.onRowUnselect}" />
</p:dataTable>
The rowSelect and rowUnselect AJAX events invoke the onRowSelect and onRowUnselect methods respectively. Their implementations are given here:
public void onRowSelect(SelectEvent event) {
  MessageUtil.addInfoMessage("car.selected",
    ((Car) event.getObject()).getName());
}

public void onRowUnselect(UnselectEvent event) {
  MessageUtil.addInfoMessage("car.unselected",
    ((Car) event.getObject()).getName());
}
Instead of specifying the rowKey attribute for instant selection, one other option could be defining a data model that extends javax.faces.model.DataModel and implements org.primefaces.model.SelectableDataModel. A selectable car data model that meets the requirements is given here:
public class CarDataModel extends ListDataModel<Car>
  implements SelectableDataModel<Car> {

  public CarDataModel(List<Car> data) {
    super(data);
  }

  @Override
  public Car getRowData(String rowKey) {
    List<Car> cars = (List<Car>) getWrappedData();

    for(Car car : cars) {
      if(car.getName().equals(rowKey))
      return car;
    }
    return null;
  }

  @Override
  public Object getRowKey(Car car) {
    return car.getName();
  }
}This recipe is available in the demo web application on GitHub (https://github.com/ova2/primefaces-cookbook/tree/second-edition). Clone the project if you have not done it yet, explore the project structure, and build and deploy the WAR file on application servers compatible with Servlet 3.x, such as JBoss WildFly and Apache TomEE.
The showcase for the recipe is available at http://localhost:8080/pf-cookbook/views/chapter5/dataTableSelectRow.jsf.
For details about the MessageUtil class, see the Internationalization (i18n) and Localization (L10n) recipe in Chapter 1, Getting Started with PrimeFaces.