
Chapter 10. Multimedia
- Playing audio and video
- Controlling the camera
- Recording audio
- Recording video
Today, people use cell phones for almost everything but phone calls, from chatting to surfing the web to listening to music and even to watching live streaming TV. Nowadays, a cell phone needs to support multimedia to be considered a usable device. In this chapter, we’re going to look at how you can use Android to play audio files, watch video, take pictures, and even record sound.
Android supports multimedia by using the open source multimedia system called OpenCORE from PacketVideo Corporation. OpenCORE provides the foundation for Android’s media services, which Android wraps in an easy-to-use API. In addition to the OpenCORE framework, the Android platform is migrating to a Google-written multimedia framework named Stagefright. Both frameworks are provided in version 2.2 (Froyo) and in subsequent versions of the SDK. It’s anticipated that most, if not all, of the multimedia functionality will be handled by the Stagefright code base.
In this chapter, we’ll look at OpenCORE’s multimedia architecture and features, and then use it via Android’s MediaPlayer API to play audio files, take a picture, play videos, and finally record video and audio from the emulator. To begin, let’s look at OpenCORE’s multimedia architecture.
10.1. Introduction to multimedia and OpenCORE
Because the foundation of Android’s multimedia platform is PacketVideo’s Open-CORE, we’re going to review OpenCORE’s architecture and services. OpenCORE is a Java open source, multimedia platform that supports:
- Interfaces for third-party and hardware media codecs, input and output devices, and content policies
- Media playback, streaming, downloading, and progressive playback, including 3rd Generation Partnership Program (3GPP), Moving Picture Experts Group 4 (MPEG-4), Advanced Audio Coding (AAC), and Moving Picture Experts Group Audio Layer 3(MP3) containers
- Video and image encoders and decoders, including MPEG-4, International Telecommunication Union H.263 video standard (H.263), Advanced Video Coding (AVC H.264), and the Joint Photographic Experts Group (JPEG)
- Speech codecs, including Adaptive Multi-Rate audio codecs AMR-NB and AMR-WB
- Audio codecs, including MP3, AAC, and AAC+
- Media recording, including 3GPP, MPEG-4, and JPEG
- Video telephony based on the 3GPP video conferencing standard 324-M
- PV test framework to ensure robustness and stability; profiling tools for memory and CPU usage
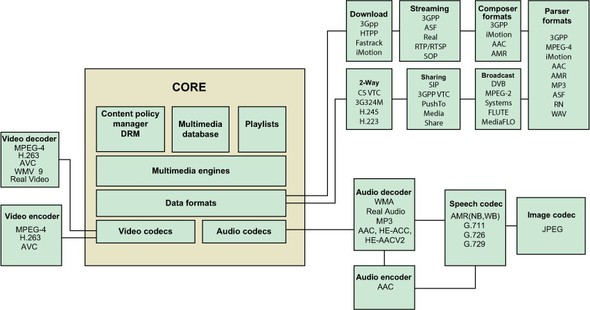
OpenCORE provides all this functionality in a well-laid-out set of services, shown in figure 10.1.
Figure 10.1. OpenCORE’s services and architecture
Note
As of Android 2.2, Google added a new multimedia platform called Stagefright with the intention of replacing OpenCORE. As for Android 2.3, Stagefright fully replaces OpenCORE with additional features, such as support for multiple cameras, progressive streaming over HTTP, and the like. For the most part, Android 2.3 and Stagefright focus on increasing performance and making the underlying multimedia system easier to use and develop for. If you plan to target Android 2.3 for your multimedia application development, be sure to check against the Google list of support media file types at http://developer.android.com/guide/appendix/media-formats.html.
As you can see from figure 10.1, OpenCORE’s architecture has excellent support for multimedia and numerous codecs. In the next section, we’re going to dive right in and use the Android API to play audio files.
Note
The current Android SDK doesn’t support video recording via the API. Video recording is still possible, but it’s specific to the phone vendor.
10.2. Playing audio
Probably the most basic need for multimedia on a cell phone is the ability to play audio files, whether new ringtones, MP3s, or quick audio notes. Android’s Media Player is easy to use. At a high level, all you need to do to play back an MP3 file is follow these steps:
1. Put the MP3 in the res/raw directory in a project (note that you can also use a URI to access files on the network or via the internet).
2. Create a new instance of the MediaPlayer and reference your MP3 by calling MediaPlayer.create().
3. Call the MediaPlayer methods prepare() and start().
Let’s work through an example to demonstrate how simple this task is. First, create a new project called MediaPlayer Example, with an Activity called MediaPlayer-Activity. Now, create a new folder under res/called raw. We’ll store our MP3s in this folder. For this example, we’ll use a ringtone for the game Halo 3, which you can retrieve from MediaPlayer.create. Download the Halo 3 theme song and any other MP3s you fancy, and put them in the raw directory. Next, create a simple Button for the music player, as shown in the following listing.
Listing 10.1. main.xml for MediaPlayer Example
<?xml version="1.0" encoding="utf-8"?>
<LinearLayout xmlns:android="http://schemas.android.com/apk/res/android"
    android:orientation="vertical"
    android:layout_width="fill_parent"
    android:layout_height="fill_parent"
    >
<TextView
    android:layout_width="fill_parent"
    android:layout_height="wrap_content"
    android:text="Simple Media Player"
    />
<Button android:id="@+id/playsong"
    android:layout_width="fill_parent"
    android:layout_height="wrap_content"
    android:text="Halo 3 Theme Song"
    />
</LinearLayout>
We need to fill out our MediaPlayerActivity class, as shown in the following listing.
Listing 10.2. MediaPlayerActivity.java

As you can see, playing back an MP3 is easy. In listing 10.2, all we did was use the view that we created in listing 10.1 and map the button, playsong, to mybutton, which we then bound to the setOnClickListener() ![]() . Inside the listener, we created the MediaPlayer instance
. Inside the listener, we created the MediaPlayer instance ![]() using the create(Context context, int resourceid) method, which takes our context and a resource ID for our MP3. Finally, we set the setOnCompletionListener, which will perform some task on completion. For the moment, we do nothing, but you might want to change a button’s state
or provide a notification to a user that the song is over, or ask if the user would like to play another song. If you want
to do any of these things, you’d use this method.
using the create(Context context, int resourceid) method, which takes our context and a resource ID for our MP3. Finally, we set the setOnCompletionListener, which will perform some task on completion. For the moment, we do nothing, but you might want to change a button’s state
or provide a notification to a user that the song is over, or ask if the user would like to play another song. If you want
to do any of these things, you’d use this method.
Now if you compile the application and run it, you should see something like figure 10.2. Click the button, and you should hear the Halo 3 song played back in the emulator via your speakers. You can also control the volume of the playback with the volume switches on the side of the Android emulator phone visualization.
Figure 10.2. Simple media player example

Now that we’ve looked at how to play an audio file, let’s see how you can play a video file.
10.3. Playing video
Playing a video is slightly more complicated than playing audio with the MediaPlayer API, in part because you have to provide a view surface for your video to play on. Android has a VideoView widget that handles that task for you; you can use it in any layout manager. Android also provides a number of display options, including scaling and tinting. So let’s get started with playing video by creating a new project called Simple Video Player. Next, create a layout, as shown in the following listing.
Note
Currently the emulator has some issues playing video content on certain computers and operating systems. Don’t be surprised if your audio or video playback is choppy.
Listing 10.3. main.xml—UI for Simple Video Player

All we’ve done in this listing is add the VideoView widget ![]() . The VideoView provides a UI widget with stop, play, advance, rewind, and other buttons, making it unnecessary to add your own. Next, we
need to write a class to play the video, which is shown in the following listing.
. The VideoView provides a UI widget with stop, play, advance, rewind, and other buttons, making it unnecessary to add your own. Next, we
need to write a class to play the video, which is shown in the following listing.
Listing 10.4. SimpleVideo.java
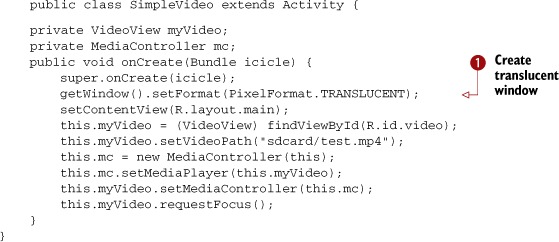
In this listing, we first created a translucent window, which is necessary for our SurfaceView ![]() . Next, we reference the VideoView as a container for playing the video, and use its setVideoPath() to have it look at an SD card for our test MP4. Finally, we set up the MediaController and use the setMediaController() to perform a callback to the VideoView to notify it when our video is finished playing.
. Next, we reference the VideoView as a container for playing the video, and use its setVideoPath() to have it look at an SD card for our test MP4. Finally, we set up the MediaController and use the setMediaController() to perform a callback to the VideoView to notify it when our video is finished playing.
Before we can run this application, we need to set up an sdcard in the emulator (see chapter 5 for details on the SD card). First, create a new SD card image:
mksdcard 512M mysdcard
Hit Return. A 512 MB FAT32 image named mysdcard has now been created for you to load into the emulator. Load the SD card into the emulator like this:
emulator –sdcard mysdcard
Now push the file test.mp4 to the disk image. After you’ve pushed the file to the image, you can launch the SimpleVideo application by going to your IDE and running the project while the emulator is already running. You should now see something like figure 10.3.
Figure 10.3. Playing an MP4 video in the Android emulator
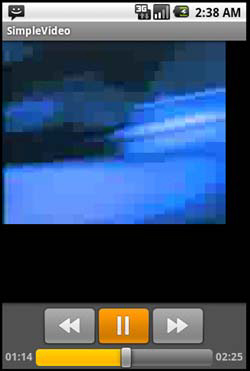
As you can see, the VideoView and MediaPlayer classes simplify working with video files. Something you’ll need to pay attention to when working with video files is that the emulator and physical devices will react differently with very large media files.
Now that you’ve seen how simple it is to play media using Android’s MediaPlayer API, let’s look at how you can use a phone’s built-in camera or microphone to capture images or audio.
10.4. Capturing media
Using your cell phone to take pictures, record memos, film short videos, and so on, are features that are expected of any such device. In this section, we’re going to not only look at how to capture media from the microphone and camera, but also how to write these files to the simulated SD card image you created in the previous section.
To get started, let’s examine how to use the Android Camera class to capture images and save them to a file.
10.4.1. Understanding the camera
An important feature of modern cell phones is their ability to take pictures or video using a built-in camera. Some phones even support using the camera’s microphone to capture audio. Android, of course, supports all three features and provides a variety of ways to interact with the camera. In this section, we’re going to look at how to interact with the camera and take photographs. In the next section, you’ll use the camera to take video and save it to an SD card.
You’ll be creating a new project called SimpleCamera to demonstrate how to connect to a phone’s camera to capture images. For this project, we’ll be using the Camera class (http://code.google.com/android/reference/android/hardware/Camera.html) to tie the emulator’s (or phone’s) camera to a View. Most of the code that we’ve created for this project deals with showing the input from the camera, but the main work for taking a picture is done by a single method called take-Picture(Camera.ShutterCallback shutter, Camera.PictureCallback raw, Camera.PictureCallback jpeg), which has three callbacks that allow you to control how a picture is taken.
Before we get any further into the Camera class and how to use the camera, let’s create the project. We’ll be creating two classes; because the main class is long, we’ll break it into two sections. For the first section, look at the following listing, Camera-Example.java.
Note
The Android emulator doesn’t allow you to connect to camera devices, such as a webcam, on your computer; all your pictures will display a chessboard like the one shown in figure 10.4. You can connect to a web camera and get live images and video, but it requires some hacking. An excellent example on how to do this can be found at Tom Gibara’s website, where he has an open source project for obtaining live images from a webcam: http://www.tomgibara.com/android/camera-source. It’s possible that in later versions of the SDK, the emulator will support connections to cameras on the hardware the emulator is running on.
Figure 10.4. Test pattern coming from the emulator camera and displayed in the SimpleCamera application

Listing 10.5. CameraExample.java

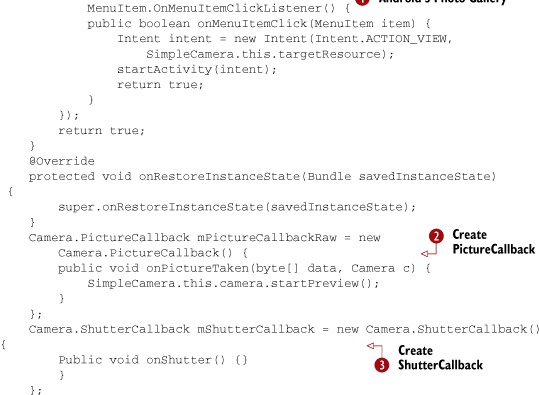
This listing is straightforward. First, we set variables for managing a surfaceView and then set up the View. Next, we create a simple menu and menu option that will float over our surface when the user clicks the Menu button on the
phone while the application is running ![]() . Doing so will open Android’s picture browser and let the user view the photos on the camera. Next, we create the first PictureCallback, which is called when a picture is first taken
. Doing so will open Android’s picture browser and let the user view the photos on the camera. Next, we create the first PictureCallback, which is called when a picture is first taken ![]() . This first callback captures the Picture-Callback’s only method, onPictureTaken(byte[] data, Camera camera), to grab the raw image data directly from the camera. Next, we create a ShutterCallback, which can be used with its method, onShutter(), to play a sound; here we don’t call the method
. This first callback captures the Picture-Callback’s only method, onPictureTaken(byte[] data, Camera camera), to grab the raw image data directly from the camera. Next, we create a ShutterCallback, which can be used with its method, onShutter(), to play a sound; here we don’t call the method ![]() . We’ll continue with the CameraExample.java in the next listing.
. We’ll continue with the CameraExample.java in the next listing.
Listing 10.6. CameraExample.java continued


This listing is more complicated than listing 10.5, although a large amount of the code is about managing the surface for the camera preview. The first line is the start of
an implementation of the method onKeyDown ![]() , which checks to see whether the center key on the dpad was pressed. If it was, we set up the creation of a file, and by
using the ImageCaptureCallback, which we’ll define in listing 10.7, we create an Outputstream to write our image data to
, which checks to see whether the center key on the dpad was pressed. If it was, we set up the creation of a file, and by
using the ImageCaptureCallback, which we’ll define in listing 10.7, we create an Outputstream to write our image data to ![]() , including not only the image but the filename and other metadata. Next, we call the method takePicture() and pass to it the three callbacks mShutterCallback, mPictureCallbackRaw, and camDemo. mPictureCallbackRaw is our raw image and camDemo writes the image to a file on the SD card
, including not only the image but the filename and other metadata. Next, we call the method takePicture() and pass to it the three callbacks mShutterCallback, mPictureCallbackRaw, and camDemo. mPictureCallbackRaw is our raw image and camDemo writes the image to a file on the SD card ![]() , as you can see in the following listing.
, as you can see in the following listing.
Listing 10.7. ImageCaptureCallback.java
public class ImageCaptureCallback implements PictureCallback  {
    private OutputStream filoutputStream;
    public ImageCaptureCallback(OutputStream filoutputStream) {
        this.filoutputStream = filoutputStream;
    }
    public void onPictureTaken(byte[] data, Camera camera) {
        try {
            this.filoutputStream.write(data);
            this.filoutputStream.flush();
            this.filoutputStream.close();
        } catch(Exception ex) {
            ex.printStackTrace();
        }
    }
}
Here, the class implements the PictureCallback interface and provides two methods. The constructor creates a stream to write data to, and the second method, onPictureTaken, takes binary data and writes to the SD card as a JPEG.
If you build this project and start the emulator running using the SD card image you created earlier in this chapter, you should see something like figure 10.4 when you start the SimpleCamera application from the Android menu. If you look at figure 10.4, you’ll notice an odd black-and-white checked background with a bouncing gray box. The Android emulator generates this test pattern to simulate an image feed because the emulator isn’t pulling a live feed from the camera.
Now if you click the center button on the dpad in the emulator, the application will take a picture. To see the picture, click the Menu button; a menu appears on the camera view window with a single option, View Pictures. If you select View Pictures, you’re taken to the Android picture explorer, and you should see Android’s image placeholders representing the number of camera captures. You can also see the JPEG files that were written to the SD card by opening the DDMS in Eclipse and navigating to mnt > sdcard > DCIM > Camera. You can see an example in figure 10.5.
Figure 10.5. The Android emulator shows placeholder images for each photo taken.

As you can see, working with the camera in Android isn’t particularly complicated. To see how a real camera will behave, you’ll have to test on a real handset until the emulator provides a simple way to connect to a camera on your computer. This work-around shouldn’t stop you from developing your camera applications. A wealth of Android applications already makes sophisticated use of the camera, ranging from games to an application that uses a picture of your face to unlock your phone.
Now that you’ve seen how the Camera class works in Android, let’s look at how to capture or record audio from a camera’s microphone. In the next section, we’ll explore the MediaRecorder class and you’ll write recordings to an SD card.
10.4.2. Capturing audio
Now we’ll look at using the onboard microphone to record audio. In this section, we’re going to use the Android MediaRecorder example from Google Android Developers list, which you can find at http://code.google.com/p/unlocking-android/. The code shown in this section has been updated slightly.
Note
Audio capture requires a physical device running Android because it’s not currently supported in the Android emulator.
In general, recording audio or video follows the same process in Android:
1. Create an instance of android.media.MediaRecorder
2. Create an instance of andriod.content.ContentValues, and add properties such as TITLE, TIMESTAMP, and the all-important MIME_TYPE
3. Create a file path for the data to go to using android.content.ContentResolver
4. To set a preview display on a view surface, use MediaRecorder.setPreviewDisplay()
5. Set the source for audio, using MediaRecorder.setAudioSource()
6. Set output file format, using MediaRecorder.setOutputFormat()
7. Set your encoding for audio, using MediaRecorder.setAudioEncoder()
8. Use prepare() and start() to prepare and start your recordings
9. Use stop() and release() to gracefully stop and clean up your recording process
Though recording media isn’t especially complex, you can see that it’s more complex than playing it. To understand how to use the MediaRecorder class, we’ll look at an application. Create a new application called SoundRecordingDemo. Next, you need to edit the AndroidManifest.xml file and add the following line:
<uses-permission android:name="android.permission.RECORD_AUDIO" />
This code will allow the application to record the audio files and play them. Next, create the class shown in the following listing.
Listing 10.8. SoundRecordingdemo.java

In this listing, the first part of the code is creating the buttons and button listeners to start and stop the recording.
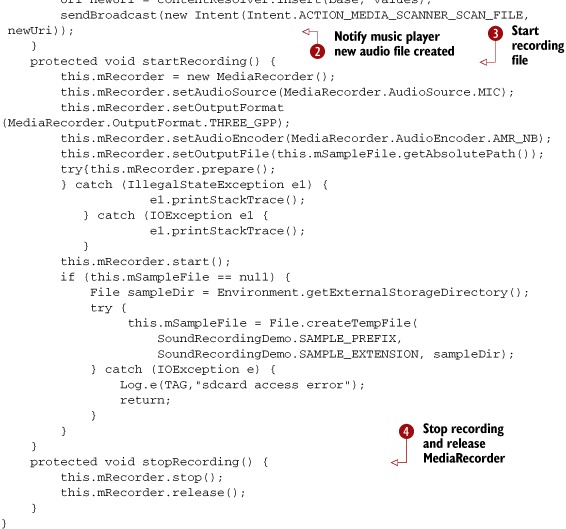
The first part of the listing you need to pay attention to is the addToDB() method. In this method, we set all the metadata for the audio file we plan to save, including the title, date, and type of
file ![]() . Next, we call the Intent ACTION_MEDIA_SCANNER_SCAN_FILE to notify applications such as Android’s Music Player that a new audio file has been created
. Next, we call the Intent ACTION_MEDIA_SCANNER_SCAN_FILE to notify applications such as Android’s Music Player that a new audio file has been created ![]() . Calling this Intent allows us to use the Music Player to look for new files in a playlist and play the files.
. Calling this Intent allows us to use the Music Player to look for new files in a playlist and play the files.
Now that we’ve finished the addToDB method, we create the startRecording method, which creates a new MediaRecorder ![]() . As in the steps in the beginning of this section, we set an audio source, which is the microphone, set an output format
as THREE_GPP, set the audio encoder type to AMR_NB, and then set the output file path to write the file. Next, we use the methods prepare() and start() to enable audio recording.
. As in the steps in the beginning of this section, we set an audio source, which is the microphone, set an output format
as THREE_GPP, set the audio encoder type to AMR_NB, and then set the output file path to write the file. Next, we use the methods prepare() and start() to enable audio recording.
Finally, we create the stopRecording() method to stop the MediaRecorder from saving audio ![]() by using the methods stop() and release(). If you build this application and run the emulator with the SD card image from the previous section, you should be able
to launch the application from Eclipse and press the Start Recording button. After a few seconds, press the Stop Recording
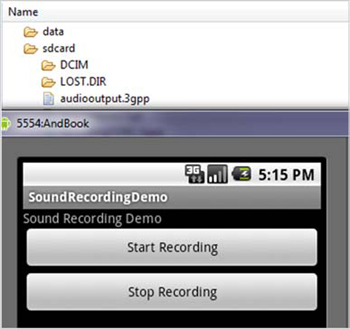
button and open the DDMS; you should be able to navigate to the sdcard folder and see your recordings, as shown in figure 10.6.
by using the methods stop() and release(). If you build this application and run the emulator with the SD card image from the previous section, you should be able
to launch the application from Eclipse and press the Start Recording button. After a few seconds, press the Stop Recording
button and open the DDMS; you should be able to navigate to the sdcard folder and see your recordings, as shown in figure 10.6.
Figure 10.6. An example of audio files being saved to the SD card image in the emulator
If music is playing on your computer’s audio system, the Android emulator will pick it up and record it directly from the audio buffer (it’s not recording from a microphone). You can then easily test whether it recorded sound by opening the Android Music Player and selecting Playlists > Recently Added. It should play your recorded file, and you should be able to hear anything that was playing on your computer at the time.
As of version 1.5, Android supported the recording of video, although many developers found it difficult and some vendors implemented their own customer solutions to support video recording. With the release of 2.0, 2.1, and 2.2, video has become far easier to work with, both for playing as well as recording. You’ll see how much easier in the next section about using the MediaRecorder class to write a simple application for recording video.
10.5. Recording video
Video recording on Android is no more difficult than recording audio, with the exception that you have a few different fields. But there’s one important difference—unlike with recording audio data, Android requires you to first preview a video feed before you can record it by passing it a surface object much like we did with the camera application earlier in this chapter. It’s worth repeating this point because when Android started supporting video recording, many developers found themselves unable to record video: You must always provide a surface object. This might be awkward for some applications, but it’s currently required in Android up to 2.2. Also, like recording audio, you have to provide several permissions to Android so you can record video. The new one is RECORD_VIDEO, which lets you use the camera to record video. The other permissions are CAMERA, RECORD_AUDIO, and WRITE_EXTERNAL_STORAGE, as shown in the following listing. So go ahead and set up a new project called VideoCam and use the permissions in this AndroidManifest.xml.
Listing 10.9. AndroidManifest.xml
<?xml version="1.0" encoding="utf-8"?>
<manifest xmlns:android="http://schemas.android.com/apk/res/android"
      package="com.msi.manning.chapter10.VideoCam"
      android:versionCode="1"
      android:versionName="1.0">
    <application android:icon="@drawable/icon"
 android:label="@string/app_name">
        <activity android:name=".VideoCam"
 android:label="@string/app_name">
            <intent-filter>
                <action android:name="android.intent.action.MAIN" />
                <category android:name=
"android.intent.category.LAUNCHER" />
            </intent-filter>
        </activity>
    </application>
     <uses-permission android:name="android.permission.CAMERA">
</uses-permission>
       <uses-permission android:name=
"android.permission.RECORD_AUDIO"></uses-permission>
       <uses-permission android:name=
"android.permission.RECORD_VIDEO"></uses-permission>
       <uses-permission android:name=
"android.permission.WRITE_EXTERNAL_STORAGE" />
       <uses-feature android:name="android.hardware.camera" />
</manifest>
Now that you’ve defined the manifest, you need to create a simple layout that has a preview area and some buttons to start, stop, pause, and play your video recording. The layout is shown in the following listing:
Listing 10.10. maim.xml
<?xml version="1.0" encoding="utf-8"?>
<!-- This file is /res/layout/main.xml -->
<RelativeLayout xmlns:android="http://schemas.android.com/apk/res/android"
        android:orientation="vertical"
        android:layout_width="fill_parent"
        android:layout_height="fill_parent">

    <RelativeLayout android:layout_width="fill_parent"
        android:layout_height="wrap_content"
        android:id="@+id/relativeVideoLayoutView"
            android:layout_centerInParent="true">

            <VideoView android:id="@+id/videoView"
     android:layout_width="176px"
                   android:layout_height="144px"
                   android:layout_centerInParent="true"/>

    </RelativeLayout>

    <LinearLayout
        android:layout_width="wrap_content"
        android:layout_height="wrap_content"
        android:orientation="horizontal"
        android:layout_centerHorizontal="true"
        android:layout_below="@+id/relativeVideoLayoutView">
        <ImageButton android:id="@+id/playRecordingBtn"
            android:layout_width="wrap_content"
            android:layout_height="wrap_content"
            android:background="@drawable/play"
            />

    <ImageButton android:id="@+id/bgnBtn"
        android:layout_width="wrap_content"
        android:layout_height="wrap_content"
        android:background="@drawable/record"
        android:enabled="false"
        />
    </LinearLayout>
 </RelativeLayout>
Note
You’ll need to download this code from http://code.google.com/p/unlocking-android/ to get the open source icons that we use for the buttons, or you can use your own.
Video recording follows a set of steps that are similar to those for audio recording:
1. Create an instance of android.media.MediaRecorder.
2. Set up a VideoView.
3. To set a preview display on a view surface, use MediaRecorder.setPreviewDisplay().
4. Set the source for audio, using MediaRecorder.setAudioSource().
5. Set the source for video, using MediaRecorder.setVideoSource().
6. Set your encoding for audio, using MediaRecorder.setAudioEncoder().
7. Set your encoding for video, using MediaRecorder.setVideoEncoder().
8. Set output file format using MediaRecorder.setOutputFormat().
9. Set the video size using setVideoSize(). (At the time this book was written, there was a bug in setVideoSize that limited it to 320 by 240.)
10. Set the video frame rate, using setVideoFrameRate.
11. Use prepare() and start() to prepare and start your recordings.
12. Use stop() and release() to gracefully stop and clean up your recording process.
As you can see, using video is very similar to using audio. So let’s go ahead and finish our example by using the code in the following listing.
Listing 10.11. VideoCam.java
VideoCam.java
public class VideoCam extends Activity implements SurfaceHolder.Callback {

        private MediaRecorder recorder = null;
        private static final String OUTPUT_FILE =
 "/sdcard/uatestvideo.mp4";
        private static final String TAG = "RecordVideo";
        private VideoView videoView = null;
        private ImageButton startBtn = null;
        private ImageButton playRecordingBtn = null;
        private Boolean playing = false;
        private Boolean recording = false;


    public void onCreate(Bundle savedInstanceState) {
        super.onCreate(savedInstanceState);
        setContentView(R.layout.main);

        startBtn = (ImageButton) findViewById(R.id.bgnBtn);

        playRecordingBtn = (ImageButton)
            findViewById(R.id.playRecordingBtn);

        videoView = (VideoView)this.findViewById(R.id.videoView);

        final SurfaceHolder holder = videoView.getHolder();
        holder.addCallback(this);
        holder.setType(SurfaceHolder.SURFACE_TYPE_PUSH_BUFFERS);

        startBtn.setOnClickListener(new OnClickListener() {

            public void onClick(View view) {

                if(!VideoCam.this.recording & !VideoCam.this.playing)
                {
                    try
                    {
                        beginRecording(holder);
                        playing=false;
                        recording=true;
                        startBtn.setBackgroundResource(R.drawable.stop);
                    } catch (Exception e) {
                        Log.e(TAG, e.toString());
                        e.printStackTrace();
                    }
                }
                else if(VideoCam.this.recording)
                {
                    try
                    {
                        stopRecording();
                        playing = false;
                        recording= false;
                        startBtn.setBackgroundResource(R.drawable.play);
                    }catch (Exception e) {
                        Log.e(TAG, e.toString());
                        e.printStackTrace();
                    }
                }
            }
        });

        playRecordingBtn.setOnClickListener(new OnClickListener() {

            public void onClick(View view)
            {

                if(!VideoCam.this.playing & !VideoCam.this.recording)
                {
                    try
                    {
                        playRecording();
                        VideoCam.this.playing=true;
                        VideoCam.this.recording=false;
                        playRecordingBtn.setBackgroundResource

(R.drawable.stop);
                    } catch (Exception e) {
                        Log.e(TAG, e.toString());
                        e.printStackTrace();
                    }
                }
                else if(VideoCam.this.playing)
                {
                    try
                    {
                        stopPlayingRecording();
                        VideoCam.this.playing = false;
                        VideoCam.this.recording= false;
                    playRecordingBtn.setBackgroundResource

(R.drawable.play);
                    }catch (Exception e) {
                        Log.e(TAG, e.toString());
                        e.printStackTrace();
                    }
                }

            }
        });

    }


    public void surfaceCreated(SurfaceHolder holder) {
        startBtn.setEnabled(true);
    }

    public void surfaceDestroyed(SurfaceHolder holder) {
    }

    public void surfaceChanged(SurfaceHolder holder, int format, int width,
                int height) {
        Log.v(TAG, "Width x Height = " + width + "x" + height);
    }

    private void playRecording() {
        MediaController mc = new MediaController(this);
        videoView.setMediaController(mc);
        videoView.setVideoPath(OUTPUT_FILE);
        videoView.start();
    }

    private void stopPlayingRecording() {
        videoView.stopPlayback();
    }

    private void stopRecording() throws Exception {
        if (recorder != null) {
            recorder.stop();
        }
    }

    protected void onDestroy() {
        super.onDestroy();
        if (recorder != null) {
            recorder.release();
        }
    }

    private void beginRecording(SurfaceHolder holder) throws Exception {
        if(recorder!=null)
        {
            recorder.stop();
            recorder.release();
        }

        File outFile = new File(OUTPUT_FILE);
        if(outFile.exists())
        {
            outFile.delete();
        }

        try {
            recorder = new MediaRecorder();
            recorder.setVideoSource(MediaRecorder.VideoSource.CAMERA);
            recorder.setAudioSource(MediaRecorder.AudioSource.MIC);
            recorder.setOutputFormat(MediaRecorder.OutputFormat.MPEG_4);
            recorder.setVideoSize(320, 240);
            recorder.setVideoFrameRate(15);
            recorder.setVideoEncoder(MediaRecorder.VideoEncoder.MPEG_4_SP);
            recorder.setAudioEncoder(MediaRecorder.AudioEncoder.AMR_NB);
            recorder.setMaxDuration(20000);
            recorder.setPreviewDisplay(holder.getSurface());
            recorder.setOutputFile(OUTPUT_FILE);
            recorder.prepare();
            recorder.start();
        }
        catch(Exception e) {
            Log.e(TAG, e.toString());
            e.printStackTrace();
        }
    }
}
Because much of this code is similar to other code in this chapter, we won’t describe everything that’s happening. If you look quickly at the code in this listing, you’ll note that it’s relatively simple. The first thing we do in the code, besides setting some fields, is set up our surface to support the camera preview, much like we did in the simple camera application earlier in this chapter. The next part of the code that’s important is the beginRecording method. First, this method checks to make sure that everything is ready to record a video file by making sure that the camera is free, and that it can record the output file. Then, it closely follows the preceding processes to set up the camera for recording before calling prepare() and then start().
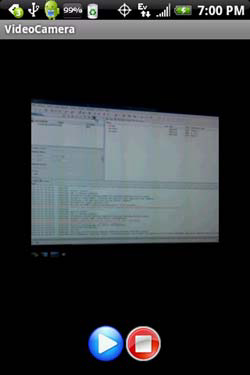
Unfortunately, as we noted with the camera project, there’s no easy way to test your application in the emulator. For this example, we’ve pushed the application to a cell phone to test the camera, and used the DDMS to note the file that was recorded and to play it back. You can see an example of the output, captured with the DDMS, from an HTC Hero in figure 10.7.
Figure 10.7. Photograph of VideoCam application running on an HTC Hero 2.
Without a device to test on, you’ll have difficulties debugging your video applications. If you decide to develop a video application, we strongly suggest that you not only obtain an Android device to test on, but that you test every physical device that you hope your application will run on. Although developing Android applications that record data from sensors can be difficult to work with on the emulator, they’re relatively straightforward to code, but you need to use a physical Android device to test.
10.6. Summary
In this chapter, we looked at how the Android SDK uses multimedia and how you can play, save, and record video and sound. We also looked at various features the Android MediaPlayer offers the developer, from a built-in video player to wide support for formats, encodings, and standards.
We talked about how to interact with other hardware devices attached to the phone, such as a microphone and camera. You used the SDK to create an SD card image for the emulator to simulate SD cards, and you used the MediaRecorder application to record audio and save it to the SD card.
The most consistent characteristic of multimedia programming with Android is that things are changing and maturing! Multimedia support is moving from Open-CORE to Stagefright, with version 2.2 being somewhat of a pivot release where both frameworks share responsibility for delivering multimedia functionality. Writing multimedia applications requires the developer to conduct a bit more work directly on the hardware because the emulated environments don’t adequately replicate the hardware capabilities of the handsets. Despite this potential speed-bump in the development process, Android currently offers you everything you need to create rich and compelling media applications. Its focus on supporting industry and open standards guarantees that your applications will have wide support on a variety of phones.
In the next chapter, you’ll learn all about how to use Android’s location services to interact with GPS and maps. By mixing in what you’ve learned in this chapter, you’ll be able to create your own GPS application that not only provides voice direction, but that even responds to voice commands.