
Chapter 11. Location, location, location
- Working with LocationProvider and LocationManager
- Testing location in the emulator
- Receiving location alerts with LocationListener
- Drawing with MapActivity and MapView
- Looking up addresses with the Geocoder
Accurate location awareness makes a mobile device more powerful. Combining location awareness with network data can change the world—and Android shines here. Other platforms have gained similar abilities in recent years, but Android excels with its easy-to-use and popular location API framework based on Google Maps.
From direct network queries to triangulation with cell towers and even satellite positioning via GPS, an Android-powered device has access to different types of LocationProvider classes that allow access to location data. Various providers supply a mix of location-related metrics, including latitude and longitude, speed, bearing, and altitude.
Developers generally prefer to work with GPS because of its accuracy and power. But some devices may not have a GPS receiver, and even GPS-enabled devices can’t access satellite data when inside a large building or otherwise obstructed from receiving the signal. In those instances the Android platform provides a graceful and automatic fallback to query other providers when your first choice fails. You can examine provider availability and hook into one or another using the LocationManager class.
Location awareness[1] opens up a new world of possibilities for application development. In this chapter you’ll build an application that combines location awareness with data from the U.S. National Oceanic and Atmospheric Administration (NOAA) to produce an interesting and useful mashup.
1 For more about location, check out Location-Aware Applications by Richard Ferraro and Murat Aktihanoglu, to be published by Manning in March 2011: http://www.manning.com/ferraro.
Specifically you’ll connect to the National Data Buoy Center (NDBC) to retrieve data from buoys and ships located around the coastline in North America. Thanks to the NOAA-NDBC system, which polls sensors on buoys and makes that data available in RSS feeds, you can retrieve data for the vicinity, based on the current location, and display condition information such as wind speed, wave height, and temperature. Although we won’t cover non-location-related details in this chapter, such as using HTTP to pull the RSS feed data, the full source code for the application is available with the code download for this chapter. Our Wind and Waves application has several main screens, including an Android MapActivity with a MapView. These components are used for displaying and manipulating map information, as shown in figure 11.1.
Figure 11.1. Screens from the Wind and Waves location-aware application

Accessing buoy data, which is important mainly for marine use cases, has a somewhat limited audience. But the principles shown in this app demonstrate the range of Android’s location-related capabilities, and should inspire you to develop your own unique application.
In addition to displaying data based on the current location, you’ll use this application to create several LocationListener instances that receive updates when the user’s location changes. When the position changes, the device will inform your application, and you’ll update your MapView using an Overlay—an object that allows you to draw on top of the map.
Beyond the buoy application requirements, you’ll also write a few samples for working with the Geocoder class. This class allows you to map between a GeoPoint (latitude and longitude) and a place (city or postal code) or address. This utility doesn’t help much on the high seas but does benefit many other apps.
Before writing the sample apps, you’ll start by using the device’s built-in mapping application and simulating your position within the Android emulator. This approach will allow you to mock your location for the emulator. After we’ve covered all of the emulator location-related options, we’ll move on to building Wind and Waves.
11.1. Simulating your location within the emulator
For any location-aware application, you’ll start by working with the provided SDK and the emulator. Within the emulator, you’ll set and update your current location. From there you’ll want to progress to supplying a range of locations and times to simulate movement over a geographic area.
You can accomplish these tasks in several ways, either by using the DDMS tool or by using the command line from the shell. To get started quickly, let’s first send in direct coordinates through the DDMS tool.
11.1.1. Sending in your coordinates with the DDMS tool
You can access the DDMS tool in two ways, either launched on its own from the SDK tools subdirectory or as the Emulator Control view within the Eclipse IDE. You need to have Eclipse and the Android Eclipse plug-in to use DDMS within Eclipse; see chapter 2 and appendix A for more details about getting the SDK and plug-in set up.
With the DDMS tool you can send direct latitude and longitude coordinates manually from the Emulator Control > Location Controls form. This is shown in figure 11.2. Note that Longitude is the first field, which is the standard around the world, but backward from how latitude and longitude are generally expressed in the United States.
Figure 11.2. Using the DDMS tool to send direct latitude and longitude coordinates to the emulator as a mock location

If you launch the built-in Maps application from Android’s main menu and send in a location with the DDMS tool, you can then use the menu to select My Location, and the map will animate to the location you’ve specified—anywhere on Earth.
Note
Both the Google Maps application and the mapping APIs are part of the optional Google APIs. As such, not all Android phones support these features. Check your target devices to ensure that they provide this support. For development, you’ll need to install an Android Virtual Device[2] (AVD) that supports the Google APIs.
2 For more on Android, maps and Android Virtual Devices, try here: http://developer.appcelerator.com/doc/mobile/android-maps.
Try this a few times to become comfortable with setting locations; for example, send the decimal coordinates in table 11.1 one by one, and in between browse around the map. When you supply coordinates to the emulator, you’ll need to use the decimal form.
Table 11.1. Example coordinates for the emulator to set using the DDMS tool
|
Description |
Latitude degrees |
Longitude degrees |
Latitude decimal |
Longitude decimal |
|---|---|---|---|---|
| Golden Gate Bridge, California | 37°49’ N | 122°29’ W | 37.49 | -122.29 |
| Mount Everest, Nepal | 27°59’ N | 86°56’ E | 27.59 | 86.56 |
| Ayer’s Rock, Australia | 25°23’ S | 131°05’ E | -25.23 | 131.05 |
| North Pole | 90°00’ N | 90.00 | ||
| South Pole | 90°00’ S | -90.00 |
Although the DDMS tool requires the decimal format, latitude and longitude are more commonly expressed on maps and other tools as degrees, minutes, and seconds. Degrees (°) represent points on the surface of the globe as measured from either the equator (for latitude) or the prime meridian (for longitude). Each degree is further subdivided into 60 smaller sections, called minutes (′), and each minute also has 60 seconds (″). If necessary, seconds can be divided into tenths of a second or smaller fractions.
When representing latitude and longitude on a computer, the degrees are usually converted into decimal form with positive representing north and east and negative representing south and west, as shown in figure 11.3.
Figure 11.3. Latitude and longitude spherical diagram, showing positive north and east and negative south and west

If you live in the southern and eastern hemispheres, such as in Buenos Aires, Argentina, which is 34°60’ S, 58°40’ W in the degree form, the decimal form is negative for both latitude and longitude, -34.60, -58.40. If you haven’t used latitude and longitude much, the different forms can be confusing at first, but they quickly become clear.
Once you’ve mastered setting a fixed position, you can move on to supplying a set of coordinates that the emulator will use to simulate a range of movement.
Note
You can also send direct coordinates from within the emulator console. If you telnet local-host 5554 (adjust the port where necessary) or adb shell, you’ll connect to the default emulator’s console. From there you can use the geo fix command to send longitude, latitude, and optional altitude; for example, geo fix -21.55 64.1. Keep in mind that the Android tools require longitude in the first parameter.
11.1.2. The GPS Exchange Format
The DDMS tool supports two formats for supplying a range of location data in file form to the emulator. The GPS Exchange Format (GPX) allows a more expressive form when working with Android.
GPX is an XML schema that allows you to store waypoints, tracks, and routes. Many handheld GPS devices support this format. The following listing shows the basics of the format in a portion of a sample GPX file.
Listing 11.1. A sample GPX file

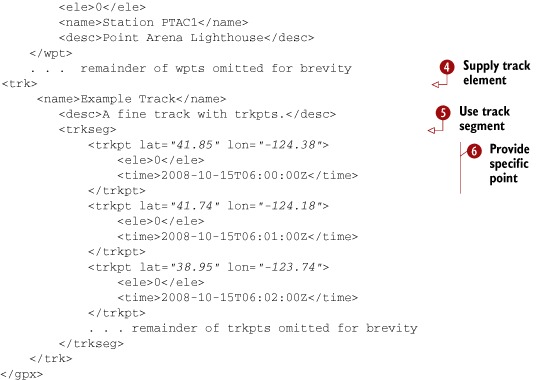
A GPX file requires the correct XML namespace in the root gpx element ![]() . Within its body, the file includes metadata
. Within its body, the file includes metadata ![]() and individual waypoints
and individual waypoints ![]() . Waypoints are named locations at a particular latitude and longitude. Along with individual waypoints, a GPX file supports related
route information in the form of tracks
. Waypoints are named locations at a particular latitude and longitude. Along with individual waypoints, a GPX file supports related
route information in the form of tracks ![]() , which can be subdivided further into track segments
, which can be subdivided further into track segments ![]() . Each track segment is made up of track points. Finally, each track point
. Each track segment is made up of track points. Finally, each track point ![]() contains a waypoint with an additional point-intime property.
contains a waypoint with an additional point-intime property.
When working with a GPX file in the DDMS tool, you can use two different modes, as figure 11.4 reveals. The top half of the GPX box lists individual waypoints; when you click one, that individual location is sent to the emulator. In the bottom half of the GPX box, all the tracks are displayed. Tracks can be “played” forward and backward to simulate movement. As the track reaches each track point, based on the time it defines, it sends those coordinates to the emulator. You can modify the speed for this playback via the Speed button.
Figure 11.4. Using the DDMS tool with a GPX file to send mock location information

GPX is simple and extremely useful when working with mock location information for your Android applications, but it’s not the only file format supported. The DDMS tool also supports a format called KML.
11.1.3. The Google Earth Keyhole Markup Language
The second format that the Android DDMS tool supports for sending a range of mock location information to the emulator is the Keyhole Markup Language (KML). KML was originally a proprietary format created by a company named Keyhole. After Google acquired Keyhole, it submitted KML to the Open Geospatial Consortium (OGC), which accepted KML as an international standard.
OGC KML pursues the following goal:
That there be one international standard language for expressing geographic annotation and visualization on existing or future web-based online and mobile maps (2d) and earth browsers (3d).
The following listing shows a sample KML file for sending location data to the Android Emulator. This file uses the same coastal location data as you saw with the previous GPX example.
Listing 11.2. A sample KML file

KML uses a kml root element requiring the correct namespace declaration. KML supports many more elements and attributes than the DDMS tool
handles. DDMS only checks your KML files for Placemark elements ![]() , which contain Point child elements
, which contain Point child elements ![]() , which in turn supply coordinates
, which in turn supply coordinates ![]() .
.
Figure 11.5 shows an example of using a KML file with the DDMS tool.
Figure 11.5. Using the DDMS tool with a KML file to send mock location information

KML[3] is flexible and expressive, but it has drawbacks when used with the Android Emulator. As we’ve noted, the DDMS parser looks for the coordinate elements in the file and sends the latitude, longitude, and elevation for each in a sequence, one Placemark per second. Timing and other advanced features of KML aren’t yet supported by DDMS. Because of this we find it more valuable at present to use GPX as a debugging and testing format, because it supports detailed timing.
3 For more details on KML, go to: http://code.google.com/apls/kml/documentation/
KML is still important; it’s an international standard and will continue to gain traction. Also, KML is an important format for other Google applications, so you may encounter it more frequently in other contexts than GPX. For example, you could create a KML route using Google Earth, and then later use it in your emulator to simulate movement.
Now that you know how to send mock location information to the emulator in various formats, you can step out of the built-in Maps application and start creating your own programs that rely on location.
11.2. Using LocationManager and LocationProvider
When building location-aware applications on the Android platform, you’ll most often use several key classes. A LocationProvider provides location data using several metrics, and you can access providers through a LocationManager.
LocationManager allows you to attach a LocationListener that receives updates when the device location changes. LocationManager also can directly fire an Intent based on the proximity to a specified latitude and longitude. You can always retrieve the last-known Location directly from the manager.
The Location class is a Java bean that represents all the location data available from a particular snapshot in time. Depending on the provider used to populate it, a Location may or may not have all the possible data present; for example, it might not include speed or altitude.
To get your Wind and Waves sample application started and to grasp the related concepts, you first need to master the LocationManager.
11.2.1. Accessing location data with LocationManager
LocationManager lets you retrieve location-related data on Android. Before you can check which providers are available or query the last-known Location, you need to acquire the manager from the system service. The following listing demonstrates this task, and includes a portion of the MapViewActivity that will drive our Wind and Waves application.
Listing 11.3. Start of MapViewActivity
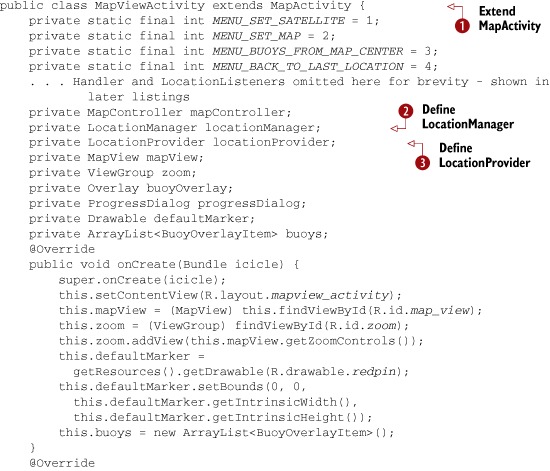

Our custom MapViewActivity extends MapActivity ![]() . We’ll focus on the Map-Activity in more detail in section 11.3, but for now, recognize that this is a special kind of Activity. Within the class, you declare member variables for Location-Manager
. We’ll focus on the Map-Activity in more detail in section 11.3, but for now, recognize that this is a special kind of Activity. Within the class, you declare member variables for Location-Manager ![]() and LocationProvider
and LocationProvider ![]() .
.
To acquire the LocationManager, you use the Activity getSystemService (String name) method ![]() . Once you have the LocationManager, you assign the LocationProvider you want to use with the manager’s getProvider method
. Once you have the LocationManager, you assign the LocationProvider you want to use with the manager’s getProvider method ![]() . In this case use the GPS provider. We’ll talk more about the LocationProvider class in the next section.
. In this case use the GPS provider. We’ll talk more about the LocationProvider class in the next section.
Once you have the manager and provider in place, you implement the onCreate method of your Activity to instantiate a MapController and set initial state for the screen ![]() . Section 11.3 covers MapController and the MapView it manipulates.
. Section 11.3 covers MapController and the MapView it manipulates.
Along with helping you set up the provider you need, LocationManager supplies quick access to the last-known Location ![]() . Use this method if you need a quick fix on the last location, as opposed to the more involved techniques for registering
for periodic location updates with a listener; we’ll cover that topic in section 11.2.3.
. Use this method if you need a quick fix on the last location, as opposed to the more involved techniques for registering
for periodic location updates with a listener; we’ll cover that topic in section 11.2.3.
Besides the features shown in this listing, LocationManager allows you to directly register for proximity alerts. For example, your app could show a custom message if you pass within a quarter-mile of a store that has a special sale. If you need to fire an Intent based on proximity to a defined location, call the addProximityAlert method. This method lets you set the target location with latitude and longitude, and also lets you specify a radius and a PendingIntent. If the device comes within the range, the PendingIntent is fired. To stop receiving these messages, call remove-ProximityAlert.
Getting back to the main purpose for which you’ll use the LocationManager with Wind and Waves, we’ll next look more closely at the GPS LocationProvider.
11.2.2. Using a LocationProvider
LocationProvider helps define the capabilities of a given provider implementation. Each implementation responsible for returning location information may be available on different devices and in different circumstances.
Available provider implementations depend on the hardware capabilities of the device, such as the presence of a GPS receiver. They also depend on the situation: even if the device has a GPS receiver, can it currently receive data from satellites, or is the user somewhere inaccessible such as an elevator or a tunnel?
At runtime you’ll query for the list of providers available and use the most suitable one. You may select multiple providers to fall back on if your first choice isn’t available or enabled. Developers generally prefer using the LocationManager.GPS_PROVIDER provider, which uses the GPS receiver. You’ll use this provider for Wind and Waves because of its accuracy and its support in the emulator. Keep in mind that a real device will normally offer multiple providers, including the LocationManager.NETWORK_PROVIDER, which uses cell tower and Wi-Fi access points to determine location data. To piggyback on other applications requesting location, use LocationManager.PASSIVE_PROVIDER.
In listing 11.3 we showed how you can obtain the GPS provider directly using the getProvider(String name) method. Table 11.2 provides alternatives to this approach of directly accessing a particular provider.
Table 11.2. Methods for obtaining a LocationProvider reference
|
LocationProvider code snippet |
Description |
|---|---|
|
List<String> providers = locationManager.getAllProviders(); |
Get all of the providers registered on the device. |
|
List<String> enabledProviders = locationManager.getAllProviders(true); |
Get all of the currently enabled providers. |
| locationProvider = | A shortcut to get the first enabled provider, regardless of type. |
| locationManager.getProviders(true).get(0); | |
|
locationProvider = locationManager.getBestProvider( myCriteria, true); |
An example of getting a LocationProvider using a particular Criteria argument. You can create a Criteria instance and specify whether bearing, altitude, cost, and other metrics are required. |
Different providers may support different location-related metrics and have different costs or capabilities. The Criteria class helps define what each provider instance can handle. Available metrics are latitude and longitude, speed, bearing, altitude, cost, and power requirements.
Remember to set the appropriate Android permissions. Your manifest needs to include location-related permissions for the providers you want to use. The following listing shows the Wind and Waves manifest XML file, which includes both COARSE- and FINE-grained location-related permissions.
Listing 11.4. A manifest file showing COARSE and FINE location-related permissions

Include both the ACCESS_COARSE_LOCATION ![]() and ACCESS_FINE_LOCATION
and ACCESS_FINE_LOCATION ![]() permissions in your manifest. The COARSE permission corresponds to the LocationManager.NETWORK_PROVIDER provider for cell and Wi-Fi based data, and the FINE permission corresponds to the LocationManager.GPS_PROVIDER provider. You don’t use the network provider in Wind and Waves, but this permission would allow you to enhance the app to
fall back to the network provider if the GPS provider becomes unavailable or disabled.
permissions in your manifest. The COARSE permission corresponds to the LocationManager.NETWORK_PROVIDER provider for cell and Wi-Fi based data, and the FINE permission corresponds to the LocationManager.GPS_PROVIDER provider. You don’t use the network provider in Wind and Waves, but this permission would allow you to enhance the app to
fall back to the network provider if the GPS provider becomes unavailable or disabled.
Once you understand the basics of LocationManager and LocationProvider, you can unleash the real power and register for periodic location updates in your application with the LocationListener class.
11.2.3. Receiving location updates with LocationListener
You can keep abreast of the device location by creating a LocationListener implementation and registering it to receive updates. LocationListener lets you filter for many types of location events based on a flexible and powerful set of properties. You implement the interface and register your instance to receive location data callbacks.
Listing 11.5 demonstrates those principles as you create several LocationListener implementations for the Wind and Waves MapViewActivity and then register those listeners using the LocationManager and LocationProvider. This listing helps complete the initial code from listing 11.3.
Listing 11.5. Creation of LocationListener implementations in MapViewActivity


You’ll usually find it practical to use an anonymous inner class ![]() to implement the LocationListener interface. For this MapViewActivity, you create two Location-Listener implementations so you can later register them using different settings.
to implement the LocationListener interface. For this MapViewActivity, you create two Location-Listener implementations so you can later register them using different settings.
The first listener, locationListenerGetBuoyData, implements the onLocation-Changed method ![]() . In that method you get the latitude and longitude from the Location sent in the callback
. In that method you get the latitude and longitude from the Location sent in the callback ![]() . You then use the data to create a GeoPoint
. You then use the data to create a GeoPoint ![]() after multiplying the latitude and longitude by 1 million (1e6). You need to multiply by a million because GeoPoint requires microdegrees for coordinates. A separate class, LocationHelper, defines this constant and provides other location utilities; you can view this class in the code download for this chapter.
after multiplying the latitude and longitude by 1 million (1e6). You need to multiply by a million because GeoPoint requires microdegrees for coordinates. A separate class, LocationHelper, defines this constant and provides other location utilities; you can view this class in the code download for this chapter.
After you have the data, you update the map ![]() using a helper method that resets a map Overlay; you’ll see this method’s implementation in the next section. In the second listener, locationListenerRecenterMap, you perform the different task of centering the map
using a helper method that resets a map Overlay; you’ll see this method’s implementation in the next section. In the second listener, locationListenerRecenterMap, you perform the different task of centering the map ![]() .
.
The need for two separate listeners becomes clear when you see how listeners are registered with the requestLocationUpdates method of the Location-Manager class. You register the first listener, locationListenerGetBuoyData, to fire only when the new device location has moved a long way from the previous one ![]() . The defined distance is 185,000 meters. (We chose this number to stay just under 100 nautical miles, which is the radius
you’ll use to pull buoy data for your map; you don’t need to redraw the buoy data on the map if the user moves less than 100
nautical miles.) You register the second listener, locationListenerRecenterMap, to fire more frequently; the map view recenters if the user moves more than 1,000 meters
. The defined distance is 185,000 meters. (We chose this number to stay just under 100 nautical miles, which is the radius
you’ll use to pull buoy data for your map; you don’t need to redraw the buoy data on the map if the user moves less than 100
nautical miles.) You register the second listener, locationListenerRecenterMap, to fire more frequently; the map view recenters if the user moves more than 1,000 meters ![]() . Using separate listeners like this allows you to fine-tune the event processing, rather than having to build in your own
logic to do different things based on different values with one listener.
. Using separate listeners like this allows you to fine-tune the event processing, rather than having to build in your own
logic to do different things based on different values with one listener.
Keep in mind that your registration of LocationListener instances could become even more robust by implementing the onProviderEnabled and onProviderDisabled methods. Using those methods and different providers, you could provide useful messages to the user and also provide a graceful fallback through a set of providers; for example, if GPS becomes disabled, you could try the network provider instead.
Note
You should carefully use the time parameter to the requestLocationUpdates method. Requesting location updates too frequently (less than 60,000 ms per the documentation) can wear down the battery and make the application too jittery. In this sample you use an extremely low value (3,000 ms) for debugging purposes. Long-lived or always-running code shouldn’t use a value lower than the recommended 60,000 ms in production code.
With LocationManager, LocationProvider, and LocationListener instances in place, we can address the MapActivity and MapView in more detail.
11.3. Working with maps
In the previous sections, you wrote the start of the MapViewActivity for our Wind and Waves application. We covered the supporting classes and showed you how to register to receive location updates. With that structure in place, let’s now focus on the actual map details.
The MapViewActivity screen will look like figure 11.6, where several map Overlay classes display on top of a MapView within a MapActivity
Figure 11.6. The MapViewActivity from the Wind and Waves application shows a MapActivity with MapView.

To use the com.google.android.maps package on the Android platform and support all the features related to a MapView, you must use a MapActivity.
11.3.1. Extending MapActivity
A MapActivity defines a gateway to the Android Google Maps-like API package and other useful map-related utilities. It handles several details behind creating and using a MapView so you don’t to have to worry about them.
The MapView, covered in the next section, offers the most important features. But a MapActivity provides essential support for the MapView. It manages all the network and filesystem-intensive setup and teardown tasks needed for supporting the map. For example, the MapActivity onResume method automatically sets up network threads for various map-related tasks and caches map section tile data on the filesystem, and the onPause method cleans up these resources. Without this class, all these details would require extra housekeeping that any Activity wishing to include a MapView would have to repeat each time.
Your code won’t do much with MapActivity. Extend this class (as in listing 11.3), making sure to use only one instance per process, and include a special manifest element to enable the com.google.android.maps package. You may have noticed the uses-library element in the Wind and Waves manifest in listing 11.4:
<uses-library android:name="com.google.android.maps" />
The com.google.android.maps package, where MapActivity, MapView, Map-Controller, and other related classes such as GeoPoint and Overlay reside, isn’t a standard package in the Android library. This manifest element pulls in support for the Google maps package.
Once you include the uses-library element and write a basic Activity that extends MapActivity, you can start writing the main app features with a MapView and related Overlay classes.
11.3.2. Using a MapView
Android offers MapView[4] as a limited version of the Google Maps API in the form of a View for your Android application. A MapView displays tiles of a map, which it obtains over the network as the map moves and zooms, much like the web version of Google Maps.
4 Take a look at this MapView tutorial for more information: http://developer.android.com/guide/tutorials/views/hello-mapview.html.
Android supports many of the concepts from the standard Google Maps API through the MapView. For instance, MapView supports a plain map mode, a satellite mode, a street-view mode, and a traffic mode. When you want to write something on top of the map, draw a straight line between two points, drop a “pushpin” marker, or display full-sized images, you use an Overlay.
You can see examples of several of these concepts in figure 11.6, which shows MapView-Activity screenshots for the Wind and Waves application. Figure 11.7 shows that same MapViewActivity again after switching into satellite mode.
Figure 11.7. The MapViewActivity from the Wind and Waves application using satellite mode

You’ve already seen the MapView we’ll use for the Wind and Waves application declared and instantiated in listing 11.3. Now we’ll discuss using this class inside your Activity to control, position, zoom, populate, and overlay your map.
Before you can use a map at all, you have to request a Google Maps API key and declare it in your layout file. This listing shows the MapActivity layout file you’ll use with a special android:apiKey attribute.
Listing 11.6. A MapView layout file including the Google Maps API key

You can declare a MapView in XML just like other View components ![]() . In order to use the Google Maps network resources, a MapView requires an API key
. In order to use the Google Maps network resources, a MapView requires an API key ![]() . You can obtain a map key from the Google Maps Android key registration web page at http://code.google.com/android/maps-api-signup.html.
. You can obtain a map key from the Google Maps Android key registration web page at http://code.google.com/android/maps-api-signup.html.
Before you register for a key, you need to look up the MD5 fingerprint of the certificate that signs your application. This sounds tricky, but it’s really simple. When using the Android Emulator, the SDK always uses a Debug Certificate. To get the MD5 finger-print for this certificate on Mac and Linux, you can use the following command:
cd ~/.android
keytool -list -keystore ./debug.keystore -storepass android -keypass android
On Windows, adjust for the user’s home directory slash directions, such as
cd c:UsersChris.android
keytool -list -keystore debug.keystore -storepass android -keypass android
Getting a key for a production application follows the same process, but you need to use the actual certificate your APK file is signed with instead of the debug.keystore file. The Android documentation provides additional information about obtaining a key at http://code.google.com/android/add-ons/google-apis/mapkey.html. For more information about digital signatures, keys, and signing in general, see appendix B.
Caution
Android requires you to declare the map API key in the layout file. With the key in the layout file, you must remember to update the key between debug and production modes. Additionally, if you debug on different development machines, you must switch keys by hand.
Once you write a MapActivity with a MapView and create your view in the layout file, complete with map API key, you can make full use of the map. Several of the previous listings use the MapView from the Wind and Waves application. In the next listing we repeat a few of the map-related lines of code we’ve already shown, and add related items to consolidate all the map-related concepts in one listing.
Listing 11.7. Portions of code that demonstrate working with maps

You declare the MapView in XML and inflate it just like other view components ![]() . Because it’s a ViewGroup, you can also combine and attach other elements to it. You tell the MapView to display its built-in zoom controls so the user can zoom in and out.
. Because it’s a ViewGroup, you can also combine and attach other elements to it. You tell the MapView to display its built-in zoom controls so the user can zoom in and out.
Next you get a MapController from the MapView. The controller allows you to programmatically zoom and move the map. When starting, you use the controller to set the initial
zoom level and animate to a specified GeoPoint ![]() . When the user selects a view mode from the menu, you set the mode of the map from plain to satellite or back again
. When the user selects a view mode from the menu, you set the mode of the map from plain to satellite or back again ![]() . Along with manipulating the map itself, you can retrieve data from it, such as the coordinates of the map center.
. Along with manipulating the map itself, you can retrieve data from it, such as the coordinates of the map center.
Besides manipulating the map and getting data from it, you can draw items on top of the map using Overlay instances.
11.3.3. Placing data on a map with an Overlay
The small buoy icons for the Wind and Waves application that we’ve used in several figures up to this point draw on the screen at specified coordinates using an Overlay.
Overlay describes an item to draw on the map. You can define your own Overlay by extending this class or MyLocationOverlay. The MyLocationOverlay class lets you display a user’s current location with a compass, and it has other useful features such as a LocationListener for convenient access to position updates.
Besides showing the user’s location, you’ll often place multiple marker items on the map. Users generally expect to see markers as pushpins. You’ll create buoy markers for the location of every buoy using data you get back from the NDBC feeds. Android provides built-in support for this with the ItemizedOverlay base class and the OverlayItem.
OverlayItem, a simple bean, includes a title, a text snippet, a drawable marker, coordinates defined in a GeoPoint, and a few other properties. The following listing shows the buoy data-related BuoyOverlayItem class for Wind and Waves.
Listing 11.8. The OverlayItem subclass BuoyOverlayItem
public class BuoyOverlayItem extends OverlayItem {
    public final GeoPoint point;
    public final BuoyData buoyData;
    public BuoyOverlayItem(GeoPoint point, BuoyData buoyData) {
        super(point, buoyData.title, buoyData.dateString);
        this.point = point;
        this.buoyData = buoyData;
    }
}
You extend OverlayItem to include all the necessary properties of an item to draw on the map. In the constructor you call the superclass constructor with the location, title, and a brief snippet, and you assign additional elements your subclass instance variables. In this case you add a BuoyData member, which is another bean with name, water temperature, wave height, and other properties.
After you prepare the individual item class, you need a class that extends ItemizedOverlay and uses a Collection of the items to display them on the map one by one. The following listing, the BuoyItemizedOverlay class, shows how this works.
Listing 11.9. The BuoyItemizedOverlay class

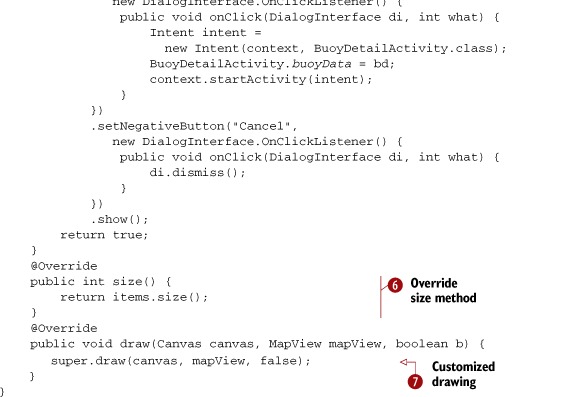
The BuoyItemizedOverlay class extends ItemizedOverlay ![]() and includes a Collection of BuoyOverlayItem elements
and includes a Collection of BuoyOverlayItem elements ![]() . In the constructor you pass the Drawable marker to the parent class
. In the constructor you pass the Drawable marker to the parent class ![]() . This marker draws on the screen in the overlay to represent each point on the map.
. This marker draws on the screen in the overlay to represent each point on the map.
ItemizedOverlay takes care of many of the details you’d otherwise have to implement yourself if you made your own Overlay with multiple points drawn on it. This includes drawing items, handling focus, and processing basic events. An ItemizedOverlay will invoke the onCreate method ![]() for every element in the Collection of items it holds. ItemizedOverlay also supports facilities such as onTap
for every element in the Collection of items it holds. ItemizedOverlay also supports facilities such as onTap ![]() , where you can react when the user selects a particular overlay item. In this code you inflate some views and display an
AlertDialog with information about the respective buoy when a BuoyOverlayItem is tapped. From the alert, the user can navigate to more detailed information if desired.
, where you can react when the user selects a particular overlay item. In this code you inflate some views and display an
AlertDialog with information about the respective buoy when a BuoyOverlayItem is tapped. From the alert, the user can navigate to more detailed information if desired.
The size method tells ItemizedOverlay how many elements it needs to process ![]() , and even though you aren’t doing anything special with it in this case, there are also methods such as onDraw
, and even though you aren’t doing anything special with it in this case, there are also methods such as onDraw ![]() that you can customize to draw something beyond the standard pushpin.
that you can customize to draw something beyond the standard pushpin.
When working with a MapView, you create the Overlay instances you need, then add them on top of the map. Wind and Waves uses a separate Thread to retrieve the buoy data in the MapViewActivity. You can view the data-retrieval code in the code download for this chapter. After downloading the buoy data, you send a Message to a Handler that adds the BuoyItemizedOverlay to the MapView. The following listing shows these details.
Listing 11.10. The Handler Wind and Waves uses to add overlays to the MapView
private final Handler handler = new Handler() {
    public void handleMessage(final Message msg) {
        progressDialog.dismiss();
        if (mapView.getOverlays().contains(buoyOverlay)) {
            mapView.getOverlays().remove(buoyOverlay);
        }
        buoyOverlay = new BuoyItemizedOverlay(buoys,
          defaultMarker,
        MapViewActivity.this);
        mapView.getOverlays().add(buoyOverlay);
    }
};
A MapView contains a Collection of Overlay elements. You use the remove method to clean up any existing BuoyOverlayItem class before you create and add a new one. This way you reset the data instead of adding more items on top of each other.
The built-in Overlay subclasses perfectly handle your requirements. The ItemizedOverlay and OverlayItem classes have allowed you to complete the Wind and Waves application without having to make your own Overlay subclasses directly. If you need to, Android lets you go to that level and implement your own draw, tap, touch, and other methods within your custom Overlay.
With this sample application now complete and providing you with buoy data using a MapActivity and MapView, we need to address one final maps-related concept that you haven’t yet encountered—geocoding.
11.4. Converting places and addresses with Geocoder
The Android documentation describes geocoding as converting a “street address or other description of a location” into latitude and longitude coordinates. Reverse geocoding is the opposite—converting latitude and longitude into an address. To accomplish this, the Geocoder class makes a network call to a web service.
You won’t use geocoding in Wind and Waves because the ocean doesn’t contain cities, addresses, and so on. Nevertheless, geocoding provides invaluable tools when working with coordinates and maps. To demonstrate the concepts surrounding geocoding, this listing includes a new single Activity application, GeocoderExample.
Listing 11.11. A Geocoder example

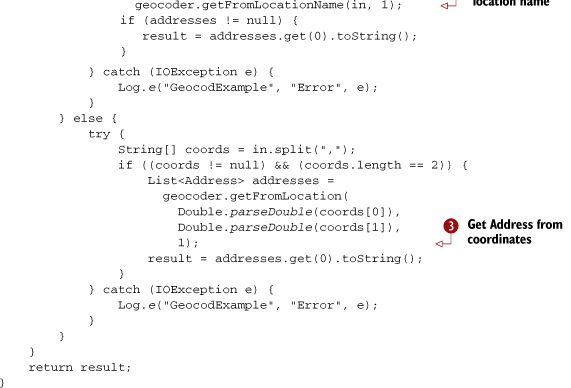
You create a Geocoder by constructing it with the Context of your application ![]() . You then use a Geocoder to either convert String instances that represent place names into Address objects with the getFromLocationName method
. You then use a Geocoder to either convert String instances that represent place names into Address objects with the getFromLocationName method ![]() or convert latitude and longitude coordinates into Address objects with the getFromLocation method
or convert latitude and longitude coordinates into Address objects with the getFromLocation method ![]() .
.
Figure 11.8 shows our GeocoderExample in use. In this case we’ve converted a String describing Wrigley Field in Chicago into an Address object containing latitude and longitude coordinates.
Figure 11.8. Geocoder example turning a String into an Address object that provides latitude and longitude coordinates

Geocoder provides many useful features. For instance, if you have data that includes address string portions, or only place descriptions, you can easily convert them into latitude and longitude numbers for use with GeoPoint and Overlay to place them on the user’s map.
Caution
As of this writing, the AVD for API level 8 (the OS 2.2 emulator) doesn’t properly support the geocoder. Attempts to look up an address will result in a “Service not Available” exception. Geocoding does work properly on OS 2.2 devices. To work around this problem during development, you can use API level 7 for building and testing your app on the emulator.
Geocoding concludes our look at the powerful location- and mapping-related components of the Android platform.
11.5. Summary
“Location, location, location,” as they say in real estate, could also be the mantra for the future of mobile computing. Android supports readily available location information and includes smart-mapping APIs and other location-related utilities.
In this chapter we explored the location and mapping capabilities of the Android platform. You built an application that acquired a LocationManager and Location-Provider, to which you attached several LocationListener instances. You did this so that you could keep your application informed about the current device location by using updates delivered to your listeners. Along with the LocationListener, we also briefly discussed several other ways to get location updates from the Android platform.
After we covered location-awareness basics, we showed you how to add information from a unique data source, the National Data Buoy Center, to provide a draggable, zoomable, interactive map. To build the map you used a MapActivity, along with MapView and MapController. These classes make it fairly easy to set up and display maps. Once you had your MapView in place, you created an ItemizedOverlay to include points of interest, using individual OverlayItem elements. From the individual points, in this case buoys, you linked into another Activity class to display more detailed information, thereby demonstrating how to go from the map to any other kind of Activity and back.
Our water-based sample application didn’t include the important mapping feature of converting from an address into a latitude and longitude and vice versa. To demonstrate this capability, we showed you how to build a separate small sample and discussed usage of the Geocoder class.
With our exploration of the mapping capabilities of Android complete, including a fully functional sample application that combines mapping with many other Android tenets we’ve previously explored, we’ll move into a new stage of the book. In the next few chapters, we’ll explore complete nontrivial applications that bring together intents, activities, data storage, networking, and more.