
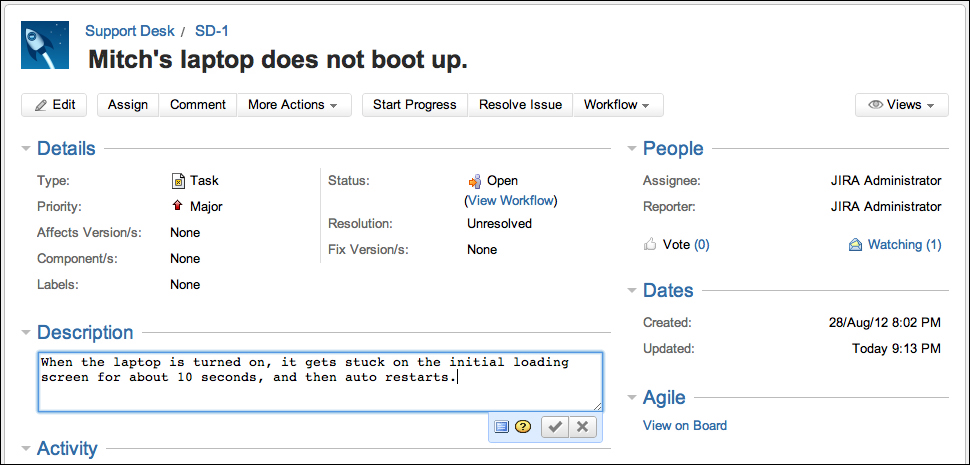
As we have seen, issues are the center of JIRA. So, it should be no surprise that JIRA 5 (and especially 5.2) comes with many new features and enhancements for working with issues. In the following sections, we will look at what you as a user can do with issues and some of the new features in JIRA 5:
- Create/edit changes
- In-line editing
- Sharing issues
- Remote issue link
When creating a new issue, you will need to fill in a number of fields. Some fields are mandatory, such as the issue's summary and type, while others are optional, such as the issue's description. We will discuss fields in more details in the next chapter.
There are several ways in which you can create a new issue in JIRA. You can choose any of the following options:
- Click on the Create Issue link at the top of the screen.
- Select the Create Issue option for the Issues drop-down menu.
- Press C on your keyboard:

This will bring up the Create Issue dialog box, as shown in the preceding screenshot. As you can see, there are quite a few fields, and the required fields will have a red asterisk mark next to their names. By default, all the fields will be displayed in the dialog box.
Since only a handful of them are really required, as a user, you can actually choose to "hide" some of the optional fields by performing the following steps:

There is a new Create another option beside the Create button in JIRA 5. By ticking this option and then clicking on the Create button, the Create Issue dialog box will stay on the screen and remember what you have previously typed in. In this way, you can avoid having to fill in the whole dialog box again and will only have to update some of the fields that actually are different, such as Summary. With this new feature, you can rapidly create many issues in a much shorter time frame.
In the earlier versions of JIRA, when you wanted to edit existing issues, you had to click on the Edit button, wait for the Issue Edit page to load, scroll down the page to find the fields you wanted to update, make the change, and finally, save the update. This works well, but if all you want to change is a single field, then all these steps may seem very inefficient.
Starting with JIRA 5.1, as a part of the effort to make JIRA easier to use and more efficient, a new feature called in-line editing has been introduced. With this new feature, you will be able to edit the fields while viewing the page, without ever needing to wait for extra page loads.
However, one thing to note is that the new in-line editing feature only works for fields that are present on the View Issue page. Generally, this means that the field needs to have a value set, but we will see in Chapter 5, Screen Management, how you can create different screens for viewing and editing issues. In these cases, you will need to use the classic edit option.
To edit an in-line issue, all you have to do is hover your mouse over the value for the field you want to update, wait for the Edit icon to show up, click the icon, and start editing:
You can delete an issue from JIRA. You might need to delete issues that have been created by mistake, or if the issue is redundant, although normally, it is better to close and mark the issue as a duplicate. We will discuss closing an issue in Chapter 6, Workflows and Business Processes.
Perform the following steps to delete an issue:
- Browse to the issue you wish to delete.
- Click on the Delete option from the More Actions menu. This will bring up the Delete Issue dialog box.
- Click on the Delete button to remove the issue permanently from JIRA.
Deleting an issue permanently removes it from JIRA, along with all of its data including attachments and comments.
Once an issue has been created, the issue is associated with a project. You can, however, move the issue around from one project to another. This may sound like a very simple process, but there are many steps involved and things to consider.
First, you need to decide on a new issue type for the issue if the current issue type does not exist in the new project. Second, you will need to map a status of the issue. Third, you will need to decide on the values for the fields that exist in the new project but do not exist in the current project; if those fields are set to mandatory in the new project. Sounds like a lot? Luckily, JIRA comes with a wizard that is designed to help you address all those items.
Perform the following steps to start moving an issue:
- Browse to the issue you wish to move.
- Click on the Move option in the More Actions menu bar. This will bring up the Move Issue wizard.
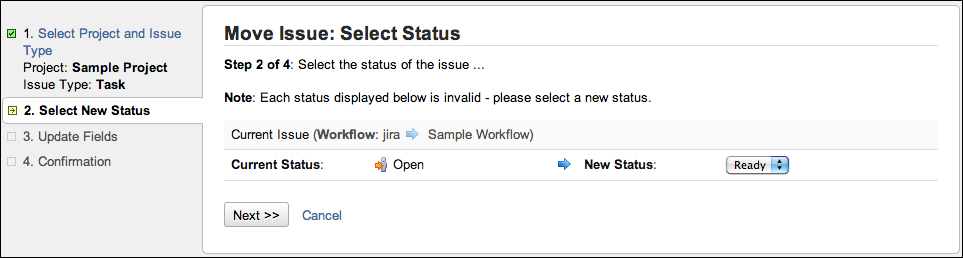
There are essentially four steps in the Move Issue wizard.
The first step is to select which project you wish to move the issue to. You will also need to select the new issue type. If the same issue type exists in the new project, it is recommended that you continue to use the same issue type:

The second step allows you to map the current issue to the new project's workflow. If the current and target projects use the same workflow, the wizard will skip this step:
The third step shows all the fields that exist in the new project but not the current project and requires a value. Again, if there are no missing fields, this step will be skipped:

The fourth and last step shows you the summary of the changes that will be applied, by moving the issue from project A to project B. This is your last chance to make sure that all the information is correct. If there are any mistakes, you can go back to step one and start over again. If you are happy with the changes, confirm the move by clicking on Move:

The most straightforward way to express your interest in a JIRA issue is to vote for it. For organizations or teams that manage their priorities based on popularity, voting is a great mechanism to collect this information.
An example of this is how Atlassian uses JIRA (for example, https://jira.atlassian.com/browse/JRA-9) as a way to let its customers choose and vote what features they want to be implemented or bugs to be fixed, by voting on issues based on their needs. This allows the product management and marketing team to have an insight on the market needs and how to best evolve their offerings.
One thing to keep in mind is when voting, you can only vote ONCE per issue. You can vote many times for many different issues, but for any given issue, you have only one vote. This helps prevent a single user from continuously voting on the same issue, which may blow the final statistics out of proportion. You can, however, unvote a vote you have already casted on an issue, and vote for it again later; if you choose to do this, it will still only count as one vote.
To vote for an issue, simply click on the thumbs-up icon next to Votes. When you have voted for an issue, the icon will appear as colored. When you have not yet voted for an issue, the icon will appear gray.
JIRA is able to send automated e-mail notifications about updates on issues to users. Normally, notification e-mails will only be sent out to the issue's reporter, assignee, and people who have registered interest in the issue. This behavior can be changed through Notification Schemes , which we will discuss in Chapter 7, E-mails and Notifications.
You can register your interest in the issue by choosing to watch the issue. By watching an issue, you become a watcher of an issue and will receive e-mail notifications on activity updates. Users watching the issue can also choose to stop watching, thus stop receiving e-mail updates from JIRA.
To watch an issue, simply click on the Watch link. When you are already watching the issue, the text will be Watching. If you click on the link again, you will stop watching the issue. In JIRA 5, you will automatically be set to watch issues you have created:

JIRA also shows how many people are actively watching the issue by displaying the total watchers next to the watch icon. You can click on the number or the Watchers link to bring up the Watchers page, which will show a list of users that are currently watching the issue.
Once an issue has been created, the user normally assigned to the issue will start working on it. However, this does not mean that the issue will stay with the same person forever.
There are many instances where an issue needs to be reassigned to a different user. For example, the current assignee may be unavailable, or if issues are created with no specific assignees. Another example will be that issues are assigned to different people at different stages of the workflow. For this reason, JIRA allows users to reassign issues once they have been created.
Perform the following steps to assign an issue:
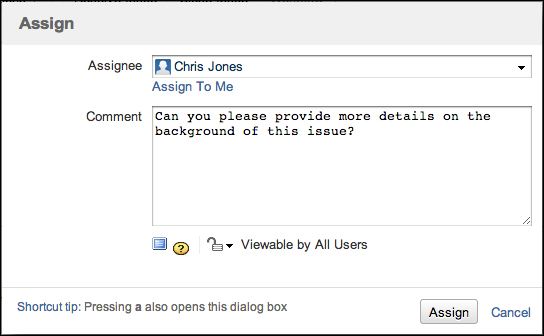
Once this issue has been reassigned, its assignee value will be updated to the new assignee. The new assignee will also receive a notification e-mail, alerting him/her that a new issue has been assigned and waiting to be worked upon. It is also possible to keep an issue unassigned. Unassigned issues do not have an assignee and will not show up on anyone's list of active issues.