
In the previous chapters, we have illustrated JIRA's flexibility by allowing you to add new custom fields to capture data, and created new workflows to model business processes, but it does not stop here. Another powerful feature of JIRA is its built-in plugin system.
Generally, an add-on (also known as a plugin) is a self-contained extension with a .jar or .obr file extension that can be installed into JIRA to add new functionalities or enhance existing features.
Atlassian hosts add-ons on its Atlassian Marketplace website. The Marketplace hosts a rich set of add-ons from both Atlassian and third-party vendors, for all Atlassian products such as JIRA, Confluence, and Stash. From here, you will be able to search useful add-ons, read reviews on add-ons you are interested in, and download/buy add-ons directly.
Add-ons hosted on the Marketplace come in several flavors:
- Free/open source: These are usually created and maintained by the community, are free to use, and are usually unsupported and "use at your own risk".
- Paid via vendor: These are commercial add-ons with payments and licenses processed by the vendor.
- Paid via Atlassian: These are commercial add-ons with payments and licenses processed by Atlassian (via Marketplace). You can purchase and obtain the license directly from the Marketplace within JIRA.
You can access the Atlassian Marketplace site at https://marketplace.atlassian.com.
The Universal Plugin Manager (UPM) for short, is where you can find and install new add-ons and manage installed add-ons directly from inside JIRA. The UPM has two main interfaces:
The find new add-ons interface allows you to search add-ons that are available on the Marketplace directly inside JIRA. You can filter your searches with criteria such as category and licensing requirement.
Once you have found the add-on you want, you can install it directly by clicking on the Install button (if it is free), or Buy/Evaluate the add-on (if it is commercial):

The manage add-ons interface allows you to manage all installed add-ons in JIRA. The page is divided into three major sections:
- Available Updates: The UPM will automatically detect the add-ons that are currently installed and search for available updates that are compatible with your JIRA version. The results will be listed under this section.
- User-installed Add-ons: These add-ons are installed by you and other administrators. You will usually find and install them from the Marketplace.
- System Add-ons: These are the important add-ons that are bundled with JIRA and cannot be uninstalled. You can, however, disable them, but doing so is not recommended.
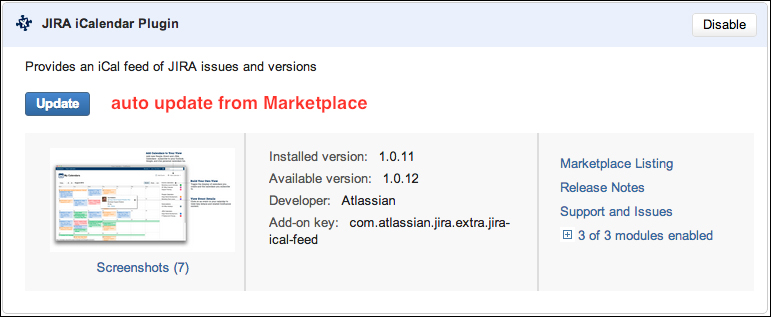
The following screenshot shows that we have one add-on, JIRA iCalendar Plugin, which can be updated, and we currently have six user-installed add-ons:

Installing a new add-on from the UPM is usually just a matter of clicks. There are two options when installing add-ons. The first option is to install it via the Marketplace; this will require you to have a working connection between your JIRA and the outside Internet:
- Browse to the UPM.
- Select the Find New Add-ons tab.
- Search for the add-on you want.
- Click on on Install, Buy Now, or Free Trial, depending upon the add-on's license requirement.
The second option to install an add-on is to manually obtain the add-on file yourself, and then upload/install it via the UPM. This method is suitable when your JIRA does not have a working connection with the Internet. Some add-ons may also require this manual installation:
- Browse to the UPM.
- Select the Manage Add-ons tab.
- Click on the Upload Add-on link.
- Select the add-on file by clicking on Choose File.
- Click on the Upload button.
Once the add-on is installed, the UPM will display additional information on the add-on. In the following screenshot, we have just installed the Atlassian GreenHopper add-on:

Simple add-ons that add additional custom field types and workflow post functions can be used straight out of the box after installation. Some other more complex add-ons would require additional configuration, such as licensing information and custom field mappings. Each add-on will have different ways to set the configuration options, so you will need to consult the add-on's usage instructions. Generally, if an add-on requires configuration, there will be a Configure button available.
Almost all add-ons can be enabled and disabled. This is useful when you troubleshoot problems, and you can just disable the add-on or specific modules within it, which you suspect to be the cause of the problem rather than uninstall it completely.
Perform the following steps to enable or disable an add-on in a simple and straightforward manner:
- Locate the add-on you with to enable/disable.
- Click on the Enable/Disable button.
As you have seen, the UPM automatically detects the available updates for your installed add-ons. All you have to do is to click on on the add-on you wish to update, and then click on on the Update button:
You can also update your add-ons by manually uploading and installing them. You will also need to read the vendor's documentation on any special requirements for the update.
Uninstalling an existing plugin is a simple process:
- Browse to the Manage Add-ons page.
- Click on the add-on to remove.
- Click on the Uninstall button for the add-on.
- Click on Continue on the confirmation dialog box.
Before you uninstall an add-on, you need to first make sure that the add-on does not contain critical functionalities that are currently being used by JIRA. For example, if the add-on has a custom field type that is being used by a workflow condition, uninstalling the add-on may cause the condition to fail. It is best to test this out in a test environment before uninstalling from production, or disable the add-on first so you can recover from problems quickly by re-enabling the add-on again.
The Universal Plugin Manager keeps track of all the changes that have been made to add-ons in an audit log. This will include activities such as installing new add-ons, upgrading the existing add-ons, enabling/disabling of add-ons, and more. The audit log will also keep a record of when each of the activities was performed, and which user performed them. Perform the following steps to view the audit log:
- Browse to Universal Plugin Manager.
- Select the Manage Add-ons tab.
- Click on the Audit Log link at the bottom of the page:

JIRA will automatically purge audit log entries after a period of time. By default, entries that are older than 90 days will be removed from the system. You can modify the period by clicking the Configure purge policy link at the top and setting a new period.
The Universal Plugin Manager allows you to disable all user-installed add-ons with the Safe Mode option. This is helpful when troubleshooting problems with JIRA, and you can very quickly determine if the problem is caused by a misconfiguration or by an add-on that has been installed recently. Perform the following steps to run your JIRA in safe mode: