
Screen schemes group screens together and create associations with issue operations. The next piece of the puzzle is to tell JIRA to use our screen schemes when creating, viewing, and editing specific types of issues.
We do not directly associate screen schemes to JIRA. The reason for this is JIRA has the flexibility to allow you to define this on a per-issue type level. What this means is, instead of forcing all the issue types in a given project to use the same screen scheme, you can actually use different screen schemes for different issue types. This extremely flexible and powerful feature is provided through the issue type screen scheme.
Just like screens and screen schemes, you need to be a JIRA administrator to create and manage issue type screen schemes. Perform the following steps to manage issue type screen schemes:
- Log in to JIRA as a JIRA administrator.
- Click on Administration at the top menu bar.
- Select Issue Type Screen Schemes in the left panel to bring up the View Issue Type Screen Schemes page:
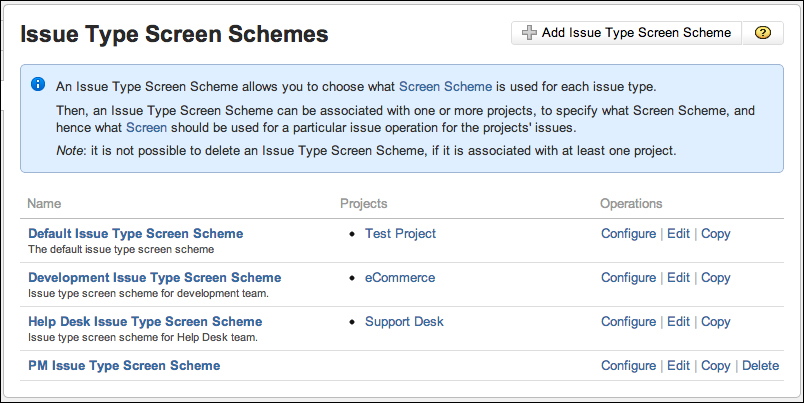
You would have noticed by now that for any project, all of our issue types have the same screen layout. All projects, by default, use the default issue type screen scheme. But just like anything else in JIRA, you can create your own schemes and apply them to your projects.
Perform the following steps to create a new issue type screen scheme:
- Browse to the View Issue Type Screen Schemes page.
- Click on the Add Issue Type Screen Scheme button.
- Provide a meaningful name for the new issue type screen scheme.
- Provide an optional short description for the issue type screen scheme.
- Select a default screen scheme from the list of screen schemes.
- Click on the Add button to create the issue type screen scheme.
That's right, you guessed it! The new issue type screen scheme is "inactive" at this stage. It will only become active once it is applied to one or more projects, which we will look at shortly.
You can make updates to an existing issue type screen scheme's name and descriptions. To change its screen scheme/issue type association details, you need to configure the issue type screen scheme, which will be covered in later sections. Perform the following steps to update an issue type screen scheme:
- Browse to the View Issue Type Screen Schemes page.
- Click on the Edit link for the issue type screen scheme you wish to edit. This will take you to the Edit Issue Type Screen Scheme page.
- Update the name and description with new values.
- Click on the Update button to apply the changes.
Just like all other schemes in JIRA, you cannot delete issue type screen schemes that are in use. You will have to make sure that no project uses it before JIRA allows you to delete the scheme:
- Browse to the View Issue Type Screen Schemes page.
- Click on the Delete link for the issue type screen scheme you wish to delete. This will take you to the Delete Issue Type Screen Scheme page.
- Click on the Delete button to remove the issue type screen scheme.
Issue type screen scheme cloning is also available in JIRA. You can easily make copies of the existing issue type screen schemes. One very useful application of this feature enables to you make backup copies before experimenting with new configurations. Note that copying the issue type screen scheme does not back up the screen schemes and screens that it contains.
Perform the following steps to copy an existing issue type screen scheme:
- Browse to the View Issue Type Screen Schemes page.
- Click on the Copy link for the issue type screen scheme you wish to copy. This will take you to the Copy Issue Type Screen Scheme page.
- Provide a new name and description for the issue type screen scheme.
- Click on the Copy button to copy the selected scheme.
Just like the newly created issue type screen schemes are inactive by default, cloned schemes only become active after being associated with projects.
By creating new issue type screen schemes, you create a mapping where you can establish associations between screen schemes and issue types. These associations are what tie the projects and issues types to the individual screens.
Each issue type screen scheme needs to be configured separately, and the associations created are specific to the configured scheme:
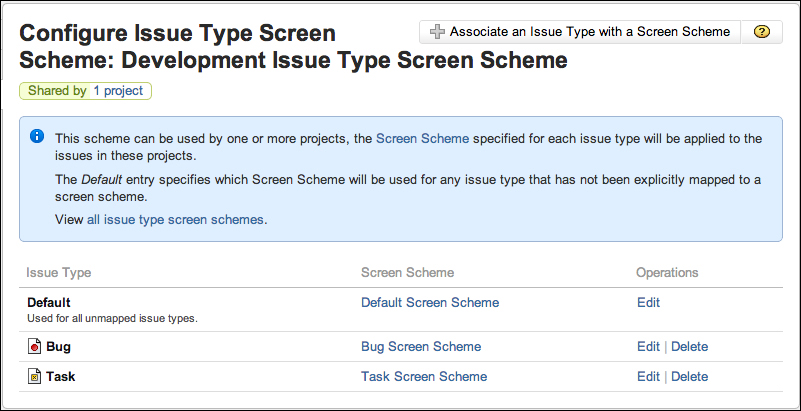
JIRA determines which screen scheme to use for an issue type by establishing an association between screen schemes and issue types. Each issue type can have only one screen scheme associated with it. Each screen scheme however, can be associated with more than one issue types. Perform the following steps to add a new association:
- Browse to the Configure Issue Type Screen Scheme page for the issue type screen scheme you wish to configure.
- Click on the Associate an Issue Type with a Screen Scheme button.
- Select the issue type to add an association for.
- Select the screen scheme to be associated with the issue type.
- Click on the Add button to create the association:
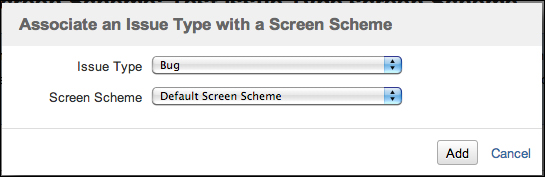
Since in an issue type screen scheme, each issue type can only be associated with one screen scheme, JIRA will not display the associated issue types in the available options.
You can update the existing associations such as the Default association, which is created automatically when you create a new issue type screen scheme:
- Browse to the Configure Screen Scheme page for the screen scheme to be configured.
- Click on the Edit link for the association you wish to edit. This will take you to the Edit Screen Scheme Entry page.
- Select a new screen scheme to associate with the issue type.
- Click the Update button to apply the change.
You can also delete the existing associations for issue types. This means that you cannot delete the Default association, since it is used as a catch for all the issue types that do not have an explicitly defined association. This is important because while you may have created associations for all the issue types right now, you might add new issue types down the track and forget to create associations for them:
- Browse to the Configure Issue Type Screen Scheme page for the issue type screen scheme to be configured.
- Click on the Delete link for the association you wish to delete.
Just like associations in screen schemes, you will not be taken to a confirmation page and the association will be deleted immediately.
Perform the following steps in order to activate your new issue type screen scheme, which will display your new screens for the different issue operations:
- Log in to JIRA as a JIRA administrator.
- Click on Administration in the top menu bar.
- Select the project you wish to associate the field configuration scheme with. This will bring up the Project Administration page.
- Click on the Screens tab in the left panel.
- Click on the Actions drop-down menu and select Use a different scheme:

- Select the issue type screen scheme from the Scheme select list.
- Click on the Associate button.
Compared to previous versions of JIRA, the project's screen page in JIRA 5 not only shows you which issue type screen scheme is being used, but it also lists its content, and you can drill down into the screen schemes to see what screens are being used.
So, unlike the old days where you had to go back and forth to see what screen and screen scheme is being used for each issue type, you get all this information on this one convenient page.