Most projects involve more than one person working on a project at any given time. It's common in design for many people to work together to meet deadlines and crank out a set of construction documents. Keeping with the theme of an integrated single-file building model, Revit allows for this workflow without breaking apart the model. A complex model can be edited by many people at once using a feature called worksharing. In this chapter, we'll focus on enabling the worksharing feature of Revit.
In this chapter, you'll learn to:
Worksharing in Revit refers to the use of worksets to divide up the model for the purpose of sharing data between multiple people. A workset is a collection of building elements and components (floors, roofs, walls, windows, and so on) that can be used to manage project workflow and responsibilities by separating these various building components into subsets that allow control over visibility and element ownership. By default, worksharing is not enabled when you start a project in Revit, because the software assumes you are working in a single-user environment until you tell it otherwise.
You share your work by saving a central file to a shared network location. This central file becomes the repository where all the individual work on the project is collected and permissions are managed.
Once the central file has been established, each team member then makes a local copy of it and works solely in that local copy. All work is done directly in these copied—but still associated—local files. This enables all users to open their local files simultaneously and work in them (see Figure 24.1).

The elements in each separate file are tied to an ownership rule linked to the central file, making it impossible to edit an element in your local file if that same element is owned by someone else in another local file. Remember, Revit is a database. In effect, you're obtaining permission to edit one or more elements from the central database. Once you have permission to modify an element, no one else can make changes to that element until it is reconciled with the central file—in other words, "checked back in." This occurs when you use the Synchronize with Central command (hereafter referred to as STC) to copy your work back to the network. If one user has ownership of an element, no other user can edit that element until its permissions, and any changes to it, are reconciled with the central file.
Worksets allow you to group many elements into virtual collections of objects for the purpose of managing visibility and file performance. To that end, there are a number of benefits to enabling worksets beyond allowing multiple team members to work within the same file:
Using worksets, you can turn visibility off and on for elements that aren't being worked on or that are not needed for the current tasks.
Revit allows you to close a particular workset globally across all views and also remove it from active memory, thus improving performance. Therefore, closing worksets is different than turning them on or off in only one view,
You can quickly request and obtain permission to work on groups of elements belonging to someone else.
When you enable worksharing, a new tab appears in the Visibility/Graphic Overrides dialog box for the worksets (see Figure 24.2). You can turn any workset on or off in any view using this tab. Additionally, you can make those settings part of any of your view templates.

Revit's worksharing features are designed to accommodate any division of labor you see fit. There are no inherent restrictions on how you use worksharing to divide up a model. For example, you can break up a model and have one group work on the shell and another work on the interior core of a building. You can turn worksharing on at any stage of the project, and you can create or remove individual worksets during the project cycle.
Worksharing is found on the Collaborate tab of the Revit UI.

Start worksharing by clicking the Worksets button on the Collaborate panel. It will then be the only active button on the panel.

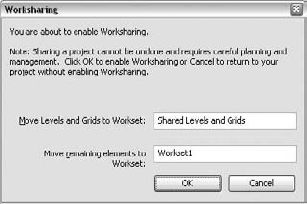
This action opens a dialog box telling you that you're about to enable worksharing for your project and that once it's enabled it can't be undone (Figure 24.3). After confirming that you do want to proceed, Revit will automatically create two worksets: Shared Levels and Grids, which contains all the levels and gridlines from the project, and Workset1, which contains everything else in the model.
In addition to the two worksets created automatically when you initialize worksharing, Revit maintains three other types of worksets in a project:
- View worksets
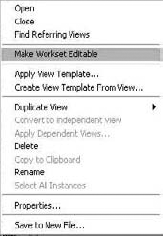
Each view in a project has a dedicated view workset. It contains the view properties and any view-specific elements (text, dimensions, tags, and so on). View-specific elements cannot be moved to another workset. You can take ownership of any view in Revit by simply right-clicking it in the Project Browser and choosing Make Workset Editable (see Figure 24.4). This will give you ownership of the view workset and all of the view-specific annotations, allowing you to easily and quickly make modifications to any of the 2D content within the view. This is a handy feature during the construction document phase when much of the work is segregated, as it allows users to view worksets for dimensioning and annotations.
- Family worksets
For each family loaded in the project, a workset is automatically created. When editing properties of a family, you will take ownership of that family unless someone else already owns it. You can add families to each of the views without having ownership over view worksets, but you cannot make changes to the families or their properties without having permission over the families themselves.
- Project standards worksets
This workset is dedicated to all the project settings, such as materials, line styles, tags, and dimensions. Any time you edit a project-wide setting, you must take ownership of a workset for that setting. However, you can always add new information, materials, or line styles to a project without having to own a workset. You only need to take ownership of a workset to edit existing settings or elements.
Once you've activated the worksets, you'll see the dialog box shown in Figure 24.5. The Worksets dialog box lets you add and remove worksets from the project. When a new workset is created, it does not contain any model elements or components; it is a blank container that you can then begin to fill.
Also note that at the bottom of this dialog box you have the option to turn on visibility for the automatically created worksets we discussed earlier. By default, they are not activated. To activate them, simply check the box for the workset desired. You can see in Figure 24.6 that enabling any of these check boxes adds a considerable number of elements to the view window.
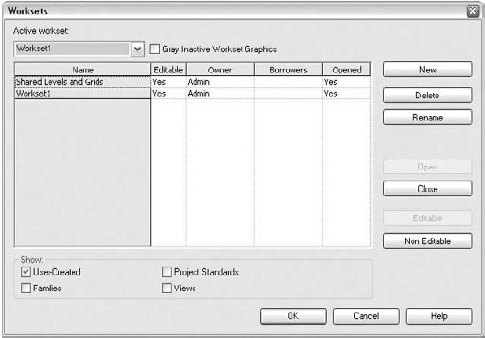

When you activate a workset, you become the owner of that workset and all the elements in it. This ownership is what the Yes value in the Editable column refers to; if you are the owner of a workset, the value in the Editable column will be Yes, but if you are not the owner, the value will be No.
It's important that you think of your project holistically when dividing it into worksets. Technically speaking, you don't need any more than the initial default worksets because Revit manages ownership of elements on a per-element basis and relinquishes elements automatically when you save your changes to the central file. However, you might want to divide up the model into worksets for some of the reasons we described earlier. Some good examples of typical worksets are Shell, Core, Exterior Skin, First Floor Interior Partitions, Second Floor Interior Partitions, Roof, and so on. You may also want to create another workset named Entourage for rendered-only elements (not for documentation).
Divide your project into worksets that relate to the roles and responsibilities of people working on the project. By default, you don't need more than two to three worksets per person on a project. When making new worksets, remember the Ludwig Mies van der Rohe dictum, "Less is more."
For our Foundations project, we have divided the model into four worksets, shown in Figure 24.7: Interiors, Shared Levels and Grids, Shell and Core, and Site.
- Interiors
All of the interior walls, furniture, and other items are managed with this workset.
- Shared Levels and Grids
This workset contains the level and grid information from the model, as was originally established when worksharing was enabled.
- Shell and Core
All the exterior skin elements of the building as well as the elevator, stair, and toilet cores that are grouped in any typical office building are in this workset.
- Site
The topography (toposurface) and any site-specific elements in the project go into this workset.

Notice that Workset1 has been renamed. That title is not descriptive enough to be of ongoing use, so it can be modified once all the model elements have been moved to relevant worksets. The worksets we've set up demonstrate how a typical breakdown might occur in a project of this size, but it's by no means limited to this scheme. Depending on how you structure work in your office, the worksets might be quite different.
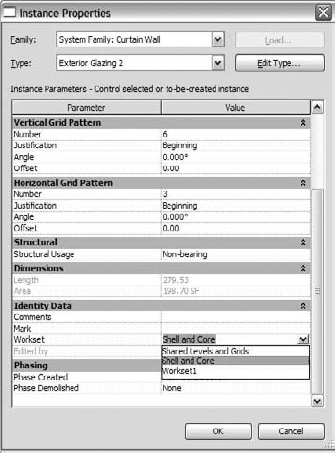
Once you are in a workset environment, you can see or change an object's workset by accessing its element properties. At the bottom of the Element Properties dialog box, you can see which workset an object or group of objects belongs to, and you can change what workset the element belongs to (see Figure 24.8). Note that you can move elements to other worksets only if you own the elements. You do not need to own the entire workset to do this—just the individual elements.
Additionally, you can tell what workset an object belongs to by hovering your cursor over the object and waiting for the tooltip to appear. This tooltip will give you a host of information about the object in question. In our example, the workset is Shell and Core, the element is also part of the Walls category, the name of the family is Basic Wall, and the family type is A3 - 4¾″:

Once the worksets are created, there are some simple steps for moving elements quickly to other worksets. As mentioned, the easiest way to move the bulk of the objects is to not move them at all but simply rename Workset1. After that, it is easiest to move elements in a subtractive method from a 3D view. The following exercise will walk you through moving elements to their new worksets using a subtractive method to locate model geometry. Note that this should be done while one person is still the solitary owner of all the worksets.
Open the default 3D view ({3D}) so that you can see all of your model elements within the project.
Open the Visibility/Graphic Overrides dialog box, turn off the Site workset, and click OK. Since nothing is in the Site workset, the view should still look the same after you do this.
Now, in the 3D view select a comfortable number of site elements and click the Properties button. (Comfortable means you don't have to try to select them all at once.) In the first image in Figure 24.9, the toposurface and some trees have been selected and are highlighted.
In the Element Properties dialog box, select Site for the Workset value and click OK. All of the elements you selected will disappear. Not to worry: remember, you turned the Site workset off using the Visibility/Graphic Overrides.
Using the same technique, you can move the remainder of the site elements to the Site workset. The same procedure is repeated in order to move the interior walls to the Interior workset.

At any point in this process, you can check your work by opening the Workset tab in the Visibility/Graphic Overrides dialog box and clearing all of the boxes but one to see what is in each workset. Figure 24.10 shows the Interiors workset with all of the interior elements. As you can see, this is a great way to manage visibility without using the object categories.

With worksharing there is always one central file that spawns local files and manages element ownerships. This is the file that collects all the work being done by your team members and allows the team to get regular updates of new work saved to the central file. Once the worksets are initialized and the model is divided into various worksets, you will need to complete a few more steps before the team can jump into the model and begin working in a multiuser environment.
To use Revit in a workset environment, start by doing something any IT manager would yell at you for doing: make a local copy of the central file and work directly off your C: drive. Although this approach is a bad idea for most work in an office environment, for the Revit database there are several good things about it:
It allows more than one user to make changes to the central file by editing local files and synchronizing those changes with the central file.
Your local copy will be more responsive than a networked local file because your access speed to your hard drive is much faster than it is across most networks.
Should anything bad happen to your network or your central file, you will have an up-to-date backup to which you can easily apply the Save As command and make a new central file.
Now that you've turned on worksharing, you need to set up the central file to be used by more than one person. To do this, first you create a central file located on your network; then you create the local files. To create the central file, choose the Application Menu

The reason for the new name is twofold. First, it gives you a backup of your original, pre-workset file. Backups never hurt. Second, Revit sometimes does not like to have a new file saved over an active file or a file of the same name. It can cause file corruption.
Now that the central file has been created, you need to create the local files that you will work from.
Make a new, local copy of the central file by dragging the file you just created to your desktop or another location on your hard drive. Be careful not to move the file; you just want to make a copy of it.
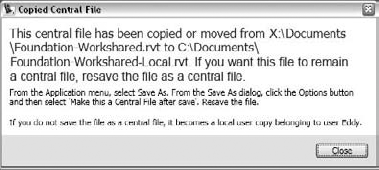
Now, open this new, local file. The first time any local file is initialized, you will receive the warning message shown in Figure 24.12. All this means is that you've made a local file and you will be the owner of the local copy. If you don't see this message, check to make sure you're opening the correct file.
Once you click OK, you are set and ready to begin working in a worksharing environment.
Now that you're in a worksharing environment, every element added to the file belongs to a workset. Try to keep model elements in a workset other than Shared Levels and Grids because these worksets may be locked down at some point to avoid accidental movement of key datums. To make sure you're placing elements in the proper workset, check the Collaborate tab to see what the active workset is. All newly created elements will be assigned to the workset shown in this box. Remember, you don't have to be the owner of this workset in order for to be able to add new elements to it, nor does the workset need to be editable.

A helpful toggle on the Collaborate tab is the Gray Inactive Workset button. It grays out all elements that aren't in the active workset, helping you identify which elements in the workset are active. This is a temporary view state and will not affect any print output.
Once you begin working in a worksharing environment, you need to know how to save your work and be able to share it with others. There are three ways to save your work when you're using a workshared file:
- Save

The Save tool saves the work you've done to your local copy only; the work isn't shared or saved back to the central file. This is useful when you're in the design phase and trying out different designs, or if you're not ready to share your work with others but you definitely want to save the work you've done.
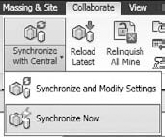
- Synchronize with Central

If you want faster access to synchronizing, a Synchronize with Central button is available on the Quick Access toolbar.
- Save to Central
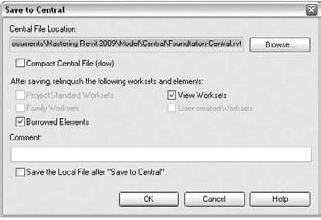
The Save to Central button is on the Collaborate tab. Use this to publish your work into the central file. When you do so, your work appears in the central file and becomes available to the entire team. Using Save to Central also acquires the changes that others have made (and likewise saved to the central file) and loads them into your local model. Using the menu option for STC is a good way to save yet maintain permission over the elements you are creating. Choosing this option will open the dialog box shown in Figure 24.13, which allows you to customize how you save to the central file. You can choose to relinquish some permissions or none of them, and you can choose to save a local copy at this time (or not). You can also add comments about this particular version you are saving. The comments are available in the History dialog box (covered later in this book).
- Synchronize with Central Synchronize Now

This option, found under the Synchronize with Central button, will synchronize your changes and download other people's changes without your needing to interact with the dialog box.
Revit will remind you regularly to save your work. In a worksharing environment, you will see a dialog box reminding you to save locally, and another one reminding you to synchronize the central file. You can dismiss these reminders from time to time, but remember that it's always a good time to save (and not lose) your work. It's also important to remember that although Revit provides automatic reminders to save your work, it will not autosave.
Each of the dialog boxes comes with three options: you can save/synchronize the project; save/synchronize the project and set reminder intervals (choosing this will bring up the Options dialog box); or you specify that you do not want to save/synchronize or set reminder intervals (this last option dismisses the reminders). However, if you want this dialog box to go away and be reminded again at the interval you've requested, just hit the cancel button.

The reminder time shown in the dialog box can be modified across the application using General

While you are working in a worksharing environment, it might become necessary to see if you have ownership of an element. To do so, select the element. If you own it, it will be highlighted in purple and can be readily moved or modified. If you do not own it, it will still be highlighted purple, but you will also see an icon resembling three stacked blocks in blue. This indicates that you do not currently have ownership of that element.

Inevitably, with any team of people, someone is bound to make a mistake somewhere in the process. It happens; it's just human nature. The important thing is knowing how to recover when those accidents happen. On one project, someone new to our team kept accidentally deleting the west wall of the project while deep into construction documentation. Since Revit is a database and everything is linked to everything else, every time this happened, not only were the plans affected, but we lost the west elevation, wall sections, the door and window details in those sections, and so on. You get the idea. Once the west wall was deleted, the user issued the Synchronize with Central command, thereby changing the central file. Fortunately, we caught the mistake in time and thus did not have to resort to a backup from the previous night and lose a day's worth of work. Because each local copy was a fully functional copy of the model, all we needed to do was find the latest local version with the wall in it, click the Application button, and choose Save As
You can obtain ownership of the element in a few ways:
If you edit or move an element, Revit will automatically grant you permission to own it provided no one else currently owns it or the workset it resides within.
If you can click the stacked block icon, and if the element is available, Revit will grant you permission to edit or change it.
You can right-click the element and choose Make Elements Editable from the context menu (see Figure 24.14).
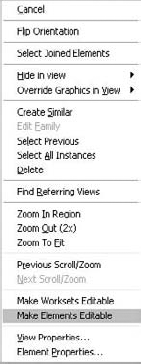
Note that in this context menu, you also have the option to make worksets editable and take permission of the entire workset the object is assigned to.
Borrowing is a critical technological concept in Revit. It allows users to fluidly transfer permission of objects without having to constantly save all their work to the central file and relinquish all worksets. By borrowing elements, team members can take ownership of some of the elements within a particular workset that belongs to someone else. This is typically used to modify only one or a few elements in a given workset without taking ownership of the entire workset. This is also valuable if you need to edit elements in a workset and someone else already owns it.
The key idea here is that you can borrow elements individually rather than by workset. If you need to work on an element that belongs to someone else, you'll be informed of that and given the option to send a notification asking to borrow it. The owner of the element can then grant permission for you to take ownership. This is referred to as relinquishing permission.
Let's look at this workflow in more detail.
Say you are happily working away on your model and realize that someone else is the owner of an element you need to modify. Should that occur, you will be presented with the dialog box shown in Figure 24.15. This will occur every time you are working in a model in which worksharing is enabled and you are attempting to edit an element that is already owned by someone else on the project.
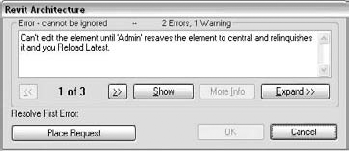
You can click Cancel, which will undo any edits you have made to that element, or you can click Place Request to ask the other user to relinquish permission over the element in question. If you opt to place a request, you will see this dialog box:

It is important to note that the other user does not receive an explicit notification that you have placed the request. To make sure your colleague knows of your request, you'll need to call or instant message (IM) that person, and get them to grant the permissions. (You'll learn how to do this in just a bit.) If owning this element is critical to the task at hand, keep in mind that you will not be able to perform any more work in relation to that element until that other user grants you permission to borrow it. Once the other user has agreed to relinquish ownership, click the Check Now button to see if you do in fact own the element. Or, if you want to just keep working, click the Continue button. This will undo your last command and return you to the view to continue your work.
Once you've received notice from the other user that your request has been granted, click Check Now and you will receive the message shown here:

Clicking OK will apply your edits and you will then be the borrower of that element.
You can view the Worksets dialog box to see who owns which worksets and who is borrowing from a workset at any time, as shown in Figure 24.16.

Clicking this button gives you the dialog box shown in Figure 24.17.

From here, you have a few options:
- Grant
This gives your teammate permission for the requested element.
- Deny/Retract
This denies permission to your teammate (or takes it away).
- Show
This shows you exactly which element or elements have been requested, which help you make an informed decision.
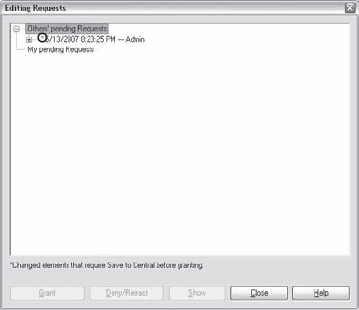
Once you are ready to grant permission, one of two things will happen. If you haven't made any changes that need to be saved, you can simply grant the permission and notify your teammate that you have done so, and then both of you can continue to work. If you have been editing the requested element, you'll need to save your changes to the central file before anything else can happen. Changes of this nature are specially flagged in the Editing Requests dialog box with an asterisk before the request. This indicates that the element has been modified and a Synchronize with Central command must be issued before permission can be granted (see Figure 24.18).
Trying to grant permission at this point will give you the dialog shown here:

To remedy this issue, close the dialog and perform a Synchronize with Central using one of the methods we discussed earlier. Keep in mind that if you choose Synchronize with Central from the Collaboration tab and uncheck the boxes for relinquishing permission, you will need to come back to the Editing Requests dialog box to grant permission for this element. Once you have saved to the central file and notified the other user, he or she can then click the Check Now button to continue to work.
The user who is requesting permission of the element will see this dialog box after clicking Check Now:

This means that the object the other user was trying to use has been edited. He or she has to choose Reload Latest or Synchronize with Central from the Collaborate tab and reload the most current copy of that object before it can be edited. Unfortunately, any modifications to this element will be lost because the element will be changed in the central file.
Depending on your role on a project, your schedule, or those annoying urges to eat and sleep, from time to time you might leave your desk and want to close Revit. Revit helps you do this by providing some directions for saving your work. It offers two options:
- Relinquish Elements and Worksets
This is the default option. It will do exactly what it says: synchronize your work with the central file and relinquish all of your permissions.
- Keep Ownership of Elements and Worksets
This button gives you the option to save only locally and keep ownership of the elements you've checked out. Be careful when using this option, because no one on your project team will be able to gain permission for or edit those elements while you are away.
Getting Permission when Someone is Away
Inevitably it happens. Someone leaves their desk for a meeting or goes home early (or just closes Revit) without relinquishing permission to their elements or worksets. Now you're stuck, unable to make the changes you need to make. There is a workaround for this dilemma. However, be warned that using it will cause the other person to lose any and all work since their most recent synchronization. If they did a Synchronize with Central and simply chose to keep ownership of their elements, no work will be lost. If they did not, the remaining work will need to be redone.
Should your needs outweigh the risk of data loss, follow these steps:
Open a new session of Revit. (You can keep your current session open if you prefer.)
Select Application
Change the name listed in the Username field from your username to that of the person whose work you are trying to save.
Either open the central file where the elements are locked or create a local copy while the temporary username is active.
Now you can open and Save to Central, and all the other person's elements will be available to you.
When you've finished, remember to change the temporary user name back to the appropriate name.
As a side note, doing this with a username that is not in use by any team members (for example, "Project Admin") is a good way to lock down gridlines or other elements you don't want anyone to accidentally edit by making the Levels and Grids workset editable and then closing the file without relinquishing the workset.
- Set up a project with worksets.
Knowing how to activate worksharing and set up the project file for more than one person at a time is critical in any office environment.
- Master It
How do you work in a single Revit file on a project team with more than one member in the file at a time?
- Understand worksharing basics.
Once you've enabled worksharing, you'll need to understand the dynamics of central and local files to fully leverage working in a worksharing environment.
- Master It
Once you have enabled worksets to allow for multiple users, what's the best way to implement and use the file?
- Manage workflow with worksets.
Saving to and loading from the central file allow you to view other team members' work and allows them to see what changes to the project you have added.
- Master It
How can you translate the changes you've made in your local file to the central file on the network? How do you download changes from other team members to your local file?
- Understand element ownership in worksets.
Editing elements in a central file means you have sole ownership over further changes to those elements. Understanding the permissions will be critical to working in a team.
- Master It
How do you edit an element in the model if someone has already taken permission of it in a worksharing environment?