
Using Multiple Desktops with Spaces
Spaces is an organizational tool that lets you create multiple spaces for certain tasks. Spaces are essentially additional desktops. You could have a space for surfing the web and checking e-mail, another space to watch your stocks, a third space to work on a spreadsheet, and so on.
Adding and removing spaces
You can have as many as 16 spaces at one time. There’s nothing magical about adding or removing spaces:
1. Launch Mission Control.
2. Move your mouse pointer to the upper-right corner of the screen and a plus sign (+) appears, as shown in Figure 1.16.

1.16 Click the plus sign (+) to add new spaces.
3. Click the plus sign (+) to add a new space to the top of the Mission Control window.
You can remove spaces just as easily as you add them:
1. Launch Mission Control.
2. Move your mouse pointer to the upper-left corner of the space you want to remove and a small circle containing an X appears, as shown in Figure 1.17.
3. Click the X to remove the space.
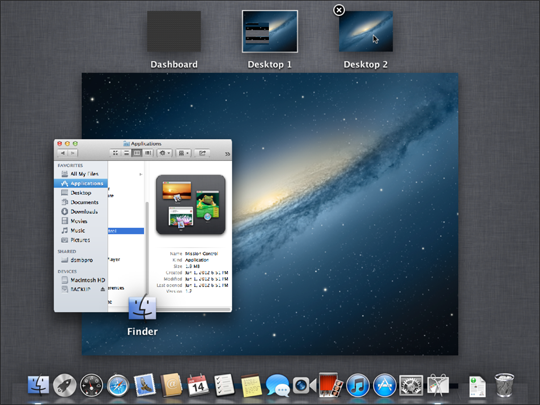
1.17 To remove a space, click the X.
Moving between spaces
There are a few ways to jump from space to space:
![]() Launch Mission Control and click the space to which you want to move.
Launch Mission Control and click the space to which you want to move.
![]() Press Control and the corresponding number key of the space to which you want to jump. For example, if you want to move to the fourth space, press Control+4.
Press Control and the corresponding number key of the space to which you want to jump. For example, if you want to move to the fourth space, press Control+4.
![]() Press Control and the right or left arrow key to scroll from space to space.
Press Control and the right or left arrow key to scroll from space to space.
![]() The coolest way is to swipe three fingers to the left or the right to scroll through your spaces.
The coolest way is to swipe three fingers to the left or the right to scroll through your spaces.
Moving windows between spaces
You can easily move a window from one space to another:
![]() Launch Mission Control from within the space that contains the window to which you want to move. Drag and drop the window into the space you want it.
Launch Mission Control from within the space that contains the window to which you want to move. Drag and drop the window into the space you want it.
![]() Place the mouse pointer over the window you want to move. Press Control and the corresponding number key of the space to which you want to move the window, or press the right or left arrow key to find the desired space. Release the keys to drop the window into its new space.
Place the mouse pointer over the window you want to move. Press Control and the corresponding number key of the space to which you want to move the window, or press the right or left arrow key to find the desired space. Release the keys to drop the window into its new space.
![]() Drag the window you desire to move all the way to the edge of the screen and hold it there for a moment. Mountain Lion detects that you want to move the window to another space and automatically switches to the next space. When you get to the space to which you want the window moved, release the mouse or trackpad button.
Drag the window you desire to move all the way to the edge of the screen and hold it there for a moment. Mountain Lion detects that you want to move the window to another space and automatically switches to the next space. When you get to the space to which you want the window moved, release the mouse or trackpad button.
Assigning applications to spaces
One feature I love in Spaces is the ability to assign applications to always open in a specific space. To assign applications to spaces, click and hold the application icon in the Dock to open the shortcut menu. If you don’t see the application icon, open it so the icon appears in the Dock.
Select one of the following options to assign an application to a space (or all spaces):
![]() Assign the application to open in one assigned space. Choose Options→This Desktop, as shown in Figure 1.18. The application now opens only in the assigned space.
Assign the application to open in one assigned space. Choose Options→This Desktop, as shown in Figure 1.18. The application now opens only in the assigned space.

1.18 Choose the space in which your applications are assigned to open.
![]() Assign the application to open in all spaces. Choose Options→All Desktops. When you open the application it opens and is available across all the spaces you have in Mission Control.
Assign the application to open in all spaces. Choose Options→All Desktops. When you open the application it opens and is available across all the spaces you have in Mission Control.
![]() Assign the application to only open in the space in which you are currently working. Choose Options → None.
Assign the application to only open in the space in which you are currently working. Choose Options → None.