
Printing Documents
Now that you have a printer installed, you can get busy printing those pressing sales figures, your family vacation photos, or that map to Aunt Linda’s house.
TextEdit is the application I use to show you how to print documents in Mountain Lion. From the Finder, choose Go→Applications (or press ![]() +Shift+A), and then double-click the TextEdit icon.
+Shift+A), and then double-click the TextEdit icon.
TextEdit automatically opens a new blank document when it first starts. Type something interesting in the document and print it.
To print from just about any application in OS X, do one of the following:
1. Choose File→Page Setup:
a. Select the printer in the Format for pop-up menu (see Figure 13.8).
b. Choose the paper size on which you want to print in the Paper Size pop-up menu (also shown in Figure 13.8).

13.8 The standard Page Setup dialog is used in most OS X applications.
c. Make adjustments to the Orientation and Scale as you see fit.
d. Click OK.
2. Choose File→Print, or press ![]() +P:
+P:
a. The standard Print dialog opens, as shown in Figure 13.9.

13.9 This is the standard OS X Print dialog used by most applications.
b. Click Show Details to expand the Print dialog, as shown in Figure 13.10.
c. Change any print options, if necessary. See the next section for a description of the print options that are available.
d. Click Print to send your print job to the printer queue, where it is passed on to the printer.

13.10 The expanded Print dialog gives you access to the printer’s features.

Some printers — typically PostScript-capable laser printers — can print certain files (such as PDFs, JPEGs, or TIFFs) directly. To do so, you simply drag and drop the file into the print queue; you don’t even have to open the file in an application. Check with your printer manufacturer to see whether yours can handle such a cool task.
Discover the Mountain Lion printing options
Mountain Lion has many built-in print options that allow you to configure your print jobs in so many ways it can make your head spin. I cover the most popular options in this section.

Some applications, such as QuarkXPress and Adobe InDesign, use their own print dialog. This can really throw you for a loop if you’re used to the standard OS X way of doing things. Peruse the application documentation to learn how to navigate the myriad options they provide.
The main sheet of the standard Print dialog offers some bare-bones basics as well as application-specific print settings. Figure 13.10 shows the main sheet of the standard Print dialog when using TextEdit.
Table 13.1 breaks down the basic print options.

To access the other printing options that OS X Mountain Lion provides, click the options pop-up menu, as shown in Figure 13.11. Note that some of the options that appear here are specific to the printer you’re using.
Tables 13.2 through 13.6 list the other printing options and their functions.
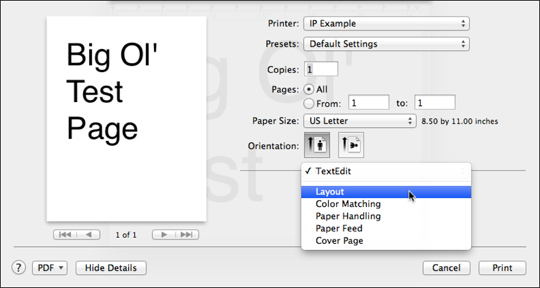
13.11 Choose from several option sheets to customize your Mountain Lion printing experience to the max.


Why and how to create PostScript files
When you first click Print in the Print dialog, Mountain Lion immediately creates PDF information for the print job. Sometimes you may need to generate a PostScript file for a certain job, especially if you work in the publishing industry and outsource your printing, or to troubleshoot a printer or printing issue. Because PDF uses a subset of the PostScript language, it’s relatively easy for OS X to convert the PDF data generated when you first click Print into a PostScript file. To create a Postscript file, follow these steps:
1. Choose File→Print in your application’s menu.
2. Click PDF in the lower-left corner of the Print dialog.
3. Select Save as PostScript from the pop-up menu.
4. Give the document a name, select a location to save it to, and click Save to generate a PostScript file.
Assigning ICC profiles to a printer
Having spent many a year in the printing industry, I know that a frequently asked question is how to use ICC profiles with a printer. An ICC profile is a data file that characterizes how a device handles color. ICC profiles may be either generic or specific to a particular device, such as a monitor or printer. Consult the manufacturer of your device to inquire about its support of ICC profiles. These profiles can be assigned to single print jobs using the application that designed the document or to printers on an individual basis. Consult the application documentation to find out how to use ICC profiles with it. Below, I’ve taken the liberty of showing you how to use the ColorSync Utility to assign profiles to individual printers. Follow these steps:
1. From the Finder, press ![]() +Shift+U to open the Utilities folder.
+Shift+U to open the Utilities folder.
2. Double-click the ColorSync Utility icon.
3. Select Devices from the toolbar at the top of the window.
4. Click the arrow next to Printers to expand the list.
5. Highlight the printer to which you want to assign the profile, as shown in Figure 13.12.
6. Click the arrow to the right of Current Profile and select Other.

13.12 Assign color profiles to devices using ColorSync Utility.
7. Browse your Mac for the ICC profile you want to use with the device, select it, and then click Open to assign the profile.
8. When you print using the printer to which you assigned the profile, turn off any color matching options provided by the manufacturer in the Print dialog to force the printer to use the profile you just created.