Edges
An edge is formed where adjacent pixels have high contrasting values. Photoshop has a number of filters that detect these and apply contrast reducing or increasing effects to soften or sharpen the image accordingly. (See Find Edges filter)
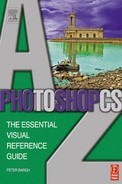
The top half of the picture (left) is an enlarged part of the stem of the plant in the picture above. The Find Edges filter picks up all the areas of edge contrast and produces an almost posterized version that highlights these edges.

Elliptical marquee tool
(See Marquee tools)
Embedded profile mismatch
This box appears when you open a picture that has an embedded profile that is different to the one you use for your working color space. You then have three options. For best results you should select Convert providing you have set up your color management correctly.

Emboss filter
(See Stylize filters)
Equalize

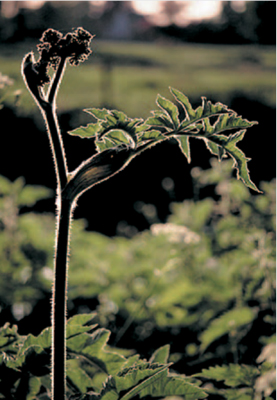
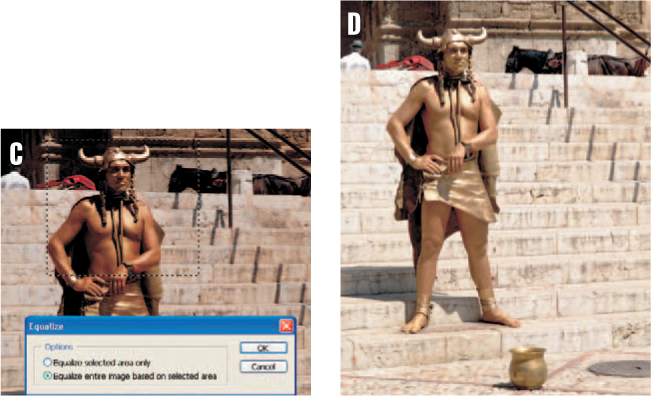
A quick fix that can help brighten up a dark scanned image that cannot be improved using Auto Levels. When you apply the Equalize command Photoshop redistributes the brightness values of the image’s pixels so that they more evenly represent the entire range of brightness levels. It does this by finding the brightest and darkest values in the image and then adjusts the levels so that the brightest value is white and the darkest value is black. It then equalizes the brightness by distributing the intermediate pixels evenly throughout the grayscale.
You can also equalize just a selected area of an image by using one of the selection tools before you go to the equalize menu. In this mode you also have the option of applying the values within that selected area to the whole photo.
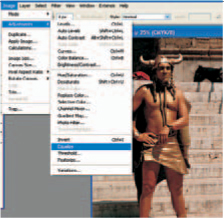
Equalizing picture A produces B. This is because the photo has dominant light tones which caused the process to overcompensate. If you make a selection of a representative area, picture C, and choose ‘Equalize entire image based on selected area’ you get a better result, as illustrated in picture D.
Eraser
Use this to remove pixels, replacing them with the background color, or to a previous state using the Erase to History option, or to an underlying layer.

The Eraser options bar lets you select the opacity of the Eraser and can be set to gradually fade out in a selected number of steps.
You can choose from three brush styles including Paintbrush, Pencil and Block (users of version 6.0 please note that the Airbrush is now selected from a separate icon) and also vary the size of these from the Brush options box.
The Paintbrush has a Wet Edges option that produces a stronger effect towards the edges of the brush stroke.

The Erase to History option was selected here with a point before desaturation took place. Then when you erase you bring back the original color.
Tip
![]() Shift+E rotates through the various brush options.
Shift+E rotates through the various brush options.
Exclusion mode
(See Blending modes)

Exif data
Most digital cameras now capture and store information about the picture such as exposure details, properties, etc. This data, known as Exif data, stays with the picture and is read by Photoshop. It’s useful when you are learning photography to compare pictures and exposure data to see what works and what doesn’t.
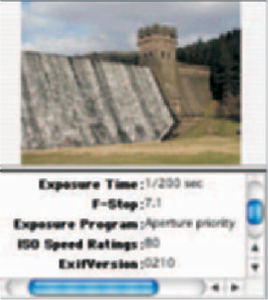
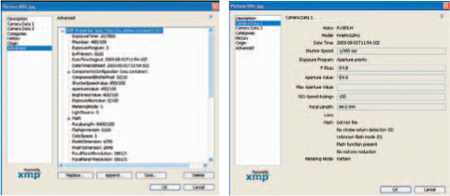
In Photoshop 7 the info was found under the Exif tab of the File info window. In Photoshop CS it’s split into a basic version showing main camera info or a huge list of recorded data under an advanced tab. Exif data also appears within the Metadata section in the File Browser.
(See File Browser and File info)
The illustrations above show the level of Exif data that’s accessed from the File Browser. The two below show data that’s accessed via file Info.
Exporting files
![]()
Photoshop comes with two plug-in modules to export files to GIFs (using File→Save for Web or, using File→Export, you can save Paths to Adobe Illustrator. Paths to Illustrator converts Photoshop paths created with the Pen tool into Illustrator files.
Exporting from clipboard
As with most programs that handle pictures and text, when you copy an item it is saved in the program’s clipboard. Photoshop is just the same, so pictures can be copied and then pasted into other programs.
Exposure correction
When an image is too dark or too light, caused by either poor scanning or a badly exposed original, it can be corrected using several Photoshop features. Brightness is the most basic but easiest to understand, Levels adds slightly more control, but Curves is the more advanced method of exposure correction
(See Levels, Curves and Brightness)

Levels were used to lighten this image shot on a Fujifilm Finepix S2 Pro.

Extract

This feature, introduced in Photoshop 5.5, makes selecting objects from their background easier and is especially useful on complex cutouts such as hair.
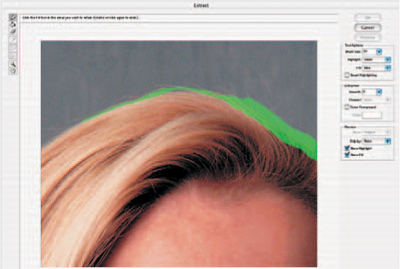
You first draw around the edge that you want to cut out using the Edge Highlight tool. Then fill the inner area with the Fill tool. When you click ‘preview’ the command goes to work and produces a foreground cut out on a transparent background.
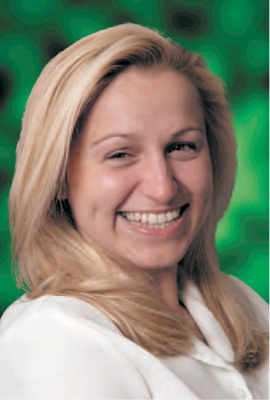
If you’re happy with the preview cutout click on OK and the extraction is applied. In a few moments you are delivered a cutout that can then be dropped onto another background.
Version 6.0 introduced a few extra features to make the selection process even easier. Draw around the edge using the Smart Highlight tool and it calculates how easy it is to select the object and adjusts the thickness of pen to suit. If the edge detail is complex it makes the pen line thicker and if the edge is well defined the pen line becomes thinner.

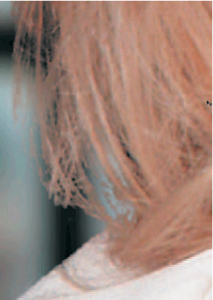
Cutting round the hair on this photo could be really difficult to do using one of the normal Selection tools.
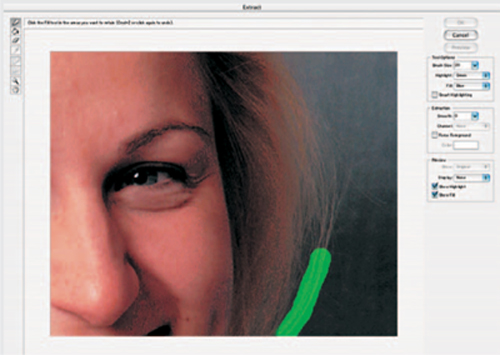
Paint over the edge that you want to cut round ensuring foreground and background areas are both covered by the highlighter. Use a larger sized highlight brush to paint over areas that aren’t easy to define such as the hair where fine strands appear. Select a smaller size brush for the definite edges such as this girl’s blouse.
The Smart Highlight tool, introduced on version 6.0, automatically adjusts pen thickness as you draw around the subject you want to extract.
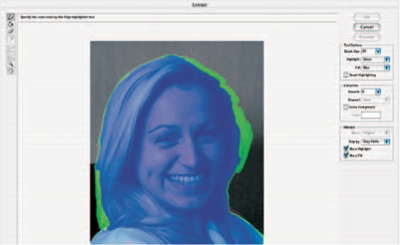
When the selection is complete click in the centre, using the bucket/fill tool and then click on preview to see the extraction take place.
Depending on the speed of your computer’s processor and the size of the image this could take a few minutes, or longer, to perform the task.

Tip
![]() When you’ve made an extracted selection it’s often better to tidy it up using the clean-up tools in the extract box. In this example I’ve erased some of the straddling hairs to tidy up the cutout.
When you’ve made an extracted selection it’s often better to tidy it up using the clean-up tools in the extract box. In this example I’ve erased some of the straddling hairs to tidy up the cutout.


The extracted image can be viewed in a number of ways. The preset version appears with a transparent background, but you can also select a gray, white (above middle) or black matte (above right) which are often more useful to display how good the cutout is. You can also select your own color, using the color picker. Version 6.0 even has an option to view the cutout as a mask (left).
It helps to look at the preview in the mask mode when using the new Clean Up and Edge Touch up editing tools. Both are used after the preview has been made to improve the accuracy of the extraction.

Once you have your extracted subject you can either drop the picture onto an existing canvas or create a new one with an interesting background. Here the green canvas effect (right) was achieved in Photoshop using the Clouds filter, followed by Contrast adjustment, Gaussian Blur and a dark vignette. You could also use one of your own photos as a ready-made background as I have done here with the picture of an old leaded window frame (above).

The extract mode is great for cutting round hair, but not for more complex subjects such as Dandelion Clocks. This example was brushed over using the Magic eraser before being pasted into this grid of color. If the Extract tool had been used I would have had to paint within all the inner areas of the seeds and it would have taken for ever!
Tip
![]() Some areas of the image that you wanted to keep may have been erased. If this happens set the History brush onto the stage prior to the extraction and paint back the missing pixels.
Some areas of the image that you wanted to keep may have been erased. If this happens set the History brush onto the stage prior to the extraction and paint back the missing pixels.
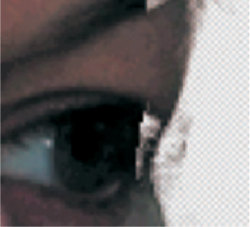
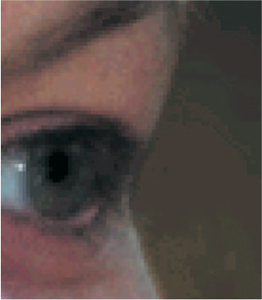
Eyedropper
This tool is normally used to select the foreground or background color and the only control you have is selecting the sampling area which can be accurate to one pixel, 3x3 or 5x5. Simply position the dropper end over the area you want to sample and click the mouse to take the sample which becomes the foreground color.

Holding down the Alt key when you click selects the background color. The Eyedropper also appears in several other palettes, including Replace Color, Color Range, Levels, Curves and Hue/Saturation.

Tip
![]() Hold down the Alt key while using the Airbrush to convert it into an Eyedropper.
Hold down the Alt key while using the Airbrush to convert it into an Eyedropper.