Navigator palette
![]()
This palette shows a small preview of the image you’re working on. The palette preview can be made smaller or larger by dragging the bottom right edge of the box. At the base of the preview window is a zoom scale that you adjust to make the main image magnify or reduce in size.


The area that shows on screen appears as a frame in the navigator’s preview window which gets smaller as you increase magnification. The frame can be moved around the preview to select the area of the main image you want to work on. It’s a really useful feature to help you fly around a photo, especially when you’re working on a vastly enlarged version.
New
![]()
opening a fresh file in Photoshop you follow the usual path that most programs offer, File>New. In Photoshop’s past you then keyed in the measurements required and a blank canvas would appear.
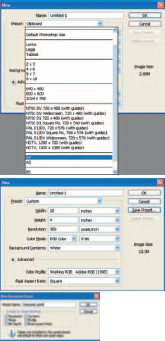
Photoshop 7.0 added default options with a drop down list of popular preset sizes to save you keying in values. You can, of course, still set any size you want in the custom fields and Photoshop CS adds a save preset feature so favourites can be added to the drop down list. I’ve added the 10x4in panoramic format.
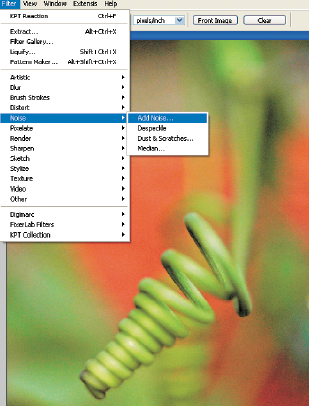
Noise filter
![]()
Four filters used to add grain or remove dust in an image to make it look natural. Noise can also be used to reduce banding effects that are often introduced by gradients.
To illustrate this I have created a color gradient which clearly shows the lines between tones of the color gradient. Adding a small amount of noise removes these, making the gradient smoother and a little more natural. Adjust the slider and watch the image. You can always undo (Ctrl+Z) if you are not happy with the effect. I used a setting of 0.6%. Any more and the grain became too noticeable.
ADD NOISE
When used in small amounts this filter can make a digital picture with smoothed edges or an Illustrator file look more natural. Use in larger amounts to recreate an effect you’d obtain using fast film. Controls include an amount slider to vary from a very subtle 1 to an unbelievably gritty 999. Then you can choose between Uniform or Gaussian distribution. Gaussian produces a stronger effect. Finally turn Monochromatic on or off. When on, the Noise filter works the same on all color channels, unlike off where the effect is random on each channel.

Adding 30% of Gaussian distribution with Monochromatic selected produces an image that’s far too grainy for most images.
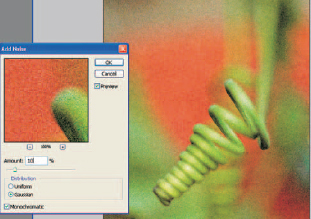
Adding 10% of Gaussian distribution with Monochromatic selected produces a far more natural result.
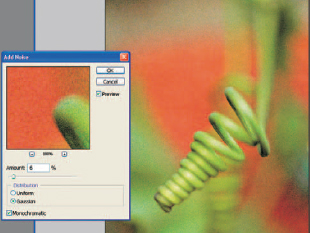
Reducing to about 6% gives the best and more subtle effect.
DESPECKLE
A subtle softening filter that helps reduce noise caused by poor scanning. When applied increase sharpness using the Unsharp Mask filter.

This close-up of a girl’s eye was cropped from a 46Mb scan. The Despeckle filter helps reduce some of the problems of the scan, but does tend to soften the image slightly.
MEDIAN
Used to reduce noise, so it’s quite effective with the Moiré patterns that are caused when scanning printed material. The downside is it tends to soften the image. Apply the Unsharp Mask filter to increase sharpness after this filter has been used.
Median has a dialogue box with a sliding adjuster giving more control over the effect. The Moiré pattern is easily removed but the result is softer and needs the Unsharp Mask applying.
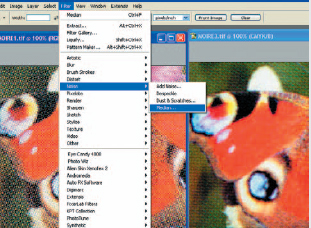
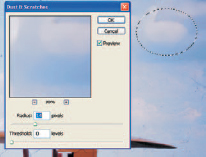
DUST & SCRATCHES
The most useful of the Noise filter range is Dust & Scratches, especially when used on scanned films. No matter how well you try to keep the surface clean it will attract dust and result in scans with marks. This is a noise filter that detects dramatic changes in adjacent pixels and blurs the surrounding colors to smooth out the tones.
It’s not always clever enough to know what is and what isn’t dust so don’t think this is the answer to your prayers. You’re more likely to end up with a soft result than a rescued one!
Try various combinations of the two Radius and Threshold sliders and adjust the settings until the best result shows in the preview window. Dragging the Radius slider to the right increases the effect, unlike the Threshold slider which reduces it.


Be careful how far across you set the Radius. Even just a small setting of 5 pixels has destroyed all the detail in the example on the right, but the dust has gone! Below is a more sensible 1 pixel setting, but here the image is softened and the dust is still present. 3 pixels was best.
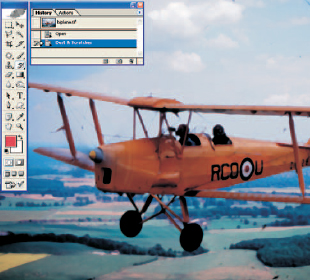
Here’s a handy tip to help you use Dust & Scratches over a whole image without affecting quality.
1 First apply the filter to the whole image. Then click in the box to the left of the Dust & Scratches level in the History palette. This puts the History Brush icon in the box.
The quickest way to get rid of big chunks, especially if there are only a few around your picture, is to use the Patch tool seen here doing a marvellous job with ease.


The Add Noise filter can be used to reduce banding when a gradient is produced.
Tips
![]() Adjust the zoom ratio of the preview until the area containing the dust or scratch is visible.
Adjust the zoom ratio of the preview until the area containing the dust or scratch is visible.
![]() Use the Clone Stamp or Patch tool to clone out larger blots.
Use the Clone Stamp or Patch tool to clone out larger blots.
Nonsquare pixel support
(See Pixel Aspect ratio)
2 Now click on the previous history state, in our case the crop stage. The dust and scratches will return but you can now use the History brush to paint over all the bad areas with the Dust & Scratches filter applied to the size of the History brush.

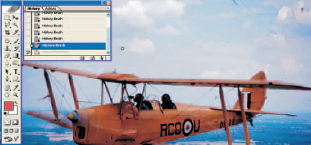
3 Keep working around using the History brush and when you get to a big chunk try the tip below or use the Patch tool. (See Patch tool)
Tip
![]() Draw a selection around the affected area, apply a feather and then use the Dust & Scratches filter.
Draw a selection around the affected area, apply a feather and then use the Dust & Scratches filter.

Note
A feature introduced on version 6.0 that allows you to leave messages around the picture. These appear as little notes on the image which, when clicked open, reveal the message you’ve left. Useful if you’re working with a designer who needs to do something with the picture before it goes to print.