Actions
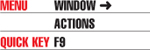
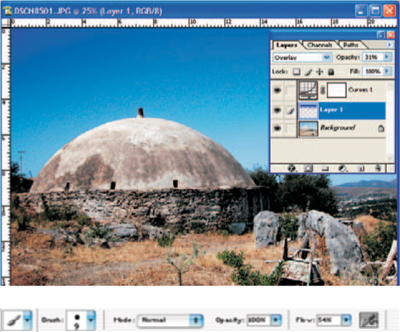
An action is a way of automatically applying a technique to an image using a pre-recorded series of commands, or a script, that is triggered by pressing one or a combination of keys. Many actions are already supplied with Photoshop and can be found at the bottom of the Actions menu by clicking on the arrow at the top right of the Actions palette. They can also be found in the Presets folder. An action can be as simple as opening a new canvas or as advanced as creating a drop shadow on an existing picture or, as in our example (left), making snow.

You can turn part of an action on or off, as well as record, play or edit new or existing actions.

You can also create your own Photoshop actions using the Automate mode, so if there are techniques you find particularly fiddly or ones you’ll want to use again, record the commands as you run through them and assign the action a shortcut key.
To record a new action open an image and select New Action from the hidden menu or click on the page icon at the bottom of the palette. This displays a new palette. Name your action, choose a destination folder, a shortcut key and a color for the button display.
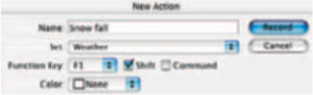
The shortcut can be a single F button or any combination of an F along with Shift and Control keys. Click on the record button and run through the various steps to produce the desired result. You’ll see each step appear in the menu as it’s recorded. When you’ve done click stop.
Now when you want to apply the recorded effect just click on the designated shortcut key. Actions can also be applied to several images in one go using the Batch command or created into droplets. (See Batch command and Droplets)
Tips
![]() If a command cannot be recorded you can insert it manually using the Insert Menu command.
If a command cannot be recorded you can insert it manually using the Insert Menu command.
![]() If you make a mistake, keep going, you can edit the script later.
If you make a mistake, keep going, you can edit the script later.
![]() Some settings may need modifying for different images. Clicking on the box to the left of the action will stop the script at that point and bring up the dialogue box so you can manually adjust before continuing the script.
Some settings may need modifying for different images. Clicking on the box to the left of the action will stop the script at that point and bring up the dialogue box so you can manually adjust before continuing the script.
Active layer
This is the layer that is currently selected. To select a layer click on the layer icon in the layers palette. The layer will become highlighted and when a filter effect or brush is applied it will only affect the highlighted layer.
Adjustment layer
![]()
An adjustment layer is a layer that you can apply effects to that will change all the layers below it in the stack. If you then turn off the eye icon next to the layer it will turn off the effects for that particular adjustment layer. It’s great for hand coloring black & white pictures as well as controlling levels or curves.
You can delete these layers at any time to remove the effect.

Airbrush
A painting tool that applies a color in much the same way as a real airbrush. The airbrush moved from the toolbar in Photoshop 7.0 and appears in the brush options bar. Now you simply choose airbrush as a style and select how you want it to work from the brush palette.

Hold down the mouse and drag it around to spray color evenly onto the canvas. Hold it in the same place and color builds up while spreading outwards. Covering an area that’s already sprayed increases color depth.
As with all brush modes you can specify size, blending mode and opacity from the bar that appears at the top of the page when you click on a brush. There’s also an option to adjust flow.
Tips
![]() Select a start point, hold down the Shift key and click an end point to paint a straight line.
Select a start point, hold down the Shift key and click an end point to paint a straight line.
![]() Use the Airbrush on low pressure with black paint to create shadows.
Use the Airbrush on low pressure with black paint to create shadows.
![]() Switch on Caps lock to turn the Airbrush standard cursor into a precision crosshair.
Switch on Caps lock to turn the Airbrush standard cursor into a precision crosshair.
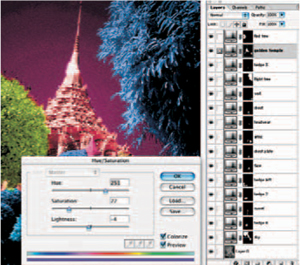
A Hue/Saturation Adjustment layer was used to color this infrared black & white original. Make a selection of an area and save it as an Adjustment layer. You can then adjust the color of just that selection without affecting the rest of the picture, as illustrated here. At this stage I was trying out a violet colored temple.
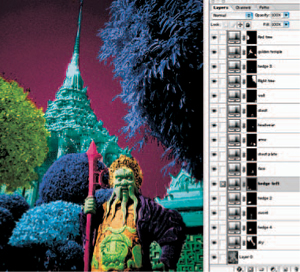
The finished picture. Each of the 15 layers can now be changed to alter the color of individual elements within the picture. And as each layer has a mask you can change the area colored using the Brush and Eraser tools.
Tips
![]() In Version 5.5 open from Layer→New→Adjustment Layer.
In Version 5.5 open from Layer→New→Adjustment Layer.
Align Linked
![]()
Feature introduced in Photoshop CS to make it easier to align items within layers. Select this option and one of the six align options to make objects on linked layers align to the top, centre or bottom edge in either horizontal or vertical directions.

Here Align to left edges has been selected and the three images have lined up to the left while maintaining their horizontal positions.
Alpha channels
These are ideal for saving selections separate from the RGB or CMYK channels. Carefully draw round a subject and choose Select→Save Selection once you’re happy with the selection. This is stored at the base of the Channels palette as a separate channel – the Alpha channel.
It can be recalled and the selection applied to the image at any time by calling up Load Selection from the Select menu. This saves you having to reselect a subject later. Up to 53 Alpha channels can now be added to an RGB image allowing you to produce very complex selections that can be recalled to make changes to a variety of detailed parts of the image at any time.
Tips
![]() Alpha channels can be combined to add selections together.
Alpha channels can be combined to add selections together.

Anchor points
![]()
The small square boxes that are placed around an object when you make a selection with the Pen tool. The points can be moved when they’ve been placed using the Direct Selection tool.
Anti-aliasing
Aliasing occurs when the sharp edges of pixels appear jagged on the straight edges of an image or text.
Photoshop uses anti-aliasing to smooth out the edges by making the pixels semi-transparent so that they pick up color from surrounding pixels. It’s useful when cutting or copying and pasting selections onto new backgrounds. Anti-aliasing can make the image look a little blurred when viewed close up.

Pixels make round edges look jagged. Using anti-aliasing smooths the ‘jaggies’ by adding midtone pixels to the harsh edge. Here two circular selections have been made – one with anti-aliasing on (bottom) and one with it off (top). Then the selections were copied and pasted onto a white background. Notice how sharp the top cutout looks.
Apply image
![]()
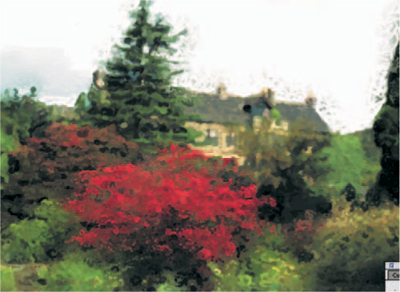
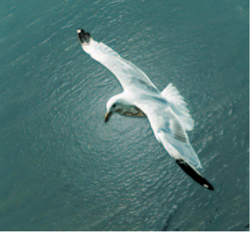
Used to blend one image layer and channel with another. The source and destination image have to be the same size. I found the effect works well using the same image with the blend option. It’s very much a trial and error process but well worth the effort as seen here as I’ve appeared to change the time of day in one simple step. (See Calculations)
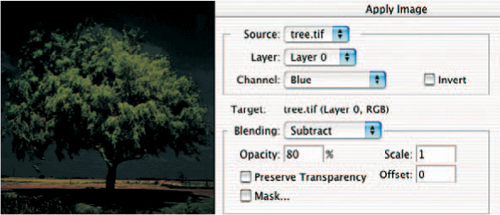
Moon-lit scene, made possible by the Subtract Blend mode and green channel.
Art History Brush
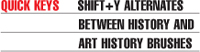
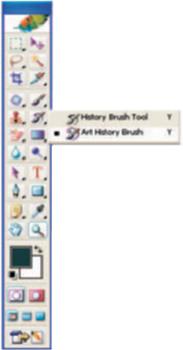
A feature first seen in version 5.5 that will appeal to artists as, with a little experimentation, it can create some stunning painterly effects.
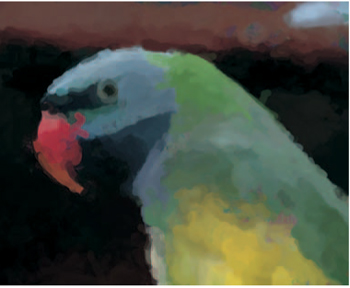
You choose from a variety of patterns and select the Blending mode and opacity before painting over an existing image. The more you paint over the same area the greater the effect. The larger the brush size the bigger the paint daubs and less realistic the effect.

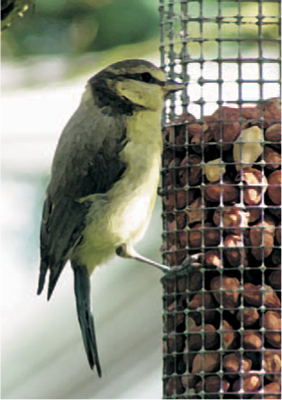
Colorful images like this are suitable for the Art History Brush attack.

Setting Fidelity to a low value produces brush strokes that have more color than the source point (left). A high value maintains the source color (right).
Tip
![]() Using one of the other custom brushes from Photoshop’s Presets folder will produce more unusual results.
Using one of the other custom brushes from Photoshop’s Presets folder will produce more unusual results.
Here two of the Special effect brushes were used with Fade mode to create an oil paint style photograph.
With a small brush and careful choice of the palette options paint effects can be quite realistic (above).
Choose too large a brush size and the effect could go completely wrong (left). You could use this sort of treatment as background to text, though.

You can also use the technique to paint around the head of a bride to create a pretty vignette/diffuser style effect.
Artifacts
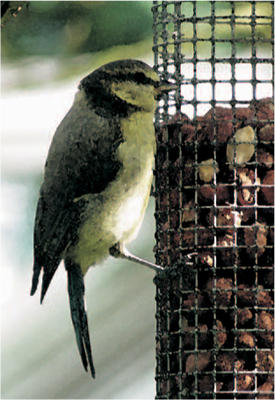
Digital photography, like any form of image capture, can produce faults. In digital photography they’re referred to as artifacts and can be caused by a number of problems including flare from the camera’s lens, electrical interference or low resolution CCDs. Low resolution CCDs cause curved edges to appear jagged as the curve takes on the square edges of each pixel – known as Aliasing.
Blooming is less of a problem now but occurred on earlier CCDs when the electrical charge exceeded the pixel’s storage capacity and crossed into adjacent pixels causing image distortion. We’ve all seen the TV presenter with the stripy shirt appearing as a strange colored pattern. The same thing happens on CCDs and it’s known as color fringing.
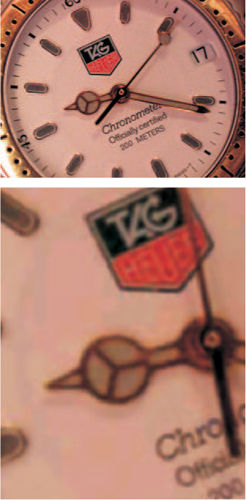
This photo from a digital camera’s economy mode, shows the high level of compression has caused the unusual artifacts in certain areas.
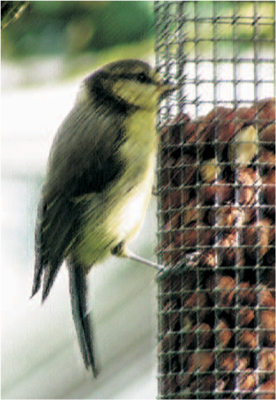
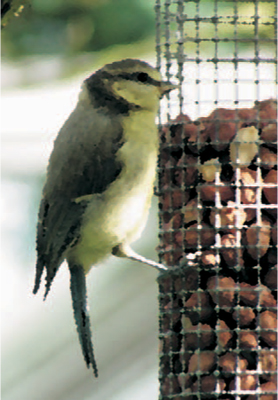
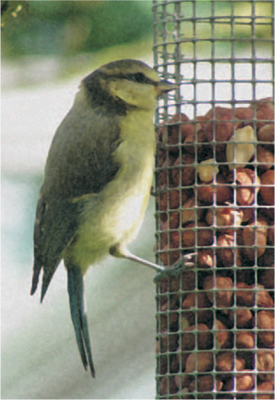
Artistic filters
![]()
Change your picture into a painterly image using this collection of filters that mimic natural or traditional artists’ effects. Each filter has a selection of sliders which I’ll explain for the Colored Pencil (below).
For the rest I’ve used the same image and included settings I made, but you should experiment with your photos, because each filter suits different images.
Also try using the Edit→Fade option with a Blend mode. (See Fade)

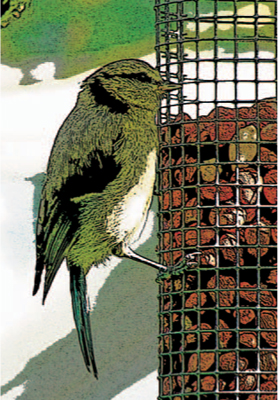
COLORED PENCIL
Produces a rough crosshatch effect by drawing in a pencil style over the original using the background color. Edges are retained and the original background image shows through the pencil strokes. Moving the pencil width slider to the left makes the pencil lines thin while sliding to the right makes them thick.
Stroke pressure controls the accuracy of the lines over the original image. Moving over to the left fills the image with color and to the right produces deep and defined lines. The paper brightness slider affects the color of the pencil. Move it to the right for the maximum color. Moving the slider to the middle produces a progressively gray pencil effect and to the left it goes black.
Above left: Pencil Width: 9, Stroke Pressure: 4, Paper Brightness: 0
Above right: Pencil Width: 2, Stroke Pressure: 13, Paper Brightness: 49
Right: Pencil Width: 2, Stroke Pressure: 4,
Paper Brightness: 25, Difference filter 70%


DRY BRUSH
Paints edges using a dry brush technique that appears midway between an oil and watercolor effect. The range of colors is simplified as the filter looks at nearby pixels and blends them into areas of common color.
Brush Size: 9, Brush Detail: 9, Texture: 2
FILM GRAIN
Applies a pattern of grain that simulates real film. The higher you set the grain the more like fast film the effect becomes.
Grain: 8, Highlight Area: 13, Intensity: 1
CUTOUT
Builds up the image as though it’s created by a collage of several pieces of torn colored paper. It has a similar look to a posterization effect. Number of levels: 6, Edge Simplicity: 3, Edge Fidelity: 1
FRESCO
Converts the image into a coarse stippled effect using short, rounded, quickly applied brush dabs. Good for a Classic painting effect. Brush Size: 2, Brush Detail: 6, Texture: 1, Fade filter by 59% and Darker blend mode.
NEON GLOW
Adds a glow to parts of the image. The glow color is selected by clicking the glow box and choosing a color from the color picker. Size: 12, Brightness: 15, Color: Green, Fade filter 95% with Linear Light blend mode
ROUGH PASTELS
Makes an image appear as though it’s on a textured background, covered in colored pastel chalk strokes. Stroke Length: 15, Stroke Detail: 8, Texture: Burlap, Scaling: 61%, Relief: 65, Light Direction: Right

PAINT DAUBS
A nice effect varied by altering the brush size to between 1 and 50, with a selected brush type that includes simple, light rough, light dark, wide sharp, wide blurry and sparkle.
Size: 6, Sharpness: 20, Brush Type: Simple

SMUDGE STICK
Uses diagonal strokes to smudge or smear the darker areas and soften the image while lighter areas become brighter and lose detail.
Stroke Length: 8, Highlight Area: 14, Intensity: 5
PALETTE KNIFE
Similar to cutout, but with more blurred edges to emulate a palette knife style of painting. Will only suit certain images.
Stroke Size: 10, Stroke Detail: 2, Softness: 3
SPONGE
This is supposed to give an appearance of the image being painted with a sponge. Hmmm! Brush Size: 2, Definition: 1, Smoothness: 4

PLASTIC WRAP
Create Terminator style morphing by coating the image with a shiny plastic effect that accentuates surface detail.
Highlight Strength: 13, Detail: 12, Smoothness: 7

UNDERPAINTING
Makes the image appear with a textured background that shows through the surface. Brush Size: 9, Texture Coverage: 8, Texture: Canvas, Scaling: 98%, Relief: 24, Light Direction: Top right
POSTER EDGES
Creates poster style effects by reducing the number of colors in the image and adding black lines around edges. Edge Thickness: 2, Edge Intensity: 7, Posterization: 0, No Fade 20% saturation.
WATERCOLOR
Saturates colors and paints in a watercolor style by simplifying image detail. Can become too contrasty if you’re not careful.
Brush Detail: 8, Shadow Intensity: 0, Texture: 2
Tip
![]() As with most filters and styles once the effect has been applied you can fade the result using the Edit → Fade command. Add a Blend mode to make the result very different than the original filter effect. Here’s a couple of examples using the Artistic filters, but turn to the Fade page for more ways to use this excellent control.
As with most filters and styles once the effect has been applied you can fade the result using the Edit → Fade command. Add a Blend mode to make the result very different than the original filter effect. Here’s a couple of examples using the Artistic filters, but turn to the Fade page for more ways to use this excellent control.
Above Cutout and Plastic Wrap were applied in succession each using fade and a Blend mode. Right: Fresco faded followed by a duplicate layer with threshold command and Saturation blend, reduced to 70%. The key is experiment – you never know what will happen.
Assign profile
![]()

An option that lets you select a color profile to your image so that it will always request being opened in this mode or will indicate that a different profile is being used.
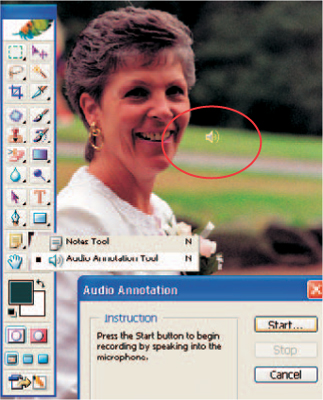
Audio Annotation tool
If you have a microphone plugged into the audio-in point of your computer you can record short audio messages and place them on a picture. The annotation appears as a small speaker icon which, when clicked, will replay the recording. This is a great tool for designers who want to leave messages to the next person who will work on the image. It’s also open to abuse! (See Note)
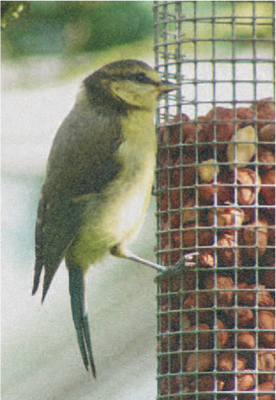
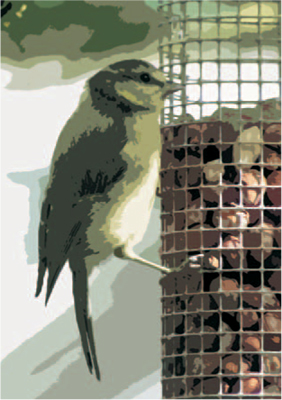
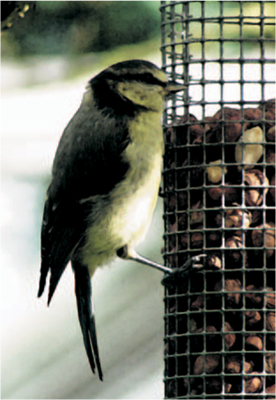
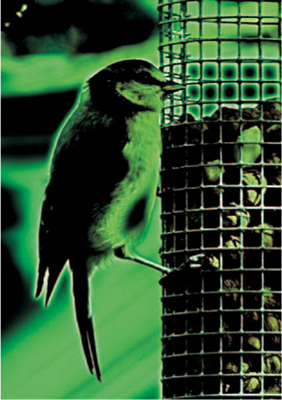
Auto Color correction

An auto feature that first appeared in version 7.0. Clicking on the Options button from the Curves dialogue box calls up a window that allows you to preset the way that each of the auto correction modes works.
Selecting Enhance Monochromatic Contrast clips all channels identically to ensure the photo holds its color values while making highlights appear lighter and shadows appear darker. Applying Auto Contrast from the Image→Adjustments menu has the same effect.
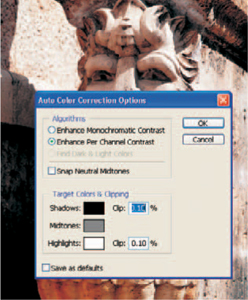
Enhance Per Channel Contrast maximizes the tonal range in each channel. This produces a more dramatic correction, but as each channel is adjusted individually a color cast may be removed or added. Applying Auto Levels uses this algorithm.
Find Dark & Light Colors locates the average lightest and darkest pixels and uses these to maximize contrast while minimizing clipping. This happens when the Auto Color command is used.
Tip
![]() Add the same effect as placing a color filter over the front of your camera, by altering the color of the highlights or shadows. Below left: Here I selected maximum red from the color picker, which has produced a lith style effect. If you looked at the channels now you would see that the green and blue channel thumbnails were black.
Add the same effect as placing a color filter over the front of your camera, by altering the color of the highlights or shadows. Below left: Here I selected maximum red from the color picker, which has produced a lith style effect. If you looked at the channels now you would see that the green and blue channel thumbnails were black.
Below right: Here’s the result of a blue shadow selection and a green highlights. Don’t forget to reset to white or any future auto adjustments will come out wrong.


Auto Contrast
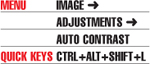
Auto mode that looks at the brightest and darkest parts of the image and adjusts the picture’s highlights and shadows. It works well on some images, but it’s often better to adjust the picture using Levels or Curves. (See Levels)


Auto Levels

Scanned images using the auto setting rarely turn out with correct color or density so you need to adjust brightness and contrast.

Auto Levels looks for the brightest and darkest points and adjusts contrast so both maintain detail. It’s a quick and easy fix, but learning how to adjust Levels manually produces better results. (See Levels)

Using any of the three Auto modes from the Image→Adjustments menu can provide a quick fix, but there are times when you have to choose the mode with care. The beauty with Photoshop is you can always undo an adjustment if you don’t think it has worked well.
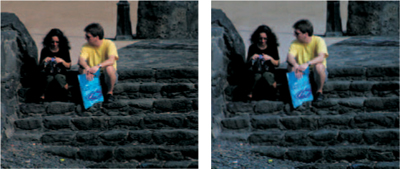
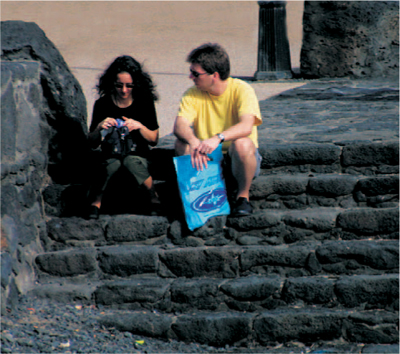
Here are two examples of when things can go wrong.
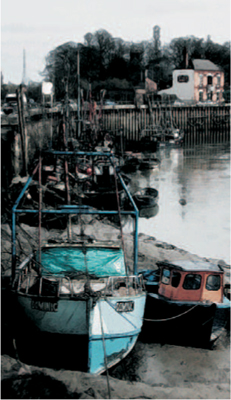
The first example (above left), of the couple on the steps, lacks contrast and has a slight warm color cast, so the obvious choice would be Auto Color, but this introduced a blue cast (above middle), Auto Contrast actually got it about right here (right).
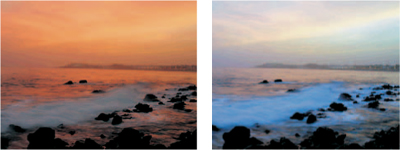
The sunset picture (below) also looks a little dull, Auto Contrast did nothing, Auto Color did nothing and Auto Levels made a right mess of it (below middle). The only option here was to use Curves and adjust manually which has enriched the photograph (below right).
Automate
![]()
A series of pre-written auto tasks used to make contact sheets, multi-format prints, batch conversions and format pictures for your Web page.