Page Setup
This takes you to your printer’s settings where you select the paper size and orientation.

The depth of settings you see depends on the Operating System and print driver software. Clicking on the printer button takes you to the printer’s driver and from here you can access properties and set paper type, size, resolution and a whole many more options.
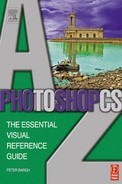
Paint bucket
![]()
Use this to flood the selected area with the foreground color.
The Tolerance setting determines how many pixels are affected by the flood. A small amount results in a patchy paint effect, while a higher tolerance may color areas you don’t want covered. The deckchair stripes, above, show the Tolerance at four settings. The left-hand one was set to 10, the second 20, the third 30 and the fourth 40. Click on Anti-aliased to soften the edge of the paint fill.
Paintbrush tool
![]()
One of three tools used to apply selected color to the image. The paintbrush can be used on full strength or less using the opacity setting to reduce the amount of color affecting the image.

With lower opacity the original pixel color can still be seen. This effect is like adding a wash to the image and is really useful for hand-coloring black & white images like the example below.
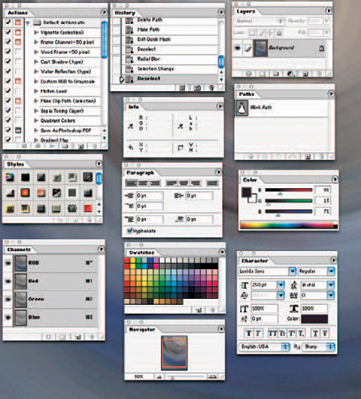
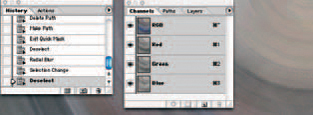
Palettes
The menu boxes that let you adjust settings of various tools.
Arrange them carefully on the desktop to avoid clutter. Many of them have shortcut keys to open and close the window, making it visible or invisible on the desktop.
Palettes can also be grouped to make the desktop even tidier.
(See Appendix C)
Paste into
Used to paste an image into part of another that’s been previously selected. The new pasted image appears within the selection. The area around the selection becomes a Layer Mask and the icon appears by the pasted image by the layer thumbnail. You can use the mask to hide or reveal sections of the pasted in image.
You can drag one palette onto another to combine them and save space on the desktop.
Palette Well
When several palettes are open your screen may become cluttered. Photoshop CS makes it easy to arrange things by having a Dock to Palette Well mode that moves the palette to a position at the top of the page. The palette can then either be used as a drop down from the well or dragged back onto the screen.

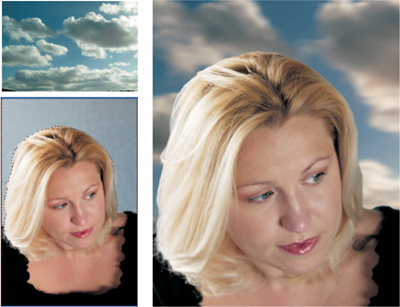
The background was selected and the cloudy sky was pasted into this selection. The pasted image’s position and size was then adjusted using the Move and Transform tools followed by Match color to make it similar in hue and Motion blur to give the clouds movement.
Patch tool

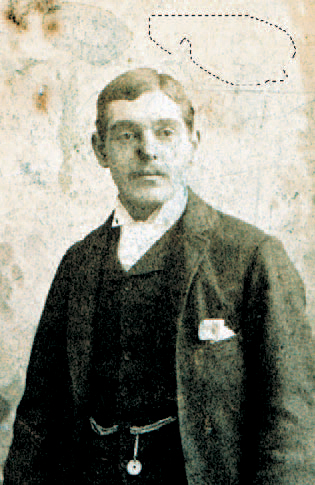
One of the star features of Photoshop 7.0, this astounding tool has been made even better in Photoshop CS. It does a similar job to the familiar Clone tool but makes a much better and faster job of repairs. You select an area that you want to repair. This could be wrinkles on portraits, blemishes on skin or fruit, dusts on scans, or even unwanted birds in a sky. You select either source or destination and draw a lasso around the area you want to use as the source (pixels that will be the sample) or Destination (area you want to repair). Then you drag the selection to the new spot and the job’s done.
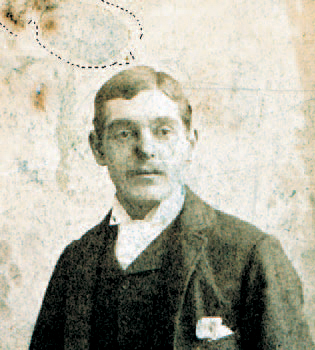
Here’s an old photo that was scanned on a flatbed scanner. I selected the area I want to repair, dragged it to the new sample point and let go. The Patch tool selection automatically returns to base and the sampled pixels are blended.
A few laughter lines, catchlights from the flash on the nose and chin and an odd crease here and there – put away the Nivea, we have a much better option! Photoshop CS shows the pixels that you are sampling in the Patch tool sample area making it easier to sample the best area.
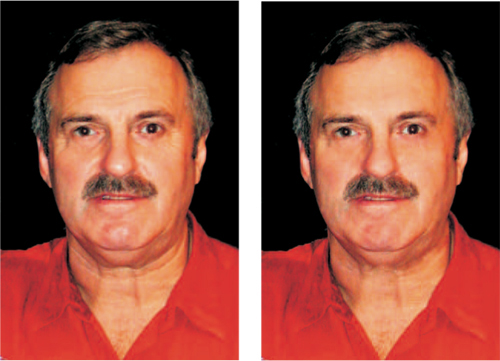
Moving around the face and neck with the Patch tool took no longer than five minutes and you can’t see where the repairs are. All you do is select nearby areas and drag to match up the photo. Alan’s 10 years’ younger now.

Photoshop CS has a transparent option in the menu bar. This allows new sampled pixels to be patched over existing pixels without the existing ones being removed. So the new ones merge with the old rather than replace them.
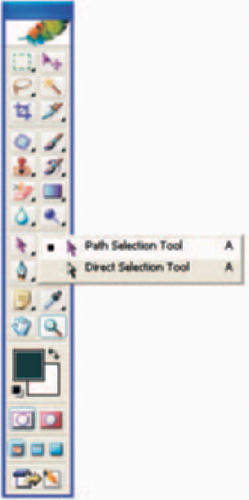
Path component selection tool
![]()
This tool is used to select a whole path shape and move it on screen. Unlike the direct selection tool which lets you click on an anchor point and drag to distort the path’s shape.
Paths
Paths are outlines created by drawing with one of the Pen tools. They are vector-based so don’t contain pixels and appear separate from a normal bitmap image.
A thumbnail of the path can be viewed in the Paths palette, and from here you can select a number of options to apply to the active layer from a row of icons along the base or from the arrow’s drop down menu. These options include: Filling the path with the foreground color; producing a Stroke to add the foreground color along the selected path and making a Selection from the path.
A path can be moved to a new image by dragging the original path icon from the palette and pulling it over a new image. You can also copy paths from one location and paste them into another using the normal copy & paste option. Paths can be converted quickly into selections and selections can be turned into paths.
Paths are also used by designers who turn the selection into a clipping path and import it into a page layout. The clipping path ensures everything outside the frame appears as transparent on the layout. This ensures text wraps around the subject and the subject blends well with the layout.
(See Pen tools)

Use the Quick Mask mode to paint a mask around the subject. Magnify an area and use the Eraser and Airbrush to remove or add to the mask, then convert the masked selection into a path.
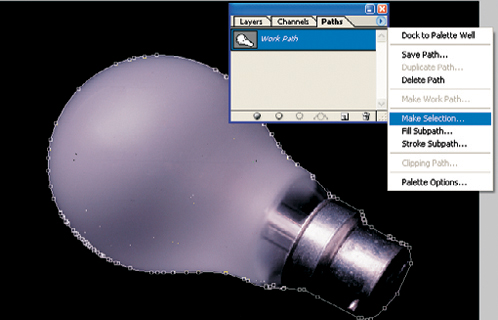
When a path is drawn you can turn it into a selection, fill it or produce a colored outline using the Stroke Path option.

Paths can be turned into selections and then cut and paste the selected object. In this case the lightbulb was copied and colored using the Hue/Saturation command.
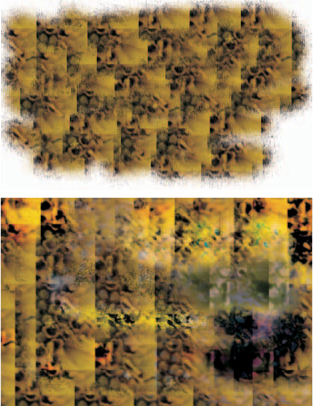
Pattern Stamp tool
![]()

Like the Clone Stamp, but it takes the sample from a preselected area that you’ve defined. To use this select an area you want to clone using the Rectangular Marquee and use this to create the pattern. Then select Edit→Define Pattern.
Now when you use the Pattern Stamp tool the defined area will be repeated as you draw across the canvas. If the Align box is checked the pattern will be repeated in uniform tiles in the shape of the selection. If you uncheck the Align box a tile appears wherever you draw. Blend tools are also available in this mode.
A selection from a mushroom, painted in using the aligned turned off for the top version and turned on for the bottom version.
Right is the same brush with the Impressionist option turned on and changed to purple.


First make a selection of an area that you think will suit the Pattern Stamp tool. Then go to the Edit Define Pattern and the new pattern will appear in the Patterns Presets box. Then you can paint a pattern using the pattern stamp and it will repeat whatever pattern you select.


As illustrated here you can also use Blend modes to change the way the pattern appears on the page. Above left is the pattern painted with Diffuse blend mode and align turned off. Left is various blend modes painted on top of each other and above is a strip of five blend modes from left; Normal, Difference, Luminosity, Hardlight and Dissolve.
Tip
![]() Make your own mini gift wrapping paper by selecting a part of a subject that would look good repeated and use the Pattern Stamp tool in aligned mode to cover an A4 or A3 sheet.
Make your own mini gift wrapping paper by selecting a part of a subject that would look good repeated and use the Pattern Stamp tool in aligned mode to cover an A4 or A3 sheet.

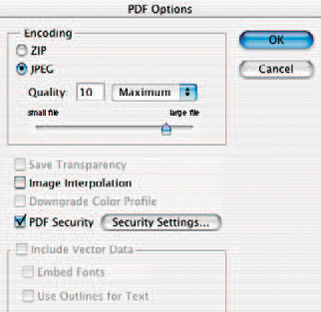
Short for Portable Document Format, this file format is used to convert Quark documents that contain words and pictures into a format that any one can view using the free Adobe Acrobat reader. Pictures that have been edited in Photoshop can also be saved in this format. Photoshop 7.0 introduced an option to password protect the PDFs too.
PDF presentation


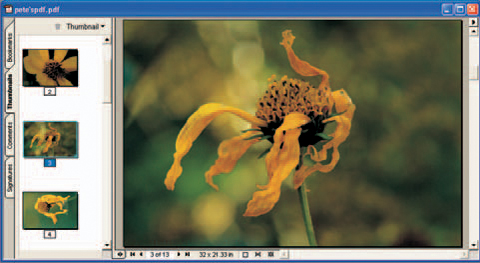
At last! Photoshop has a slide show mode. This mode is new to Photoshop CS and lets you create PDF presentations (slide shows) that you view using Adobe Acrobat. The images can be set to change at selected intervals with one of many transitions. You can also choose to save as a multi page document. You can access this mode from the File Browser menu.
Pencil tool
![]()
Produces a hard-edged line and is more useful for drawing than retouching images. The Options palette has a fade feature that gradually reduces the pencil color opacity to zero giving a gradual fading effect. There’s also an Auto erase that replaces the image with the background color as you draw.

Pen tool
![]()

Creates a path that can be turned into a selection. It’s unusual to use at first, but spend some time getting familiar with it and your drawing and selection skills will improve tenfold.
The Pen tool icon on the toolbar has several options. The first is Pen tool which you use to add points, known as anchor points, around the subject. Points are automatically linked to make a path. This is ideal I when you want to draw a straight lines and smooth curves. You can have as many anchor points as you like and they can be removed by clicking on them.
To draw a straight line, click at a start point then move to the finish point and click again. To complete a straight path click the Pen tool icon in the toolbox when you reach the end. To complete a round path click on the original start point to complete the shape. The Freeform Pen tool is like the normal Lasso and creates a path wherever you draw. It’s like using a normal pen and is very accurate, providing you are! Anchor points are added along the path, and their positions can be changed when the path is complete. The Magnetic Pen tool works like the Magnetic Lasso and automatically locates high contrast differences between pixels and lays the path along the edge.
Tip
![]() When using the Magnetic Pen tool go slowly so the Pen locates the edge you’re drawing along to ensure it picks up what you expect it to.
When using the Magnetic Pen tool go slowly so the Pen locates the edge you’re drawing along to ensure it picks up what you expect it to.
![]() Hold down the Shift key to create a straight line running at a 45° angle.
Hold down the Shift key to create a straight line running at a 45° angle.
![]() Click the Rubber Band box in the Options palette to see the curve of the path you’re about to create as you move the Pen tool.
Click the Rubber Band box in the Options palette to see the curve of the path you’re about to create as you move the Pen tool.
Perspective
Use this to either reduce converging verticals or exaggerate them. Drag the handles at the edges of the selection to pull in or pull out the canvas. A tall building that’s been taken from a low angle with a wide-angle lens will appear narrower at the top. Stretch the canvas outward to make the walls upright.
Alternatively a road going off into the distance can be made to reach a pinpoint at the horizon by pulling the canvas in at the top.
Tip
![]() Use View→Show Grid to help get uprights vertical.
Use View→Show Grid to help get uprights vertical.
Whoops!
![]() If the Transform option is grayed out go back to the picture and select the area you want to transform. Select All if it’s the whole picture you’re changing.
If the Transform option is grayed out go back to the picture and select the area you want to transform. Select All if it’s the whole picture you’re changing.
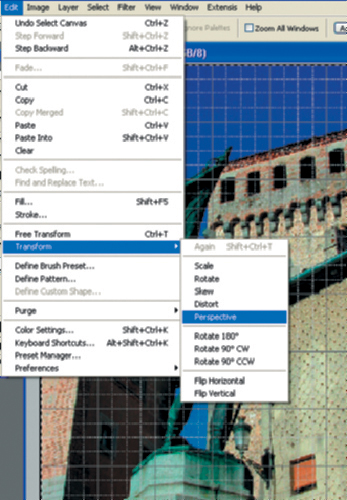
Pub signs are something that rarely appear square, and that’s not because of the few you’ve just had indoors! The distort tool is a better option to use.


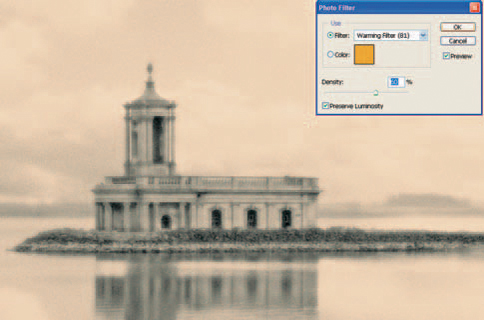
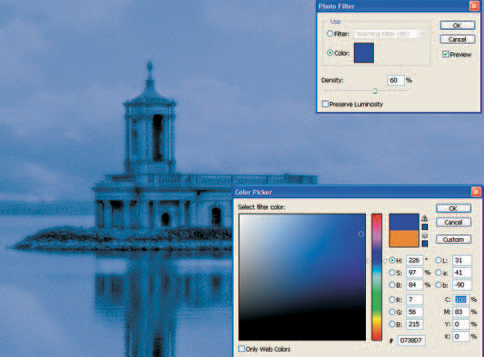
Photo Filter

Those traditional photographers who have been wondering how to emulate an optical photographic filter can now do so with ease. Photoshop CS adds this option that places a color over the photo without you having to worry about variations, hue/saturation or adjustment layers.
This new adjustments feature has a range of preset options including the 81 warm, 80 cool and sepia, plus a color option where you can select any color from the color picker and apply that. The only other control is an opacity slider which reduces the amount of color as you reduce the opacity and a preserve luminosity box that keeps the tonal values the same just allowing the color to adjust. If this is not checked the image will go darker if you choose a dark color.
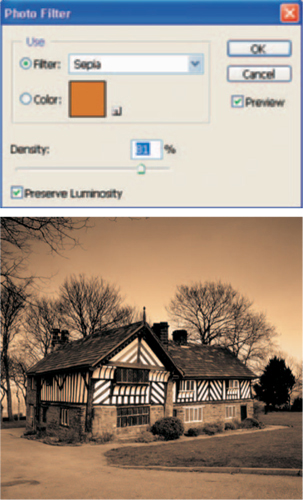
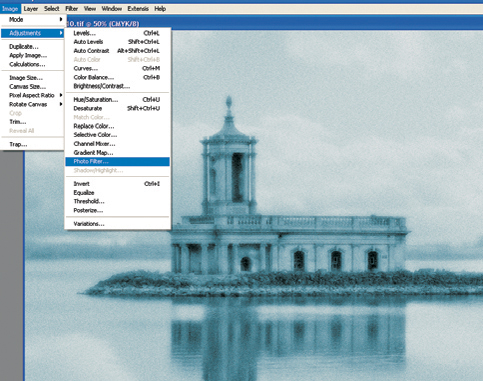
Warm up filters are no longer required and you can even add warmth to a toned photo. You can adjust the density while watching the preview.
Click on the color box to manual select a color from Photoshop’s standard color picker.
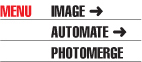
Photomerge
This first appeared in Photoshop Elements and it’s good to see that the same option is now included within Photoshop CS. This feature automatically joins photographs together that have been taken from the same position but pointing at different sections of a scene. It’s a great feature when you see a landscape in front of you and find you are restricted by the angle of the lens you use. You simply shoot several photos to cover the width of the scene and then let the program automatically stitch them together. Each photo should be taken allowing around 20% overlap and ideally with manual exposure so that all the shots have the same tonal value. This makes it easier for the software to match and create an even join.
Settings gives you the choice of a straight stitch (Normal) or one that takes into account the view you see would be arced and perspective would be different at the edges. This is the option I’ve used. Notice the photos at each edge are stretched and made bigger, giving the illusion that you are looking around the scene rather than at a flat, two-dimensional view.
Click on Cylindrical Mapping Composition setting to remove the bow tie shape created when you use perspective setting. Use Advanced Blending to minimize color changes where blending images with exposure differences overlap.
You can save the composite as a .pmg file which can then be called up in future and reworked.

Left is a version created when Normal is selected from the Settings option. The version below is when Perspective is selected and this is the option I used for the main photo at the bottom.
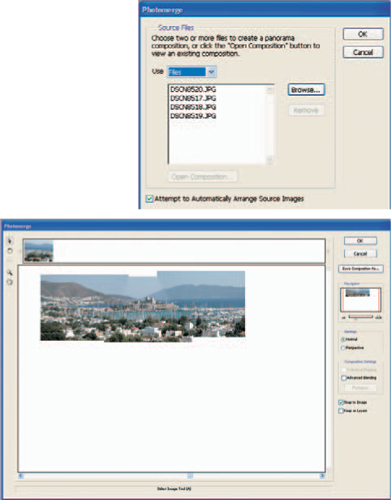
When you first activate this mode it asks you to select the photos you want to join. These then appear in the centre window in sequence, usually overlapped and ready for you to confirm acceptance. You do have several options to improve the results.

You may find the merge leaves a line where two tones have been blended. Use the Patch tool to make a selection over the poor merge and sample from a spot outside the merge area.
PICT file

Is widely used by Mac operators for use in graphics and page layout programs, and is ideal for transferring between the two. It supports RGB and allows a single Alpha channel, Index colors and Grayscale.
Picture Package
An auto mode that resizes a selected picture to a specified resolution and fits a variety of sizes on an A4 page, ranging from one to 16 pictures.
First you choose the source image which then opens into one of the templates. You can change the size of the page and the number of pictures displayed in the layout. The source image appears in each of the picture frame areas on the layout and then you either print that or click on individual boxes in the layout to change pictures into a multiple print page.
Photoshop CS adds a layout editor where you can choose the shape, size and position of pictures on the page and save the layout as a custom file for future use. Custom files can be deleted by going into Photoshop Folder and presets and layouts.

CHOOSE YOUR TEMPLATE
Picture Package has a range of layouts you can choose from. This is a great automated tool to help you print multiple photos from one or several images on a sheet of A4 paper.
Pin light
(See Blending modes)

Pixel Aspect ratio
![]()
A new feature in Photoshop 8 that enables either DV or D1 video format files which are composed of rectangular (non-square) pixels to be viewed accurately on screen.
DV or IEEE 1394 is a digital video standard with a 4:3 frame aspect ratio and a screen resolution of either 720x480 (NTSC) or 720x576 (PAL). D1 is also known as CCIR-601 and has a screen resolution of either 720x486 (NTSC) or 720x576 (PAL).
If you were to view files created in either of these two formats the image would look squashed. By selecting the correct non-square format you can view the files as they will appear on a video display or in video editing software such as Adobe After Dark.

Pixel dimensions
Number of pixels measured along the width and height of an image, quoted as 640x480 pixels on a basic digital camera and 1280x960 pixels on a megapixel model. The latest six million pixel cameras have dimensions of around 3072x2048 pixels.
Pixelating filters
![]()

A range of seemingly pointless filters that convert the selected area into varying patterns of clumped pixels.

CRYSTALLIZE
Takes pixels into lumps and converts them into a polygon shape of solid color. The size of polygon can be varied between 3 and 300 pixels, although anything past 3 starts to look ridiculous.
FRAGMENT
Duplicates pixels and offsets them to create an effect that you’d normally only see after a few too many drinks!

MOSAIC
Clumps pixels into square blocks and makes them the same color. The effect is like a very low resolution image and another one we’ll avoid.
COLOR HALFTONE
Divides the image into rectangles and replaces them with circles to create an enlarged halftone effect. The menu lets you select the radius of the halftone dot, with pixel values from 4 to 127, and you can enter screen-angle values for each channel. It can take ages to apply and you’ll wonder why you bothered!

FACET
One of the better pixelating filters, changes clumps of similar colored pixels into blocks of the same color pixels to make images look like they’re paintings.
MEZZOTINT
Brings up a dialogue box that has nine options – each scrambling the picture to look as though it’s a badly tuned television picture. One to avoid, unless, of course, you like looking at badly tuned images!
POINTILLIZE
Makes the image look like a pointillist painting. Yuk!
Plastic Wrap filter
(See Artistic filters)
Plug-in filters
A filter that offers additional features to the standard program. Photoshop supports third party filters that can be added to Photoshop’s plug-ins folder to increase the program’s flexibility. The files have .8bf as their description. Many of the current supplied range used to be third party options.
(See Appendix E)
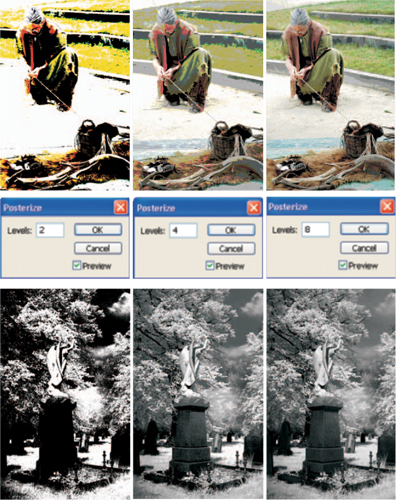
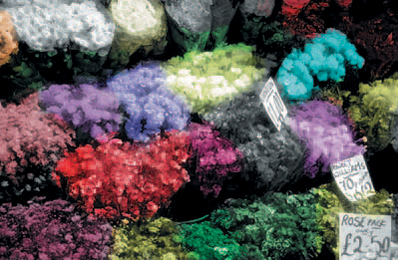
The examples below show the result of varying of Posterization on color and black & white images
Polygonal Lasso tool
(See Lasso tool)
Posterization

Converts the image into a number of brightness levels between 2 and 255 to produce a graphic effect. 2 is too harsh, 255 too subtle. A good balance is between four and eight.
Preferences
(See Appendix D)
Preserve luminosity
(See Color balance)
Preserve Transparency
When this box is ticked in the Layers palette the areas of transparency are protected from brush strokes or other changes made to that layer.

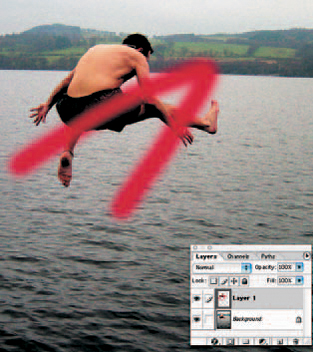
To show the effect I cut around the leaping bather and pasted him onto a new layer. Then I painted over him using Preserve Transparency turned on (above) and off (below).
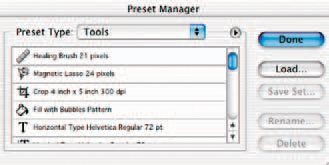
Preset manager
![]()
Brings all the preset palettes into one box so you can create new ones, load and edit existing ones or delete unwanted ones. These categories include Brushes, Swatches, Gradients, Styles, Patterns, Contours, Custom Shapes and Tools, each with its own set of presets. Tools, for instance, contains Crop & Marquee, Art History, Brushes, and Text presets that can be loaded or new ones saved.

Left: The preview window shows the default setting and how the print will appear on an A4 sheet, in this case it’s too big and will be heavily cropped and a message will appear when you try to print saying the image is too large.

Below left: Click Scale to fit media to get a full image inside the preview window and a useful print. The Color management section lets you set the source (image) and print space (output) profiles. This ensures that Photoshop works with the inkjet printer to deliver a good quality result.
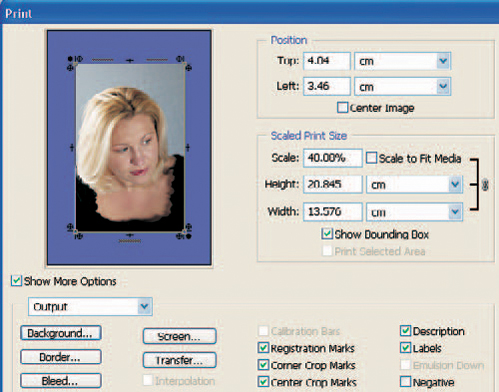
Below right: Uncheck ‘centre’ and key in a size to print a custom size and position anywhere on the page. The Print options window has many more options to choose from that were introduced in version 7.0. To see these change the Color Management drop down to Output. To show you a few in this example I’ve changed the background color to blue, selected crop marks which help when you, or a repro house wants to trim the print. I’ve also selected registration marks.
Print Options
Adobe created this sensible printing system on version 6.0. When the message saying ‘image too big, do you wish to proceed’ appears come here and select Scale to fit Media which automatically adjusts the image to suit the paper you’re using in your printer. You can also adjust the size and position of the image so it prints in a certain part of the paper. Show bounding box lets you adjust by dragging the corner boxes or you could manually adjust size and position by keying in known measurements. All done with minimal loss of brain cells! There are plenty of options for repro houses too including allowing bleeds and printing crop marks.
Print resolution
The number of dots along the length and width of a print, measured in dots per inch. Generally the more dots per inch the higher the resolution. Most inkjet printers print out at between 600dpi and 1440dpi, but these are slightly misleading as the figures allow for between three and six ink color droplets which are used to make up each dot.
A 1440dpi printer that uses six individual ink colors actually means the print resolution is more like 240dpi. The highest true resolution is around 400dpi for dye-sub printers and most books and magazines print at around 300dpi.
Proof Setup
![]()
Lets you view the image on the monitor as it will appear when reproduced on a specific output device. This is known as soft-proofing and saves you printing a hard copy of your document to preview how the colors will look. It is only any use when you have calibrated your monitor.
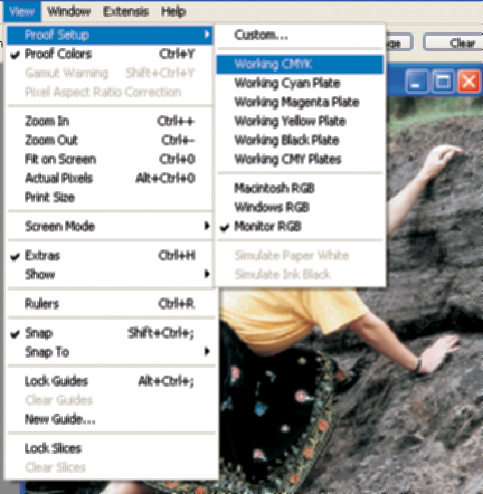
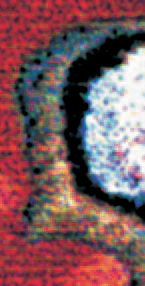
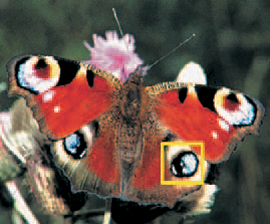
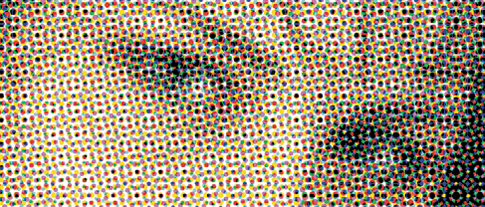
This close-up of the tip of a peacock butterfly’s wing shows how the dots make up the image. This is the equivalent of a 1/4in area printed out at 300dpi, so it shows the formation of around 75 dots across the length.
Progressive JPEG
A file format used on the Web for quicker downloads. The image opens up progressively so you can get a rough idea what it looks like and either wait until it is at its highest resolution or click off and go elsewhere.

PSB
A new format for huge documents to get around the file size limits in the old formats. In the same way PSD stands for Photoshop Document, PSB is short for Photoshop Big! You have to enable large document format in the File handling Preference window first before it will show up. Then you can work on files with up to 300,000 pixels in any dimension.
PSD
Photoshop’s native format. Use this to save photos when you want to keep individual layers, but files are large.
Purge command
![]()

This clears stuff out of the computer’s memory such as the pattern held in the buffer ready for use by the Pattern Stamp tool.
You’d use the Purge command when the computer is starting to run slowly or can’t finish an action due to a lack of memory. Several options are available from the Purge drop down menu including Undo, Clipboard, Patterns, History.