l
a b c d e f g h i j k l m n o p q r s t u v w x y z
Lab Color
An international standard for color measurements developed by the Commission Internationale de L’Eclairage (CIE). It’s capable of reproducing all the colors of RGB and CMYK and uses three channels – one for luminosity and the other two for RGB type color ranges.
Some users prefer to work in this mode as it’s device independent and colors that fall into the CMYK gamut aren’t changed when you convert to CMYK.
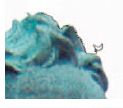
Lasso
![]()
There are three Lassos to pick from the toolbox. The two standard versions, Freehand and Polygon and a Magnetic version.


The Freehand Lasso is used in most programs and is used by accurately drawing round the subject. You can select a feather to be applied to the section and turn anti-aliasing on or off.
The Polygon Lasso is good for drawing round boxes and straight edged items as it creates a straight edge between the source and destination point.
Magnetic Lasso is arguably the most useful Lasso. You draw roughly around the subject and the Lasso detects contrast changes and defines the edge. It then pulls the inaccurate drawing into line, often creating a very good selection.
Tip
![]() Don’t worry too much about being spot on with your drawing. You can hold down the Shift key to add to the selection or the Alt key to take away from it.
Don’t worry too much about being spot on with your drawing. You can hold down the Shift key to add to the selection or the Alt key to take away from it.
Layers

One of the most useful features of Photoshop is Layers. Basically, using layers is like having several sheets of tracing paper, each holding part of the image. Laying the sheets on top of each other builds up the image and it’s easy to remove any sheet to change the feel of the work. But, being digital, layers offer much more.
You can change how one layer reacts with another using the Blend modes (see individual entries). You can adjust the opacity so one layer is stronger than another, you can apply a filter effect to one layer and you can copy and paste from one layer to another.
Photoshop 6.0 introduced new Layer options on the palette. A selection of locks can be assigned to a layer to protect it from accidents later. The first is lock transparency. This used to be called Preserve Transparency and ensures that any areas that are transparent (indicated by the checked grid) will not be affected by paint or filter effects. Then we have lock paintbrush which, as the name implies, prevents you from using brushes. The third is a lock to stop you using the Move tool to move elements from this layer. All three can be individually selected or locked as a group.

Layers are like sheets of glass or tracing paper, each one placed on top of the other to produce a combined multi-layer image.

Three images of a boy, flowers and colored pattern were combined for this shot, each with a blend mode selected that would allow the layers to mix and become diffused by each other.
The three bottom layers of this five layer image were merged using Overlay and Screen blend modes while the top two layers were set to normal so that they stand out.
Layer Based Slice
![]()
This feature, introduced with version 6.0, lets you cut up, or slice, your picture into several pieces. When the image is used in a Web page each slice is saved as an independent file with html code and becomes a fully functional part. The html code contains color palette info and links, rollover effects, and animations can be added in ImageReady.
Slices help you gain faster download speeds and increased image quality. Apply a layer based slice on a layer with a selection and the slice will be positioned around it. This can then be moved and scaled using the Move tool.
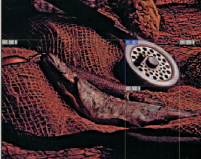
A selection was made around the fishing reel and this was copied and pasted onto a new layer. Now when you request a New Layer Slice it appears around the selection and can be set to be used as a hot link on a Web page.
Layer clipping path
![]()
Sharp edged shape around an object that can be edited using the Shape or Pen tools. The path can be converted into a layer mask: Layer→Rasterize→Layer Clipping Path.
Layer comps
![]()
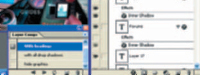
New Photoshop CS feature that lets you create a snapshot of a state of the Layers palette. Layer comps records a layer’s position in the Layers palette and whether it’s showing or hidden. It also records whether layer styles are applied. This is a useful feature if you want to try different effects to show a client. You can then turn each version on or off in the Layer Comps palette and view the differences with speed.
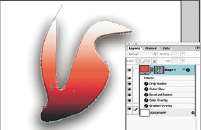
This Layer clipping path was a tick before I started to drag the points around.

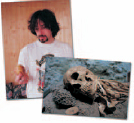
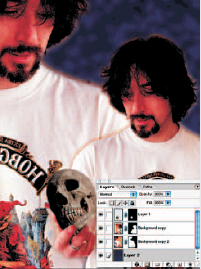
I took this photo a few years ago for Sam, a drummer in a band, who wanted to create a promo card. It was shot on color negative film and scanned on, at the time, one of the better budget film scanners. This didn’t have dust and scratch removal and grain was accentuated.
Sam was holding a potato (it seemed like a good idea at the time!) from which I originally had a lens flare spot appearing to make it look a little magical. This time I decided to replace it with a picture of a skull. And almost in the words of Shakespeare ‘Alas, poor layer masks, I knew them well’.
With Layer masks you can edit each layer with ease, allowing areas of one layer to show through to the ones below. In this composite I have four layers: one with the skull, one with Sam the correct way round and the same image copied, flipped and enlarged to produce a ghostlike extra, plus a man-made background.
Layer Mask
![]()
A layer mask controls how much of that particular layer appears in the overall image. Black masked areas don’t show through and white areas do. You can use the vignette and graduate filters to good effect using Layer Masks.
Masks can be turned off at any stage and any bits of the image that have been masked will show through on the overall image again.

Left: The skull has been very roughly cut from its background and pasted on the layer with Sam. It obviously looks like it has too! By adding a Layer Mask you can paint out areas of the skull layer using the Eraser. Above: Use a large Eraser brush to get rid of the surrounds and a small one for the detailed areas.

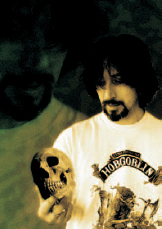
Above right: Now the second Sam layer was pasted, flipped and scaled up. Notice the rough selection around the shirt and hair. Eraser and Paint brush to the rescue.
Once complete I rearranged the pieces, added an adjustment layer and turned it sepia. I then flattened the layers and added grain and a green vignette on the background areas.
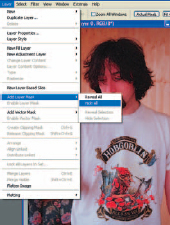
Layer properties
![]()
Opens up a small box where you name the layer and select a color for it.
Layer set
A great feature introduced in version 6.0 that allows layers to be grouped and all the layer blend modes applied to the group. Alternatively the individual layers within the group can have their own set of blend modes that become active when you select Pass Through from the set’s blend mode options.
Layer style
![]()
Control how a layer looks by adjusting its style from a new palette. This offers advanced blending options that lets you adjust the way each color channel blends with the layer below and each element can be adjusted from the palette. Global light lets all the layers have the same angle and altitude.
Lens Blur
(SeeBlur filters)
Lens Flare
![]()
Another one of those filters that will make lens manufacturers cringe. They spend millions on research to get a lens that you can point into the light without getting flare and then you go and stick some in using Photoshop! The truth is a touch of flare can sometimes add the extra bit that’s needed to make the image work.
Tip
![]() Try using the fade option after you’ve applied Lens flare.
Try using the fade option after you’ve applied Lens flare.


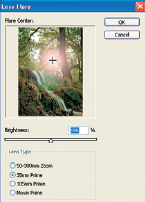
The palette offers a choice of four lens types (Movie Prime is new for Photoshop CS) and an adjustable brightness control, each can be seen in action in the series of pictures below. The preview window above allows you to check the result before you apply the effect to the main image.
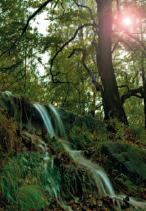
35mm prime
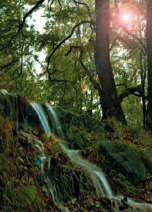
50–300mm zoom

105mm prime
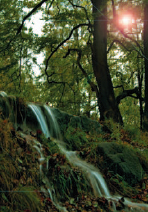
Movie prime
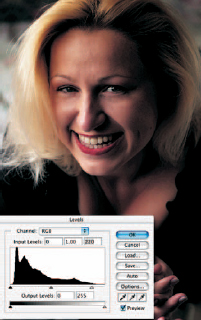
Levels
Used to adjust the black and white points of an image to change contrast. Auto levels does this automatically, but it can affect the color of the image.
When you’re in this palette there’s a window with the histogram and sliders to control the darkest and lightest points. The left-hand triangle controls the shadow area, the right one looks after highlights and the middle triangle adjusts midtones.
If you drag the black triangle to the right you’ll see the image becomes darker. This is because you are changing the value of the darker pixels to appear black. Dragging this too far over would make shadow areas with detail become black. Similarly dragging the white triangle left affects highlights and dragging it too far left will make highlight areas completely white without any detail. This is known as clipping because you are basically cutting off the black and white areas of your photograph.

This test grid shows what happens when Levels are used. The original (left) displays a full range of gray tones in 5% increases from pure white to pure black. On the right are two versions showing what happens when levels are adjusted.

As the right-hand slider is moved inwards the white point shifts. Here the white triangle indicates the new white point and everything that was beyond that also becomes white. The result is a compressed range of colors with washed-out highlights.
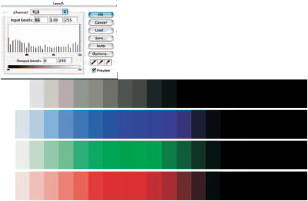
This time the left-hand black triangle was moved inward. Now the highlights stay the same but the shadows block up, so more black area exists and the color tonal range is reduced.
Tip
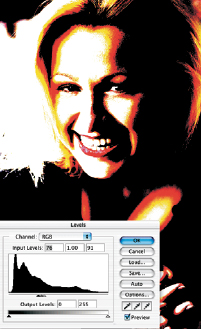
![]() To help you gauge the darkest and lightest points hold down the Alt key (Option on a Mac) while you click on the white or black triangle. This creates a posterized image showing the lightest point as white and the darkest point as black. As you drag the markers inwards you will see the white or black areas increase over the picture. This will give you an indication of how far to drag the sliders to make effective use of clipping the image. Use the values displayed as your highlight and shadow points.
To help you gauge the darkest and lightest points hold down the Alt key (Option on a Mac) while you click on the white or black triangle. This creates a posterized image showing the lightest point as white and the darkest point as black. As you drag the markers inwards you will see the white or black areas increase over the picture. This will give you an indication of how far to drag the sliders to make effective use of clipping the image. Use the values displayed as your highlight and shadow points.


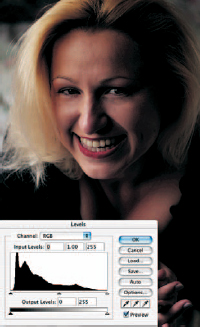
This is the original photograph with the Levels histogram showing a peak in the darker areas and a flat area where the highlights are.
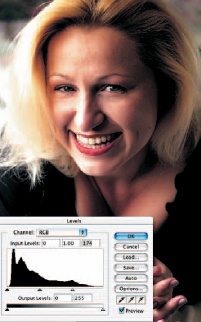
If you drag the white highlight triangle to the left the image lightens in the highlight areas. Take it too far, as I have done here, and the lighter areas that should have detail become pure white.
The trick is to move the highlight slider so that the image lightens but you still maintain detail in the highlights. This is usually around the end of the black graph.

Now we drag the black triangle which takes care of the shadows. Again taking this just far enough to avoid the shadow area blocking up.

Finally drag the middle gray slider left or right to balance out the midtones. In this case slightly to the left towards the graph’s peak.
Pull all three triangles into a similar point on the histogram and you create a posterized effect with only a few tones.
Lighten
(See Blending modes)
Lighting Effects
![]()
A superb range of filters that can be used to simulate various forms of light from spotlight to tungsten. There’s plenty of choice so it’s a case of picking a suitable image and sliding the controls to experiment. Remember to select undo (Ctrl+U) if you don’t like the effect or click on a previous stage in the History palette.
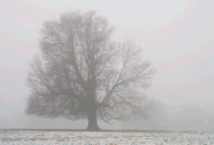
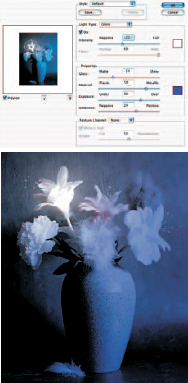
Almost any lighting effect is possible using this filter. Here I’ve taken an icy cold winter scene and will add a sunrise lighting style while explaining the various sliders.
Several presets appear in the Style menu, but I’ll stick with default and create my own. To do this select Omni, Spotlight or Directional from lighting type. Then pick a color – sunset orange in our case. Intensity controls the brightness of the light.
The properties section adjusts the lighting effect by emulating real life objects and how they react to light. Gloss makes the object’s surface reflectivity low when you slide left towards Matte or high when you move towards Glossy.
Material controls whether the light or the object reflects more light. Plastic reflects the light’s color and Metallic reflects the object’s color. Exposure works like a camera – over exposure increases the intensity of light and under exposure decreases the light. There’s no effect at 0. Ambience adjusts the balance of the light with a background lighting color that you’ve pre-selected. A 100 value puts full emphasis on the light source while a –100 value removes the light source. Go between to create an interesting balance of the two colors.

The two screengrabs below show the effect of adjusting the Exposure and Ambience sliders.
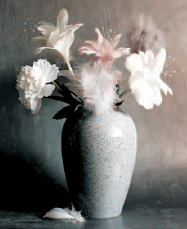
Omni light was selected with white light at a medium intensity. The point was positioned on the white flower to create a glowing effect. The ambient light was set to blue to contrast and give a wintery feel to the shot.
Tip
![]() If the Lighting filter is grayed out you are in 16-bit mode or CMYK color space. Convert to 8-bit, RGB.
If the Lighting filter is grayed out you are in 16-bit mode or CMYK color space. Convert to 8-bit, RGB.


Omni lighting was used with gray and black colors to create a moonlight effect which suits the mood of the powerful Stonehenge stone circle.

It’s easy to turn lights on and create night time pictures using omni lighting and suitable colors. Here a warm yellow was selected for the light type and blue for the properties and the balance of both elements was adjusted using various sliders.
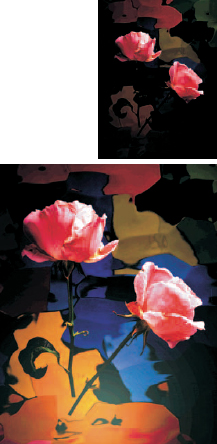
The original was lit using a snoot light for a low key effect. This placed emphasis on the rose petals. Digitally, using an omni light source, it’s easy to bring back the underexposed areas and create a very different effect.
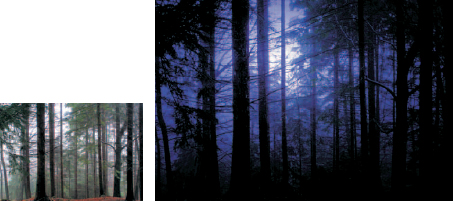
A spotlight effect with dark tones can be used to place emphasis on one area of the photograph. In this case, blue was used making the shot look like a dark and moody Blair Witch style forest. Or you could try an orange hue for a misty morning sunrise.
Line art
An image that’s drawn using one color on a background color with no midtones. Line art is a popular giveaway on royalty-free CDs and web sites. This frog was found on <www.free-graphics.com>, a web site with over 130,000 free graphics for use when downloaded. I’ve picked a small size one to show you what happens to line art if the file size is too small. It looked sharp on screen, but here in print it looks smudged so choose with care.

Linear burn
(See Blending modes)
Linear dodge
(See Blending modes)
Linear light
(See Blending modes)
Line tool
![]()
Used to place lines in the image. When you draw with the Line tool it uses the foreground color and whatever width is set in the palette. You can change the color, width and style of line from the Options palette. You can also stick on an arrowhead making the tool useful for creating pointers.

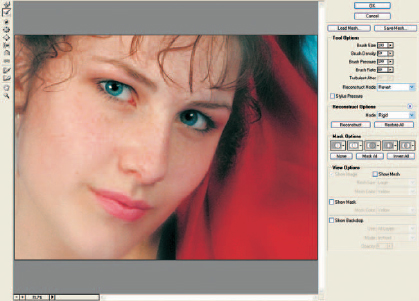
Liquify
![]()
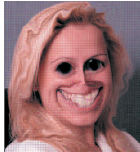
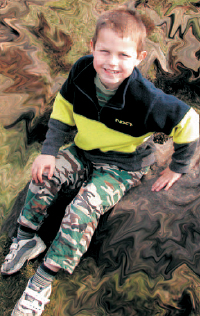
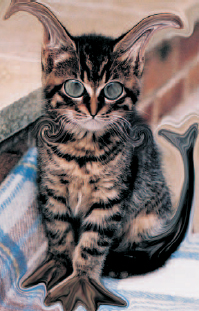
This crazy filter first appeared in Photoshop 6.0’s Image menu and is now in the Filter menu. It basically lets you smudge pixels to distort the image as if it was liquid and while it has many practical applications the most fun can be had by creating wacky portraits of people or pets.
Use the Pucker tool to shrink the nose, the Bloat tool to make the eyes and teeth bulge, the Twirl tool to add an artificial curl to the hair and the Warp tool to pull up the edges of the mouth.

![]()
The Liquid tool bar offers plenty of methods to smudge and distort a photo. From the top: Warp pushes the pixels wherever you drag the finger.
The Reconstruct tool undoes a Liquify effect at a local point without cancelling the whole work. Twirl rotates the picture (ideal to make hair curly). Pucker makes pixels smaller sucking in detail (the one to use to make a mouth or nose smaller). Bloat makes pixels bigger (the one I used for the eyes). Shift pixels left (as it says, Warp tool is better option). Reflect tool, mirrors pixels from start at other end of brush stroke. (Another pointless one). Turbulence creates a wave effect when you brush (this is ideal to make smoke look more wispy or fire look more raging). The two Mask tools are used to paint on and paint off the mask which protects areas from the Liquify tools. You will also see that the new palette in Photoshop CS has complete control of masks and ones from existing pictures can be used and modified with the Liquify masks. Finally we have the familiar Move tool and Magnify tool which need no introduction!
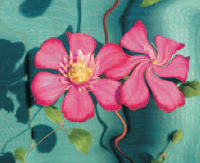
Hours of Dali style fun can be had with flowers.
Tips
![]() Use the mesh grid to help show you the extent of the effect you’ve added and change its color so it stands out from the picture you’re working on.
Use the mesh grid to help show you the extent of the effect you’ve added and change its color so it stands out from the picture you’re working on.
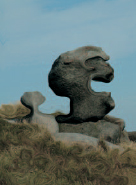
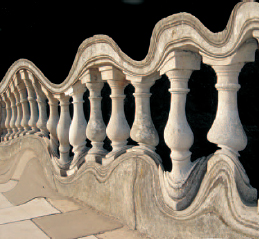
Hours of Dali style fun can be had with just about any subject – laughing rocks, ultra slim lady things and wobbly bridges. Hmmm!
You can use the filter to stretch and warp the background too which, if done better than this, could be made to look like an oil painting.
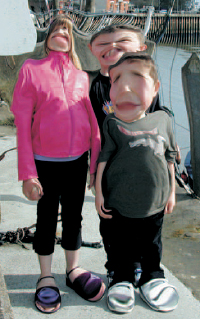
Kids will love playing around with these pictures, but it’s good fun for adults too!

You don’t have to go crazy – Liquify can be used to subtly change a photo. Here the Bloat tool was set to a low pressure and used to enlarge the eye slightly, making it appear a touch wider.
Oh dear, this tool also gives you a licence to create all sorts of what’s the point pictures.
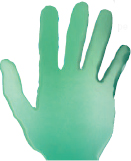

You can save the Mesh and load it later to perform the same distortion pattern on other images. Here I created the hand out of a green backdrop and saved the mesh. 1I then loaded it on a I portrait and used the I reconstruction tool to alter the shape so it suited the new photo.
Luminosity blend
(See Blend modes)
LZW compression
A lossless method of compression used with TIFF and GIF file formats to save space without affecting image quality. The disadvantage is it takes longer to open a compressed image than an uncompressed version.
As a matter of fact
![]() LZW is named after its three inventors Abraham Lempel, Jacob Ziv and Terry Welch. Sounds too odd to be true!
LZW is named after its three inventors Abraham Lempel, Jacob Ziv and Terry Welch. Sounds too odd to be true!