Calculations
![]()
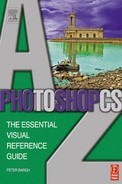
This mode lets you merge two channels from one or two images and save the result as a new channel in one of the existing images or create a new image. The Calculations palette gives you various options including Blend method and is useful if you want to combine masks or selections.
Calibration
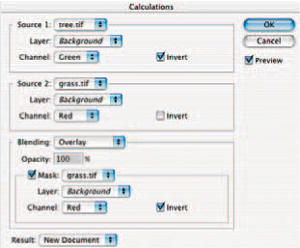
The phrase ‘what you see is what you get’, or ‘wysiwyg’ (pronounced whizzywig) couldn’t be more important. When you view an image on the computer screen you want it to appear exactly the same when it prints out – oh if life were so simple! Computer monitors can be wildly out – just like your neighbour’s television, and a high contrast, vivid color image on screen is likely to be disappointingly dull when printed.
It’s because the image on the monitor is an RGB file that’s projected light, while the printed image is a CMYK version that you view by reflected light. To get round this you need to calibrate your system.

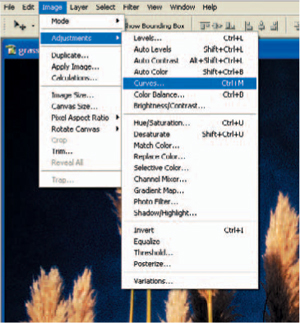
Adobe Gamma can be found in the Control Panel from the Start menu of a Windows PC.
Adjust your monitor using Adobe’s Gamma file which should be located in your Window’s Control Panel. Mac users can use the Apple utility that is in the control panel, or System Preferences on OSX. These easy-to-follow wizards help you adjust brightness, contrast and gamma to ensure life-like prints.
Mac OSX gamma adjustments can be found in the display control panel in System Preferences.
You also need scanner and printer profiles set up to ensure that the file keeps consistent color as it moves through your system.
Camera Raw support
Raw support was introduced halfway through the life of Photoshop 7.0 as an optional upgrade. It now comes free with Photoshop CS and allows you to open RAW files taken with more advanced digital cameras.
When you shoot in Raw mode the camera does no internal processing and gives you a file that cannot normally be read unless you use the manufacturer’s own software. This plug-in allows Photoshop to read and process the file and has basic and advanced options.
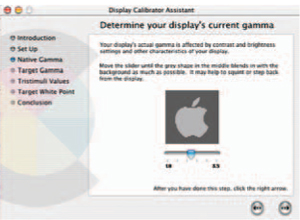
Basic includes control over setting the white balance with preset options and a Kelvin scale for those who know more about color temperature. You can also adjust overall exposure, shadow, brightness, contrast, saturation, sharpness and color noise reduction. You have the option to open as 8-bit or 16-bit color depth and adjust the file size and resolution.
Click on the advanced button and two more tabs appear offering control over individual RGB hue and saturation plus compensation for camera lens chromatic aberrations and vignetting.
As new cameras are introduced Adobe will make updates available on their Web site to support the cameras.
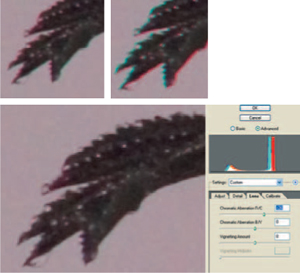
Even the best digital cameras currently suffer from distortion of color, known as chromatic aberrations, in the edges of the photo. The advanced options allow you to correct for this. Left is the Raw file which displays slight red/cyan aberrations. Above right is what happens if you adjust the R/C slider too far and right is the corrected version.
Tip
![]() If you regularly shoot in similar conditions save your most used settings so you can apply them again later on images with similar characteristics.
If you regularly shoot in similar conditions save your most used settings so you can apply them again later on images with similar characteristics.
![]() Hold down the Alt key while adjusting the Exposure and Shadows sliders in the Adjust menu to see the highlight and shadow clipping.
Hold down the Alt key while adjusting the Exposure and Shadows sliders in the Adjust menu to see the highlight and shadow clipping.
Canvas size
![]()
The canvas is the base to your digital photo, like an artist would add paint, you add pixels. When an image is opened the canvas size is the same as the image. If you want to extend to one side or to the top or bottom you need to increase the canvas size.
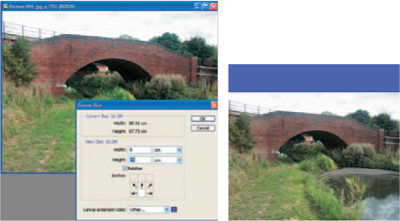
Here I’ve illustrated how to increase the canvas when you want more space for the sky, I would then add clouds. Click in the bottom middle of the Anchor grid of nine squares so that the extended area appears at the top of the existing canvas. I selected blue so you can see the effect (below right). Ticking Relative allows you to enter the amount of extra canvas you want rather than a total when it’s not ticked.
Channels
![]()
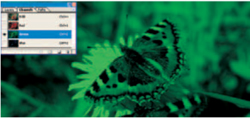
Each file in Photoshop is made up of channels that store information about the image. A freshly created RGB file has a channel for each of the three colors, and a CMYK file has four channels, while Duotones and Index color images have just one.

You can add channels to store info about the picture. For example, Alpha channels can be added to save selections as masks. Then when you want to perform a similar cutout in the future you load the Alpha channel to bring the marching ants into play on the selected layer.
Channels can also be edited individually so you could blend certain ones, or fiddle with the color of just one channel – useful when you want to make a selection based on a certain color which would be easier to do in its own environment.
Tip
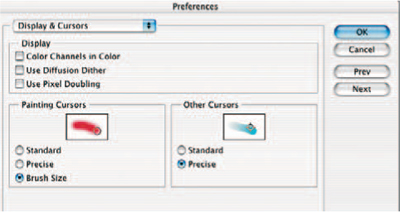
![]() Individual color channels appear as black & white. If you’d prefer to see them in color go to File → Preferences → Displays & Cursors and select the Color Channels in Color option.
Individual color channels appear as black & white. If you’d prefer to see them in color go to File → Preferences → Displays & Cursors and select the Color Channels in Color option.
Channel Mixer
![]()
The Channel Mixer is one of those tools in Photoshop that you come to once you have a little more experience. By adjusting the color of the individual R, G and B channels you can change the color of an element within the picture.
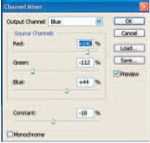
You could play around mixing channel colors all day! If you don’t like the result, click on cancel and start again.

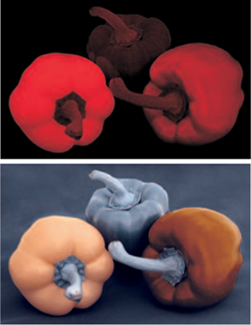
Try also converting the image to CMYK and adjusting the yellow, magenta, cyan and black channels for a completely different set of results
Tip
![]() Click on monochromatic filter and recreate black & white filter effects using the slides to adjust the colors in each channel. Experimentation is the key here!
Click on monochromatic filter and recreate black & white filter effects using the slides to adjust the colors in each channel. Experimentation is the key here!

Check spelling
![]()
This feature, which was introduced in version 7.0, proves useful if you are using the type tool to work with text in Photoshop. This automatically runs through your work and finds anything that isn’t spelt correctly or doesn’t appear in its dictionary and suggests an alternative.
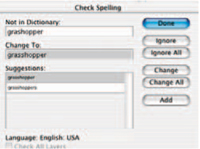
If, for example, it found grashopper it would suggest the correct grasshopper and you could then click on ‘change’ to have the word automatically substituted. This sort of feature is available with all word and DTP (desktop publishing) packages and is a welcome addition to Photoshop.
Clipping path
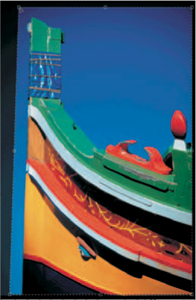
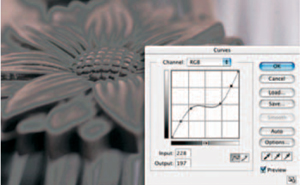
Puts an invisible path around an image to ensure the background is transparent when the image is dropped into an illustration or desktop publishing page.
To create a clipping path first draw around the subject to make a selection then click on the arrow at the right of the paths palette and select Make Work Path, then Save Path. Finally select Clipping Path.
Save the file as an EPS or TIFF which keeps the clipping path data which can then be read by the DTP software to allow a transparent background or text to wrap around the subject.

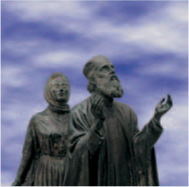
A clipping path was drawn around the wooden carving so it can be dropped into a DTP layout without a background, and text wraps around it.
Clone Stamp tool
Adobe followed most of the other software programmers in version 6.0 by giving the oddly named Rubber Stamp tool a more sensible title of Clone Stamp tool. This particular tool is responsible for many photographers taking up digital imaging.
The first time you see bits of rubbish being wiped right out of an image or spots and blemishes being removed from your partner’s face you’ll be in awe. All that’s happening is the Clone Stamp tool is being used to pick up or sample pixels from one place and drop them somewhere else. It’s one of the most used devices to remove or add detail to an image.
There are several ways to use it. For starters it acts like a brush so you can change the size, allowing cloning from just one pixel wide to hundreds. You can change the opacity to produce a subtle clone effect. You can select any one of the options from the Blend menu. And, most importantly, there’s a choice between Clone align or Clone non-align.
To use it place the cursor over the sample point, hold down the Alt key and click the mouse. Then move the cursor to the point where you want the sample to appear and click the mouse to dump the pixels. If you hold down the mouse button and drag you’ll paint from the sample area. Select Aligned from the Clone Stamp options palette and the sample cursor will follow the destination cursor around keeping the same distance away. When unaligned the sample cursor starts where you left off. Both choices have their advantages.

(See Pattern Stamp tool, Patch tool and Heal tool)
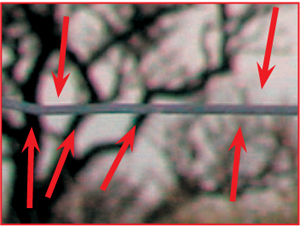
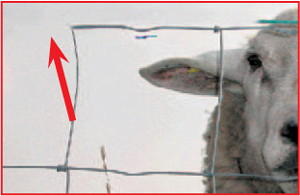
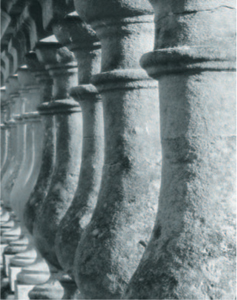
When cloning fine detail look around for similar areas and try to follow a path that will make the sample look natural. In this part I cloned from the arrow heads and followed their direction.

Removing fencing or cages is fairly easy if you’re handy with the clone tool.
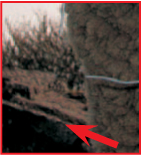
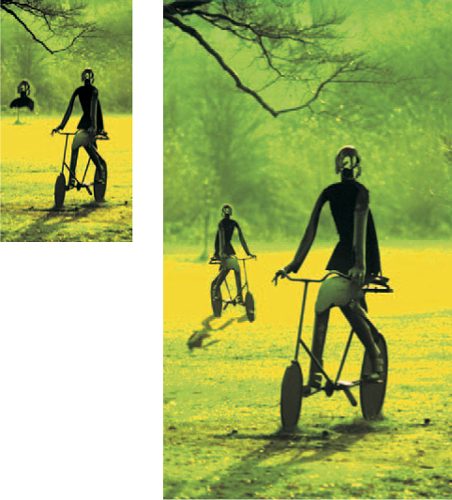
Here I sampled from the edge of the rock and followed up in the direction of the arrow.
You may think areas of sky would be easy to clone, but that’s not always the case. As the tones subtly change you could easily end up with an obvious line. Sample from a point as near to the area that you are cloning over.
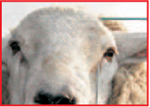
The face was fairly easy to clone over. Keep a steady hand and follow patterns in the wool when cloning.
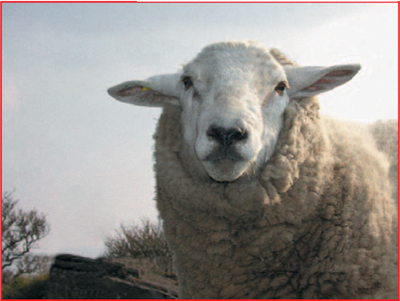
The end picture, with a small amount of noise added and cropped at the right, to provide a more pleasing composition. Free at last!

Clone aligned ensures the clone sample point stays at the same distance from the cursor as you move around cloning. This is useful when, as in our example above, you’re cleaning up blemishes or dust in a sky. The sampling point (indicated by the arrow tip) will follow at the same distance from the cursor (cloning over the scratch) so the sampled pixels will usually be a similar color and texture. It’s generally the best method to use and only falls down when, as in our example, it cloned the steeple when a blemish was just to the right. Here you would take a new sample to the right of the blemish.
Clone unaligned keeps the sample point where you left off so when you move the cursor it stays put. This is useful when you want to take a certain part of the image (sky in our case) and paint it in various other similar parts.
Some programs allow cloning to be applied at different percentages to produce a smaller or larger version of the original. Photoshop doesn’t (right), but you can get round this by adding a new layer. Then take your sample point from the original layer and clone with the new layer active. Then use the Transform tool to rescale the cloned image.

Dust from scans of unclean transparencies can easily be removed. Select similar areas of color or pattern from nearby and sample from those to clone over the spot. Zoom in on screen and vary the brush size on different areas.
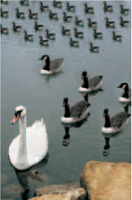
Play God and create new life. This started out with just four ducks!

You can take your sample point from one image and then reposition the cursor on a different one to clone onto it.
Clouds filter
![]()
This useful addition to the Filters menu creates cloud effects that can be used as effective backgrounds to your pictures. Before selecting the filter make sure your background color is set to white and the foreground to the color sky you’d like. Blue creates natural skies while orange will deliver a sunset effect and black will produce a stormy sky.
Open a new canvas and set it to the size you want to end up with and select the filter. If you don’t like the clouds that are created, try again – it’s random.
Draw around your subject to make a selection, then copy and paste the selection onto an image created using the Clouds filter. Try experimenting with colors for unusual effects.

If the cloud effect is too harsh use Ctrl+ - key to reduce the image on screen. Then use the transform tool to stretch the clouds.

Go to Image → Adjust → Hue/Saturation (Ctrl+U), click on Colorize and adjust Hue to change color.
Use the Gaussian or Motion Blur filter to soften the effect.
You may wish to create a surreal sky. Simply select Hue/Saturation and adjust the sliders until the color you like pops up.
CMYK
When a digital image is printed it’s converted from RGB into CMYK. CMYK is the standard method of printing and uses Cyan, Magenta and Yellow inks to make up the various colors.
A 100% combination of C, M and Y should produce black, but in reality it’s a murky brown color so the Black ink (K to avoid confusion with the Blue of RGB) ensures black is printed where necessary.
Collage
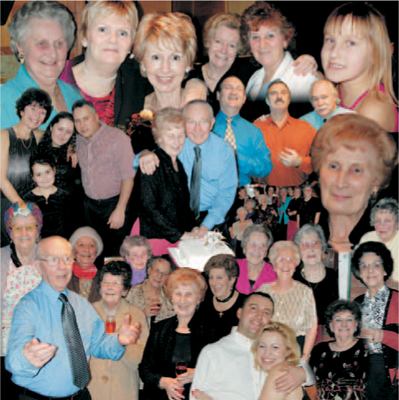
Strictly speaking a collage is a collection of photographs mounted together, but Photoshop creates a perfect alternative by bringing several photos together to form one larger image that hasn’t seen a drop of glue or sticky tape.
It’s a great technique to use to create a family tree, group photo, promo, surreal image or, as below, a panel to go on a Web site or stationery header.
Using Layers makes the job much easier and more controllable. Here masks and blend modes allow lower layers to react with ones above. The binary text was created using the text tool and then distorted, skewed and stretched, to give it a forward look.
![]()
Color Balance
Used to remove or create a color cast. The Color Balance palette has three sliders to control the color. Moving the top slider left adds cyan and reduces red. Move it to the right to add red and reduce cyan. The middle slider controls magenta and green and the bottom, yellow and blue. Precise values can be keyed in the top boxes. You can also select where you want the color to change, placing emphasis in the highlights, shadows or midtones. The final option is to Preserve Luminosity which maintains the original brightness when it’s turned on.
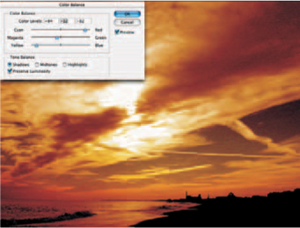
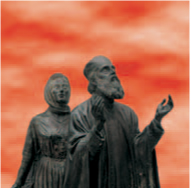
The above original lacks that extra something. Maybe a vivid glowing sunset. Applying lots of yellow and red gives a strong sunset that would make any shepherd delighted!

Daylight film is designed to produce a natural looking range of colors for outdoor photography or indoor shots taken with flash. Take a photo indoors without flash and you’ll end up with a color cast. This will be green if the light source is fluorescent or orange if it’s tungsten light. Some flashguns are so harsh that they create a blue color cast. The walls in a room can also reflect light to add a color to your subject. Any color cast can be removed, or added, using Photoshop’s Color Balance mode.
Color burn
(See Blending modes)
Color Channels
(See Channels)
Color dodge
(See Blending modes)

Or how about blue for a stormy winter sunrise effect? Almost anything’s possible with the Color Balance sliders.
Color Range
![]()
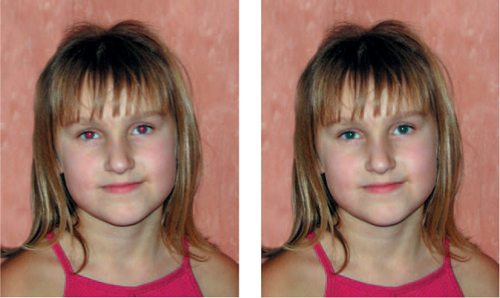
Photoshop’s Color Range is a versatile tool to help you select and change the color of a part of your picture. This could easily be a model’s lipstick, car paint work or, as in this case, red pupils.
With the picture open call up the Color Range palette. To make it easier to see what you’re doing click on Selection at the bottom of the palette to turn the preview window into a grayscale image. For this exercise also select Sampled Colors from the menu at the top of the palette.
Now click on the left-hand Eyedropper tool and position your cursor over a part of the red pupil and click once. You’ll see areas of white appear on the grayscale preview. These are red pixels that are similar in color to the red you’ve just clicked on. Adjust the Fuzziness to control the range of reds that are selected.
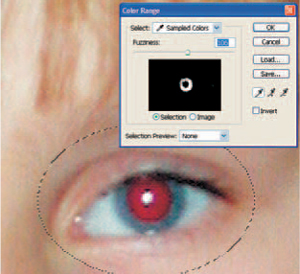
The Fuzziness slider above the preview window controls the range of reds either side of the one you picked. Adjusting the slider to the right increases the selection, and to the left decreases the selection.
Another method is to let Photoshop pick the color you want to change. Go to the Select menu and pull down the Red option. Now you’ll see the Fuzziness scale cannot be adjusted and everything that’s red in the image has been selected. You can also use this method to select highlights, midtones or shadows. It couldn’t be used in this example though because the girl’s top would also be highlighted. Now turn to the Patch tool to see how we get rid of wrinkles.

Each eye was selected using the + Eyedropper in the Color Range window and fuzziness was set to ensure all the red area was selected. Then hue/saturation was used to turn the eye to a suitable color.
WHICH MASK?
The Color Range palette also lets you choose which type of mask to put over the image as you work. We’ve been using None, but the menu box, labelled Selection Preview at the bottom of the palette, has four other options. Grayscale makes the image look like the palette’s preview. Black Matte (above) shows the unselected area black. White Matte makes the unselected area white. Quick Mask puts red over unselected areas.

Tip
![]() Press CTRL to change the grayscale preview to the color image or click inside the preview box.
Press CTRL to change the grayscale preview to the color image or click inside the preview box.
![]()
Color Replacement tool
![]()
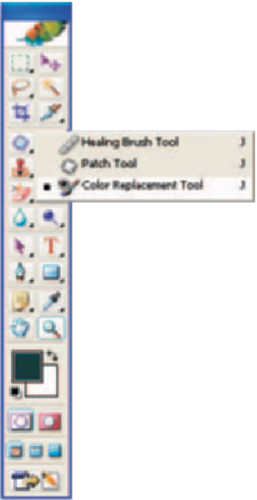
Appears as the third option under the Heal and Patch tools in Photoshop CS’s toolbar.
This is used to replace the color in the photograph with the foreground color selected and acts like a paintbrush to change the color. If you set the foreground color to black and the mode to hue it acts like a desaturation brush (below). You could previously do this by changing a photo from color to grayscale and then back to color, setting the History to the grayscale state and painting in with the History brush. Using the Color replacement tool is a much quicker way.
It goes one stage further by working like the Magic eraser where it only replaces the color of pixels within the same tolerance range as the first sampled point. You can chose Hue, Saturation, Color or Luminosity modes.
Colorize
![]()
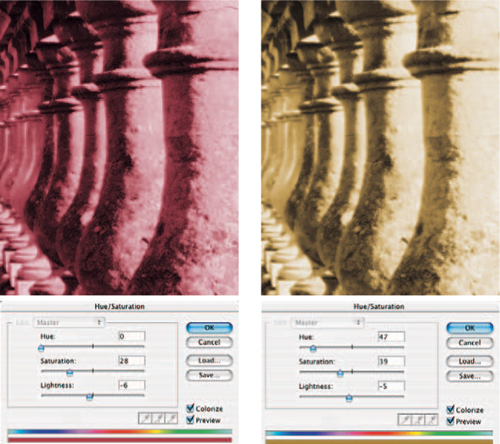
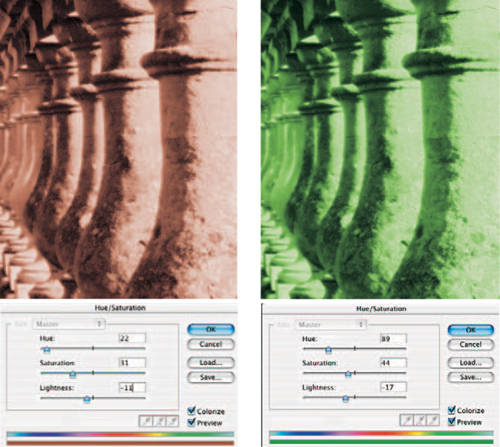
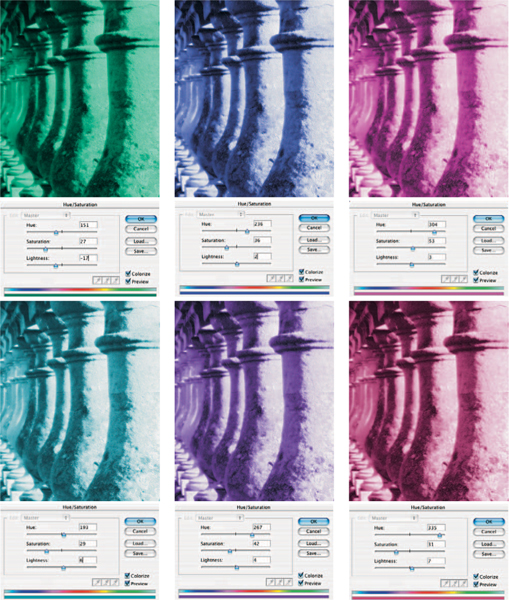
Turned on in the Hue/Saturation palette to create a monocolor image. If you want to tone a black & white image first convert it to RGB, Image → Mode → RGB Color. Adjust the Hue slider and watch the image go from blue through the colors of the rainbow and back to blue. Stop when the image is the color you like and save. Use lightness and saturation sliders to vary color further.
I’ve included a range of examples here using a black & white infrared photograph with the various settings made. You could use these as starting points to colorizing your own photographs. The color tonal range is displayed below the rainbow color bar in the preview window.
Tick the preview box to ensure you see the effect as you adjust the sliders.
Original grayscale image
Color Sampler tool
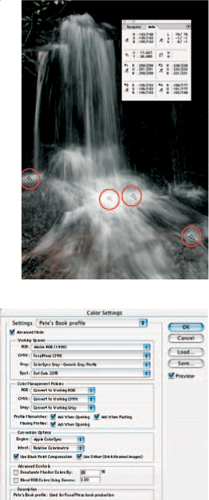
An Eyedropper tool that is used to place up to four sample points on the photo so you can compare color and density of each spot using measurements displayed in the Info palette. A second set of measurements appears at the side of the current values, showing the adjustments you make when using controls such as levels, curves, contrast and brightness. In this example I placed four samples in the highlight areas of the waterfall so I could adjust curves and ensure there was still detail in most parts.

Color Settings
![]()
Allows you to set up color profiles so that images you open up use a pre-selected color space. Spend some time setting this up correctly and you’ll maintain consistent color when the image is displayed and printed. Mac OSX users will find the item under the Photoshop menu not the Edit menu.
Compression
Digital images can have huge file sizes. A 10x8in RGB image with a resolution of 300ppi, for example, has a file size of 21Mb. A few of these will start to fill up your computer’s hard disk and a quick calculation finds you’ll only ever fit 30 on a CD. It doesn’t have to be this way. There are several file formats that change the data to reduce the file size – a method known as compression.
Two types exist – Lossy and Lossless. Lossy removes data for good, Lossless keeps it all safe. JPEG is the common storage format used by most digital cameras and Kodak’s Picture CD. JPEG is a Lossy version and can affect the picture quality if it’s highly compressed.
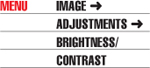
Conditional mode change
Add this to an action to keep the color mode of a file the same when the action is being performed.

Contact sheet
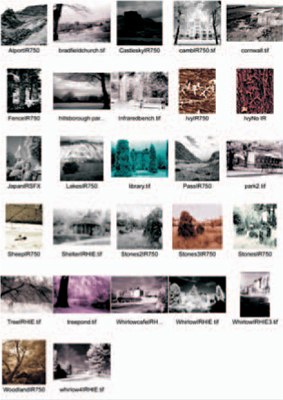
![]()
Photoshop has a neat conversion that takes a collection of images and turns them into low resolution thumbnails that are positioned like a contact sheet.
It’s a good way of keeping a record of your images and also to submit with CDs so the client can have a rough visual of what’s included in the package.
You can choose the size of sheet and the number of pictures displayed across the page. The quality is a bit disappointing, but it’s quick and easy to use.
Tip
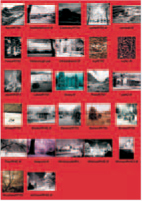
![]() The contact sheet is saved with a white background.
The contact sheet is saved with a white background.
If you would prefer a different color use the Fill tool with a neutral tone selected for the paint and click on the transparent area to deposit the color of your choice.
Red might clash! Black’s a safe choice.

The pictures appear on the contact sheet in the same way that they have been saved. It’s a shame you can’t preview and rotate the pictures before you save the contact.

Contiguous
(See Magic wand)
Contrast
The range of tones between black and white, or highlight and shadow.
A high contrast image is one where there’s dark and light tones, but not much in between. Shots taken into the sun, or with the sun high in the sky are often high contrast.
A low contrast image is one that doesn’t have many tones in the lightest or darkest areas so it looks quite gray and flat. Pictures taken in mist or dull conditions are often low contrast. In the traditional darkroom contrast is controlled using special variable-contrast paper – in the digital lab you simply adjust the sliders and watch the preview.
This is a very basic method of tonal adjustment and can cause the image to lose detail, which could be saved if you adjust contrast using the more advanced Levels or Curves.
(See Levels and Curves)

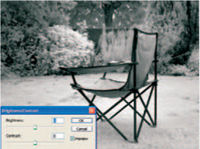
This photograph was taken with a Nikon D1X and was incorrectly set to underexpose so the image came out very dull and lacking contrast. Look at the Color Sampler tool values in the Info palette and see what happens to the highlights when contrast is raised using the Brightness/Contrast control.
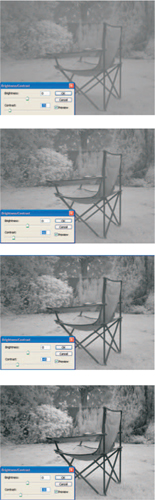
Here’s what happens when you adjust contrast of a black & white print. I adjusted the slider in 15 point increments going from -75 to +75.

Tip
![]() You don’t have to adjust the contrast of the whole picture. You can make selections of areas and individually adjust contrast to suit each component just like printing in clouds using a different grade of paper in the darkroom.
You don’t have to adjust the contrast of the whole picture. You can make selections of areas and individually adjust contrast to suit each component just like printing in clouds using a different grade of paper in the darkroom.
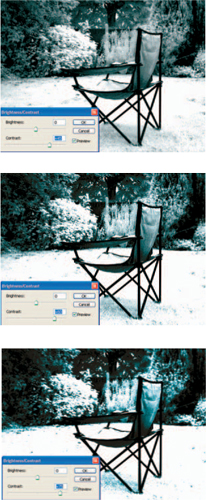
Adjusting contrast in a color image makes colors look dull and subdued when contrast is decreased (left) or vivid when contrast is increased (right). Edges can become overtly enhanced so the result looks very digital.

Convert to profile
![]()
This changed from its previous title of Profile to Profile in version 5.5. It lets you convert a picture into a different color space so you can ensure a more accurate result when viewing or printing. For this book I was given a CMYK profile by the printer which I used to convert all the RGB images before sending them to be printed.

Crop & Straighten
![]()
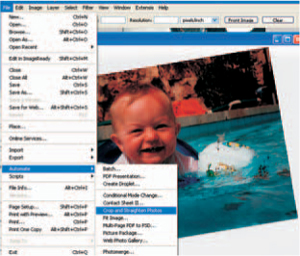
This feature, new to Photoshop CS, appeared a few years ago on flatbed scanners from the likes of Canon. It automatically detects the edges of a photo, that may have been scanned in with too much surroundings, and crops off the waste pixels. It also rotates if the picture was scanned at an angle like this example.
Tip
![]() Use this to tidy up screengrabs when you want a crop that’s just around a palette. Do a rough crop using the crop tool to eliminate other parts of the desktop and leave the automated feature to remove the area around the palette.
Use this to tidy up screengrabs when you want a crop that’s just around a palette. Do a rough crop using the crop tool to eliminate other parts of the desktop and leave the automated feature to remove the area around the palette.
Crop tool
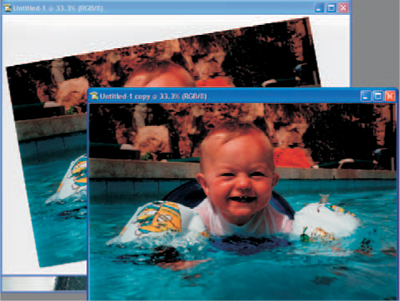
Use this to be more creative with your composition and cut out wasteful surrounds. Click and hold down the mouse to draw a frame around the subject. Then use the handles to resize or reposition. When you’ve included everything you want click in the centre to make anything outside the frame disappear.
Photoshop 6 introduced a new version of the crop tool that masks all the area surrounding the crop frame in a colour and opacity of your choice. It’s factory set at 75% black which gives a useful gray mask. This is much clearer to work with than previous versions and gives you a far better indication of the effect the crop will have on the image.
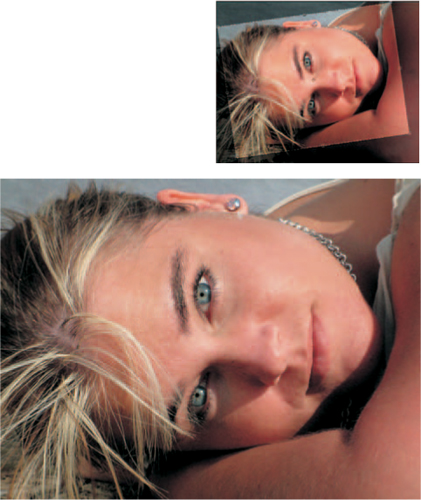
A tighter crop on this shot above adds emphasis to the face The Crop tool darkens the surrounding area to make it easier to judge the crop.
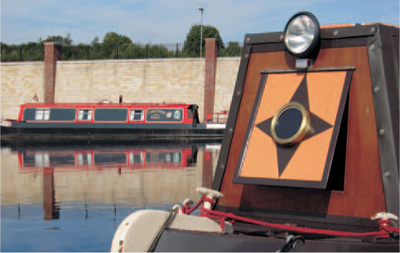
You can also click on perspective to allow the Crop box to be adjusted to straighten out perspective problems and badly squared shots, like this boat example, or off-vertical scanned images.
Cursor
The cursor is where all the action is. It’s the point of the brush, the insertion point, the Cloning source, etc. and is controlled by the mouse or keyboard arrows.
The way it appears can be changed by going to File → Preference → Displays & Cursors.
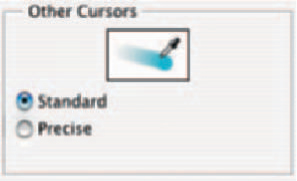
Paint cursors can be set to Standard, Precise or Brush Size. The brush or tool icon appears when the cursor is set to Standard, a crosshair appears on Precise and a shape the size of the brush being used appears with Brush size. Which you use is a matter of personal preference and may vary depending on the work you’re doing. Try all three in different circumstances and pick whichever works best.

Curves

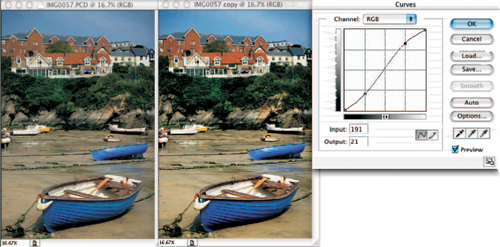
Curves is an advanced tonal control that offers the most accurate contrast, color and brightness adjustments of any Photoshop feature.
Its palette has a graph with vertical and horizontal scales representing input and output brightness.
When you first open this you’ll see a straight line running through the graph at 45° from the bottom left to the top right. The bottom left represents the shadow area, top right is highlights and the midpoint is midtones. You can drag the line by clicking on it and holding down as you move the mouse. Moving the midpoint up has a lightening effect and down darkens the image. Use the Eyedropper tool and Ctrl+click anywhere on the image and its brightness value will appear as a point on the line. You can then move this point up or down to darken or lighten that part of the image. The picture will look natural, providing you create either a straight line or an arc. The best results are usually achieved with a very shallow S shaped curve, and is the reason why it’s called Curves.
You can reverse the graph if you prefer the shadow detail to be at the top right and the highlights at the bottom left by clicking on the arrow on the horizontal bar.
Tip
![]() The standard cursor shows an icon of the tool you are using. It’s much better if you change to the precision or brush size icons.
The standard cursor shows an icon of the tool you are using. It’s much better if you change to the precision or brush size icons.
(See Appendix D)
Tip
![]() If you know what shape curve you want. Select the Pen icon and draw the line in the box. This can be quicker than dragging the line around.
If you know what shape curve you want. Select the Pen icon and draw the line in the box. This can be quicker than dragging the line around.

![]() Hold down the Alt key and click on the grid to make it finer.
Hold down the Alt key and click on the grid to make it finer.

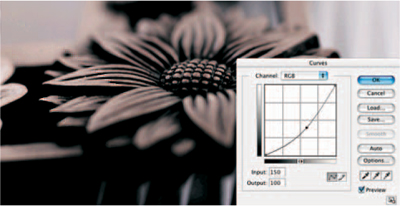
Dragging downwards from a point in the middle of the line darkens the midtones without clipping detail from the highlights or shadows.
Tip
![]() A new feature, first introduced in Photoshop 7.0, lets you enlarge the Curves palette by clicking on the icon in the bottom right of the box. This helps you have more precise control of the curves graph. When you’ve done click on the icon again to reduce it.
A new feature, first introduced in Photoshop 7.0, lets you enlarge the Curves palette by clicking on the icon in the bottom right of the box. This helps you have more precise control of the curves graph. When you’ve done click on the icon again to reduce it.

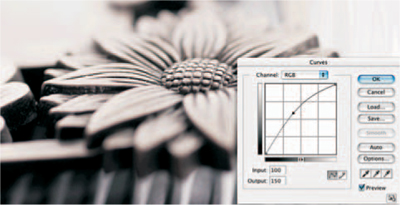
Dragging upwards from a point in the middle of the line lightens the midtones without clipping detail from the highlights or shadows.
Harsh curves can create posterization. Keep them smooth!
The usual Curve to make is a slight downward direction of the 3/4 shadow areas and a slight upward movement of the first quarter highlight areas, creating a very gentle S shape. This gives a boost to contrast without clipping shadow or highlight detail that could occur when Levels or Brightness/Contrast is used.
Tip
![]() If you want extremely accurate control over your image, scan in or convert to 16-bit, instead of 8-bit, giving you a total of 48-bit color in an RGB image. Photoshop doesn’t have layers in a 16-bit image, but you can edit the curves using this file and then compress back to 8-bit once you have a perfectly corrected image.
If you want extremely accurate control over your image, scan in or convert to 16-bit, instead of 8-bit, giving you a total of 48-bit color in an RGB image. Photoshop doesn’t have layers in a 16-bit image, but you can edit the curves using this file and then compress back to 8-bit once you have a perfectly corrected image.
Tip
![]() If you need to make complex selections that require layers and masks and you are working with the 16-bit image, make a duplicate of the image Image → Duplicate and save this as 8-bit. Work up the selection on the 8-bit image and save this selection Select → Save Selection. Then go back to the 16-bit version and load the saved selection Select → Load Selection. Now perform your curves adjustments.
If you need to make complex selections that require layers and masks and you are working with the 16-bit image, make a duplicate of the image Image → Duplicate and save this as 8-bit. Work up the selection on the 8-bit image and save this selection Select → Save Selection. Then go back to the 16-bit version and load the saved selection Select → Load Selection. Now perform your curves adjustments.

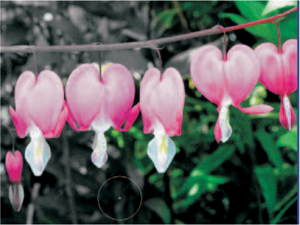
Curves can be used to make minor or major color adjustments. In this example I have selected the blue channel and pulled the highlight area upwards which intensifies the blue in the highlight area. This has made the flowers look a more vibrant blue without affecting the darker areas noticeably.
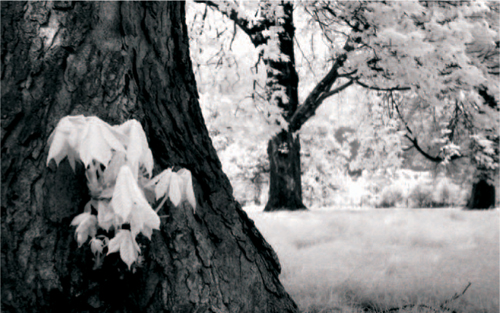
Better black & white
![]() Curves can be used to enhance your black & white pictures. Simply open up the picture and the Curves palette. First set up target white and black points for the Eyedropper (see Setting White and Black points). With targets set, click on the left-hand Eyedropper tool in the curves palette and, using your mouse cursor, place the Eyedropper icon on the darkest part of the image that you still want to contain minimal detail (deep shadow areas) and click. Do the same with the right-hand Eyedropper on the brightest area that you want minimal detail in (bright highlights) and click to produce an image with a more satisfactory tonal range. You must also choose the area that you click on with care as you could clip detail from the image if you select an area that’s lighter or darker than necessary.
Curves can be used to enhance your black & white pictures. Simply open up the picture and the Curves palette. First set up target white and black points for the Eyedropper (see Setting White and Black points). With targets set, click on the left-hand Eyedropper tool in the curves palette and, using your mouse cursor, place the Eyedropper icon on the darkest part of the image that you still want to contain minimal detail (deep shadow areas) and click. Do the same with the right-hand Eyedropper on the brightest area that you want minimal detail in (bright highlights) and click to produce an image with a more satisfactory tonal range. You must also choose the area that you click on with care as you could clip detail from the image if you select an area that’s lighter or darker than necessary.
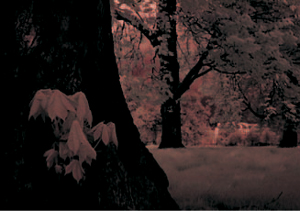
The original has a bad color cast.
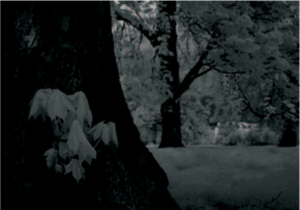
Saturation is reduced so it becomes monocolor.

The shadow area is picked using the Eyedropper.
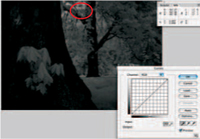
And then the highlight point selected which was in the bright sky area.
A duplicate layer was then made and Gaussian Blur was applied. Then the layer was blended in Overlay to finish off the improved infrared feel.
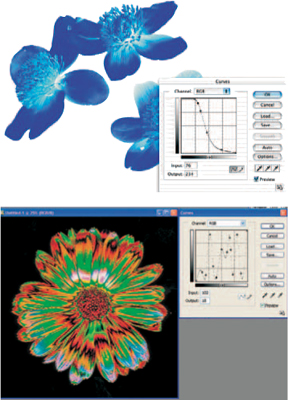
Right: Pull the left part up from the bottom to top and the right down from top to bottom and totally reverse the image into a from the bottom to top and the right down from top to bottom and totally reverse the image into a negative. Then drag the highlight area across to the right to wipe out all the detail and make the background white. Below: You can also select up to 15 points on the line and pull them in either direction to create snake patterns and very interesting results. This is a mode to experiment with, especially if you enjoy creating surreal effects. If you stumble across a style you like you can save it to reuse on other images later.
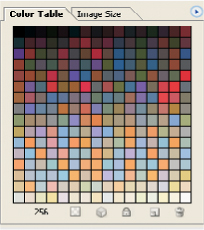
Custom color table
Images produced to be used on the Web need small file sizes. Photoshop reduces the number of colors from millions down to just 256 when it saves files as GIFs and the colors that are used can be saved as a custom table. This photo of canal boats would contain these 256 colours when reduced.
![]()
Custom Shape tool
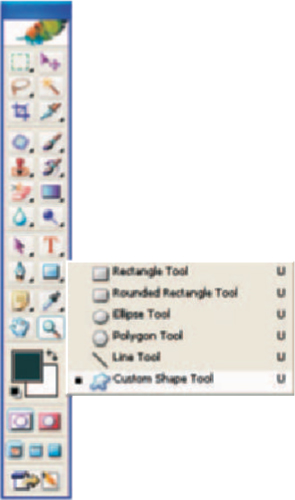
Custom Shapes are selected from the toolbar and when selected they allow you to draw vector shapes that have editable path outlines. They can also be resized without any loss in definition as they are resolution independent.
Shapes can be filled with colors, patterns or images. You can also distort using the Transform tool and save as a selection which can then be saved as a clipping path.

The hand shape was selected I here and a gradient fill was applied on top, along with a drop shadow and rounded bevel.

The Jigsaw piece Custom shape was selected and its path made into a selection. Then the new image was pasted into the selection – Edit → Paste Into. This I creates a new layer with a layer mask that can then be edited.

Click on the arrow to the right of the Custom Shape palette to access the groups of custom shapes (right). The full selection of 249 Custom Shapes that come with Photoshop CS are seen below.