Undo
If you don’t like the effect of a filter you’ve just applied, or you’ve gone wrong with a brushstroke you can use Undo to take you back one step. Edit→Step Forward/Step Backwards makes life even easier. It’s like the History palette but uses shortcut keys to speed things up. Whatever you do can be simply undone. (For multiple undos see History palette)
Tip
![]() Use Undo to revert to a previous setting when making adjustments to palette settings that have several options.
Use Undo to revert to a previous setting when making adjustments to palette settings that have several options.
![]()
Use all Layers
Select this mode in the Rubber Stamp, Paint bucket or Sharpness/Blur/Smudge palettes to ensure the colors of all layers are considered when an effect is applied to the active layer. When Use all Layers is not selected only the colors in the active layer are sampled, cloned or smudged.
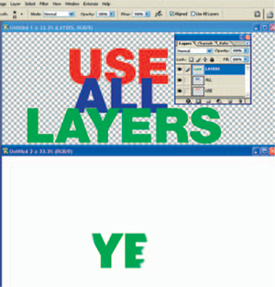
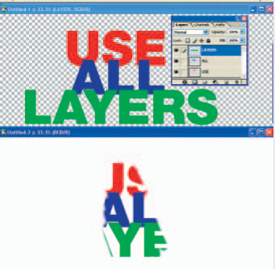
Here’s what happens when we clone from a source image (Untitled 1) to a destination document (Untitled 2). The image has text on each of three layers. The first example (top) doesn’t have Use All Layers selected. When you clone from source to destination only the active layer is picked up and cloned onto the new document. When Use All Layers is selected (right) all three layers are cloned.
Unsharp Mask
![]()
A filter used to sharpen edges in an image and reduce blurring caused at the photographic, scanning, resampling, or printing stage. Unsharp Mask locates pixels that differ from neighbouring pixels and increases their contrast. It’s perfect for sharpening pictures that are taken with digital cameras and scanned images that often have a slightly soft edge sharpness.
The dialogue box has Amount, Radius and Threshold settings that are adjusted by dragging sliders or manually entering values.
Amount changes the pixel contrast by the amount you set. When producing images for on-screen viewing you can judge the effect quite accurately and a setting of 50–100% is fine, but for printed output it’s not as easy. Try a setting of 150% to 200%.
Radius controls the number of pixels surrounding the edge pixels that will be affected by sharpening. A lower value sharpens just edge pixels while a higher value sharpens a wider band of pixels. The amount you set also depends on the size of the image – use a smaller number for a lower resolution image and increase the number for a higher resolution image. Go too high and the edges become too contrasty.
Threshold, set at a default of 0, sharpens all the pixels. Moving the slider upwards prevents the filter from affecting pixels that are similar to neighbouring pixels. A value of between 2 and 20 is a good starting point. The higher you go the less effect Unsharp Mask will have on the image.

Tip
![]() Bright colors can become overly saturated when Unsharp Mask has been applied and dust marks are easily enhanced. Try converting the image to Lab mode and apply the filter to the Lightness channel only to sharpen the image without affecting the color.
Bright colors can become overly saturated when Unsharp Mask has been applied and dust marks are easily enhanced. Try converting the image to Lab mode and apply the filter to the Lightness channel only to sharpen the image without affecting the color.

![]() Run Unsharp Mask twice at half the single settings for a more subtle effect.
Run Unsharp Mask twice at half the single settings for a more subtle effect.
![]() Hold down the Shift key and click within the preview window to show the original unfiltered version.
Hold down the Shift key and click within the preview window to show the original unfiltered version.
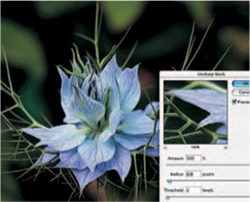
Above: Amount set at 500% with low radius and threshold values is acceptable.
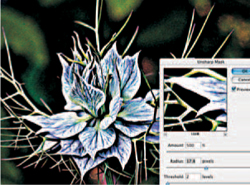
Above: Increase the radius and the result is too harsh with extreme contrast on all edges.
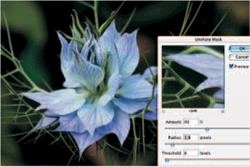
Above: Reducing the Amount and Radius and increasing threshold produces a better result. Below: Applying Unsharp mask to the lightness layer of the image in Lab color mode is best.

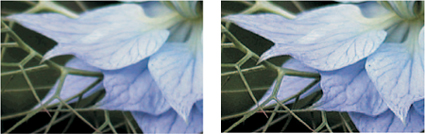
Above left: Magnified section of original shot on a Nikon Coolpix 995. Above right: Same shot with Unsharp Mask applied in Lab color’s lightness channel.