
Chapter 9. IBM Tivoli NetView integration 295
Leave the port numbers as they are for now. You can change theTCP port
assignments if you need to; for example, if these ports are already occupied
by other TCP-based services. Example 9-7 shows the changes we applied in
our lab environment.
Example 9-7 usr/OV/conf/topxlistener.properties
# transport base properties
.
.
transport.local.ip.address = capecod.itsc.austin.ibm.com
transport.request.address = capecod.itsc.austin.ibm.com.BASETEST.QM+BASETEST.Q
transport.request.port = 9898
transport.response.address = capecod.itsc.austin.ibm.com.BASETEST.QM+BASETEST.Q
transport.response.port = 9898
.
.
# only for client
# server
transport.server.mqe.address = ServerQM+ServerQ
transport.server.mqe.port = 8082
transport.server.ip.address = ibmtiv3.itsc.austin.ibm.com
3. The last file you need to modify is /usr/OV/conf/topxgate.conf. This file
contains all events to be forwarded to IBM Tivoli Business Systems Manager.
If you want to prevent a specific trap from being forwarded to IBM Tivoli
Business Systems Manager, place a comment sign (#) in front of the trap
definition.
9.5 Using the adapter
This section covers the use of IBM Tivoli Business Systems Manager Adapter.
9.5.1 Bulk discovery
After a successful installation, you can use the following steps to verify the
NetView side of the adapter installation:
1. Use NetView’s /usr/OV/bin/ovstatus or the /usr/OV/service/nvstat utility to
verify that a new daemon, tbsmadapter, is running and registered to NetView.
You should see a new daemon in the list of running NetView daemons as
shown in Example 9-8.
Example 9-8 The new tbsmadapter daemon (partial output of nvstat)
capecod:/ #nvstat
NOTE: ovspmd is process 27850
296 Tivoli Business Systems Manager Version 2.1: End-to-End Business Impact Management
DAEMON NAME PROCESS PARENT DEPENDENCIES
actionsvr 25698 ovspmd nvsecd,nvcorrd
ems_log_agent 31236 ovspmd nvsecd,ems_sieve_agent
.
.
tbsmadapter 19662 ovspmd nvsecd
.
.
webserver 17584 ovspmd ovwdb
capecod:/ #
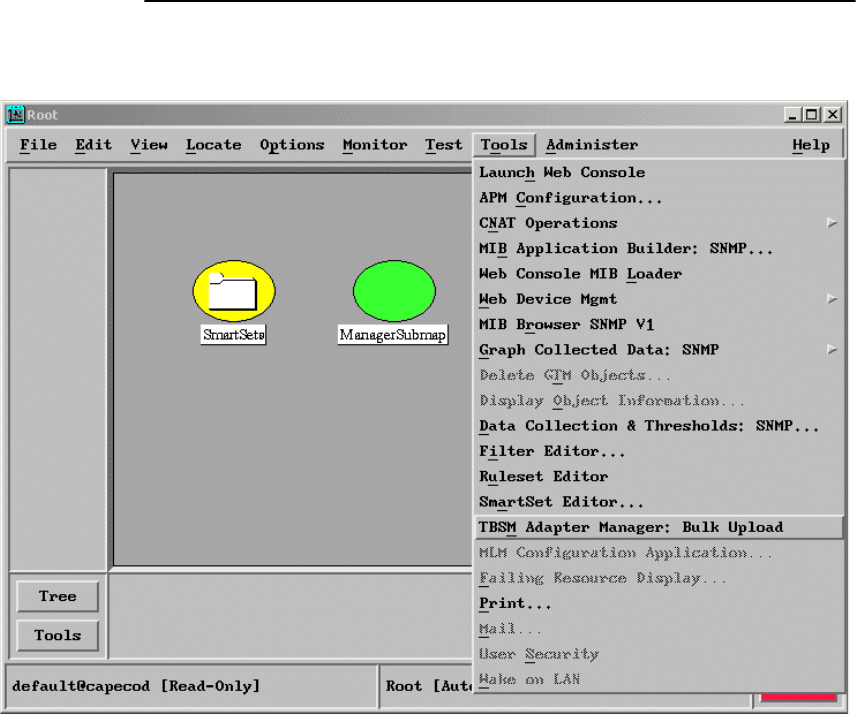
2. Next, open a NetView GUI and select the Tools menu. You will see a new
menu entry TBSM Adapter Manager: Bulk Upload as in Figure 9-10.
Figure 9-10 The TBSM Bulk Upload entry
Select this menu entry. This will start a Bulk Upload of the NetView topology data
to IBM Tivoli Business Systems Manager. During the update the message shown
in Figure 9-11 on page 297 will appear.

Chapter 9. IBM Tivoli NetView integration 297
Figure 9-11 NetViews bulk upload message
Alternatively, you can issue the /usr/OV/bin/tbsmbulkupload.ksh command
from the command line to initiate a bulk upload. After executing the bulk upload,
you should see your NetView resources in IBM Tivoli Business Systems
Manager. In case of problems, refer to 9.6, “Troubleshooting the environment” on
page 305.
9.5.2 How NetView resources are handled
Once you have executed the bulk upload, you can display the resources in IBM
Tivoli Business Systems Manager either in a typical Explorer view or in
Hyperview presentation. A bulk upload from NetView to IBM Tivoli Business
Systems Manager builds the initial set of resources. Subsequent updates to this
set of resources are always triggered by a NetView event. The upload follows
these simple rules:
? All visible elements in and including the IP Internet set of submaps will be
populated to IBM Tivoli Business Systems Manager upon initial population
during bulk upload.
? To prevent a resource from being uploaded to IBM Tivoli Business Systems
Manager you must hide them on the NetView map.
? Unmanaged resources will be uploaded, but none of the lower-level resources
will be uploaded. For unmanaged routers, the interfaces will not be uploaded
even if they are managed.
? After the initial population, changes in the IBM Tivoli Business Systems
Manager views usually are triggered by NetView events through tbsmtrap.
To demonstrate this behavior, we executed the following steps:
1. We stopped the IBM Tivoli Business Systems Manager adapter, and ran
Server Setup -> Control -> Restart Automatic Map Generation to build a
fresh initial NetView Map.

298 Tivoli Business Systems Manager Version 2.1: End-to-End Business Impact Management
Figure 9-12 The initial NetView Map contents
2. We reorganized the initial map to show only our central router and a location
containing the network segment hosting our NetView server. Figure 9-12
shows the related submaps.
3. Then we started the IBM Tivoli Business Systems Manager adapter. We
verified the connection to the common listener by checking the existence of
two connections between NetView and the node where the common listener
executes. An easy way to look for TCP connections is using the netstat
command: netstat -a | grep <CL_node>, where <CL_node> is the name or
IP address of the node the common listener runs. The command should
return with a list containing two TCP connections, as shown in Example 9-9.
Example 9-9 TCP connections between NetView and TBSM
capecod:/ #netstat -a|grep ibmtiv3
tcp4 0 0 capecod.itsc.aus.9898 ibmtiv3.itsc.aus.1521 ESTABLISHED
tcp4 0 0 capecod.itsc.aus.39109 ibmtiv3.itsc.aus.8082 ESTABLISHED
4. With this environment set up, we were ready to upload the initial resources
using a bulk upload to IBM Tivoli Business Systems Manager. To issue the
bulk upload with NetView, refer to Figure 9-10 on page 296.

Chapter 9. IBM Tivoli NetView integration 299
5. With the bulk upload successfully finished, we logged on to IBM Tivoli
Business Systems Manager using the Java console. To check the upload, we
chose Console -> Open All Resources from the menu. As expected, we
were able to identify our NetView resources inside IBM Tivoli Business
Systems Manager as shown in Figure 9-13.
Figure 9-13 Initial NetView resources uploaded to TBSM
..................Content has been hidden....................
You can't read the all page of ebook, please click here login for view all page.