
Chapter 2. XAML Demystified
Throughout .NET technologies, XML is used to expose functionality in a transparent and declarative fashion. XAML, a dialect of XML, has been especially important since its introduction with the first version of WPF in 2006. It is often misunderstood to be just a way to specify user interfaces, much like HTML. Most of the time, XAML is used to describe user interfaces, but it can describe other things as well. By the end of this chapter, you will see that XAML is about much more than arranging controls on a computer screen.
The point of XAML is to make it easy for programmers to work together with experts in other fields. XAML becomes the common language spoken by all parties, most likely via development tools and field-specific design tools. But because XAML (and XML in general) is generally human readable, people can participate in this ecosystem armed with nothing more than a tool such as Notepad.
In WPF, the “field experts” are graphic designers, who can use a design tool such as Blend to create a slick user interface while developers independently write code. What enables the developer/designer cooperation is not just the common language of XAML but the fact that great care went into making functionality exposed by the relevant APIs accessible declaratively. This gives design tools a wide range of expressiveness (such as specifying complex animations or state changes) without having to worry about generating procedural code.
Even if you have no plans to work with graphic designers, you should still become familiar with XAML for the following reasons:
![]() XAML can be a very concise way to represent user interfaces or other hierarchies of objects.
XAML can be a very concise way to represent user interfaces or other hierarchies of objects.
![]() The use of XAML encourages a separation of front-end appearance and back-end logic, which is helpful for maintenance even if you’re only a team of one.
The use of XAML encourages a separation of front-end appearance and back-end logic, which is helpful for maintenance even if you’re only a team of one.
![]() XAML can often be easily pasted into tools such as Visual Studio, Blend, or small standalone tools to see results without any compilation.
XAML can often be easily pasted into tools such as Visual Studio, Blend, or small standalone tools to see results without any compilation.
![]() XAML is the language that almost all WPF-related tools emit.
XAML is the language that almost all WPF-related tools emit.
This chapter jumps right into the mechanics of XAML, examining its syntax in depth and showing how it relates to procedural code. Unlike the preceding chapter, this is a fairly deep dive! Having this background knowledge before proceeding with the rest of the book will not only help you understand the code examples but give you better insight into why the APIs in each feature area were designed the way they were. This perspective can be helpful whether you are building WPF applications or controls, designing class libraries that you want to be XAML friendly, or building tools that consume and/or produce XAML (such as validation tools, localization tools, file format converters, designers, and so on).
Tip
There are several ways to run the XAML examples in this chapter, which you can download in electronic form with the rest of this book’s source code. For example, you can do the following:
![]() Save the content in a
Save the content in a .xaml file and open it inside Internet Explorer (in Windows Vista or later, or in Windows XP with the .NET Framework 3.0 or later installed). Firefox can also work if you install an add-on. Note: By default your web browser will use the version of WPF installed with the operating system.
![]() Paste the content into a lightweight tool such as the XAMLPAD2009 sample included with this chapter’s source code or Kaxaml (from http://kaxaml.com).
Paste the content into a lightweight tool such as the XAMLPAD2009 sample included with this chapter’s source code or Kaxaml (from http://kaxaml.com).
![]() Create a WPF Visual Studio project and replace the content of the main
Create a WPF Visual Studio project and replace the content of the main Window or Page element with the desired content, which might require some code changes.
Using the first two options gives you a couple great ways to get started and do some experimentation. Mixing XAML with other content in a Visual Studio project is covered at the end of this chapter.
![]() FAQ: What happened to XamlPad?
FAQ: What happened to XamlPad?
Earlier versions of the Windows SDK shipped with a simple tool called XamlPad that allows you to type in (or paste) WPF-compatible XAML and see it rendered as a live user interface. Unfortunately, this tool is no longer being shipped due to lack of resources. (Yes, contrary to popular belief, Microsoft does not have unlimited resources!) Fortunately, there are several alternative lightweight tools for quickly experimenting with XAML, including the following:
![]() XAMLPAD2009—A sample in this book’s source code. Although it lacks the bells and whistles of the other tools, it provides full source code. Plus, it’s the only tool that supports XAML2009 (explained later in this chapter) at the time of writing.
XAMLPAD2009—A sample in this book’s source code. Although it lacks the bells and whistles of the other tools, it provides full source code. Plus, it’s the only tool that supports XAML2009 (explained later in this chapter) at the time of writing.
![]() Kaxaml—A slick tool downloadable from http://kaxaml.com, created by Robby Ingebretsen, a former WPF team member.
Kaxaml—A slick tool downloadable from http://kaxaml.com, created by Robby Ingebretsen, a former WPF team member.
![]() XamlPadX—A feature-filled tool downloadable from http://blogs.msdn.com/llobo/archive/2008/08/25/xamlpadx-4-0.aspx, created by Lester Lobo, another former WPF team member.
XamlPadX—A feature-filled tool downloadable from http://blogs.msdn.com/llobo/archive/2008/08/25/xamlpadx-4-0.aspx, created by Lester Lobo, another former WPF team member.
![]() XAML Cruncher—A ClickOnce application available at http://charlespetzold.com/wpf/XamlCruncher/XamlCruncher.application, created by Charles Petzold, prolific author and blogger.
XAML Cruncher—A ClickOnce application available at http://charlespetzold.com/wpf/XamlCruncher/XamlCruncher.application, created by Charles Petzold, prolific author and blogger.
XAML Defined
XAML is a relatively simple and general-purpose declarative programming language suitable for constructing and initializing objects. XAML is just XML, but with a set of rules about its elements and attributes and their mapping to objects, their properties, and the values of those properties (among other things).
Because XAML is just a mechanism for using .NET APIs, attempts to compare it to HTML, Scalable Vector Graphics (SVG), or other domain-specific formats/languages are misguided. XAML consists of rules for how parsers/compilers must treat XML and has some keywords, but it doesn’t define any interesting elements by itself. So, talking about XAML without a framework like WPF is like talking about C# without the .NET Framework or the Windows Runtime. That said, Microsoft has formalized the notion of “XAML vocabularies” that define the set of valid elements for a given domain, such as what it means to be a WPF XAML file versus a Silverlight XAML file versus any other type of XAML file.
The role XAML plays in relation to WPF is often confused, so it’s important to reemphasize that WPF and XAML can be used independently from each other. Although XAML was originally designed for WPF, it is used by other technologies as well—even ones that have nothing to do with user interfaces, such as Windows Workflow Foundation (WF) and Windows Communication Foundation (WCF). Because of its general-purpose nature, XAML can be applied to just about any object-oriented technology if you really want it to be. Furthermore, using XAML in WPF projects is optional. Almost everything done with XAML can be done entirely in your favorite .NET procedural language instead. (But note that the reverse is not true.) However, because of the benefits listed at the beginning of the chapter, it’s rare to see WPF used in the real world without XAML.
Digging Deeper: XAML Functionality Unavailable in Procedural Code
There are a few things that can be done in XAML that can’t be done with procedural code. These are all fairly obscure and are covered in Chapters 12 and 14:
![]() Creating the full range of templates. Procedural code can create templates using
Creating the full range of templates. Procedural code can create templates using FrameworkElementFactory, but the expressiveness of this approach is limited.
![]() Using
Using x:Shared="False" to instruct WPF to return a new instance each time an element is accessed from a resource dictionary.
![]() Deferred instantiation of items inside of a resource dictionary. This is an important performance optimization, and only available via compiled XAML.
Deferred instantiation of items inside of a resource dictionary. This is an important performance optimization, and only available via compiled XAML.
Elements and Attributes
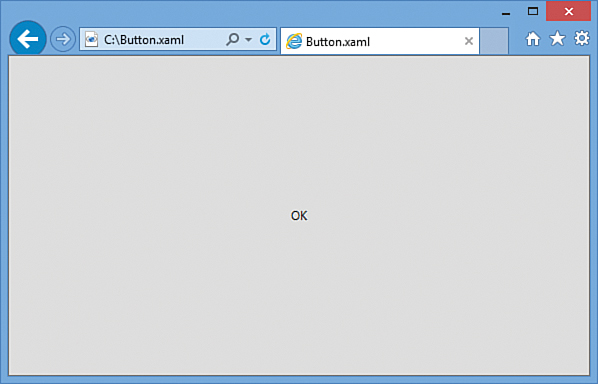
The XAML specification defines rules that map .NET namespaces, types, properties, and events into XML namespaces, elements, and attributes. You can see this by examining the following simple (but complete) XAML file that declares a WPF Button and comparing it to the equivalent C# code:
XAML:
<Button xmlns="http://schemas.microsoft.com/winfx/2006/xaml/presentation"
Content="OK"/>
C#:
System.Windows.Controls.Button b = new System.Windows.Controls.Button();
b.Content = "OK";
Although these two snippets are equivalent, you can instantly view the XAML in Internet Explorer and see a live button fill the browser window, as pictured in Figure 2.1, whereas the C# code must be compiled with additional code to be usable.
Declaring an XML element in XAML (known as an object element) is equivalent to instantiating the corresponding .NET object via a default constructor. Setting an attribute on the object element is equivalent to setting a property of the same name (called a property attribute) or hooking up an event handler of the same name (called an event attribute). For example, here’s an update to the Button that not only sets its Content property but also attaches an event handler to its Click event:
XAML:
<Button xmlns="http://schemas.microsoft.com/winfx/2006/xaml/presentation"
Content="OK" Click="button_Click"/>
C#:
System.Windows.Controls.Button b = new System.Windows.Controls.Button();
b.Click += new System.Windows.RoutedEventHandler(button_Click);
b.Content = "OK";
This requires a method called button_Click to be defined somewhere, with the appropriate signature, which means that the XAML file can no longer be rendered standalone, as in Figure 2.1. The “Mixing XAML with Procedural Code” section at the end of this chapter explains how to work with XAML that requires additional code. Note that XAML, like C#, is a case-sensitive language.
Namespaces
The most mysterious part about comparing the previous XAML examples with the equivalent C# examples is how the XML namespace http://schemas.microsoft.com/winfx/2006/xaml/presentation maps to the .NET namespace System.Windows.Controls. It turns out that the mapping to this and other WPF namespaces is hard-coded inside the WPF assemblies with several instances of an XmlnsDefinitionAttribute custom attribute. (In case you’re wondering, no web page exists at the schemas.microsoft.com URL—it’s just an arbitrary string like any namespace.)
The root object element in a XAML file must specify at least one XML namespace that is used to qualify itself and any child elements. You can declare additional XML namespaces (on the root or on children), but each one must be given a distinct prefix to be used on any identifiers from that namespace. For example, WPF XAML files typically use a second namespace with the prefix x (denoted by using xmlns:x instead of just xmlns):
xmlns:x="http://schemas.microsoft.com/winfx/2006/xaml"
This is the XAML language namespace, which maps to types in the System.Windows.Markup namespace but also defines some special directives for the XAML compiler or parser. These directives often appear as attributes to XML elements, so they look like properties of the host element but actually are not. For a list of XAML keywords, see the “XAML Keywords” section later in this chapter.
Digging Deeper: The Implicit .NET Namespaces
WPF maps all the following .NET namespaces from a handful of WPF assemblies to the WPF XML namespace (http://schemas.microsoft.com/winfx/2006/xaml/presentation) used throughout this book:
![]()
System.Windows
![]()
System.Windows.Automation
![]()
System.Windows.Controls
![]()
System.Windows.Controls.Primitives
![]()
System.Windows.Data
![]()
System.Windows.Documents
![]()
System.Windows.Forms.Integration
![]()
System.Windows.Ink
![]()
System.Windows.Input
![]()
System.Windows.Media
![]()
System.Windows.Media.Animation
![]()
System.Windows.Media.Effects
![]()
System.Windows.Media.Imaging
![]()
System.Windows.Media.Media3D
![]()
System.Windows.Media.TextFormatting
![]()
System.Windows.Navigation
![]()
System.Windows.Shapes
![]()
System.Windows.Shell
Because this is a many-to-one mapping, the designers of WPF needed to take care not to introduce two classes with the same name, despite the fact that the classes are in separate .NET namespaces.
Tip
Most of the standalone XAML examples in this chapter explicitly specify their namespaces, but in the remainder of the book, most examples assume that the WPF XML namespace (http://schemas.microsoft.com/winfx/2006/xaml/presentation) is declared as the primary namespace, and the XAML language namespace (http://schemas.microsoft.com/winfx/2006/xaml) is declared as a secondary namespace, with the prefix x. If you want to view such content in your web browser or copy it into a lightweight viewer such as the XAMLPAD2009 sample, be sure to add these explicitly.
Using the WPF XML namespace (http://schemas.microsoft.com/winfx/2006/xaml/presentation) as a default namespace and the XAML language namespace (http://schemas.microsoft.com/winfx/2006/xaml) as a secondary namespace with the prefix x is just a convention, just like it’s a convention to begin a C# file with a using System; directive. You could instead write the original XAML file as follows, and it would mean the same thing:
<WpfNamespace:Button
xmlns:WpfNamespace="http://schemas.microsoft.com/winfx/2006/xaml/presentation"
Content="OK"/>
Of course, for readability it makes sense for your most commonly used namespace (also known as the primary XML namespace) to be prefix free and to use short prefixes for any additional namespaces.
Property Elements
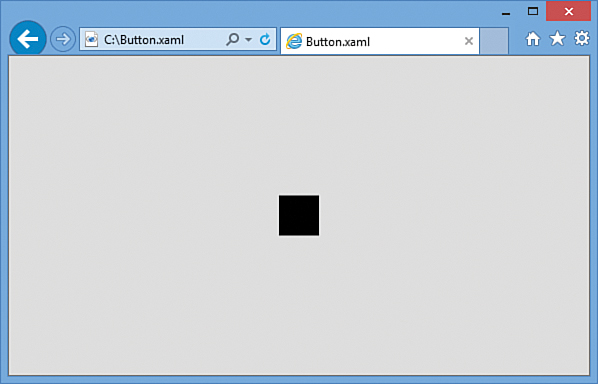
The preceding chapter mentioned that rich composition is one of the highlights of WPF. This can be demonstrated with the simple Button from Figure 2.1, because you can put arbitrary content inside it; you’re not limited to just text! To demonstrate this, the following code embeds a simple square to make a Stop button like what might be found in a media player:
System.Windows.Controls.Button b = new System.Windows.Controls.Button();
System.Windows.Shapes.Rectangle r = new System.Windows.Shapes.Rectangle();
r.Width = 40;
r.Height = 40;
r.Fill = System.Windows.Media.Brushes.Black;
b.Content = r; // Make the square the content of the Button
Button’s Content property is of type System.Object, so it can easily be set to the 40x40 Rectangle object. The result is pictured in Figure 2.2.
That’s pretty neat, but how can you do the same thing in XAML with property attribute syntax? What kind of string could you possibly set Content to that is equivalent to the preceding Rectangle declared in C#? There is no such string, but XAML fortunately provides an alternative (and more verbose) syntax for setting complex property values: property elements. It looks like the following:
<Button xmlns="http://schemas.microsoft.com/winfx/2006/xaml/presentation">
<Button.Content>
<Rectangle Height="40" Width="40" Fill="Black"/>
</Button.Content>
</Button>
The Content property is now set with an XML element instead of an XML attribute, making it equivalent to the previous C# code. The period in Button.Content is what distinguishes property elements from object elements. Property elements always take the form TypeName.PropertyName, they are always contained inside a TypeName object element, and they can never have attributes of their own (with one exception—the x:Uid attribute used for localization).
Property element syntax can be used for simple property values as well. The following Button that sets two properties with attributes (Content and Background):
<Button xmlns="http://schemas.microsoft.com/winfx/2006/xaml/presentation"
Content="OK" Background="White"/>
is equivalent to this Button, which sets the same two properties with elements:
<Button xmlns="http://schemas.microsoft.com/winfx/2006/xaml/presentation">
<Button.Content>
OK
</Button.Content>
<Button.Background>
White
</Button.Background>
</Button>
Of course, using attributes when you can is a nice shortcut when hand-typing XAML.
Type Converters
Let’s look at the C# code equivalent to the preceding Button declaration that sets both Content and Background properties:
System.Windows.Controls.Button b = new System.Windows.Controls.Button();
b.Content = "OK";
b.Background = System.Windows.Media.Brushes.White;
Wait a minute. How can "White" in the previous XAML file be equivalent to the static System.Windows.Media.Brushes.White field (of type System.Windows.Media.SolidColorBrush) in the C# code? Indeed, this example exposes a subtlety with using strings to set properties in XAML that are a different data type than System.String or System.Object. In such cases, the XAML parser or compiler must look for a type converter that knows how to convert the string representation to the desired data type.
WPF provides type converters for many common data types: Brush, Color, FontWeight, Point, and so on. They are all classes deriving from TypeConverter (BrushConverter, ColorConverter, and so on). You can also write your own type converters for custom data types. Unlike the XAML language, type converters generally support case-insensitive strings.
Without a type converter for Brush, you would have to use property element syntax to set the Background in XAML, as follows:
<Button xmlns="http://schemas.microsoft.com/winfx/2006/xaml/presentation"
Content="OK">
<Button.Background>
<SolidColorBrush Color="White"/>
</Button.Background>
</Button>
And even that is only possible because of a type converter for Color that can make sense of the "White" string. If there were no Color type converter, you could still write the following:
<Button xmlns="http://schemas.microsoft.com/winfx/2006/xaml/presentation"
Content="OK">
<Button.Background>
<SolidColorBrush>
<SolidColorBrush.Color>
<Color A="255" R="255" G="255" B="255"/>
</SolidColorBrush.Color>
</SolidColorBrush>
</Button.Background>
</Button>
But this is only possible because of a type converter that can convert each "255" string into a Byte value expected by the A, R, G, and B properties of the Color type. Without this type converter, you would basically be stuck. Type converters don’t just enhance the readability of XAML, they also enable values to be expressed that couldn’t otherwise be expressed.
Markup Extensions
Markup extensions, like type converters, enable you to extend the expressiveness of XAML. Both can evaluate a string attribute value at runtime (except for a few built-in markup extensions that are currently evaluated at compile time for performance reasons) and produce an appropriate object based on the string. As with type converters, WPF ships with several markup extensions built in.
Unlike type converters, however, markup extensions are invoked from XAML with explicit and consistent syntax. For this reason, using markup extensions is a preferred approach for extending XAML. In addition, using markup extensions enables you to overcome potential limitations in existing type converters that you don’t have the power to change. For example, if you want to set a control’s background to a fancy gradient brush with a simple string value, you can write a custom markup extension that supports it even though the built-in BrushConverter does not.
Whenever an attribute value is enclosed in curly braces ({}), the XAML compiler/parser treats it as a markup extension value rather than a literal string (or something that needs to be type-converted). The following Button uses three different markup extension values with three different properties:
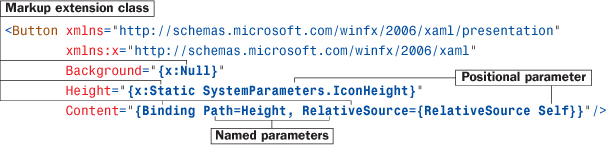
The first identifier in each set of curly braces is the name of the markup extension class, which must derive from a class called MarkupExtension. By convention, such classes end with an Extension suffix, but you can leave it off when using it in XAML. In this example, NullExtension (seen as x:Null) and StaticExtension (seen as x:Static) are classes in the System.Windows.Markup namespace, so the x prefix must be used to locate them. Binding (which doesn’t happen to have the Extension suffix) is in the System.Windows.Data namespace, so it can be found in the default XML namespace.
If a markup extension supports them, comma-delimited parameters can be specified. Positional parameters (such as SystemParameters.IconHeight in the example) are treated as string arguments for the extension class’s appropriate constructor. Named parameters (Path and RelativeSource in the example) enable you to set properties with matching names on the constructed extension object. The values for these properties can be markup extension values themselves (using nested curly braces, as done with the value for RelativeSource) or literal values that can undergo the normal type conversion process. If you’re familiar with .NET custom attributes (the .NET Framework’s popular extensibility mechanism), you’ve probably noticed that the design and usage of markup extensions closely mirrors the design and usage of custom attributes. That is intentional.
In the preceding Button declaration, NullExtension enables the Background brush to be set to null, which isn’t natively supported by BrushConverter (or many other type converters, for that matter). This is just done for demonstration purposes, as a null Background is not very useful. StaticExtension enables the use of static properties, fields, constants, and enumeration values rather than hard-coding literals in XAML. In this case, the Button’s Height is set to the operating system’s current height setting for icons, exposed by the static IconHeight property on a System.Windows.SystemParameters class. Binding, covered in depth in Chapter 13, “Data Binding,” enables Content to be set to the same value as the Height property.
Because markup extensions are just classes with default constructors, they can be used with property element syntax. The following Button is identical to the preceding one:
<Button xmlns="http://schemas.microsoft.com/winfx/2006/xaml/presentation"
xmlns:x="http://schemas.microsoft.com/winfx/2006/xaml">
<Button.Background>
<x:Null/>
</Button.Background>
<Button.Height>
<x:Static Member="SystemParameters.IconHeight"/>
</Button.Height>
<Button.Content>
<Binding Path="Height">
<Binding.RelativeSource>
<RelativeSource Mode="Self"/>
</Binding.RelativeSource>
</Binding>
</Button.Content>
</Button>
This transformation works because these markup extensions all have properties corresponding to their parameterized constructor arguments (the positional parameters used with property attribute syntax). For example, StaticExtension has a Member property that has the same meaning as the argument that was previously passed to its parameterized constructor, and RelativeSource has a Mode property that corresponds to its constructor argument.
Children of Object Elements
A XAML file, like all XML files, must have a single root object element. Therefore, it should come as no surprise that object elements can support child object elements (not just property elements, which aren’t children, as far as XAML is concerned). An object element can have three types of children: a value for a content property, collection items, or a value that can be type-converted to the object element.
The Content Property
Most WPF classes designate a property (via a custom attribute) that should be set to whatever content is inside the XML element. This property is called the content property, and it is really just a convenient shortcut to make the XAML representation more compact. In some ways, these content properties are like the (often-maligned) default properties in old versions of Visual Basic.
Button’s Content property is (appropriately) given this special designation, so the following Button:
<Button xmlns="http://schemas.microsoft.com/winfx/2006/xaml/presentation"
Content="OK"/>
could be rewritten as follows:
<Button xmlns="http://schemas.microsoft.com/winfx/2006/xaml/presentation">
OK
</Button>
Or, more usefully, this Button with more complex content:
<Button xmlns="http://schemas.microsoft.com/winfx/2006/xaml/presentation">
<Button.Content>
<Rectangle Height="40" Width="40" Fill="Black"/>
</Button.Content>
</Button>
could be rewritten as follows:
<Button xmlns="http://schemas.microsoft.com/winfx/2006/xaml/presentation">
<Rectangle Height="40" Width="40" Fill="Black"/>
</Button>
There is no requirement that the content property must actually be called Content; classes such as ComboBox, ListBox, and TabControl (also in the System.Windows.Controls namespace) use their Items property as the content property.
Collection Items
XAML enables you to add items to the two main types of collections that support indexing: lists and dictionaries.
Lists
A list is any collection that implements System.Collections.IList, such as System.Collections.ArrayList or numerous collection classes defined by WPF. For example, the following XAML adds two items to a ListBox control whose Items property is an ItemCollection that implements IList:
<ListBox xmlns="http://schemas.microsoft.com/winfx/2006/xaml/presentation">
<ListBox.Items>
<ListBoxItem Content="Item 1"/>
<ListBoxItem Content="Item 2"/>
</ListBox.Items>
</ListBox>
This is equivalent to the following C# code:
System.Windows.Controls.ListBox listbox = new System.Windows.Controls.ListBox();
System.Windows.Controls.ListBoxItem item1 =
new System.Windows.Controls.ListBoxItem();
System.Windows.Controls.ListBoxItem item2 =
new System.Windows.Controls.ListBoxItem();
item1.Content = "Item 1";
item2.Content = "Item 2";
listbox.Items.Add(item1);
listbox.Items.Add(item2);
Furthermore, because Items is the content property for ListBox, you can shorten the XAML even further, as follows:
<ListBox xmlns="http://schemas.microsoft.com/winfx/2006/xaml/presentation">
<ListBoxItem Content="Item 1"/>
<ListBoxItem Content="Item 2"/>
</ListBox>
In all these cases, the code works because ListBox’s Items property is automatically initialized to any empty collection object. If a collection property is initially null instead (and is read/write, unlike ListBox’s read-only Items property), you need to wrap the items in an explicit element that instantiates the collection. WPF’s built-in controls do not act this way, so an imaginary OtherListBox element demonstrates what this could look like:
<OtherListBox>
<OtherListBox.Items>
<ItemCollection>
<ListBoxItem Content="Item 1"/>
<ListBoxItem Content="Item 2"/>
</ItemCollection>
</OtherListBox.Items>
</OtherListBox>
Dictionaries
System.Windows.ResourceDictionary is a commonly used collection type in WPF that you’ll see more of in Chapter 12, “Resources.” It implements System.Collections.IDictionary, so it supports adding, removing, and enumerating key/value pairs in procedural code, as you would do with a typical hash table. In XAML, you can add key/value pairs to any collection that implements IDictionary. For example, the following XAML adds two Colors to a ResourceDictionary:
<ResourceDictionary
xmlns="http://schemas.microsoft.com/winfx/2006/xaml/presentation"
xmlns:x="http://schemas.microsoft.com/winfx/2006/xaml">
<Color x:Key="1" A="255" R="255" G="255" B="255"/>
<Color x:Key="2" A="0" R="0" G="0" B="0"/>
</ResourceDictionary>
This leverages the XAML Key keyword (defined in the secondary XML namespace), which is processed specially and enables us to attach a key to each Color value. (The Color type does not define a Key property.) Therefore, the XAML is equivalent to the following C# code:
System.Windows.ResourceDictionary d = new System.Windows.ResourceDictionary();
System.Windows.Media.Color color1 = new System.Windows.Media.Color();
System.Windows.Media.Color color2 = new System.Windows.Media.Color();
color1.A = 255; color1.R = 255; color1.G = 255; color1.B = 255;
color2.A = 0; color2.R = 0; color2.G = 0; color2.B = 0;
d.Add("1", color1);
d.Add("2", color2);
Note that the value specified in XAML with x:Key is treated as a string unless a markup extension is used or the XAML2009 parser is used (see the later “XAML2009” section); no type conversion is attempted otherwise.
More Type Conversion
Plain text can often be used as the child of an object element, as in the following XAML declaration of SolidColorBrush:
<SolidColorBrush>White</SolidColorBrush>
This is equivalent to the following:
<SolidColorBrush Color="White"/>
even though Color has not been designated as a content property. In this case, the first XAML snippet works because a type converter exists that can convert strings such as "White" (or "white" or "#FFFFFF") into a SolidColorBrush object.
Although type converters play a huge role in making XAML readable, the downside is that they can make XAML appear a bit “magical,” and it can be difficult to understand how it maps to instances of .NET objects. Using what you know so far, it would be reasonable to assume that you can’t declare an abstract class element in XAML because there’s no way to instantiate it. However, even though System.Windows.Media.Brush is an abstract base class for SolidColorBrush, GradientBrush, and other concrete brushes, you can express the preceding XAML snippets as simply:
<Brush>White</Brush>
because the type converter for Brushes understands that this is still SolidColorBrush. This may seem like an unusual feature, but it’s important for supporting the ability to express primitive types in XAML, as demonstrated in “The Extensible Part of XAML.”
Digging Deeper: The Extensible Part of XAML
Because XAML was designed to work with the .NET type system, you can use it with just about any .NET object (or even COM objects, thanks to COM interoperability), including ones you define yourself. It doesn’t matter whether these objects have anything to do with a user interface. However, the objects need to be designed in a “declarative-friendly” way. For example, if a class doesn’t have a default constructor and doesn’t expose useful instance properties, it’s not going to be directly usable from XAML (unless you use the XAML2009 parser). A lot of care went into the design of the WPF APIs—above and beyond the usual .NET design guidelines—to fit XAML’s declarative model.
The WPF assemblies are marked with XmlnsDefinitionAttribute to map their .NET namespaces to XML namespaces in a XAML file, but what about assemblies that weren’t designed with XAML in mind and, therefore, don’t use this attribute? Their types can still be used; you just need to use a special directive as the XML namespace. For example, here’s some plain old C# code using .NET Framework APIs contained in mscorlib.dll:
System.Collections.Hashtable h = new System.Collections.Hashtable();
h.Add("key1", 7);
h.Add("key2", 23);
and here’s how it can be represented in XAML:
<collections:Hashtable
xmlns:collections="clr-namespace:System.Collections;assembly=mscorlib"
xmlns:sys="clr-namespace:System;assembly=mscorlib"
xmlns:x="http://schemas.microsoft.com/winfx/2006/xaml">
<sys:Int32 x:Key="key1">7</sys:Int32>
<sys:Int32 x:Key="key2">23</sys:Int32>
</collections:Hashtable>
The clr-namespace directive enables you to place a .NET namespace directly inside XAML. The assembly specification at the end is necessary only if the desired types don’t reside in the same assembly that the XAML is compiled into. Typically the assembly’s simple name is used (as with mscorlib), but you can use the canonical representation supported by System.Reflection.Assembly.Load (although with no spaces allowed), which includes additional information such as a version and/or public key token.
Two key points about this example really highlight the integration with not only the .NET type system but specific types in the .NET Framework:
![]() Child elements can be added to the parent
Child elements can be added to the parent Hashtable with the standard XAML x:Key syntax because Hashtable and other collection classes in the .NET Framework have implemented the IDictionary interface since version 1.0.
![]()
System.Int32 can be used in this simple fashion because a type converter already exists that supports converting strings to integers. This is because the type converters supported by XAML are simply classes that derive from System.ComponentModel.TypeConverter, a class that has also been around since version 1.0 of the .NET Framework. This is the same type conversion mechanism used by Windows Forms (enabling you to type strings into the Visual Studio property grid, for example, and have them converted to the appropriate type).
Mixing XAML with Procedural Code
WPF applications can be written entirely in procedural code in any .NET language. In addition, certain types of simple applications can be written entirely in XAML, thanks to the data-binding features described in Chapter 13, the triggers introduced in the next chapter, and the fact that loose XAML pages can be rendered in a web browser. However, most WPF applications are a mix of XAML and procedural code. This section covers the two ways that XAML and code can be mixed together.
Loading and Parsing XAML at Runtime
WPF has a runtime XAML parser exposed as two classes in the System.Windows.Markup namespace: XamlReader and XamlWriter. And their APIs couldn’t be much simpler. XamlReader contains a few overloads of a static Load method, and XamlWriter contains a few overloads of a static Save method. Therefore, programs written in any .NET language can leverage XAML at runtime without much effort. Starting with the .NET Framework 4.0, a new, separate set of XAML readers and writers exists, but with a fair number of caveats. They are not important for this discussion but are covered later in Appendix A, “Fun with XAML Readers and Writers.”
XamlReader
The set of XamlReader.Load methods parse XAML, create the appropriate .NET objects, and return an instance of the root element. So, if a XAML file named MyWindow.xaml in the current directory contains a Window object (explained in depth in Chapter 7, “Structuring and Deploying an Application”) as its root node, the following code could be used to load and retrieve the Window object:
Window window = null;
using (FileStream fs =
new FileStream("MyWindow.xaml", FileMode.Open, FileAccess.Read))
{
// Get the root element, which we know is a Window
window = (Window)XamlReader.Load(fs);
}
In this case, Load is called with a FileStream (from the System.IO namespace). After Load returns, the entire hierarchy of objects in the XAML file is instantiated in memory, so the XAML file is no longer needed. In the preceding code, the FileStream is instantly closed by exiting the using block. Because XamlReader can be passed an arbitrary Stream (or System.Xml.XmlReader, via a different overload), you have a lot of flexibility in retrieving XAML content.
Tip
XamlReader also defines LoadAsync instance methods that load and parse XAML content asynchronously. You’ll want to use LoadAsync to keep a responsive user interface during the loading of large files or files over the network, for example. Accompanying these methods are a CancelAsync method for halting the processing and a LoadCompleted event for knowing when the processing is complete.
The behavior of LoadAsync is a bit odd, however. The work is done on the UI thread via multiple Dispatcher.BeginInvoke calls. (WPF tries to break the work up into 200-millisecond chunks.) Furthermore, this asynchronous processing is only used if x:SynchronousMode="Async" is set on the root XAML node. If this attribute is not set, LoadAsync will silently load the XAML synchronously.
Now that an instance of the root element exists, you can retrieve child elements by making use of the appropriate content properties or collection properties. The following code assumes that the Window has a StackPanel object as its content, whose fifth child is an OK Button:
Window window = null;
using (FileStream fs =
new FileStream("MyWindow.xaml", FileMode.Open, FileAccess.Read))
{
// Get the root element, which we know is a Window
window = (Window)XamlReader.Load(fs);
}
// Grab the OK button by walking the children (with hard-coded knowledge!)
StackPanel panel = (StackPanel)window.Content;
Button okButton = (Button)panel.Children[4];
With a reference to the Button, you can do whatever you want: Set additional properties (perhaps using logic that is hard or impossible to express in XAML), attach event handlers, or perform additional actions that you can’t do from XAML, such as calling its methods.
Of course, the code that uses a hard-coded index and other assumptions about the user interface structure isn’t very satisfying, as simple changes to the XAML can break it. Instead, you could write code to process the elements more generically and look for a Button element whose content is an "OK" string, but that would be a lot of work for such a simple task. In addition, if you want the Button to contain graphical content, how can you easily identify it in the presence of multiple Buttons?
Fortunately, XAML supports naming of elements so they can be found and used reliably from procedural code.
Naming XAML Elements
The XAML language namespace has a Name keyword that enables you to give any element a name. For the simple OK button that we’re imagining is embedded somewhere inside a Window, the Name keyword can be used as follows:
<Button x:Name="okButton">OK</Button>
With this in place, you can update the preceding C# code to use Window’s FindName method that searches its children (recursively) and returns the desired instance:
Window window = null;
using (FileStream fs =
new FileStream("MyWindow.xaml", FileMode.Open, FileAccess.Read))
{
// Get the root element, which we know is a Window
window = (Window)XamlReader.Load(fs);
}
// Grab the OK button, knowing only its name
Button okButton = (Button)window.FindName("okButton");
FindName is not unique to Window; it is defined on FrameworkElement and FrameworkContentElement, which are base classes for many important classes in WPF.
In all versions of WPF, the Binding markup extension can be used to reference a named element as a property value:
<StackPanel xmlns="http://schemas.microsoft.com/winfx/2006/xaml/presentation">
<Label Target="{Binding ElementName=box}" Content="Enter _text:"/>
<TextBox Name="box"/>
</StackPanel>
In this case, assigning the TextBox as the Target of the Label gives it focus when the Label’s access key, Alt+T, is pressed. However, WPF 4.0 and later support a simpler markup extension (that finds the element at parse time rather than runtime): System.Windows.Markup.Reference. It can be used as follows:
<StackPanel xmlns="http://schemas.microsoft.com/winfx/2006/xaml/presentation"
xmlns:x="http://schemas.microsoft.com/winfx/2006/xaml">
<Label Target="{x:Reference box}" Content="Enter _text:"/>
<TextBox Name="box"/>
</StackPanel>
Or, when a relevant property is marked with the System.Windows.Markup.NameReferenceConverter type converter (as in this case), a simple name string can be implicitly converted into the referenced instance:
<StackPanel xmlns="http://schemas.microsoft.com/winfx/2006/xaml/presentation">
<Label Target="box" Content="Enter _text:"/>
<TextBox Name="box"/>
</StackPanel>
Compiling XAML
Loading and parsing XAML at runtime is interesting for dynamic skinning scenarios or for .NET languages that don’t have the necessary support for XAML compilation. Most WPF projects, however, leverage the XAML compilation supported by MSBuild and Visual Studio. XAML compilation involves three things: converting a XAML file into a special binary format, embedding the converted content as a binary resource in the assembly being built, and performing the plumbing that connects XAML with procedural code automatically. C# and Visual Basic are the two languages with the best support for XAML compilation.
If you don’t care about mixing procedural code with your XAML file, then all you need to do to compile it is add it to a WPF project in Visual Studio with a Build Action of Page. (Chapter 7 explains ways to make use of such content in the context of an application.) But for the typical case of compiling a XAML file and mixing it with procedural code, the first step is specifying a subclass for the root element in a XAML file. This can be done with the Class keyword defined in the XAML language namespace, for example:
<Window xmlns="http://schemas.microsoft.com/winfx/2006/xaml/presentation"
xmlns:x="http://schemas.microsoft.com/winfx/2006/xaml"
x:Class="MyNamespace.MyWindow">
...
</Window>
In a separate source file (but in the same project), you can define the subclass and add whatever members you want:
namespace MyNamespace
{
partial class MyWindow : Window
{
public MyWindow()
{
// Necessary to call in order to load XAML-defined content!
InitializeComponent();
...
}
Any other members can go here...
}
}
This is often referred to as the code-behind file. If you reference any event handlers in XAML (via event attributes such as Click on Button), this is where they should be defined.
The partial keyword in the class definition is important, as the class’s implementation is spread across more than one file. If the .NET language doesn’t support partial classes (for example, C++/CLI), the XAML file must also use a Subclass keyword in the root element, as follows:
<Window xmlns="http://schemas.microsoft.com/winfx/2006/xaml/presentation"
xmlns:x="http://schemas.microsoft.com/winfx/2006/xaml"
x:Class="MyNamespace.MyWindow" x:Subclass="MyNamespace.MyWindow2">
...
</Window>
With this change, the XAML file completely defines the Subclass (MyWindow2 in this case) but uses the Class in the code-behind file (MyWindow) as its base class. Therefore, this simulates the ability to split the implementation across two files by relying on inheritance.
When creating a WPF-based C# or Visual Basic project in Visual Studio, or when you use Add New Item... to add certain WPF items to a project, Visual Studio automatically creates a XAML file with x:Class on its root, creates the code-behind source file with the partial class definition, and links the two together so they are built properly.
If you’re an MSBuild user and want to understand the contents of the project file that enables code-behind, you can open any of the C# project files included with this book’s source code in a simple text editor such as Notepad. The relevant part of a typical project is as follows:
<ItemGroup>
<Page Include="MyWindow.xaml"/>
</ItemGroup>
<ItemGroup>
<Compile Include="MyWindow.xaml.cs">
<DependentUpon>MyWindow.xaml</DependentUpon>
<SubType>Code</SubType>
</Compile>
</ItemGroup>
For such a project, the build system generates several items when processing MyWindow.xaml, including these:
![]() A BAML file (
A BAML file (MyWindow.baml), which gets embedded in the assembly as a binary resource by default.
![]() A C# source file (
A C# source file (MyWindow.g.cs), which gets compiled into the assembly like all other source code.
Tip
x:Class can only be used in a XAML file that gets compiled. But you can sometimes compile a XAML file with no x:Class just fine. This simply means that there is no corresponding code-behind file, so you can’t use any features that rely on the presence of procedural code. Therefore, adding a XAML file to a Visual Studio project without an x:Class directive can be a handy way to get the deployment and performance benefits of compiled XAML without having to create an unnecessary code-behind file.
BAML
BAML, which stands for Binary Application Markup Language, is simply XAML that has been parsed, tokenized, and converted into binary form. Although almost any chunk of XAML can be represented by procedural code, the XAML-to-BAML compilation process does not generate procedural source code. So, BAML is not like Microsoft intermediate language (MSIL); it is a compressed declarative format that is faster to load and parse (and smaller in size) than plain XAML. BAML is basically an implementation detail of the XAML compilation process. Nevertheless, it’s interesting to be aware of its existence. In fact, WPF contains a public BAML reader class (see Appendix A).
Generated Source Code
Some procedural code does get generated in the XAML compilation process (if you use x:Class), but it’s just some “glue code” similar to what had to be written to load and parse a loose XAML file at runtime. Such files are given a suffix such as .g.cs (or .g.vb), where the g stands for generated.
Each generated source file contains a partial class definition for the class specified with x:Class on the root object element. This partial class contains a field (internal by default) for every named element in the XAML file, using the element name as the field name. It also contains an InitializeComponent method that does the grunt work of loading the embedded BAML resource, assigning the fields to the appropriate instances originally declared in XAML, and hooking up any event handlers (if any event handlers were specified in the XAML file).
Because the glue code tucked away in the generated source file is part of the same class you’ve defined in the code-behind file (and because BAML gets embedded as a resource), you often don’t need to be aware of the existence of BAML or the process of loading and parsing it. You simply write code that references named elements just like any other class member, and you let the build system worry about hooking things together. The only thing you need to remember is to call InitializeComponent in your code-behind class’s constructor.
Warning: Don’t forget to call InitializeComponent in the constructor of your code-behind class!
If you fail to do so, your root element won’t contain any of the content you defined in XAML (because the corresponding BAML doesn’t get loaded), and all the fields representing named object elements will be null.
![]() FAQ: Can BAML be decompiled back into XAML?
FAQ: Can BAML be decompiled back into XAML?
Sure, because BAML can be converted into a graph of live object instances, and these instances can be serialized as XAML, regardless of how they were originally declared.
The first step is to retrieve an instance that you want to be the root of the XAML. If you don’t already have this object, you can call the static System.Windows.Application.LoadComponent method to load it from BAML, as follows:
System.Uri uri = new System.Uri("/WpfApplication1;component/MyWindow.xaml",
System.UriKind.Relative);
Window window = (Window)Application.LoadComponent(uri);
Yes, that code is loading BAML despite the .xaml suffix. This differs from previous code that uses FileStream to load a .xaml file because with LoadComponent, the name specified as the uniform resource identifier (URI) does not have to physically exist as a standalone .xaml file. LoadComponent can automatically retrieve BAML embedded as a resource when given the appropriate URI (which, by MSBuild convention, is the name of the original XAML source file). In fact, Visual Studio’s autogenerated InitializeComponent method calls Application.LoadComponent to load embedded BAML, although it uses a different overload. Chapter 12 provides more details about this mechanism of retrieving embedded resources with URIs.
After you’ve gotten a hold of the root element instance, you can use the System.Windows.Markup.XamlWriter class to get a XAML representation of the root element (and, therefore, all its children). XamlWriter contains five overloads of a static Save method, the simplest of which accepts an object instance and returns appropriate XAML as a string:
string xaml = XamlWriter.Save(window);
It might sound a little troubling that BAML can be so easily “cracked open,” but it’s really no different from any other software running locally or displaying a user interface locally. (For example, you can easily dig into a website’s HTML, JavaScript, and Cascading Style Sheets [CSS] files.) The popular .NET Reflector tool has a BamlViewer add-in (see http://codeplex.com/reflectoraddins) that displays BAML embedded in any assembly as XAML.
XAML2009
Although XAML is a general-purpose language whose use is broader than that of WPF, WPF’s XAML compiler and parsers are architecturally tied to WPF. Therefore, they are not usable by other technologies without taking a dependency on WPF. The .NET Framework 4.0 fixed this by introducing a System.Xaml assembly that contains a bunch of functionality for processing XAML. WPF (and WCF and WF) take a dependency on System.Xaml—not the other way around.
At the same time, the .NET Framework 4.0 introduced a handful of new features for the XAML language. This second generation of the XAML language is referred to as XAML2009. (To differentiate, the first generation is sometimes referred to as XAML2006.) The System.Xaml assembly supports XAML2009, unlike the older APIs (System.Windows.Markup.XamlReader and System.Windows.Markup.XamlWriter from the previous section), which only support XAML2006.
The XAML2009 features, outlined in this section, are nothing revolutionary but represent a nice set of incremental improvements to XAML. However, don’t get too excited; for the most part, these features are not usable in WPF projects because XAML compilation still uses the XAML2006-based APIs, as do Visual Studio’s WPF designer and editor.
It is unclear whether WPF will ever completely switch over to XAML2009. (Note that Silverlight and Windows Store apps don’t support XAML2009 either.) In WPF 4.0 or later, however, you can take advantage of these features when using loose XAML with a host that processes the XAML with the XAML2009-based APIs, such as the XAMLPAD2009 sample from this book’s source code or Internet Explorer when the netfx/2009 XML namespace is used.
Therefore, the XAML2009 features are interesting to know about, even if they are not terribly useful. Most of them revolve around the idea of making a wider range of types directly usable from XAML. This is good news for class library authors, as XAML2009 imposes fewer restrictions for making class libraries XAML friendly. On its own, each feature provides a small improvement in expressiveness, but many of the features work together to solve real-world problems.
Full Generics Support
In XAML2006, the root element can be an instantiation of a generic class, thanks to the x:TypeArguments keyword. x:TypeArguments can be set to a type name or a comma-delimited list of type names. But because x:TypeArguments can only be used on the root element, generic classes generally have not been XAML friendly.
A common workaround for this limitation is to derive a non-generic class from a generic one simply so it can be referenced from XAML, as in the following example:
C#:
public class PhotoCollection : ObservableCollection<Photo> {}
XAML:
<custom:PhotoCollection>
<custom:Photo .../>
<custom:Photo .../>
</custom:PhotoCollection>
In XAML2009, however, x:TypeArguments can be used on any element, so a class like ObservableCollection<Photo> can be instantiated directly from XAML:
<collections:ObservableCollection TypeArguments="custom:Photo">
<custom:Photo .../>
<custom:Photo .../>
</collections:ObservableCollection>
In this case, collections is assumed to map to the System.Collections.ObjectModel namespace that contains ObservableCollection.
Dictionary Keys of Any Type
In XAML2009, type conversion is now attempted with x:Key values, so you can successfully add items to a dictionary with non-string keys without using a markup extension. Here’s an example:
<collections:Dictionary x:TypeArguments="x:Int32, x:String">
<x:String x:Key="1">One</x:String>
<x:String x:Key="2">Two</x:String>
</collections:Dictionary>
Here, collections is assumed to map to the System.Collections.Generic namespace.
Digging Deeper: Turning Off the Type Conversion of Non-String Dictionary Keys
For backwards compatibility, the XAML2009 XamlObjectWriter has a setting for turning off the new automatic type conversion. This is controlled by the XamlObjectWriterSettings.PreferUnconvertedDictionaryKeys property. When set to true, System.Xaml won’t convert keys if the dictionary implements the non-generic IDictionary interface, unless:
![]()
System.Xaml has already failed calling IDictionary.Add on this same instance, or
![]() The dictionary is a well-known type from the .NET Framework that
The dictionary is a well-known type from the .NET Framework that System.Xaml knows requires conversion.
Built-In System Data Types
In XAML2006, using core .NET data types such as String or Int32 is awkward due to the need to reference the System namespace from the mscorlib assembly, as seen previously in this chapter:
<sys:Int32 xmlns:sys="clr-namespace:System;assembly=mscorlib">7</sys:Int32>
In XAML2009, 13 .NET data types have been added to the XAML language namespace that most XAML is already referencing. With a namespace prefix of x, these data types are x:Byte, x:Boolean, x:Int16, x:Int32, x:Int64, x:Single, x:Double, x:Decimal, x:Char, x:String, x:Object, x:Uri, and x:TimeSpan. Therefore, the previous snippet can be rewritten as follows:
<x:Int32 xmlns:x="http://schemas.microsoft.com/winfx/2006/xaml">7</x:Int32>
But it is typically seen as follows in a XAML file already referencing the XAML language namespace:
<x:Int32>7</x:Int32>
Instantiating Objects with Non-Default Constructors
XAML2009 introduces an x:Arguments keyword that enables you to specify one or more arguments to pass to a class’s constructor. Consider, for example, the System.Version class, which has a default constructor and four parameterized constructors. You could not construct an instance of this class in XAML2006 unless someone provided an appropriate type converter (or unless you were happy with the behavior of the default constructor, which produces a version number of 0.0).
In XAML2009, you can instantiate this class with its constructor that accepts a single string as follows:
<sys:Version x:Arguments="4.0.30319.1"/>
The constructor argument doesn’t have to be a string; the attribute value undergoes type conversion as necessary.
Unlike x:TypeArguments, x:Arguments does not allow you to specify multiple arguments in the attribute value with a comma-delimited string. Instead, you can use the element form of x:Arguments to specify any number of arguments. For example, calling System.Version’s constructor that accepts four integers can be done as follows:
<sys:Version>
<x:Arguments>
<x:Int32>4</x:Int32>
<x:Int32>0</x:Int32>
<x:Int32>30319</x:Int32>
<x:Int32>1</x:Int32>
</x:Arguments>
</sys:Version>
Getting Instances via Factory Methods
With the new x:FactoryMethod keyword in XAML2009, you can now get an instance of a class that doesn’t have any public constructors. x:FactoryMethod enables you to specify any public static method that returns an instance of the desired type. For example, the following XAML uses a Guid instance returned by the static Guid.NewGuid method:
<Label xmlns=http://schemas.microsoft.com/winfx/2006/xaml/presentation
xmlns:x=http://schemas.microsoft.com/winfx/2006/xaml
xmlns:sys="clr-namespace:System;assembly=mscorlib">
<sys:Guid x:FactoryMethod="sys:Guid.NewGuid"/>
</Label>
When x:FactoryMethod is used with x:Arguments, the arguments are passed to the static factory method rather than to a constructor. Therefore, the following XAML calls the static Marshal.GetExceptionForHR method, which accepts an HRESULT error code as input and returns the corresponding .NET exception that would be thrown by the common language runtime interoperability layer when encountering such an error:
<Label xmlns=http://schemas.microsoft.com/winfx/2006/xaml/presentation
xmlns:x=http://schemas.microsoft.com/winfx/2006/xaml
xmlns:sys="clr-namespace:System;assembly=mscorlib"
xmlns:interop=
"clr-namespace:System.Runtime.InteropServices;assembly=mscorlib">
<sys:Exception x:FactoryMethod="interop:Marshal.GetExceptionForHR">
<x:Arguments>
<x:Int32>0x80004001</x:Int32>
</x:Arguments>
</sys:Exception>
</Label>
Figure 2.3 shows the result of the previous two Labels stacked in the same XAML content, as rendered by the XAMLPAD2009 sample.

Event Handler Flexibility
Event handlers can’t be assigned in a loose XAML2006 file, but they can be assigned in a loose XAML2009 file as long as the root instance can be located and it has a method with a matching name and appropriate signature. In addition, in XAML2009, the value of an event attribute can be any markup extension that returns an appropriate delegate:
<Button Click="{custom:DelegateFinder Click}"/>
As with any markup extension, it can accept arbitrary input and perform arbitrary logic to look up the delegate.
Defining New Properties
XAML is primarily focused on instantiating existing classes and setting values of their predefined properties. Two new elements in XAML2009—x:Members and the corresponding x:Property—enable the definition of additional properties directly inside XAML. This functionality doesn’t apply to WPF, however. You can see it used in Windows Workflow Foundation XAML, as in the following example:
<Activity x:Class="ActivityLibrary1.Activity1" ...>
<x:Members>
<x:Property Name="argument1" Type="InArgument(x:Int32)"/>
<x:Property Name="argument2" Type="OutArgument(x:String)"/>
</x:Members>
...
</Activity>
XAML Keywords
The XAML language namespace (http://schemas.microsoft.com/winfx/2006/xaml) defines a handful of keywords that must be treated specially by any XAML compiler or parser. They mostly control aspects of how elements get exposed to procedural code, but several are useful even without any procedural code. You’ve already seen some of them (such as Key, Name, Class, Subclass, and Code), but Table 2.1 lists them all. They are listed with the conventional x prefix because that is how they usually appear in XAML and in documentation.
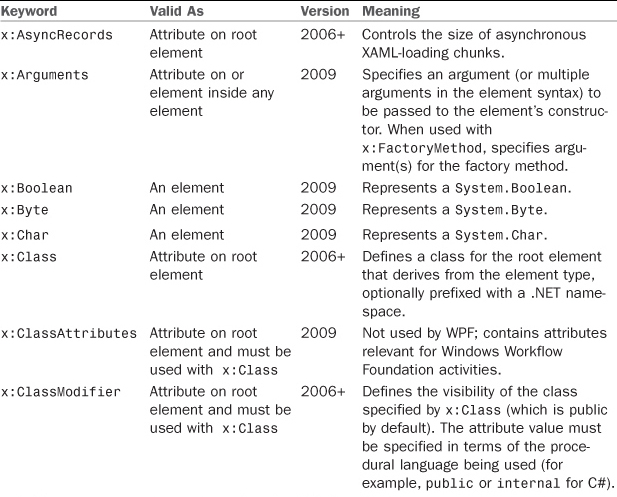
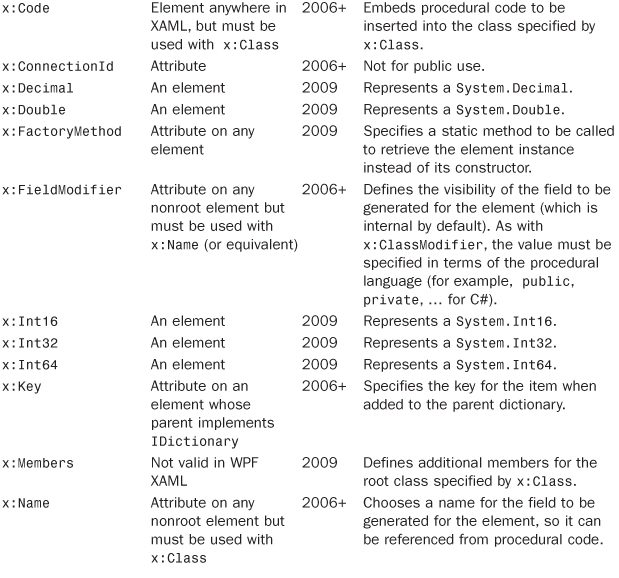

Table 2.2 contains additional items in the XAML language namespace that can be confused as keywords but are actually just markup extensions (real .NET classes in the System.Windows.Markup namespace). Each class’s Extension suffix is omitted from the table because the classes are typically used without the suffix.
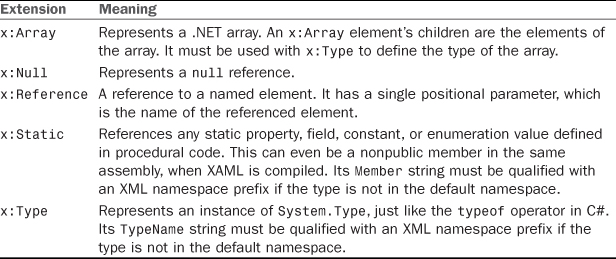
TABLE 2.2 Markup Extensions in the XAML Language Namespace, Assuming the Conventional x Namespace Prefix
Summary
You have now seen how XAML fits in with WPF and, most importantly, you now have the information needed to translate most XAML examples into a language such as C# and vice versa. However, because type converters and markup extensions are “black boxes,” a straightforward translation is not always going to be obvious. That said, invoking a type converter directly from procedural code is always an option if you can’t figure out the conversion that the type converter is doing internally! (Many classes with corresponding type converters even expose a static Parse method that does the same work, for the sake of simpler procedural code.)
I love the fact that simple concepts that could have been treated specially by XAML (such as null or a named reference) are expressed using the same markup extension mechanism used by third parties. This keeps the XAML language as simple as possible, and it ensures that the extensibility mechanism works really well.
As you proceed further with WPF, you might find that some WPF APIs can be a little clunky from procedural code because their design is often optimized for XAML use. For example, WPF exposes many small building blocks (enabling the rich composition described in the previous chapter), so a WPF application generally must create many objects manually. Besides the fact the XAML excels at expressing deep hierarchies of objects concisely, the WPF team spent more time implementing features to effectively hide intermediate objects in XAML (such as type converters) rather than features to hide them from procedural code (such as constructors that create inner objects on your behalf).
Most people understand the benefit of WPF having the separate declarative model provided by XAML, but some lament XML as the choice of format. The following sections are two common complaints and my attempt to debunk them.
Complaint 1: XML Is Too Verbose to Type
This is true: Almost nobody enjoys typing lots of XML, but that’s where tools come in. Tools such as IntelliSense and visual designers can spare you from typing a single angle bracket! The transparent and well-specified nature of XML enables you to easily integrate new tools into the development process (creating a XAML exporter for your favorite tool, for example) and also enables easy hand-tweaking or troubleshooting.
In some areas of WPF—complicated paths and shapes, 3D models, and so on—typing XAML by hand isn’t even practical. In fact, the trend from when XAML was first introduced in beta form has been to remove some of the handy human-typable shortcuts in favor of a more robust and extensible format that can be supported well by tools. But I still believe that being familiar with XAML and seeing the WPF APIs through both procedural and declarative perspectives is the best way to learn the technology. It’s like understanding how HTML works without relying on a visual tool.
Complaint 2: XML-Based Systems Have Poor Performance
XML is about interoperability, not about an efficient representation of data. So, why should most WPF applications be saddled with a bunch of data that is relatively large and slow to parse?
The good news is that in a normal WPF scenario, XAML is compiled into BAML, so you don’t pay the full penalties of size and parsing performance at runtime. BAML is both smaller in size than the original XAML and optimized for efficient use at runtime. Performance pitfalls from XML are therefore limited to development time, which is when the benefits of XML are needed the most.