
Chapter 20. User Controls and Custom Controls
Chapter 9, “Content Controls,” claims that no modern presentation framework would be complete without a standard set of controls that enable you to quickly assemble traditional user interfaces. I think it’s also safe to say that no modern presentation framework would be complete without the ability to create your own reusable controls. You might want to create a control because your own applications have custom needs, or because there’s money to be made by selling unique controls to other software developers! This chapter is about two WPF mechanisms for writing your own controls: user controls (the easier of the two) and custom controls (the more complicated but also more flexible variety).
The role that user controls and custom controls play in WPF is quite different than in other technologies. In other technologies, custom controls are often created simply to get a nonstandard look. But WPF has many options for achieving nonstandard-looking controls without creating brand-new controls. You can completely restyle built-in controls with WPF’s style and template mechanisms, demonstrated in Chapter 14, “Styles, Templates, Skins, and Themes.” Or you can sometimes simply embed complex content inside built-in controls to get the look you want. In other technologies, a Button containing an Image or a TreeView containing ComboBoxes might necessitate a custom control, but not in WPF! (That’s not to say that there are fewer opportunities for selling reusable components. It just means you have more implementation options.)
The decision to create a new control should be based on the APIs you want to expose rather than the look you want to achieve. If no existing control has a programmatic interface that naturally represents your concept, go ahead and create a user control or custom control. The biggest mistake people make with user controls and custom controls is creating one from scratch when an existing control can suffice!
![]() FAQ: I’ve concluded that I need to write my own control. But should I write a user control or a custom control?
FAQ: I’ve concluded that I need to write my own control. But should I write a user control or a custom control?
You should create a user control if its reuse will be limited and you don’t care about exposing rich styling and theming support. You should create a custom control if you want it to be a robust first-class control (like WPF’s built-in controls). A user control tends to contain a logical tree defining its look and tends to have logic that directly interacts with these child elements. A custom control, on the other hand, tends to get its look from a visual tree defined in a separate control template and generally has logic that works even if a consumer changes its visual tree completely (using the techniques from Chapter 14).
This distinction is mostly imposed by the default development experience provided by Visual Studio, however. Visual Studio pushes you in a certain direction based on the type of control you add to a project. When you add a user control, you get a XAML file with a corresponding code-behind file, so you can easily build your user control much as you would build a Window or Page. But when you add a custom control to a project, you get a normal .cs (or .vb) code file plus a theme style with a simple control template injected into the project’s generic dictionary (themesgeneric.xaml).
Therefore, to answer this question with less hand-waving, let’s look at the precise differences between user controls and custom controls. A custom control can derive from Control or any of its subclasses. The definition of a user control, on the other hand, is a class that derives from UserControl, which itself derives from ContentControl, which derives from Control. So, user controls are technically a type of custom control, but this chapter uses the term custom control to mean any Control-derived class that isn’t a user control.
If the control you want to create would benefit from taking advantage of functionality already present in a non-ContentControl (such as RangeBase or Selector) or a ContentControl-derived class (such as HeaderedContentControl or Button), it’s logical to derive your class from it. If your control doesn’t need any of the extra functionality that classes such as ContentControl add on top of Control, deriving directly from Control makes sense. Both of these choices mean that you’re writing a custom control rather than a user control.
But if neither of these conditions is true, the choice between deriving directly from ContentControl (which means you’re writing a custom control) versus deriving from UserControl (which means you’re writing a user control) is fairly insignificant if you ignore the development experience. That’s because UserControl differs very little from its ContentControl base class; it has a different default control template, it has a default content alignment of Stretch in both directions (rather than Left and Top), it sets IsTabStop and Focusable to false by default, and it changes the source of any events raised from inner content to be the UserControl itself. And that’s all. WPF does no special-casing of UserControl at runtime. Therefore, in this case, it makes sense to choose based on your intention to create a “lookless” control (which would be a custom control) versus a “look-filled” control (which would be a user control).
Creating a User Control
There’s no better way to understand the process of creating a user control than actually creating one. So in this section, we’ll create a user control called FileInputBox.
FileInputBox combines a TextBox with a Browse Button. The intention is that a user could type a raw filename in the TextBox or click the Button to get a standard OpenFileDialog. If the user chooses a file in this dialog box, its fully qualified name is automatically pasted into the TextBox. This control works exactly like <INPUT TYPE="FILE"/> in HTML.
Creating the User Interface of the User Control
Listing 20.1 contains the user control’s XAML file that defines the user interface, and Figure 20.1 shows the rendered result.

LISTING 20.1 FileInputBox.xaml—The User Interface for FileInputBox
<UserControl x:Class="Chapter20.FileInputBox"
xmlns="http://schemas.microsoft.com/winfx/2006/xaml/presentation"
xmlns:x="http://schemas.microsoft.com/winfx/2006/xaml">
<DockPanel>
<Button x:Name="theButton" DockPanel.Dock="Right" Click="theButton_Click">
Browse...</Button>
<TextBox x:Name="theTextBox"
MinWidth="{Binding ActualWidth, ElementName=theButton}" Margin="0,0,2,0"/>
</DockPanel>
</UserControl>
The Button is docked on the right and has an event handler for the Click event (covered in the next section). The TextBox fills the remaining space except for a two-unit margin on the right to give some space between itself and the Button. The XAML definition is very simple, but it handles every layout situation flawlessly. The setting of MinWidth on TextBox isn’t necessary, but it’s a slick way to ensure that the TextBox doesn’t look too small in certain layout conditions. And by making its minimum width match the width of the Button (which is always just big enough to fit its content, thanks to the right-docking), a hard-coded size is avoided.
Figure 20.2 shows what happens when an application uses an instance of FileInputBox and sets various properties inherited from ContentControl and Control, as follows:
<local:FileInputBox BorderBrush="Orange" BorderThickness="4" Background="Blue"
HorizontalContentAlignment="Right"/>

The fact that setting these properties works correctly seems like a no-brainer, but it’s actually not as automatic as you might think. The appearance of FileInputBox depends on its control template, which it inherits from UserControl. Fortunately, UserControl’s default control template respects properties such as the ones used in Figure 20.2:
<ControlTemplate TargetType="{x:Type UserControl}">
<Border Background="{TemplateBinding Background}"
BorderBrush="{TemplateBinding BorderBrush}"
BorderThickness="{TemplateBinding BorderThickness}"
Padding="{TemplateBinding Padding}">
<ContentPresenter
HorizontalAlignment="{TemplateBinding HorizontalContentAlignment}"
VerticalAlignment="{TemplateBinding VerticalContentAlignment}"/>
</Border>
</ControlTemplate>
If FileInputBox derived directly from ContentControl (UserControl’s base class) instead, these properties would not be respected unless FileInputBox were given a custom template. As is, FileInputBox can be restyled by its consumers, and individual elements (the TextBox, Button, and/or DockPanel) can even be restyled if the consumer creates typed styles for them!
Tip
If you want to prevent an application’s typed styles from impacting elements inside your control, your best bet is to give them an explicit Style (which can be null to get the default look).
From a visual perspective, consuming a FileInputBox as follows:
<Window xmlns="http://schemas.microsoft.com/winfx/2006/xaml/presentation"
xmlns:x="http://schemas.microsoft.com/winfx/2006/xaml"
xmlns:local="clr-namespace:Chapter20">
<StackPanel Margin="20">
<local:FileInputBox/>
</StackPanel>
</Window>
is just a shortcut for plopping the logical tree of elements from FileInputBox.xaml into your user interface:
<Window xmlns="http://schemas.microsoft.com/winfx/2006/xaml/presentation"
xmlns:x="http://schemas.microsoft.com/winfx/2006/xaml"
xmlns:local="clr-namespace:Chapter20">
<StackPanel Margin="20">
<UserControl>
<DockPanel>
<Button DockPanel.Dock="Right">Browse...</Button>
<TextBox MinWidth="{Binding ActualWidth, ElementName=theButton}"
Margin="0,0,2,0"/>
</DockPanel>
</UserControl>
</StackPanel>
</Window>
This alone can be handy, but it is also achievable by giving an arbitrary existing control an explicit control template containing the DockPanel, Button, and TextBox (ignoring the subtle differences from the elements being in a visual tree rather than the logical tree). However, user controls typically add value by encapsulating custom behavior.
Creating the Behavior of the User Control
Listing 20.2 contains the entire code-behind file for Listing 20.1. This gives FileInputBox the appropriate behavior when the Button is clicked, exposes the text from the TextBox as a read/write property, and exposes a simple FileNameChanged event corresponding to the TextChanged event exposed by the TextBox. The event handler for TextChanged marks the event as handled (to stop its bubbling) and raises the FileNameChanged event instead.
LISTING 20.2 FileInputBox.xaml.cs—The Logic for FileInputBox
using System;
using System.Windows;
using System.Windows.Controls;
using Microsoft.Win32;
namespace Chapter20
{
public partial class FileInputBox : UserControl
{
public FileInputBox()
{
InitializeComponent();
theTextBox.TextChanged += new TextChangedEventHandler(OnTextChanged);
}
private void theButton_Click(object sender, RoutedEventArgs e)
{
OpenFileDialog d = new OpenFileDialog();
if (d.ShowDialog() == true) // Result could be true, false, or null
this.FileName = d.FileName;
}
public string FileName
{
get { return theTextBox.Text; }
set { theTextBox.Text = value; }
}
void OnTextChanged(object sender, TextChangedEventArgs e)
{
e.Handled = true;
if (FileNameChanged != null)
FileNameChanged(this, EventArgs.Empty);
}
public event EventHandler<EventArgs> FileNameChanged;
}
}
That’s all there is to it! If you don’t care about broadly sharing your user control or maximizing the integration with WPF’s subsystems, you can often expose plain .NET methods, properties, and events and have a control that’s “good enough.” Figure 20.3 shows the control in action.

Consuming a user control is very straightforward. If you want to use it from a Window or Page in the same assembly, you simply reference the appropriate namespace, which, in this case, is Chapter20:
<Window xmlns="http://schemas.microsoft.com/winfx/2006/xaml/presentation"
xmlns:x="http://schemas.microsoft.com/winfx/2006/xaml"
xmlns:local="clr-namespace:Chapter20">
<StackPanel Margin="20">
<local:FileInputBox/>
</StackPanel>
</Window>
If you want to use it from a separate assembly, the clr-namespace directive simply needs to include the assembly information along with the namespace:
xmlns:local="clr-namespace:Chapter20;assembly=Chapter20Controls"
Digging Deeper: Protecting User Controls from Accidental Usage
The following is a valid way to initialize FileInputBox, giving its TextBox an initial FileName value of c:Eileen.htm:
<local:FileInputBox FileName="c:Eileen.htm"/>
But because FileInputBox ultimately derives from ContentControl, here are two other ways a consumer might attempt to use FileInputBox:
<local:FileInputBox Content="c:Eileen.htm"/>
or:
<local:FileInputBox>c:Eileen.htm</local:FileInputBox>
Can you guess what happens in these cases? The default value of Content (the DockPanel containing the Button and TextBox) gets completely replaced with this string! This is clearly not what the consumer intended; otherwise, they should have just used a TextBlock element!
Fortunately, you can take some actions to prevent such mistakes. For FileInputBox, you can designate FileName to be the content property instead of Content, as follows:
[ContentProperty("FileName")]
public partial class FileInputBox : UserControl
{
...
}
This simple change makes this:
<local:FileInputBox>c:Eileen.htm</local:FileInputBox>
equivalent to this:
<local:FileInputBox FileName="c:Eileen.htm"/>
But how can you change the explicit setting of Content from being disastrous? One way is to add the following method to FileInputBox:
protected override void OnContentChanged(object oldContent, object newContent)
{
if (oldContent != null)
throw new InvalidOperationException("You can't change Content!");
}
Another solution is to place your control’s user interface inside a control template (rather than Content) and bind TextBox.Text to the Content property. But if you do that, you might as well write a custom control rather than a user control!
Adding Dependency Properties to the User Control
One possible enhancement to FileInputBox is to change FileName from a plain .NET property to a dependency property. That way, consumers of the control can use it as a data-binding target, more easily use the value in a custom control template, and so on.
To turn FileName into a dependency property, you can add a DependencyProperty field to the class, initialize it appropriately, and change the implementation of the FileName property to use the dependency property mechanism:
public static readonly DependencyProperty FileNameProperty =
DependencyProperty.Register("FileName", typeof(string), typeof(FileInputBox));
public string FileName
{
get { return (string)GetValue(FileNameProperty); }
set { SetValue(FileNameProperty, value); }
}
By convention, WPF’s built-in objects give the field the name PropertyNameProperty. You should follow this convention with your own controls to avoid confusion.
The preceding implementation of FileName as a dependency property is flawed, however. It’s no longer associated with the Text property of the control’s inner TextBox! To update FileName when Text changes, you could add a line of code inside OnTextChanged:
void OnTextChanged(object sender, TextChangedEventArgs e)
{
this.FileName = theTextBox.Text;
e.Handled = true;
if (FileNameChanged != null)
FileNameChanged(this, EventArgs.Empty);
}
And to update Text when FileName changes, it’s tempting to add a line of code to the FileName property’s set accessor as follows:
set { theTextBox.Text = value; SetValue(FileNameProperty, value); }
But this isn’t a good idea because, as explained in Chapter 3, “WPF Fundamentals,” the set accessor never gets called unless someone sets the .NET property in procedural code. When setting the property in XAML, data binding to it, and so on, WPF calls SetValue directly.
To respond properly to any value change in the FileName dependency property, you could register for a notification provided by the dependency property system. But the easiest way to keep Text and FileName in sync is to use data binding. Listing 20.3 contains the entire C# implementation of FileInputBox, updated with FileName as a dependency property. This assumes that the XAML for FileInputBox has been updated to take advantage of data binding as follows:
<UserControl x:Class="Chapter20.FileInputBox"
xmlns="http://schemas.microsoft.com/winfx/2006/xaml/presentation"
xmlns:x="http://schemas.microsoft.com/winfx/2006/xaml"
x:Name="root">
<DockPanel>
<Button x:Name="theButton" DockPanel.Dock="Right" Click="theButton_Click">
Browse...</Button>
<TextBox x:Name="theTextBox"
MinWidth="{Binding ActualWidth, ElementName=theButton}"
Text="{Binding FileName, ElementName=root}" Margin="0,0,2,0"/>
</DockPanel>
</UserControl>
LISTING 20.3 FileInputBox.xaml.cs—An Alternate Version of Listing 20.2, in Which FileName Is a Dependency Property
using System;
using System.Windows;
using System.Windows.Controls;
using Microsoft.Win32;
namespace Chapter20
{
public partial class FileInputBox : UserControl
{
public FileInputBox()
{
InitializeComponent();
theTextBox.TextChanged += new TextChangedEventHandler(OnTextChanged);
}
private void theButton_Click(object sender, RoutedEventArgs e)
{
OpenFileDialog d = new OpenFileDialog();
if (d.ShowDialog() == true) // Result could be true, false, or null
this.FileName = d.FileName;
}
public string FileName
{
get { return (string)GetValue(FileNameProperty); }
set { SetValue(FileNameProperty, value); }
}
private void OnTextChanged(object sender, TextChangedEventArgs e)
{
e.Handled = true;
if (FileNameChanged != null)
FileNameChanged(this, EventArgs.Empty);
}
public static readonly DependencyProperty FileNameProperty =
DependencyProperty.Register("FileName", typeof(string), typeof(FileInputBox));
public event EventHandler<EventArgs> FileNameChanged;
}
}
With the data binding in place on TextBox.Text (which is two-way by default), the standard dependency property implementation works with no extra code, despite the fact that the value for FileName is stored separately from the TextBox.
Warning: Avoid implementing logic in a dependency property’s property wrapper other than calling GetValue and SetValue!
If you deviate from the standard implementation, you’ll introduce semantics that apply only when the property is directly set from procedural code. To react to calls to SetValue, regardless of the source, you should register for a dependency property changed notification and place your logic in the callback method instead. Or you can find another mechanism to respond to property value changes with the help of data binding, as done in Listing 20.3.
FrameworkPropertyMetadata, an instance of which can be passed to DependencyProperty.Register, contains several properties for customizing the behavior of the dependency property. Besides attaching a property changed handler, you can set a default value, control whether the property is inherited by child elements, set the default data flow for data binding, control whether a value change should refresh the control’s layout or rendering, and so on.
Adding Routed Events to the User Control
If you go to the effort of giving a user control appropriate dependency properties, you should probably make the same effort to transform appropriate events into routed events. Consumers can write triggers based on a routed event you expose, but they can’t directly do that for normal .NET events. For FileInputBox, it makes sense for its FileNameChanged event to be a bubbling routed event, especially because the TextChanged event it’s wrapping is itself a bubbling routed event!
As discussed in Chapter 6, “Input Events: Keyboard, Mouse, Stylus, and Touch,” defining a routed event is much like defining a dependency property: You define a RoutedEvent field (with an Event suffix by convention), register it, and optionally provide a .NET event that wraps the AddHandler and RemoveHandler APIs. Listing 20.4 shows what it looks like to update the FileNameChanged event from the previous two listings to be a bubbling routed event. In addition to the routed event implementation, the private OnTextChanged method is updated to raise the routed event with the RaiseEvent method inherited from UIElement.
LISTING 20.4 FileInputBox.xaml.cs—An Update to Listing 20.3, Making FileNameChanged a Routed Event
using System;
using System.Windows;
using System.Windows.Controls;
using Microsoft.Win32;
namespace Chapter20
{
public partial class FileInputBox : UserControl
{
public FileInputBox()
{
InitializeComponent();
theTextBox.TextChanged += new TextChangedEventHandler(OnTextChanged);
}
private void theButton_Click(object sender, RoutedEventArgs e)
{
OpenFileDialog d = new OpenFileDialog();
if (d.ShowDialog() == true) // Result could be true, false, or null
this.FileName = d.FileName;
}
public string FileName
{
get { return (string)GetValue(FileNameProperty); }
set { SetValue(FileNameProperty, value); }
}
private void OnTextChanged(object sender, TextChangedEventArgs e)
{
e.Handled = true;
RoutedEventArgs args = new RoutedEventArgs(FileNameChangedEvent);
RaiseEvent(args);
}
public event RoutedEventHandler FileNameChanged
{
add { AddHandler(FileNameChangedEvent, value); }
remove { RemoveHandler(FileNameChangedEvent, value); }
}
public static readonly DependencyProperty FileNameProperty =
DependencyProperty.Register("FileName", typeof(string), typeof(FileInputBox));
public static readonly RoutedEvent FileNameChangedEvent =
EventManager.RegisterRoutedEvent("FileNameChanged",
RoutingStrategy.Bubble, typeof(RoutedEventHandler), typeof(FileInputBox));
}
}
Creating a Custom Control
Just as the previous section uses FileInputBox to illustrate creating a user control, this section uses a PlayingCard control to illustrate the process of creating a custom control. Whereas the tendency for designing a user control is to start with the user interface and then later add behavior, it usually makes more sense to start with the behavior when designing a custom control. That’s because a good custom control has a pluggable user interface.
Creating the Behavior of the Custom Control
The PlayingCard control should have a notion of a face, which can be set to one of 52 possible values. It should be clickable. It could also have a notion of being selected, for which each click toggles its state between selected and unselected.
Before implementing the control, it helps to think about the similarities between the control and any of the built-in WPF controls. That way, you can choose a base class more specific than just Control and leverage as much built-in support as possible.
For PlayingCard, the notion of a face is sort of like the Foreground property that all controls have. But Foreground is a Brush, and I want to enable setting the control’s face to a simple string such as "H2" for two of hearts or "SQ" for queen of spades. We could hijack some control’s existing property of type string (for example, TextBlock.Text), as described in Chapter 14, but such a hack would be a poor experience for consumers of the control. Therefore, it feels logical to implement a distinct Face property.
The notion of being clickable is what defines a Button, so it seems obvious that Button should be the base class we choose. But what about the notion of being selected? ToggleButton already provides that in the form of an IsChecked property, as well as the notion of being clickable! So ToggleButton sounds like an ideal base class.
A First Attempt
Listing 20.5 contains an implementation of a ToggleButton-derived PlayingCard control.
LISTING 20.5 PlayingCard.cs—Logic for the PlayingCard Custom Control
using System.Windows.Media;
using System.Windows.Controls.Primitives;
namespace Chapter20
{
public class PlayingCard : ToggleButton
{
public string Face
{
get { return face; }
set { face = value; Foreground = (Brush)TryFindResource(face); }
}
private string face;
}
}
With the Click, Checked, and Unchecked events and the IsChecked property inherited from ToggleButton, all PlayingCard needs to do is implement a Face property. Listing 20.5 uses the input string as the key to a resource used for the control’s Foreground. By using TryFindResource, any invalid strings result in the Foreground being set to null, which is reasonable behavior. But this also implies that we need to store valid resources somewhere with the keys "HA", "H2", "H3", and so on. That’s not a problem; we could store them in PlayingCard’s Resources collection, and the TryFindResource call will find them.
To create the visuals for PlayingCard, I designed 52 drawings in Adobe Illustrator—one for each possible face—and then exported them to XAML, using the exporter from http://mikeswanson.com/xamlexport. Each of the 52 resources is a DrawingBrush with a number of GeometryDrawing objects. These are the resources to add to PlayingCard’s Resources collection. It would be ridiculous to attempt to convert such a large chunk of XAML to C# code, so one approach we could take is to split the definition of PlayingCard between a XAML file and a C# file, making the code in Listing 20.5 the code-behind file. Listings 20.6 and 20.7 show what this would look like.
LISTING 20.6 PlayingCard.xaml.cs—The Code from Listing 20.5, Now as a Code-Behind File
using System.Windows.Media;
using System.Windows.Controls.Primitives;
namespace Chapter20
{
public partial class PlayingCard : ToggleButton
{
public PlayingCard()
{
InitializeComponent();
}
public string Face
{
get { return face; }
set { face = value; Foreground = (Brush)TryFindResource(face); }
}
private string face;
}
}
LISTING 20.7 PlayingCard.xaml—Resources for the PlayingCard Custom Control
<ToggleButton x:Class="Chapter20.PlayingCard"
xmlns="http://schemas.microsoft.com/winfx/2006/xaml/presentation"
xmlns:x="http://schemas.microsoft.com/winfx/2006/xaml"
xmlns:local="clr-namespace:Chapter20">
<ToggleButton.Resources>
<DrawingBrush x:Key="HA" Stretch="Uniform">
<DrawingBrush.Drawing>
...
</DrawingBrush.Drawing>
</DrawingBrush>
<DrawingBrush x:Key="H2" Stretch="Uniform">
<DrawingBrush.Drawing>
...
</DrawingBrush.Drawing>
</DrawingBrush>
...
<Style TargetType="{x:Type local:PlayingCard}">
...
<Setter Property="Template">
<Setter.Value>
<ControlTemplate TargetType="{x:Type local:PlayingCard}">
...
<Rectangle Fill="{TemplateBinding Foreground}"/>
...
</ControlTemplate>
</Setter.Value>
</Setter>
</Style>
</ToggleButton.Resources>
</ToggleButton>
The changes to the C# code are straightforward additions needed to support the compilation of PlayingCard across both files. Listing 20.7 fills the Resources collection with all 52 DrawingBrushes, plus a typed Style with a template that improves the visual appearance (so PlayingCard looks even less like a Button). The Style contains triggers that start animations based on the Checked, Unchecked, MouseEnter, and MouseLeave events (not shown in this listing). Alternatively, it could leverage the Visual State Manager because ToggleButton defines Checked and Unchecked states in its CheckStates group, plus it respects the Normal and MouseOver states from ButtonBase’s CommonStates group.
The key to the template is that the control’s Foreground, which is assigned to one of the DrawingBrush resources whenever Face is assigned a value, fills a Rectangle. Showing the entire contents of Listing 20.7 would occupy over 100 pages (I kid you not!) because of the size and number of DrawingBrushes. Therefore, the whole listing isn’t provided here, but this book’s source code includes it in its entirety (on the website, http://informit.com/title/9780672336973).
Figure 20.4 shows instances of PlayingCard in action, using the following Window that assigns a unique Face to each instance and rotates them in a “fan” formation:
<Window xmlns="http://schemas.microsoft.com/winfx/2006/xaml/presentation"
xmlns:x="http://schemas.microsoft.com/winfx/2006/xaml"
xmlns:local="clr-namespace:Chapter20"
Title="Window Hosting PlayingCards">
<Window.Background>
...
</Window.Background>
<Viewbox>
<Canvas Width="220" Height="400">
<local:PlayingCard Face="C3" Width="100" Height="140" Canvas.Left="0"
Canvas.Top="100">
<local:PlayingCard.RenderTransform>
<RotateTransform CenterX="50" CenterY="140" Angle="300"/>
</local:PlayingCard.RenderTransform>
</local:PlayingCard>
<local:PlayingCard Face="CQ" Width="100" Height="140" Canvas.Left="10"
Canvas.Top="100">
<local:PlayingCard.RenderTransform>
<RotateTransform CenterX="50" CenterY="140" Angle="310"/>
</local:PlayingCard.RenderTransform>
</local:PlayingCard>
...
</Canvas>
</Viewbox>
</Window>
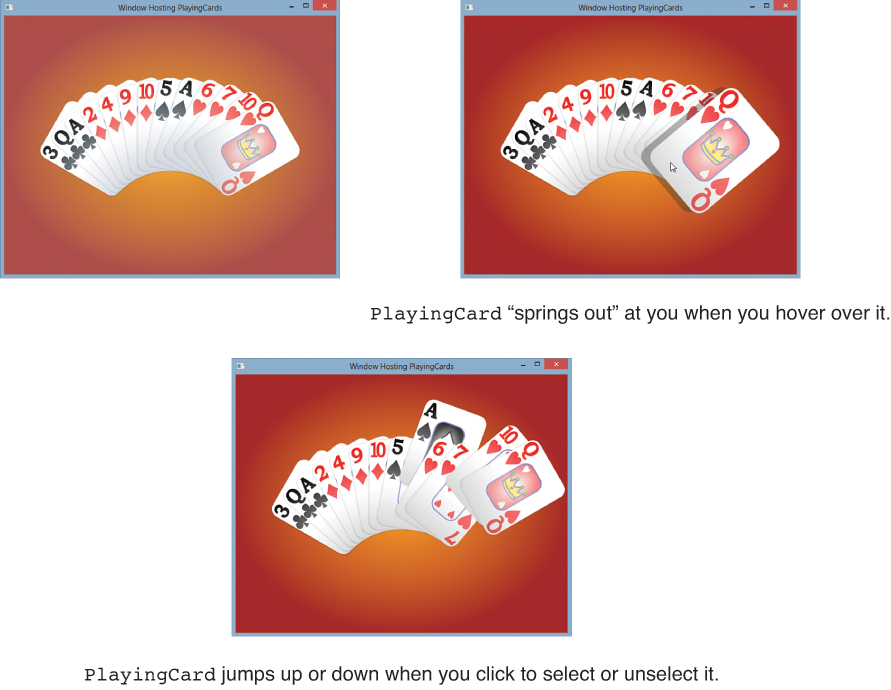
This approach to implementing PlayingCard works, and the output looks just fine on paper. But if you run the application shown in Figure 20.4, you’ll probably notice that the performance is sluggish. It also consumes a lot of memory. And both of these issues get worse for every additional PlayingCard you place in the Window. The problem is that the 52 DrawingBrush resources are stored inside the control, so every instance has its own copy of all of them! (100 book pages of resources x 13 instances = a lot of memory!)
This approach also suffers from unexpected behavior for consumers of the control. For example, if the preceding Window attempts to set an individual PlayingCard’s Resources property in XAML, an exception is thrown, explaining that the ResourceDictionary can’t be reinitialized.
There was a warning sign that indicated that we were heading down the wrong path (in addition to the title of this section being “A First Attempt”): The logic in Listings 20.5 and 20.6 does not purely focus on the behavior of the PlayingCard control. Instead, it dictates a visual implementation detail by requiring resources with specific keys and by assigning them to Foreground.
A quick fix is to take the contents of PlayingCard.Resources and slap them into any consumer’s Application.Resources instead. This avoids the performance and memory problems, but it breaks the encapsulation of the control. If the application pictured in Figure 20.4 accidentally omitted these resources, it would look like Figure 20.5.
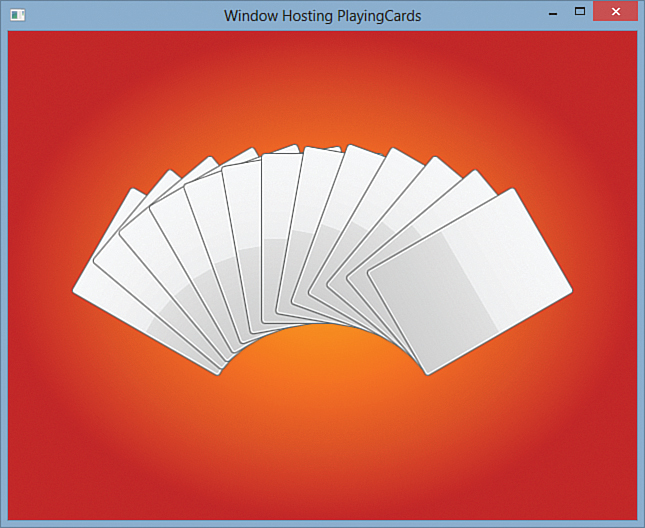
FIGURE 20.5 A hand of PlayingCard instances looks no different than ToggleButtons when the necessary resources aren’t present.
The bottom line is that when creating this version of PlayingCard, we were still thinking in terms of the user control model, in which the control “owns” its user interface. We need to break free of that thinking and reorganize the code.
The Recommended Approach
Looking back at Listing 20.5, we should remove the resource retrieval and setting of Foreground, leaving that detail to the Style applied to PlayingCard:
public string Face
{
get { return face; }
set { face = value; Foreground = (Brush)TryFindResource(face); }
}
The reasonable place to put PlayingCard’s Style is inside the assembly’s generic dictionary (themesgeneric.xaml, covered in Chapter 14). Therefore, to apply the custom Style to PlayingCard (and avoid having it look as it does in Figure 20.5), we should place the following line of code in PlayingCard’s static constructor:
DefaultStyleKeyProperty.OverrideMetadata(typeof(PlayingCard),
new FrameworkPropertyMetadata(typeof(PlayingCard)));
Also, to facilitate the use of Face with WPF subsystems, we should turn it into a dependency property. Listing 20.8 contains all three of these changes, giving the final implementation of PlayingCard.
LISTING 20.8 PlayingCard.cs—The Final Logic for the PlayingCard Custom Control
using System.Windows;
using System.Windows.Media;
using System.Windows.Controls.Primitives;
namespace Chapter20
{
public class PlayingCard : ToggleButton
{
static PlayingCard()
{
// Override style
DefaultStyleKeyProperty.OverrideMetadata(typeof(PlayingCard),
new FrameworkPropertyMetadata(typeof(PlayingCard)));
// Register Face dependency property
FaceProperty = DependencyProperty.Register("Face",
typeof(string), typeof(PlayingCard));
}
public string Face
{
get { return (string)GetValue(FaceProperty); }
set { SetValue(FaceProperty, value); }
}
public static DependencyProperty FaceProperty;
}
}
It almost seems too simple, but this is all the logic you need. The code captures the essence of PlayingCard: The only way it’s unique from ToggleButton is that it has a string Face property. The rest is just a difference in default visuals.
Tip
When you create a WPF Custom Control Library project in Visual Studio or use Add, New Item to add a WPF custom control to an existing project, Visual Studio automatically creates a code file with the correct DefaultStyleKeyProperty.OverrideMetadata call and a placeholder Style inside the generic dictionary (generating the file if it doesn’t already exist). It does not give you a XAML file that shares the class definition. Therefore, if you use these mechanisms, you’re unlikely to fall into implementation traps such as the first attempt at implementing PlayingCard shown in this section.
Creating the User Interface of the Custom Control
To give the final implementation of PlayingCard an appropriate user interface, we need to fill the assembly’s generic dictionary with the appropriate Style and supporting resources. (You should also fill one or more theme dictionaries if you care about customizing the visuals for specific Windows themes.) To get the same visual results achieved in Figure 20.4, we should move all the resources that we originally defined inside PlayingCard (in Listing 20.7) into the generic dictionary.
The following line of the control template from Listing 20.7 also needs to be modified:
<Rectangle Fill="{TemplateBinding Foreground}"/>
Filling the main Rectangle with Foreground’s value isn’t appropriate anymore because PlayingCard itself doesn’t set its value, and it would be too much of a burden to require consumers of the control to set this Brush.
What we want to do instead is set Fill to the appropriate DrawingBrush resource in the generic dictionary, based on the current value of Face. We should use StaticResource to do this because the DynamicResource mechanism won’t find resources inside a generic or theme dictionary. Because Face is a dependency property, your first instinct might be to change the value of Fill as follows:
<Rectangle>
<Rectangle.Fill>
<StaticResource ResourceKey="{TemplateBinding Face}"/>
</Rectangle.Fill>
</Rectangle>
Unfortunately, this produces an exception at runtime with the following horribly confusing message:
Cannot convert the value in attribute 'ResourceKey' to object of type ''.
If you replace TemplateBinding with the equivalent Binding:
<Rectangle>
<Rectangle.Fill>
<StaticResource ResourceKey=
"{Binding Face, RelativeSource={RelativeSource TemplatedParent}}"/>
</Rectangle.Fill>
</Rectangle>
you’ll still get an exception, but at least its message makes sense:
'Binding' cannot be set on the 'ResourceKey' property of type
'StaticResourceExtension'. A 'Binding' can only be set on a DependencyProperty
of a DependencyObject.
ResourceKey isn’t a dependency property (and couldn’t possibly be because StaticResourceExtension doesn’t even derive from DependencyObject), so you can’t use it as the target of data binding.
If we define the key to each DrawingBrush as a ComponentResourceKey (with the PlayingCard type as its TypeInTargetAssembly and the face name as its ResourceId) rather than a simple string, we could restore the C# code that programmatically sets Foreground by calling TryFindResource and leave the TemplateBinding to Foreground intact. (The use of the ComponentResourceKey class is important because otherwise FindResource and TryFindResource can’t find resources inside a generic or theme dictionary.) There’s another option, however, that enables us to keep the C# code as shown in Listing 20.8 and keep the resource keys as simple strings: Define 52 property triggers (one per valid Face value) that assign Fill to a resource specified at compile time. Although this is verbose, it’s also simple. Listing 20.9 shows 13 of these 52 triggers.
LISTING 20.9 Generic.xaml—The Generic Dictionary Containing PlayingCard’s Default Style and Control Template
<ResourceDictionary
xmlns="http://schemas.microsoft.com/winfx/2006/xaml/presentation"
xmlns:x="http://schemas.microsoft.com/winfx/2006/xaml"
xmlns:local="clr-namespace:Chapter20">
...
<Style TargetType="{x:Type local:PlayingCard}">
...
<Setter Property="Template">
<Setter.Value>
<ControlTemplate TargetType="{x:Type local:PlayingCard}">
...
<Rectangle Name="faceRect"/>
...
<ControlTemplate.Triggers>
<Trigger Property="Face" Value="HA">
<Setter TargetName="faceRect" Property="Fill" Value="{StaticResource HA}"/>
</Trigger>
<Trigger Property="Face" Value="H2">
<Setter TargetName="faceRect" Property="Fill" Value="{StaticResource H2}"/>
</Trigger>
<Trigger Property="Face" Value="H3">
<Setter TargetName="faceRect" Property="Fill" Value="{StaticResource H3}"/>
</Trigger>
<Trigger Property="Face" Value="H4">
<Setter TargetName="faceRect" Property="Fill" Value="{StaticResource H4}"/>
</Trigger>
<Trigger Property="Face" Value="H5">
<Setter TargetName="faceRect" Property="Fill" Value="{StaticResource H5}"/>
</Trigger>
<Trigger Property="Face" Value="H6">
<Setter TargetName="faceRect" Property="Fill" Value="{StaticResource H6}"/>
</Trigger>
<Trigger Property="Face" Value="H7">
<Setter TargetName="faceRect" Property="Fill" Value="{StaticResource H7}"/>
</Trigger>
<Trigger Property="Face" Value="H8">
<Setter TargetName="faceRect" Property="Fill" Value="{StaticResource H8}"/>
</Trigger>
<Trigger Property="Face" Value="H9">
<Setter TargetName="faceRect" Property="Fill" Value="{StaticResource H9}"/>
</Trigger>
<Trigger Property="Face" Value="H10">
<Setter TargetName="faceRect" Property="Fill" Value="{StaticResource H10}"/>
</Trigger>
<Trigger Property="Face" Value="HJ">
<Setter TargetName="faceRect" Property="Fill" Value="{StaticResource HJ}"/>
</Trigger>
<Trigger Property="Face" Value="HQ">
<Setter TargetName="faceRect" Property="Fill" Value="{StaticResource HQ}"/>
</Trigger>
<Trigger Property="Face" Value="HK">
<Setter TargetName="faceRect" Property="Fill" Value="{StaticResource HK}"/>
</Trigger>
...
</ControlTemplate.Triggers>
</Setter.Value>
</Setter>
</Style>
</ResourceDictionary>
Of course, as long as we are manually mapping values of Face to resource keys, we might as well redefine Face as an integer from 0 to 51, to be friendlier to typical algorithms that operate on playing cards. We could then add properties such as Suit and Rank to make working with the information easier.
This approach fixes the performance problems of the first attempt because the generic resources are shared among all instances of PlayingCard. (And if you don’t want to share a certain resource, you can mark it with x:Shared="False".) But more than that, the complete separation of user interface and logic enables PlayingCard to be restyled with maximum flexibility. Unlike the first version of the code, it doesn’t require a Brush for each face, so you could even plug in a control template that represents each card as a simple TextBlock. If you want to advertise the customizable resources from a control such as PlayingCard and encourage them to be overridden by others, you could define 52 static properties that return an appropriate ComponentResourceKey for each resource.
Tip
The “Creating the Behavior of the Custom Control” section discusses reusing as much existing logic as possible by choosing an appropriate base class for a custom control. On the user interface side of things, WPF also has many built-in elements that you should try to leverage in your control template.
For the nontraditional user interface inside PlayingCard, it makes sense to start from scratch. But for other controls, you might find a lot of unfamiliar reusable components to leverage in the System.Windows.Controls.Primitives namespace, such as BulletDecorator, ResizeGrip, ScrollBar, Thumb, Track, and so on.
Considerations for More Sophisticated Controls
The PlayingCard control has minimal interactivity that could be handled in the control template with some simple triggers or visual states. But controls with more interactivity need to use other techniques. For example, imagine that you want to change FileInputBox from the beginning of this chapter from a user control to a custom control. This implies that you’ll move its user interface (repeated in the following XAML) into a control template:
<DockPanel>
<Button x:Name="theButton" DockPanel.Dock="Right" Click="theButton_Click">
Browse...</Button>
<TextBox x:Name="theTextBox"
MinWidth="{Binding ActualWidth, ElementName=theButton}"
Text="{Binding FileName, ElementName=root}" Margin="0,0,2,0"/>
</DockPanel>
But how should you attach the clicking of the Button to FileInputBox's theButton_Click event handler? You can’t set the Click event the same way inside the control template. (Well, you could if you redefined theButton_Click in a code-behind file for the generic dictionary. But that would effectively reimplement all the control’s logic, and it would mean that anyone overriding the default template with his or her own would have to do the same thing!)
You can handle this kind of interactivity using two reasonable approaches, both of which are employed by WPF’s built-in controls in different situations:
![]() Using control parts
Using control parts
![]() Using commands
Using commands
This section also examines the technique of defining and using new control states, using the PlayingCard control as an example.
Using Control Parts
As mentioned in Chapter 14, a control part is a loose contract between a control and its template. A control can retrieve an element in its template with a given name and then do whatever it desires with that element.
After you decide on elements to designate as control parts, you should choose a name for each one. The general naming convention is PART_XXX, where XXX is the name of the control. You should then document each part’s existence by marking your class with TemplatePartAttribute (one for each part). This looks as follows for a version of FileInputBox that expects a Browse Button in its control template:
[TemplatePart(Name="PART_Browse", Type=typeof(Button))]
public class FileInputBox : Control
{
...
}
WPF doesn’t do anything with TemplatePartAttribute, but it serves as documentation that design tools can leverage.
To process your specially designated control parts, you should override the OnApplyTemplate method inherited from FrameworkElement. This method is called any time a template is applied, so it gives you the opportunity to handle dynamic template changes gracefully. To retrieve the instances of any elements inside your control template, you can call GetTemplateChild, also inherited from FrameworkElement. The following implementation retrieves the designated Browse Button and attaches the necessary logic to its Click event:
public override void OnApplyTemplate()
{
base.OnApplyTemplate();
// Retrieve the Button from the current template
Button browseButton = base.GetTemplateChild("PART_Browse") as Button;
// Hook up the event handler
if (browseButton != null)
browseButton.Click += new RoutedEventHandler(theButton_Click);
}
Note that this implementation gracefully handles templates that omit PART_Browse, causing the Button variable to be null. This is the recommended approach, making your control handle any control template with varying degrees of functionality. After all, it’s quite reasonable to imagine someone wanting to restyle FileInputBox such that it doesn’t have a Browse Button. If you want to go against recommendations and be stricter, you could always throw an exception in OnApplyTemplate if the template doesn’t contain the parts you require. But such a control likely won’t work well inside graphic design tools such as Blend.
Using Commands
A more flexible way to attach logic to pieces of a template is to define and use commands. With a command on FileInputBox representing the notion of browsing, a control template could associate a subelement with it as follows:
<Button Command="{x:Static local:FileInputBox.BrowseCommand}">Browse...</Button>
Not only does this avoid the need for magical names, but the element triggering this command no longer has to be a Button!
To implement this command, FileInputBox needs a static .NET property of type RoutedCommand or RoutedUICommand (with a static backing field that can be private):
private static RoutedUICommand browseCommand = new
RoutedUICommand("Browse...", "BrowseCommand", typeof(FileInputBox));
public static RoutedUICommand BrowseCommand
{
get { return browseCommand; }
}
The control should bind this command to the desired custom logic (theButton_Click in this case) in its static constructor:
static FileInputBox()
{
// Specify the gesture that triggers the command:
CommandManager.RegisterClassInputBinding(typeof(FileInputBox),
new MouseGesture(MouseAction.LeftClick));
// Attach the command to custom logic:
CommandManager.RegisterClassCommandBinding(typeof(FileInputBox),
new CommandBinding(browseCommand, theButton_Click));
}
Using Control States
As explained in Chapter 14, WPF 4 adds the ability for controls to define control states in order to provide an optimal experience inside design tools such as Blend. Both user controls and custom controls can—and do—support states. Any class that derives from Control already supports three states from the ValidationStates group: Valid, InvalidFocused, and InvalidUnfocused. The PlayingCard control automatically supports the CheckStates group (with Checked, Unchecked, and Indeterminate states) from its ToggleButton base class and the CommonStates group (with Normal, MouseOver, Pressed, and Disabled states) from its ButtonBase base class.
Thanks to the richness of PlayingCard’s base classes, defining additional states is not necessary. Still, it might be nice to define the notion of a PlayingCard being flipped on its back rather than always showing its face. That way, a graphic designer could easily plug in a beautiful design for a card back without worrying about what events or properties might cause the card to be flipped over.
For this scenario, it makes sense to have two states—Front and Back—and assign them to a new state group called FlipStates. (Every new state group should include one state that acts as the default state.) You should document the existence of these states by marking the PlayingCard class with two TemplateVisualState custom attributes:
[TemplateVisualState(Name="Front", GroupName="FlipStates")]
[TemplateVisualState(Name="Back", GroupName="FlipStates")]
public class PlayingCard : ToggleButton
{
...
}
Warning: Controls should not add any states to state groups already defined by a base class!
New states should be added to new state group(s). Because each state group works independently, new transitions among states in a new state group cannot interfere with base class logic. If you add new states to an existing state group, however, there’s no guarantee that the base class logic to transition among states will continue operate correctly.
Warning: Every state must have a unique name, even across different state groups!
Despite any partitioning into multiple state groups, a control must not have two states with the same name. This limitation can be surprising until you’ve implemented state transitions and realize that VisualStateManager’s GoToState method doesn’t have the concept of state groups. State groups are really just a documentation tool for understanding the behavior of a control’s states and the possible transitions.
This limitation is why state names tend to be very specific. For example, the default set of states for CalendarDayButton include Normal (from the CommonStates group), NormalDay (from the BlackoutDayStates group), RegularDay (from the DayStates group), Unfocused (from the FocusStates group), CalendarButtonUnfocused (from the CalendarButtonFocusStates group), and more. They could not all simply be called Default or Normal.
Once you have chosen and documented your states, the only other thing to do is transition to the appropriate states at the appropriate times by calling VisualStateManager’s static GoToState method. This is usually done from a helper method such as the following:
internal void ChangeState(bool useTransitions)
{
// Assume that IsShowingFace is the property that determines the state:
if (this.IsShowingFace)
VisualStateManager.GoToState(this, "Front", useTransitions);
else
VisualStateManager.GoToState(this, "Back", useTransitions);
}
Controls typically call such a method in the following situations:
![]() Inside
Inside OnApplyTemplate (with useTransitions=false)
![]() When the control first loads (with
When the control first loads (with useTransitions=false)
![]() Inside appropriate event handlers (for this example, it should be called inside a
Inside appropriate event handlers (for this example, it should be called inside a PropertyChanged handler for the IsShowingFace property)
There is no harm in calling GoToState when the destination state is the same as the current state. (When this is done, the call does nothing.) Therefore, helper methods such as ChangeState typically set the current state for every state group without worrying about which property just changed.
Warning: When a control loads, it must explicitly transition to the default state in every state group!
If a control does not explicitly transition to the default state(s), it introduces a subtle bug for consumers of the control. Before the initial transition for any state group, the control is not yet in any of those states. That means that the first transition to a non-default state will not invoke any transition from the default state that consumers may have defined.
When you perform this initial transition, you should pass false for VisualStateManager.GoToState’s useTransitions parameter to make it happen instantaneously.
Control defines a similar helper method called ChangeVisualState that is effectively implemented as follows:
internal virtual void ChangeVisualState(bool useTransitions)
{
// Handle the states in the ValidationStates group:
if (Validation.GetHasError(this))
{
if (this.IsKeyboardFocused)
VisualStateManager.GoToState(this, "InvalidFocused", useTransitions);
else
VisualStateManager.GoToState(this, "InvalidUnfocused", useTransitions);
}
else
{
VisualStateManager.GoToState(this, "Valid", useTransitions);
}
}
ChangeVisualState is a virtual method, and other controls in WPF override it. ButtonBase effectively overrides it as follows:
internal override void ChangeVisualState(bool useTransitions)
{
// Handle the base states in the ValidationStates group:
base.ChangeVisualState(useTransitions);
// Independently handle states in the CommonStates group:
if (!this.IsEnabled)
VisualStateManager.GoToState(this, "Disabled", useTransitions);
else if (this.IsPressed)
VisualStateManager.GoToState(this, "Pressed", useTransitions);
else if (this.IsMouseOver)
VisualStateManager.GoToState(this, "MouseOver", useTransitions);
else
VisualStateManager.GoToState(this, "Normal", useTransitions);
// Independently handle states in the FocusStates group:
if (this.IsKeyboardFocused)
VisualStateManager.GoToState(this, "Focused", useTransitions);
else
VisualStateManager.GoToState(this, "Unfocused", useTransitions);
}
ToggleButton effectively overrides ButtonBase’s implementation as follows:
internal override void ChangeVisualState(bool useTransitions)
{
// Handle the base states in the ValidationStates,
// CommonStates, and FocusStates groups:
base.ChangeVisualState(useTransitions);
// Independently handle states in the CheckStates group:
if (this.IsChecked == true)
VisualStateManager.GoToState(this, "Checked", useTransitions);
else if (this.IsChecked == false)
VisualStateManager.GoToState(this, "Unchecked", useTransitions);
else // this.isChecked == null
{
// Try to transition to the Indeterminate state. If one isn't defined,
// fall back to the Unchecked state
if (!VisualStateManager.GoToState(this, "Indeterminate", useTransitions))
VisualStateManager.GoToState(this, "Unchecked", useTransitions);
}
}
GoToState returns false if it is unable to transition to a state. This happens if a template has been applied that simply doesn’t include a corresponding VisualState definition. Controls should be resilient to this condition, and normally they are by simply ignoring the return value from GoToState. ToggleButton, however, attempts to transition to the Unchecked state if an Indeterminate state doesn’t exist. (Note that this condition does not affect the value of IsChecked; the ToggleButton is still logically indeterminate even if visually it looks unchecked.)
Although PlayingCard is unable to override ToggleButton’s ChangeVisualState method (because it is internal to the WPF assembly), it still inherits all of its behavior as a consequence of deriving from ToggleButton. The code from PlayingCard’s ChangeState method defined earlier happily runs independently of the existing ChangeVisualState logic, and the resulting control supports all the expected states from all five state groups.
A sophisticated control might want to determine whether it is running in design mode (for example, being displayed in the Visual Studio or Blend designer). The static System.ComponentModel.DesignerProperties class exposes an IsInDesignMode attached property that gives you this information. Design tools change the default value when appropriate, so a custom control can call the static GetIsInDesignMode method with a reference to itself to obtain the value.
Summary
If you’re reading this book in order, you should be familiar enough with WPF to find the process of creating a custom control fairly understandable. For WPF beginners, however, creating a custom control—even when guided by Visual Studio—involves many unorthodox concepts. And if such a user doesn’t care about restyling and theming but rather just wants to build simple applications and controls as with Windows Forms, all that extra complication doesn’t even add much value! That’s why WPF takes a bifurcated view of custom controls versus user controls.
Of course, even these two approaches are not the only options for plugging reusable pieces into WPF applications. For example, you could create a custom lower-level element that derives directly from FrameworkElement. A common non-Control to derive from is Panel, for creating custom layout schemes. That’s the topic of the next chapter.