
When adding hardware to the inside of your computer, or to its serial or SCSI ports, the basic rules are:
Turn off the computer.
Plug in the hardware.
Turn on the computer.
For most modern hardware components, that's all there is to it. When you turn the computer on, a window announces that Windows 2000 has detected new hardware and is installing its software. You can use the new device immediately thereafter.
For external devices that plug into a USB port, FireWire port, or PC Card slot, the process is even simpler: Just connect the gadget. If it's a Plug-and-Play compatible device, Windows 2000 recognizes, configures, and installs the driver software for it automatically, without your having to turn off or restart the computer.
Unfortunately, the Plug-and-Play system isn't foolproof. To install the drivers for older, non-Plug-and-Play hardware, or Plug-and-Play hardware that Windows 2000 doesn't recognize for some reason, run the Add/Remove Hardware Wizard like this:
Plug the new equipment into the computer, and turn the computer back on.
Choose Start → Settings → Control Panel. In the Control Panel window, double click Add/Remove Hardware.
The Add/Remove Hardware Wizard begins.
Click Next.
On the "Choose a Hardware Task" screen, the option you want ("Add/Troubleshoot a device") is already selected.
Click Next again.
Now Windows 2000 searches for new hardware.
If the wizard can't find any new hardware, it opens a window showing the hardware it knows about and asking which device is troubling you (Figure 16-1).
Figure 16-1. Windows reports on the devices it finds. If your new hardware is listed, highlight it and click Next. If it's not shown, highlight Add a New Device and click Next.
If your new hardware is listed, click its name and then click Next. If Windows now reports that it's working properly (which it obviously isn't), click Finish to launch a Troubleshooter (a troubleshooting wizard). If the Troubleshooter doesn't solve your problem, see Section 16.7.
If your hardware isn't listed, proceed like this:
Highlight the "Add a new device" option at the top of the list; click Next.
Windows offers a choice: "Yes, search for network hardware" and "No, I want to select the hardware from a list." There's no harm in letting Windows search; in fact, you may save time. If Windows can't find the hardware, you'll get to choose the device from a list anyway (Figure 16-2).
Click Next. If the Windows search comes up empty-handed, click Next again.
If the wizard finds no new hardware, it shows you a list of device types (Modems, Network adapters, and so on).
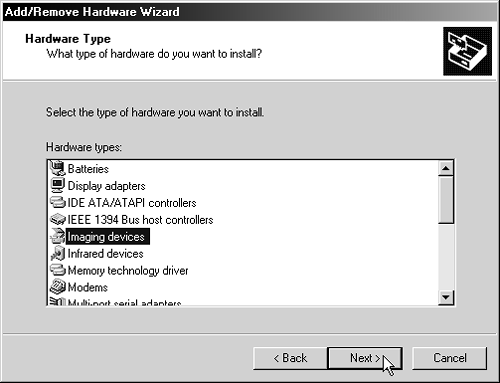
Select the type of hardware you want to install; click Next.
Now Windows opens the two-paned Select a Device Driver window, listing manufacturers' names on the left, and the model names and numbers of their products on the right. If you don't see your device listed here, click Have Disk (see the sidebar box below).
Select the manufacturer's name and model name and number of the hardware you're installing. Click Next, then Next again.
Windows may ask for the Windows 2000 installation disk; in any case, it generally finds the required drivers and installs them.

Note
Even users who don't have administrator privileges can install most Plug-and-Play devices. That's a handy feature for remote or mobile users, but it does reduce security.
TROUBLESHOOTING MOMENT : Hardware Exactitude
If your hardware isn't on the list of equipment in the Add/Remove Hardware Wizard, it's either because the hardware is newer than Windows 2000 or so old that Microsoft decided not to include it on the list.

If the hardware is very new, there may be a disk with drivers included with the device. If so, put the disk in the drive and click the Have Disk button in the Select a Device Driver window shown here.
No disk? For old or new hardware, look on the manufacturer's Web site for the appropriate driver.
No driver on the Web site? Call the manufacturer and insist that they send you the driver.
If all else fails, you can try this long-shot remedy: Select the manufacturer's name in the Select a Device Driver window and look for a similar model to yours. For example, suppose you're trying to install a Kodak DC290 digital camera, as shown here.
Now suppose you know that Kodak has no Windows 2000 drivers for this model—but you know that the camera is part of the DC200/DC21/DC215 series. As a last-ditch effort, you could try the DC200 driver, which may well work. (However, don't try this trick for some essential bit of hardware, such as a display card or hard-disk controller. You may end up with a computer that refuses to boot.)