Restoring files is less complicated than backing them up. (That's fortunate, considering the emotional state of anyone who's just experienced a total hard-drive meltdown.) That's because, unless you're a spectacularly unlucky individual, you don't perform restores as often as you do backups, and you don't schedule them. The Backup program's Restore Wizard does all the work for you. (You can also restore your files manually, using the program's Restore page.)
To restore files using the Restore Wizard, proceed like this:
Click the Restore Wizard button on the Backup program's Welcome page.
Selecting the Restore Wizard launches a standard wizard Welcome window.
Click Next. Select a backup device.
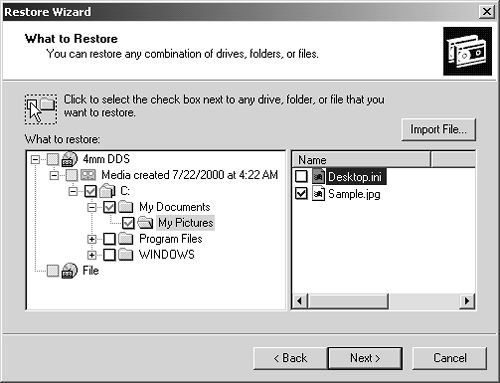
The What To Restore page contains the now-familiar expanding display that lists your PC's backup devices. The display lists a File icon, too, so that you can restore from a backup file you saved in step 4 of the preceding instructions.
Click the plus sign next to one of the icons to display the backup media that you've created with it.
Select the tape or disk that contains your backup. Select the data to restore.
When you select the backup disk or tape, the right pane in the What To Restore page contains an expandable list of its contents. Turn on the checkboxes of the files and folders you want to restore, as shown in Figure 18-7.
Note
Whenever Backup backs up your files, it remembers which files it put on which backup disks by creating, on the final disk or tape, a table of contents for itself.
That's why, as you browse the files listed on a backup disk, you may be asked to insert that final disk or tape. Only then can Backup show you what's on it.
Click the Advanced button, if you like.
Ordinarily, Backup restores every backed-up file back onto your hard drive in exactly the same folder that it came from. And if the original file is still in that original folder, it doesn't wipe out the existing file with the copy on the backup disk. If that arrangement sounds good to you, skip to Step 9.
Figure 18-4. The Restore Wizard's What To Restore page is similar in format to Windows Explorer, except that it displays only the contents of a particular backup tape or disk. You can select from the backup tapes, disks, or files you've created, or click the Import File button to read the contents of a backup file you created on another Windows 2000 system.
But suppose you'd like Backup to put the files in a different folder, or you want them to replace the duplicate files it encounters. In that case, continue like this:
Click Advanced. Select a folder destination for the restored files.
On the Where To Restore page, you can specify where you want the restored files to go: into the folders they came from, or some other disk or folder.
If you choose a different location, Backup restores the files and folders you've selected, doing its best to reconstruct the original folder hierarchy. Unless you turn on Single Folder, that is; in that case, Backup dumps all of the selected files directly into the folder you've chosen, loose (not in folders).
Click Next. Indicate whether or not you want Backup to overwrite duplicate files.
What should Backup do if a file it's trying to restore already exists in the destination folder? You can choose from among three options: Do not replace a file on my computer (Backup won't restore any file that's already on the hard drive), Replace the file on my computer only if the file is older (Backup will replace a file on your hard drive if it's an older version than the backed-up copy); or Always replace the file on my computer (Backup will restore every file, replacing its equivalent on the hard drive, regardless of which is newer).
Click Next. If the restore summary page looks good, click the Finish button.
Backup swings into action, asking you to insert backup disks or tapes as necessary, and restores your backed-up files safely back onto your hard drive.

