
The humble Search command looks no more special than anything else on the Start menu. But in fact, it's a powerhouse, and you'll probably use it often. The Search function (which was called Find in Windows NT, 95, and 98) can quickly find all kinds of computery things: file and folder icons, computers on your network, email addresses and phone numbers, Web sites, and even maps that pinpoint any address in the United States and Canada.
If the Search program looks vaguely familiar, that's because it's actually a component of Internet Explorer, the Web browser. You can read more about Internet Explorer in Chapter 11.
If you save your new files only in the My Documents folder on the desktop, you'll have little need to use the Search function to locate your files. You'll always know where they are—right in that folder.
Every now and then, however, you won't be able to remember where you filed something, or you'll download something from the Internet and not be able to find it again, or you'll install something and not know where to look for it. In those situations, the Search program, shown in Figure 3-6, is just what you need. It lets you look for a particular file or folder based on its description—by its name, size, date stamp, and so on.
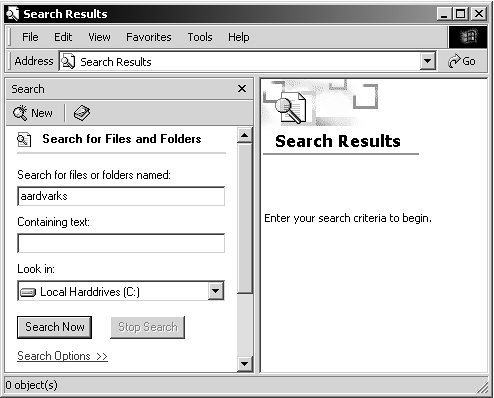
Figure 3-6. When you're looking for files, the Search feature is like having a bloodhound available. You can use as much information as you manage to remember to initiate a search, and it doesn't matter if you can't remember the exact name of the file that's gone missing. The Search feature ordinarily finds both folder titles and filenames; to search only for files, add .* to the end of the name you're looking for (for example, memo.*).
A typical search goes like this:
Choose Start → Search → For Files and Folders.
The Search window appears, as shown in Figure 3-6.
Specify what disk you want to search, using the "Look in:" drop-down menu.
Every disk attached to your PC at that moment—your hard drive, Zip disk, CD-ROM, and so on—shows up here in this list. Most of the time, you just want to search your C: drive; ensure that "Local Hard Drives (C:)" appears in the "Look in:" box, and then proceed.
Tip
If you know that the file or folder you're looking for is on a particular disk or in a certain folder, double-click the icon for that disk or folder, and then press the F3 key at the top of the keyboard. Doing so splits the disk or folder window in half—the left half now contains the Search controls, which are already set up to search only inside that disk or folder window. In other words, you're spared the first two steps of this search setup business. (Press F3 again to remove the Search panel.)
You can also limit your search to a specific folder on your hard drive by typing its path into the "Look in:" blank.
To find a file whose name you know, type its name into the top field.
You don't have to type the entire filename—only enough of it to distinguish it from the other files on your computer. Capitals don't matter, and neither does the position of the letters you type—if you type John, Windows will find files with names Johnson, Peterjohn, and DiJohnson.
You can also search for all files of a specific type, such as all Word files, by typing *.doc—that is, an asterisk, a period, and then the three-letter filename extension of the kind of file you want. In this context, the asterisk is a wildcard meaning, "any text at all."
To narrow the search, you can enter both a partial name and an extension, such as mom*.doc, which will turn up Word files named Mom's Finances.doc, Moment of Truth.doc, and so on.
Restrict the search even more by clicking Search Options, if you like.
Searching for a file by typing in a few letters of its name is by far the most frequently used Search function. But in certain circumstances, you may want to narrow the search by confining it to only files you created yesterday, for example.
When you click Search Options, you get the panel shown in Figure 3-7. The Date controls let you find only files or folders you created or changed in a certain date range; the Type checkbox restricts your search to a particular type of file (Acrobat documents, applications, JPG images, and so on); and the Size checkbox lets you screen out files larger or smaller than a number of KB you specify.
Figure 3-7. Left: You can use the drop-down arrow to specify the date the file was created or the date the file was last accessed. Specify the specific dates by clicking the drop-down arrow to produce a little calendar, which you can adjust by clicking the arrow buttons and the calendar dates. Right: You can confine the search to a certain kind of document, which you can choose from the list that appears when you click the Type checkbox.
Finally, if you turn on the Advanced Options checkbox, you're offered three final choices. Search subfolders makes Windows look inside all folders inside the disk or folder you've specified. Turn this option off only when you know for sure that the file you need is in the disk or folder you're starting with, but not within any subfolders there. Skipping the subfolders makes the search process much faster. Case sensitive instructs the Search program to match the capitalization of the characters you enter; searching for files containing "dentist appointment" won't find files containing "Dentist appointment" (with a capital D). Search slow files refers to files on removable storage devices—optical or tape drives. Without turning on this option, you may have to copy these files to other, faster disks (like a hard drive) before you can search them.
Windows uses the criteria you enter in these fields in addition to any data you entered into the basic search fields.
Finally, click Search Now (or press Enter).
A couple of seconds later, the screen changes. On the right side of the screen, you now see a list of files and folders whose names contain what you typed in the blank. (Figure 3-8 shows this list.)
Figure 3-8. You can manipulate the found files much the way you'd approach files in a standard folder window. For example, you can highlight something in the list by typing the first few of letters of its name or by pressing the arrow keys. You can also highlight multiple icons: Highlight all by choosing Edit→Select All, highlight individual items by clicking with the Ctrl key pressed, drag vertically to enclose a cluster of them, and so on.

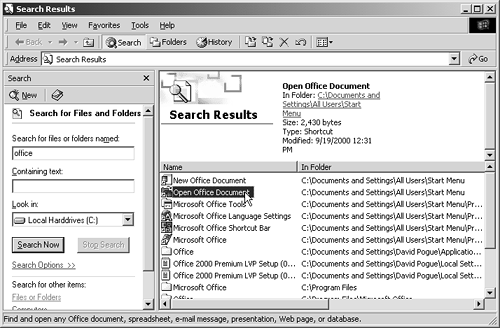
Figure 3-8 shows the splendor of the Search Results window. At this point, you can proceed in many different ways:
Read the complete name. If the Name column is too narrow to show the entire name of a file, use your arrow cursor to point to it without clicking. A pop-up tooltip appears, showing the complete name.
Read all about it. If you click the name of a found icon, the top part of the window displays a little paragraph identifying the file's path, full name, and modification date and time. (This feature is shown in Figure 3-8.)
Find out where something is. The column just to the right of an icon's name shows you exactly where it is on your machine, using the standard Windows path notation. (You may have to widen the column to see the complete path name; to do so, drag the dividing line at the top of the column, to the right of the In Folder column heading.)
Open the file. If one of the found files is the one you were looking for, double-click it to open it. This, in fact, is what most people do most of the time when using the Search program. In many cases, you'll never even know or care where the file was—you just want to get into it.
Jump to an icon in its home folder. If you want to get your mouse on the icon itself, without opening it yet, you can use a new Windows feature. Right-click the icon in the Search window and choose Open Containing Folder from the shortcut menu. The Search window instantly retreats to the background, as Windows highlights the actual icon in question, sitting there in its window wherever it happens to be on your hard drive.
Move, copy, or delete the file. You can drag an item directly out of the found-files list onto the desktop, directly onto the Recycle Bin icon, or into a different folder, window, or disk. (If you press Ctrl as you drag, you make a copy of the file. For more on copying and moving icons, and the hazards thereof, see Chapter 5.)
Send To, Rename, or Create Shortcut. After highlighting an icon (or icons) in the list of found files, you can use any of the commands in the File menu: Send To (which lets you move the icon to one of several standard folders), Rename, and so on. (See Section 5.4.3.4 for more on shortcuts.)
Adjust the list. By clicking the column headings of the results window, you can sort the list of found files in various ways: by name, size, date, and so on. (You can reverse the order by clicking the column heading a second time.) You can also adjust the relative widths of the columns by dragging the column-name dividers. (You can also drag the lower-right corner of the window to make it bigger or smaller.)
Save the search setup. By choosing File→Save Search, you can immortalize the search you've just set up. You might use this feature if you perform the same search each day—if, for example, you like to round up all the documents you created yesterday for backing up.
Windows automatically names the search file with a description it derives from the criteria you entered into the search fields, and adds the extension .fnd (for example, files named News.fnd). You can save the resulting search icon anywhere you like.
To use the search criteria again, double-click the saved .fnd file. The Search window opens, with your data already entered. Click Search Now to put the canned search underway.
If you type in the name of a computer, the Search program tries to find it on the network. If you enter part of the computer's name, the search function locates all matching characters; for example, if you search for ac, the search will turn up accounts, packages, and so on. There's no browse function; you have to know at least part of the name of the computer you want to find.
Of course, if you're trying to find another PC on the network, you can simply double-click the My Network Places desktop icon, which shows you icons representing all the computers on your network. So why would you ever use the Search function to find a computer? Because it sometimes finds computers that My Network Places can't.
Because the Search feature is, behind the scenes, Internet Explorer, it's already set up to search for information on the World Wide Web (if you have an Internet account). See Chapter 11 for much more about the Internet and surfing the Web.
If the Search window is open, you can click the Internet button shown at its lower left corner. If not, choose Start→Search→On the Internet.
Either way, there's an area to type in what you're looking for on the left side of the window, as shown in Figure 3-9. If you click Customize, you see a list of popular search engines or search providers—Web pages that search the Internet, such as Yahoo or AltaVista. And if you turn on the "Use the Search Assistant for smart searching" button at the top of the Customize dialog box, you can even set up a search of more than one search engine simultaneously. That's especially handy when you realize that each Internet search engine actually "knows about" only 30 percent of the world's Web pages.

Figure 3-9. Left: Windows is prepared to search the entire World Wide Web for "space shuttle." Right: The matching Web pages. Point to one without clicking to read the first paragraph on that page, as shown here, or click the name of a page to view the actual Web site.
To conduct a search, first select the kind of search you want. The list at the top left corner of this window offers several options (see Figure 3-9):
This is the function you might expect when you choose Start→Search→Internet. It lets you search the World Wide Web for a particular phrase, such as space shuttle or Harry Potter. After typing the phrase, click Search Now (or press Enter).
If you're online (or have set up your PC to dial the Internet automatically, as described in Section 11.2), Windows now sends your search request to the selected Web pages. After a moment, you get a list of results on the left side of the window (Figure 3-9, right). Here's what you can do with one of these results:
Read the first paragraph. Using your arrow cursor, point to one of the Web pages listed in the search results; as shown in Figure 3-9, Windows shows you the first paragraph or so of text that appears on that Web page. This blurb is a useful preview that can save you the effort of opening (and waiting for) that Web page, only to find that it's not what you were looking for.
Go to the Web page. Click one of the listings to view the actual page in the larger right portion of the window.
This function makes Windows send your search request to an Internet "White Pages" Web site, exactly as described in the next section. This time, however, you can search several of these sites simultaneously, which greatly increases the odds that you'll find the person you're looking for.
To do so, click the Customize button. The Customize dialog box appears, as shown in Figure 3-10. Scroll down to see the checkboxes for the "Find a Person's Address" category; turn on as many as you'd like. Click OK.
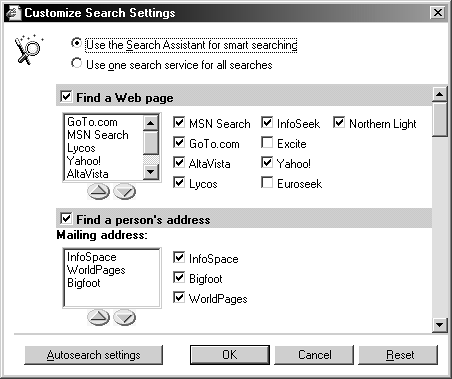
Figure 3-10. When you use the Search command to find Internet-based information, you're actually searching several Web sites simultaneously. The Customize dialog box lets you specify which ones you want the command to search. If you scroll down far enough, you'll see similar checkboxes for the other kinds of Web searches, such as "Find a business" and "Find a map."
From the Search For drop-down menu, specify what you're looking for—"mailing address" or "email address"—and then type in the first name, last name, and (if you know it) city and state or province. When you click Search (or press Enter), Windows returns a list of matches. Click one to view that person's complete address and phone number.
Think of this option as a worldwide Yellow Pages directory. Click Customize to view a list of the Yellow-Pages Web sites that Windows is prepared to search. For the best odds of turning up the company you want to find, turn on all of the checkboxes.
This time, type in the name or type a business (depending on your selection from the Search By drop-down list), such as auto glass or pediatricians. Specify the city and state or province you want to search, and then press Enter. This function works remarkably well; it comes in especially handy when you're traveling in a strange city and find yourself in sudden, desperate need of a drugstore, hospital, or bowling alley.
Click this button to view a tidy list of the Internet searches you've most recently performed. Click one to repeat that search; the Internet is constantly changing, and you're likely to turn up different results each time you search.
It's one of the miracles of the Internet: You can type in almost any street address in the United States or Canada, and get a map, as detailed as you want it (see Figure 3-11). It's free, and it's all built right into the Windows search function.
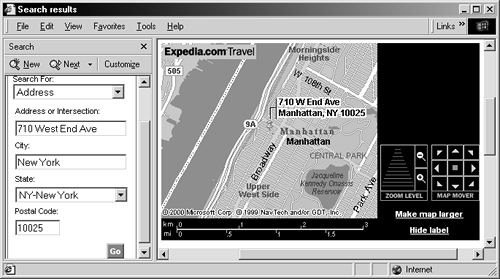
Figure 3-11. Once Windows shows you the map of the address you specified, click the Zoom Level controls to magnify or reduce the scale of the map. You can also view adjacent chunks of the map by clicking the Map Mover arrow buttons.
Tip
As great as the Search feature is, invoking it is a lot of work. You have to click, for example, Start→Search→On the Internet; by Windows standards, that's a colossal expenditure of energy.
Fortunately, there are faster ways to summon the Search feature. While holding down the Windows-logo key, you can press the letter-F key. You can also click the Search button on the toolbar of any folder or disk window—or, if there's no toolbar, you can choose File→Search.
This tantalizing option lets you type in somebody's name; the Search program can consult any of several "White Pages" Web sites online in an attempt to track down that person's email address and telephone number. It can also search your own Windows address book when you want to check someone's phone number or other information.
To try out this feature, choose Start→Search→People. The dialog box shown in Figure 3-12 appears.
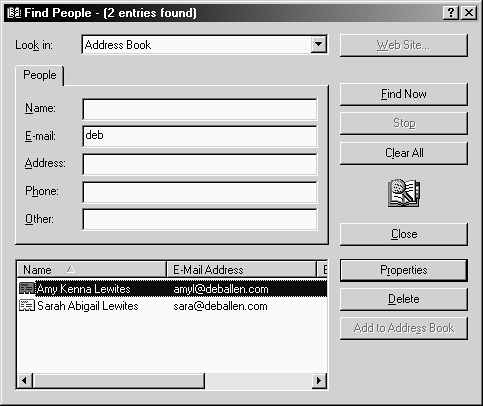
Figure 3-12. Fill in whatever you know about the person you want to find (top). You can use partial words. The Search command produces a list of all matches (bottom). As shown here, if you're trying to find an email address for somebody at a company, you don't even have to know the company's full domain name. Select the entry that matches your quest, and then click Properties to see all the information you've collected about that person.
The Start→Search→People command brings up the dialog box shown in Figure 3-12. Windows 2000 assumes that you want to search your network's Active Directory (see Section 2.2) for a certain name or phone number, but you can use the drop-down menu to confine your search to your own PC's address book instead. Enter information in one or more fields, and then click Find Now. All matching entries appear at the bottom of the window, also shown in Figure 3-12.
No matter how social a person you are, it's theoretically possible somebody out there has managed to elude your Address Book or your company's Active Directory. There may be times that you want to look up the phone number or email address of someone who's not even in the local phone book. Fortunately, you live in the Internet age where a number of Web sites serve as worldwide White Pages. The Search→People command can access these Web sites automatically.
Use the "Look in:" drop-down menu (see Figure 3-13) to display a list of these people-finding Web sites. Choose a search service to try; as a little experimentation will quickly demonstrate, some of these sites work better than others.
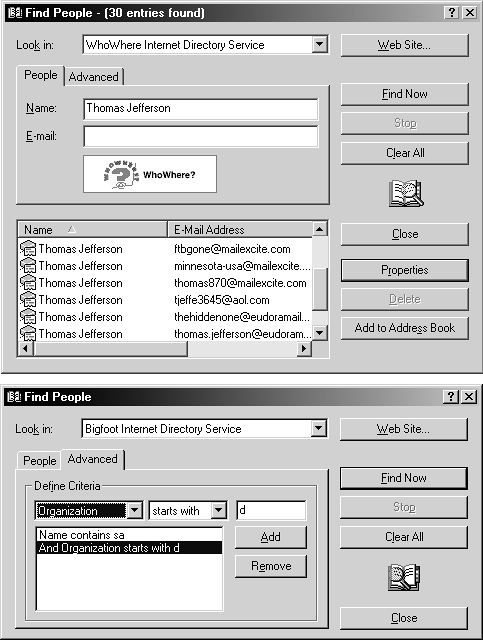
Figure 3-13. Top: A straight-ahead name search by no means turns up every one of the 200 million Internet citizens, but it's occasionally successful in turning up a few matches for the name you specify. Bottom: On the Advanced tab, you can use the categories and choices in the drop-down lists to provide as many details as possible to the Internet search engine. Here, for example, you're looking for a company whose name you vaguely remember, begins with a D, and contains sa. Delessa, Dilessa, or something like that; if you're lucky, the Web site will find it.
You must be connected to the Internet to use this feature (or your browser must be configured to start your Internet connection automatically when it opens; see Section 11.2). The dialog box that appears has two tabs:
The People tab provides a place to enter a name, email address, or both. Use this tab if you know that information, and need a street address or a telephone number.
The Advanced tab lets you narrow your search. As you can see in Figure 3-13, you can make some very fine distinctions as you describe the person you're trying to find.
When you're finished setting up your search, click Find Now. The Search program uses your existing Internet connection to send the query off to the chosen Web site. After a few minutes, you'll get a response, even if it's "No response."
Unfortunately, the technology gods don't smile on this feature. You'll probably discover that Internet phone book sites fail to find someone more often than they succeed.
Tip
Instead of using the Find People dialog box, it's frequently more productive to work directly on the directory Web page. After choosing the search engine you want to use from the drop-down list, click Web Site. In a flash (or in a few minutes, depending on the speed of your Internet connection), you're on the Internet and the browser window displays the search engine you selected. Working directly on the Web, instead of using the Search feature as an intermediary, offers more powerful choices for searching.