Sooner or later, almost everyone who uses Windows 2000 Professional is connected to a network. It may be a giant corporate network with hundreds or thousands of computers, a smaller "workgroup" network in a small business, or an even smaller network that connects two or three computers in your home so that they can share your Internet connection and printer. In each case, Windows 2000 is an excellent choice for networking, thanks to its reliability (you rarely have to run around the office to restart a crashed PC) and security features.
The biggest advantage of a network is that it can improve efficiency by letting you share files, folders, printers, and other resources. Networking also helps to prevent lost data, because it's so easy to back up your files onto different computers.
The biggest disadvantage of networking is the risk of security problems: Once files and folders become available to any computer on the network, you have to take care to ensure that only appropriate individuals can access them; see Chapter 17 for more on security options. The other unfortunate aspect of networking is that its configuration, terminology, and troubleshooting can be extremely complex.
Note
This chapter is called Working on the Network, not Building a Network. Corporate Windows 2000 networks generally rely on Windows 2000 Server, installed by networking professionals. This chapter covers using a network that somebody else has designed and installed.
There is a kind of network you can create on your own, however—a smaller one that doesn't require Windows 2000 Server. Chapter 15 offers step-by-step instructions.
The primary purpose of a network is the sharing of files, folders, disks, and printers. Before the invention of Local Area Networks (LANs), you had to move files from computer to computer using floppy disks (a method called a sneakernet due to its reliance on good footwear). A LAN lets network citizens share several different components of its computers, including files and folders, disks, and printers.
So that computer professionals won't go quietly insane repeatedly saying "files, folders, disks, and printers" when discussing networking, they use the collective term resources. And once they've made one of these resources available to the network, they call it a shared resource—or just share for short.
The icon on your desktop called My Network Places (Figure 13-1) is the gateway to the other computers and devices on the network. Double-click it to browse, search, and bookmark shared drives, folders, Web pages, and printers.
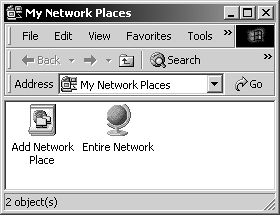
Figure 13-1. Double-click My Network Places to open this window. At the very least, you'll find the Add Network Place and Entire Network icons. If you're a member of a workgroup, you'll also see Computers Near Me. You (or your network administrator) may have added shortcuts to other computers to this window, too.
Getting to the shared resource you want involves several double-clicks, as you work your way through the network hierarchy. Here's how you'd get to a particular shared folder on a typical corporate domain:
Double-click the My Network Places icon on the desktop.
The My Network Places window opens, shown in Figure 13-2. The very first time you double-click the My Network Places icon on your desktop, you see two icons: Add Network Place and Entire Network (see Figure 13-2). (You may also see a Computers Near Me icon, as described in the sidebar box above.) The Add Network Place icon is described on Section 13.1.1.1; for now, proceed like this:
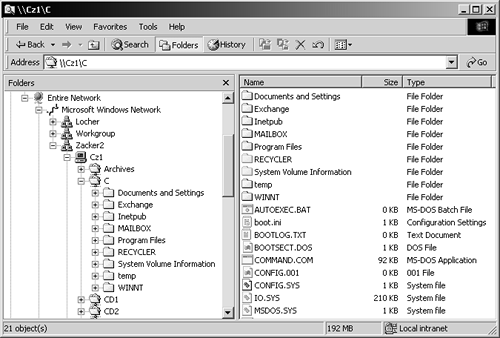
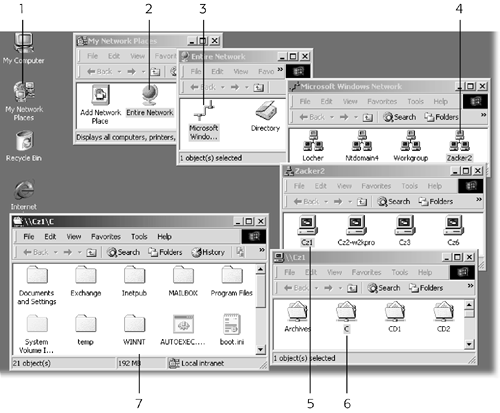
Figure 13-2. Finding a certain shared folder, disk, or printer involves a series of double-clicks in successive windows. Start with the My Network Places icon on the desktop (1), then Entire Network (2), Microsoft Windows Network (3), the domain or workgroup you want (4), the computer's icon (5), and finally, the icon of the disk, folder, or printer you want (6). In this example, you wind up looking at the contents of the shared folder (7).
Double-click Entire Network.
Now you see a window containing two more icons: Microsoft Windows Network and Directory. You use these icons to access the various other machines on the network, just as you navigate through the drive hierarchy in the My Computer window.
The Directory icon enables you to access resources that have been published in the Active Directory (see Section 2.2). On large networks, administrators do this "publishing" to spare you from having to browse through hundreds or thousands of computers, looking for a particular shared resource.
Double-click Microsoft Windows Network.
A list of the domains and workgroups on the network appears.
Double-click the icon of the domain or workgroup you want.
Now you see icons for the computers in that domain or workgroup.
Double-click a computer icon.
The window now shows all of the shares on that computer: drives, folders, or printers.
Double-click one of the shared drive or folder icons to display the files and subfolders inside.
Now you see the list of shared folders, disks, files, and printers on that computer. You can use them as though they were right there on your own computer.
Double-clicking icon after icon as shown in Figure 13-2 is one way to find a certain disk, folder, or file. But if you find yourself using a certain shared folder or disk often, you may find it more convenient to create a shortcut for it right in the My Network Places window.
The Add Network Place Wizard lets you do just that. Double-click its icon in the My Network Places window. On the first screen (Figure 13-3), you can click the Browse button to select a shared drive or folder; a subsequent wizard screen invites you to assign an alternate name to the shared resource as it will appear in your My Network Places window.
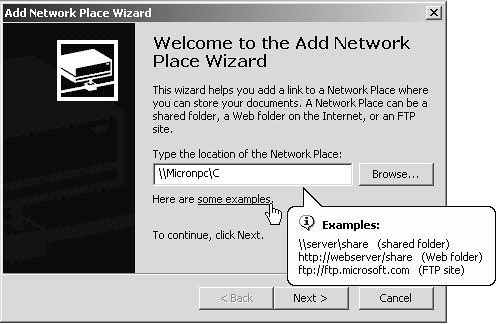
Figure 13-3. If you're having trouble creating a new My Network Place icon, click the some examples link; you're shown some examples of location codes that the Add Network Place Wizard will understand.
Tip
You can also make a shortcut to a shared folder or drive by dragging the folder or drive to the desktop and selecting Make Shortcut Here from the pop-up menu.
Instead of clicking Browse, however, you may sometimes find it more efficient to type the path to the drive or folder you want. Into the wizard's first text box, you can type a network address in this form:
\ComputerNameShareNameFilename
This special path format (called the Universal Naming Convention, or UNC ) can pinpoint a shared folder or file on the network without requiring a long series of double-clicks from the My Network Places icon.
For example, suppose a particular picture file is on somebody's computer at c:GraphicsPhotographsAntarcticAlert Adelie Penguin. (See page 32 for details on this Windows path notation.) If the Antarctic folder has been shared (see Section 13.3.2), you can open the file from across the network using its UNC path:
\WS1PhotosAlert Adelie Penguin
The double backslash means that WS1 is the name of a computer on the network (a single backslash would mean it's a folder at the top level of the local hard drive—that is, not in any other folder); Photos is the share name for the Antarctic folder. (As noted later in this chapter, a folder's real name may not match its shared name—the name you see over the network.)
Now the wizard proposes a name for it (which you're welcome to change).
After you click Finish, you'll be connected to the shared folder or drive. The next time you open My Network Places, you'll see the new Network Place icon. Double-click it to open the corresponding folder or drive in a window on your desktop. You can use the contents of the window as if it were on your own computer.
Instead of using the Network Places icon on the desktop, you can also survey the network landscape using Windows Explorer.
The left pane of the Windows Explorer window lists an icon for My Network Places. As shown in Figure 13-4, you can click the + button to see a list of the computers and shared resources on them. The hierarchy is exactly the same as that in My Network Places, and nearly all of the Explorer tricks you've learned when working with local drives (see Section 5.1.1) also work on network shares.