
This submenu of your Start→Programs folder might be better named "Multimedia," because all four of these programs pertain to sound and video.
The CD Player program (Figure 9-12) serves as the front panel for your computer's music CD-playing features, complete with Play, Stop, Pause, Next Track, Eject, and other familiar buttons. If you insert an audio CD into the CD drive and start CD Player, you'll be asked if you want to download information about the CD from the Internet.

Figure 9-12. CD Player gives every CD the name "New Title," and every song on it is "Track 1," "Track 2," and so on. Fortunately, the program can consult an Internet database to download the actual CD and track names, which it fills in automatically and remembers for the next time you insert the disc. This option alone is a major improvement over the bad old days when you had to type all the track information in.
Next, the CD begins to play. Click the Track arrow to see the names (and lengths) of the tracks, as shown in Figure 9-12. You can change tracks by clicking the list; click the Disc button (or just look at the top of the window) to see the name of the CD.
The Mode menu lets you choose to play tracks at random, repeat a track until you go mad, repeat the entire CD until you go mad, or preview each track (for an amount of time you set by clicking Options→Preferences). For volume control, drag the virtual knob.
In recent years, Media Player (Section 9.3.4) has taken over the sound-playing duties in Windows; in fact, if you double-click a WAV file (a standard Windows sound file), Media Player opens and plays it. But Sound Recorder is one simple way to record new sounds—and edit them. You can then associate these files with events on your computer (like booting up, shutting down, or launching a program), as described in Section 8.22.
To record a sound, follow these steps:
Choose Start → Programs → Accessories → Entertainment → Sound Recorder.
Sound Recorder opens.
Check the recording format by choosing File → Properties → Convert Now.
In this dialog box (Figure 9-13), you can specify the sound quality for your recording; the better the quality, the more disk space your file will consume. The default ("untitled") setting is fine for casual voice recordings, which will consume 7 K of hard drive space for every second recorded.
Figure 9-13. Top: Experiment to find an acceptable quality, but bear in mind that unless you have great speakers, you won't get much benefit from using the higher quality settings. Bottom: Note that the total length of the file is displayed on the right and the current position of the playback is on the left. You can click the fast-forward and rewind buttons to jump to the end or beginning of the file.
For a higher quality, click the Name drop-down list (Figure 9-13). Telephone quality is slightly better than the default. Radio is even better; CD quality is the best of all, but consumes 172 K of drive space for every second recorded. Experiment to find an acceptable quality for the type of audio you're recording. Telephone quality is usually fine for voice recordings, but if you're creating a WAV file from an audio CD, you'll probably want to use a higher sound quality.
To begin recording, click on the button with the dark red dot. Start the CD or start speaking into the microphone. Click the button with the black square to stop recording.
If you see animated sound waves in the Sound Recorder window, great; that's your VU (sound level) meter. It tells you that the PC is hearing you. If you don't see these yellow lines, however, then the sound isn't getting through. The problem is most likely that your PC control panel isn't set to record the appropriate sound source. Choose Edit→Audio Properties, and then use the Sound Recording drop-down menu to choose your microphone's name.
Select Save from the File menu to save the sound clip. Name the file in the Save dialog box.
If you want your new sound to be available in the Sounds and Multimedia control panel (so that you can make it play back to signal a Windows event), save it into the C: drive→WINNT→Media folder.
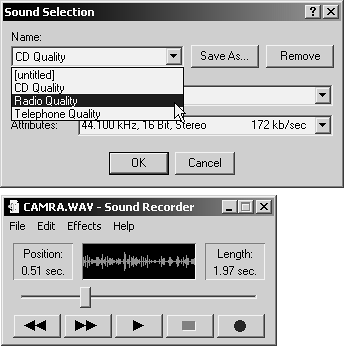
To play an existing WAV file, open Sound Recorder. You can drag a WAV file from a desktop window onto the Sound Recorder window, or select File→Open and then browse for the file. Figure 9-13, bottom, shows a file being played.
You can play with a file before you save it—adding echo or editing unwanted parts. Using the commands in the Edit menu, you can make your recording play faster or slower, add an echo effect, or even play it backward—great for finding subliminal messages in your own utterances.
To tidy up a sound file, you can edit out sound from the slider position to the beginning of the file or to the end of the file. To remove the introduction from a musical clip, for example, adjust the slider to just before the point where the good sound starts—play the file a few times, watching the position indicator to make sure you have the right spot—then choose Edit→Delete Before Current Position.
The controls you see in this program govern the volume and balance levels of the speakers, microphones, and sound-card elements of your PC. Every PC's sound card and other features are different, so not all of the controls may be operational on your machine, but you get the idea. Here are a few of the things you might want to do with Volume Control:
Shut your PC up. By clicking "Mute all" at the lower-left corner of the window, you make your PC completely silent—a handy feature when you don't want some errant beep or squawk to let the world know that you're using your laptop in, for example, church.
Adjust the stereo balance of your PC speakers. If one of the speakers is farther away from your head, you can drag the Balance sliders so that the distant speaker plays a little bit louder.
Fine-tune MIDI playback. If your sound card can play back MIDI files (a compact file format for instrumental music), use the Synthesizer balance and volume controls to tweak its sound.
Adjust the bass and treble. These knobs don't appear on the Volume Control screen; you have to choose Options→Advanced Controls, and then click Advanced, to see these sliders.
Media Player has evolved from one of those Windows applets whose unimportance couldn't be overestimated into a genuinely useful and entertaining tool. In its latest incarnation, Windows Media Player can play CDs, MP3 files, sounds, digital movies, or Internet radio stations. The program can also save your favorite CD tracks to your hard drive or MP3 player. This blossoming is the result of the growth of streaming audio and video over the Internet—plus the explosion in the use of MP3 technology for music storage and distribution.
Unfortunately, the version of Media Player that came with your copy of Windows 2000 may be the older, much less useful version 6; the following discussion, and indeed all Media Player discussion these days, revolves around the newer version 7.
To find out which version you have, choose Start→Programs→Accessories→Entertainment→Windows Media Player. Choose Help→About Windows Media Player. If the dialog box that opens reveals that you have a version before 7.0, click OK, and then don't hesitate: Choose Go→Windows Media Player Home Page to download the latest version of Media Player for Windows 2000.
For its first trick, Media Player can simulate a $200 CD player, capable of playing your music CDs while you're working at your computer. To fire it up, just insert a CD into your computer's CD-ROM drive (see Figure 9-14).

Figure 9-14. Media Player automatically displays the album title and the titles of each track, if that information was encoded onto your music CD. The track that's currently playing is highlighted (along with its length) and the elapsed time appears below the scroll bar. Double-click a track name to listen to it. The controls at the bottom of the Media Player window are like the controls on a physical CD player (Pause, Play, Next Track, Volume, and so on).
Tip
As the music plays, you get to watch psychedelic screen-saver-like displays, which Microsoft calls visualizations, that bounce and shimmer to the music. To try a different one, click the Next Visualization arrow (the tiny arrow button just below the shimmery display), or press Tab+Enter, or choose View→Visualizations. And if you tire of the 48 built-in displays, you can download more of them from the Internet by choosing Tools→Download Visualizations.
If the Media Player window shows names like "Track 1" and "Track 2" instead of actual song names, it's because the track data wasn't encoded on the CD by the record company. In such cases, exactly as with CD Player described earlier, you can let the Internet fill in the missing information for you. Just click the CD Audio button at the left side of the Media Player window, and then click Get Names at the top of the window. Once you're online, a wizard walks you through the steps needed to identify the album in your CD drive.
After you enter the CD and song names for a particular CD, Windows saves this information in your music library (see "Copying Music to Your Hard Drive," later in this chapter). The next time you insert this CD, the Media Player will recognize it and display the track names and album information automatically.
Tip
If the Media Player window is taking up too much screen space, making it harder for you to do other work, press Ctrl+2, or click the Compact Mode button in the lower-right corner of the window (Figure 9-15). Either way, the Media Player reappears in the lower-right corner of your screen, a fraction of its former size, its useful controls still visible. Press Ctrl+1 to return the Media Player window to its full-size glory. (Of course, you can also just minimize Media Player, as you would any window.)

Figure 9-15. At full size, the Media Player window occupies a large chunk of your screen (Figure 9-14). Left: In Compact Mode, it takes up less space on your screen. Right: Compact Mode also puts a small control window in the corner of your desktop. Click the compact window for a menu that offers, among other commands, Return to Full Mode.
In hopes of riding the world's craze for MP3 files (compact, downloadable, CD-quality sound files), Microsoft has helped itself to one of MP3-playing software's most interesting features: skins. A skin is a design scheme that completely changes the look of Windows Media Player.
To choose a new skin, click the Skin Chooser button on the left side of the Media Player window. (If you don't like any of the designs or just want to keep looking, click More Skins to visit Microsoft's Windows Media Skin Gallery.) Then click each of the available skins to see a preview of its appearance. When you click the Apply Skin button, your player takes on the look of the skin you chose and shrinks down into Compact mode, as described in the previous tip.
You can copy an audio CD, or selected tracks, to your hard drive in the form of stand-alone music files that play when you double-click them. Having CD songs on your hard drive affords you a number of benefits:
You can listen to whatever songs you like, without having to hunt for the CDs they came from.
You can listen to music even if you're using the CD-ROM drive for something else (such as a CD-based game).
You can build your own playlist (set of favorite songs) consisting of cuts from different albums.
You can compress the file in the process, so that each song takes up less disk space.
Follow these steps to copy audio from a CD to your hard drive:
Click the CD Audio button on the left side of the Media Player window.
The track list appears.
Turn off the checkbox of any track you don't want to copy.
Before you proceed, choose Tools→Options; on the CD Audio tab, make sure that Digital Copying is selected. Click OK.
Click the Copy Music button on the toolbar.
The button changes its name to Stop Copy, which you can click to interrupt the process. Windows now copies the selected tracks onto your hard drive.
When you perform this copying procedure, Windows goes about building a music library, a set of nested folders, in the C:→Documents and Settings→All Users→Documents→My Music folder. Within the My Music folder, Windows makes a folder for each performer; within the performer folder, there's a folder for each CD; and within that folder, you'll find icons representing the tracks you copied. To play a song, just double-click its icon.
If your PC has a CD burner attached, you can create your own audio CDs that play in any standard CD player. Candidates for this treatment are MP3 files, WAV files, and Windows Media files (.asf, .wma, and .wmv), such as the ones you've copied from a CD to your hard drive.
Copy the music you'll want to your hard drive.
If you're using MP3 or WAV files, they're probably already on your hard drive. If you're planning to use tracks from a CD, copy them as directed in "Copy the CD to your hard drive," above. Remember that the quality settings you use will affect the sound quality of the finished disc.
Create a playlist.
A playlist, in this case, is simply a list of the tracks you'll want on your homemade CD. To create a playlist, click the Media Library button, click New Playlist, type a name for the list. Then add tracks to the new playlist by highlighting their names (at the right side of the window) and then clicking "Add to playlist" on the toolbar; choose "Add to [your new playlist's name]" from the tiny menu. The maximum length for a CD is 74 minutes.
Choose File → Copy to CD.
Now the Playlists list appears.
Double-click the name of the playlist you want converted to a CD.
If the equipment gods are smiling, your CD burner now spins into action, and the messages on the screen keep you posted as the CD is created.
If you have a palmtop computer that's capable of playing music, such as a Diamond Rio or a Windows CE-based palmtop, you can copy your CD files there. To do so, connect the palmtop, and then click the Portable Device button on the left side of the Media Player window. Now Media Player displays a split window: the left side lists the tracks on the CD, and the right side lists the music currently installed on the palmtop. Turn on the checkboxes of the tracks you want, and then click Copy Music; Windows copies the music you selected to your portable player.
Your CD collection isn't the only source of music worth listening to as you work. The Internet is crawling with Web sites that harbor music files you can download and make part of your music library (or download to your palmtop).
To find them, click the Media Guide button on the Media Player window. You're shown a list of Microsoft media Web sites, where you'll find lists, search engines, and other methods for finding music.
You can use the computer itself as a radio, one that can tune in to any of hundreds of radio stations from all over the world, each brought to you by the Internet. To do so, open Windows Media Player. Click the Radio Tuner button at the left to connect to the Internet, where you can select the stations you want to hear (see Figure 9-16).

Figure 9-16. The left side of the Radio Tuner window lists your preset stations (Microsoft features several popular stations in a collection named Featured); the right side provides search features you can use to find stations you want to add to this canned list.
To create your own list (which will replace Microsoft's Featured List), choose My Presets from the drop-down menu at the top of the left pane. Then find the stations you want to add by using the search features in the right pane. When you find a radio station you like, select it and click Add. Once you've done so, the radio station will appear automatically in the Radio toolbar that you can summon to any desktop window (see Section 4.2.3.2). (To remove a station from your preset list, select it and click Delete.)
Media Player can also play movie files, such as those you've downloaded from the Internet, made yourself, or grabbed from a CD-ROM. The standard Windows movie-file format is .avi, but Media Player can also play many other Microsoft media formats (.ask, .asx, .wav, .wma, .wm, .wmv, .wax, .wvx), Unix formats (.au, .snd), MPEG formats (.mpg, .mpeg, .m1v, .mp2, .mp2v, .mp3, .mpa, .mpe, .m3u), MIDI files (.mid, .midi, .mi), Apple QuickTime files (.qt, .aif, .aifc, .aiff, .mov), RealAudio files (.ram, .ra, .rm, .rmm), and several others (.ivf, .cda).