
As millions of Windows users illustrate, it's perfectly possible to live a long and happy life without ever tampering with the Start menu; for many people, the idea of making it look or work differently comes dangerously close to nerd territory. (It's true that listing your favorite files there gives you quicker access to them—but it's even easier to use the Quick Launch toolbar, as described in Section 4.3.2.)
Still, knowing how to manipulate the Start menu listings may come in handy someday. It also provides an interesting glimpse into the way Windows works.
Note
Any Start menu changes apply only to the person that's currently logged on to this computer. When you log on, Windows loads your customized Start menu, as stored in your user profile; when the next person logs on, he'll see his own version of the Start menu.
Microsoft offers a fascinating set of Start menu customization options. It's hard to tell whether these options were selected by a scientific usability study or by a dartboard, but you're likely to find something that suits you.
To view and change the basic options, right-click a blank spot on the Taskbar; choose Properties from the shortcut menu. Alternatively, choose Start→Settings→Taskbar & Start Menu. Either way, the Taskbar and Start Menu Properties dialog box opens, as seen in Figure 3-16.
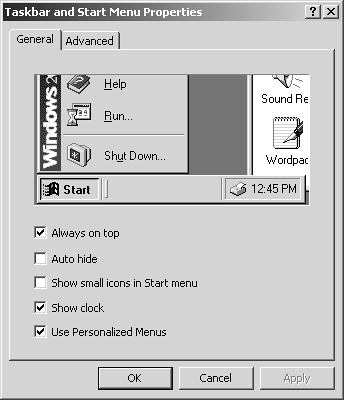
Figure 3-16. Only two of the options on the General tab apply to the Start Menu; the rest are for configuring the Taskbar. The two Start Menu items, "Show small icons in Start menu" and "Use Personalized Menus," have a great deal of influence over the way the Start menu looks and behaves. Because of their importance, you should try changing the settings for each before deciding on a final configuration for the Start menu.
Only two of the checkboxes in this dialog box pertain to the Start menu: "Show small icons in Start menu" and "Use personalized menus."
Show small icons in Start menu. Turning on this checkbox gives you smaller icons next to the commands in the Start menu. As a result, the Start menu is more compact.
Use Personalized Menus. When the Use Personalized Menus checkbox is on, Windows watches you and studies your behavior (that is, even more than usual). If it notices that you haven't been using certain Start menu commands, Windows hides them, making the menu listing shorter. Figure 3-17 shows the idea.
Figure 3-17. Left: A Programs menu displaying only those you've used recently. Click the arrow at the bottom of the menu (or just point to it and wait) to see the full menu, as shown at right. The previously displayed items announce their favored status by appearing in a darker shade of gray.
As noted in Chapter 1, you may find either that Personalized Menus makes it harder to find commands (because they keep moving around), or that it makes life easier because you don't have to sift through commands you never use.

Click the Advanced tab (Figure 3-16) to see the dialog box shown in Figure 3-18. At the bottom of the dialog box, you'll find a long scrolling list of checkboxes. Some affect the Taskbar, and are described in the next chapter; the rest, described here, affect the Start menu in interesting ways:
Display Administrative Tools. This command adds a listing for Administrative Tools (a folder of troubleshooting and maintenance tools described in Chapter 19) to your Start→Programs menu.
Favorites. This option adds a Favorites command to the Start Menu that lists your favorite Web sites, the same ones you've "bookmarked" when using Internet Explorer (see Section 11.5). Thereafter, you can use the Start Menu to launch Internet Explorer and travel directly to the selected site.
Display Logoff. This option hides or shows the Logoff item on the Start Menu, which saves you a traipse to the Shut Down dialog box when you want to sign out of your PC without actually shutting it down.
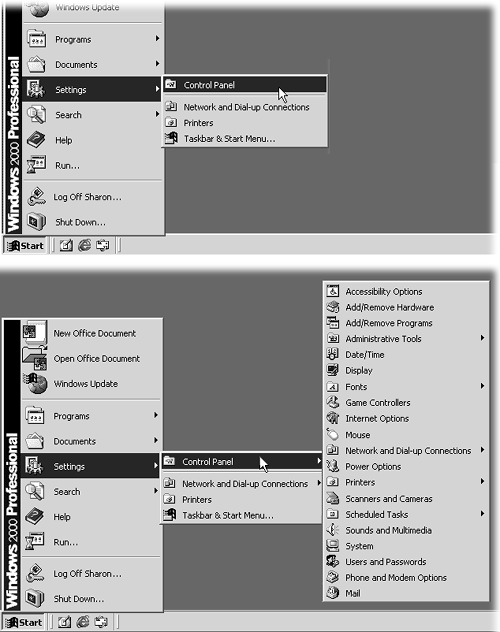
Expand options. Expanding means that instead of simply listing the name of a folder (such as Control Panel), your Start menu sprouts a submenu listing the contents of that folder. As illustrated in Figure 3-19, this new Windows 2000 feature saves you the trouble of having to open a folder window (such as Control Panel or My Documents), double-click an icon inside it, and then close the window again.
Figure 3-19. Top: When Expand Control Panel is turned off, you, like generations of Windows users before you, can't open a particular Control panel directly from the Start menu. Instead, you must choose Start→Settings→Control Panel, which opens the Control Panel window, where it's up to you to open the settings program you want. Bottom: Expanding the Control Panel saves you a step; you now get a submenu that lists each program in the Control Panel folder. By clicking one, you can open it directly, without ever having to open the Control Panel window.
The Taskbar and Start Menu Properties dialog box offers individual checkboxes for expanding these Start menu folder names: Control Panel, My Documents, Network and Dial-Up Connections, and Printers.
Scroll the Programs menu. This option changes how the Start→Programs menu looks when there are too many programs listed there to fit on the screen. Ordinarily when this situation arises, a second Programs menu appears to the right of the first one, continuing the list. But if you turn on this checkbox, all your programs appear instead on one massive, scrolling Programs list. As you scroll down past the last visible name, the top of the Programs menu scrolls off the screen.

Usually, when you install a new program, its installer inserts the program's name and icon in your Start→Programs menu automatically. There may be times, however, when you want to add something to the Start menu yourself, such as a folder, a document, or even a disk—not to mention applications whose installers don't add their names automatically.
Note
You're not allowed to touch the body of the Start menu—the list of commands between Shut Down and Documents. You can move things, remove things, or add things only in the listings above the Programs command—and among the items in the Programs submenu. (The two legal areas are indicated in Figure 3-20.) In other words, Windows won't let you drag, say, the Shut Down or Help commands into oblivion.

Figure 3-20. Left: You can add something to the top of your Start menu by dragging it, from whatever folder it's in, onto the Start button to open the Start menu, and then directly up into position. When you release the mouse, you'll find that it's been happily ensconced where you dropped it (right). Once the menu is open, you can drag commands up or down in the circled area of the menu at right.
Microsoft wouldn't be Microsoft if it didn't provide at least 437 different ways to do this job. Here are three of the world's favorites.
Nothing could be easier:
Locate the icon you want to add to your Start menu.
It can be an application (see the sidebar on Section 3.10.2.2), a document you've created, a folder you frequently access, one of the programs in your Control Panels folder, or even your hard drive or floppy drive. (Adding disks and folders to the Start menu is especially handy, because it lets you dive directly into their contents without having to drill down through the My Computer window.)
Tip
Adding an application name to your Programs menu requires that you find the program file, as described in Section 3.10.2.2. To do so, either use the Search command described earlier in this chapter, or use the Windows Explorer window described in Chapter 5. You'll find your program files in the My Computer→C: drive→Program Files folder.
Drag it directly onto the Start button.
If you release the mouse now, Windows adds the name of the icon you've just dragged to the top of the menu, as shown at right in Figure 3-20.
But if you prefer some additional control over the placement of the icon, continue the drag upward to the top section of the menu (above the Programs command). You're free to drop it exactly where you want it among the items listed there (Figure 3-20, left).
Similarly, if you drag to the Start button and then up to the Programs command without releasing the mouse, you can place it exactly where you want it in the Start→Program submenu.
If dragging icons around isn't your thing, you can use one of Microsoft's famous wizards for the same purpose. If you choose Start→Settings→Taskbar & Start Menu, click the Advanced tab, and then the Add button, the Add Shortcut wizard walks you through the process of choosing a file to add.
To open your Start menu folder, right-click the Start button and select Open. Instead of the fancy icon-adding wizards and drag-and-drop schemes described in this section, you may prefer to fine-tune your Start menu the low-tech way: Just open your Start Menu folder. (Or, if you'd like the newly installed item to show up on everyone's Start menu—everyone who uses your PC—right-click the Start button and select All Users.) You can add, remove, or rename shortcuts in your Start menu just by manipulating the shortcuts in this folder (or the Programs folder inside it).
It's easy to remove most applications from your PC—at least those whose programmers have read the Emily Post Big Book of Programming Etiquette. Just choose Start→ Settings→Control Panel→Add/Remove Programs; you get a list of every program installed on your machine (except for those supplied with Windows 2000). You can then make a selection from this list and click Add/Remove to delete the software from your life. (More on Add/Remove Programs in Chapter 7.)
In some cases, however, Add/Remove Programs fails to remove the program's name from the Start menu, or you may have to manually uninstall an application that doesn't register itself with Add/Remove Programs at all. Over time, the Programs menu can become extremely crowded, and therefore harder to navigate. Error messages become increasingly frequent as you choose the names of these dearly departed applications, perhaps forgetting that you've sent them to the great CompUSA in the sky.
Fortunately, you can remove these unwanted names—or any other program, file, folder, or disk name—from your Start menu, by one of these two methods.
Note
When you delete an item from one of the menus on the Start menu, you're only deleting the shortcut that appears on the menu. Deleting items from the Start menu doesn't actually uninstall any software.
Here's the world's easiest method for ditching a file, program, folder, or disk name from your Start menu. Click the Start menu to open it, and then simply drag the name in question off of the top of the menu (or from the Programs submenu)—onto the desktop, for example, or even directly onto the Recycle Bin icon.
Here's the second easiest way to clean up the Start menu: Click the Start menu to open it. Then right-click the file, folder, program, or disk name and choose Delete from the shortcut menu. It disappears instantly.
Tip
Speaking of the shortcut menu, you can also rename something you've added to your Start or Start→Programs menu. Click the Start menu to open it, right-click the name of the item you want to rename, and choose Rename from the shortcut menu. You'll be offered the Rename dialog box, where you can edit the name and then click OK.
To change the order of the Start→Programs listings, click the Start menu to open it, slide up to the word Programs, and simply drag the folder, document, disk, or program name up or down as you see fit. As you drag an item through the list of programs, a black line appears to show you the resulting location of your dragging action. Release the mouse when the black line is where you want the relocated icon to appear. If you change your mind while you're dragging, press the Esc key to leave everything as it was.
Tip
To sort your Start→Programs submenu alphabetically, right-click anywhere on the Programs submenu and choose Sort By Name from the shortcut menu.
Many listings Start→Programs menu listings are folders (those accompanied by a right-facing arrow). For example, clicking Start→Programs→ Accessories→Games reveals a submenu that lists the games that come with Windows.
Without all these folders consolidating the Start→Programs menu, you'd need one of those very expensive 95-inch monitors to see the entire list of applications. Fortunately, you can create Programs-menu folders of your own, and stock them with whatever icons you like. For instance, you may want to create a folder for CD-ROM-based games, eliminating those long lists from the Programs menu.
To add a folder to the Programs menu, follow these steps:
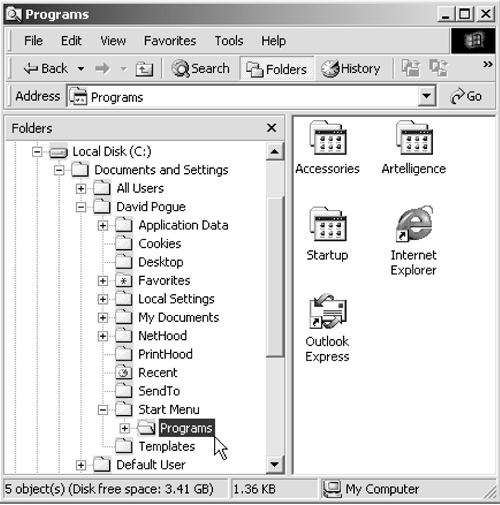
Right-click the Start button; choose Explore from the shortcut menu.
The Start Menu Explorer window appears.
Click the Programs folder.
Its contents are listed in the right pane, as shown in Figure 3-21.
Choose File → New → Folder.
Or, if your right mouse button hasn't been getting enough exercise, right-click a blank spot in the right pane, and then choose New→Folder from the shortcut menu.
When the new folder item appears, type a folder name and then press Enter.
Close the Start Menu window. Click OK to close the dialog box.
Your new folder appears at the bottom of the Start→Programs menu. Feel free to drag your new folder to the location you choose on the menu.
Now you can put favorite file, folder, disk, or application icons into this new folder. To do so, drag an icon onto the Start→Programs menu, and then onto the new folder/submenu you created. Of course, the first time you do this, your newly created folder submenu just says "Empty"; drag the icon onto that "Empty" notation to install it into your submenu. Then drag as many other icons as you like into this new folder.
You can even create folders within folders in your Start→Programs menu. Just repeat the instructions above—but following step 2, click the + sign next to the first folder you added. Then continue with step 3.