
I write articles, blog posts, books, and a monthly newsletter. Until these are published, they exist on my laptop where only I can see them. The point of my writing is to make it available for others to read. My goal is to teach people all over the world about SQL Server, and to accomplish this, my works must be published.
You can create brilliant reports using SQL Server Data Tools (SSDT) on your computer, but until those reports are published, they are not useful for the people who requested them. In this chapter, you will learn how to publish the reports that you have created throughout the book.
Getting Around in the Web Portal
Throughout all the versions of SQL Server Reporting Services (SSRS), the default user interface for SSRS reports when installed in native mode was the Report Manager as shown in Figure 8-1.

Figure 8-1. The Report Manager
Starting with SSRS 2016, the Report Manager has been replaced with the new SSRS web portal. This change not only represents an upgrade but enables SSRS to play in the new mobile world with new report types intended for smartphones and tablets. If you have managed SSRS reports over the past few years, you have probably received complaints about web browser compatibility. Starting with 2016, modern web browsers are supported!
Over the past few releases, many of the new SSRS features were available only when SSRS was installed in SharePoint integrated mode. This release is a nice departure from that trend. Those SharePoint-only features, such as data-driven reports, have not been back-ported to native mode, but several new features are available in native mode only. Figure 8-2 shows the new portal.

Figure 8-2. The new web portal
In addition to hosting the traditional paginated reports, the web portal hosts independent KPIs, or key performance indicators, and mobile reports that will run on tablets and smartphones. You will learn how to build the KPIs and mobile reports in Chapter 10.
The web portal has two pages or modes: Favorites and Browse. The Browse page looks more like the traditional view. There you can see the folders where the reports and other objects are stored as shown in Figure 8-3.

Figure 8-3. The Browse page
When you click a folder, such as the Reports folder, you will see the objects within that folder. Figure 8-4 shows the contents of the Reports folder.

Figure 8-4. The Reports folder
Inside each folder, you can store KPIs , mobile reports, and paginated reports. You will also have folders, usually in the Home folder, for data sources and the other objects that can be published. Across the top of the folder, you can see a path back to the Home folder. To run a paginated report, you just have to navigate to it and then click it.
The Favorites page is populated specifically by each user. To add a report to the Favorites page, just click the ellipsis next to the object and click Add to Favorites as shown in Figure 8-5.

Figure 8-5. Add a report to the Favorites page
To accomplish many of the management tasks in the web portal, you will need to start with the menu at the top right of the page as shown in Figure 8-6.

Figure 8-6. The menu
End users just need to know where to find the reports they want to run. They can make things more convenient for themselves by utilizing the Favorites page. SSRS developers and administrators need to understand much more. The rest of the chapter will cover the tasks that developers and administrators do to provide a convenient reporting experience.
Deploying Reports from SSDT
Reports can be deployed directly from SSDT or by uploading directly within the web portal. When deploying from SSDT, any required folders are created as well. To get started, follow these steps to configure a project for deployment:
1. To view the SSRS web services URL (uniform resource locator), open the Reporting Services Configuration Manager, one of the utilities installed with SQL Server.
2. Connect to your instance of SSRS as shown in Figure 8-7. If it is not a named instance, then the Report Server Instance will be MSSQLSERVICE.

Figure 8-7. The Reporting Services Configuration Connection dialog connecting to a named instance
3. On the Reporting Services Configuration Manager, click Web Service URL on the menu on the left.
4. Record the URL shown in Figure 8-8. This information will be needed in a subsequent step.

Figure 8-8. The web service URL
5. Click Exit to close the Reporting Services Configuration Manager.
6. Launch SSDT.
7. Open the solution created in Chapter 7 by locating it in the File menu under Recent Projects and Solutions. If you did not follow along in Chapter 7, you can find the solution in the Code/Download area of the Apress web site ( www.Apress.com ) for this book.
8. In the Solution Explorer, right-click the project name, Visual Reports, and select Properties.
9. In the Deployment section, you will see several configuration items with defaults filled in. If it is not already populated, enter the URL that you recorded in step 4 into the TargetServerURL property as shown in Figure 8-9.

Figure 8-9. Configure the TargetServerURL
10. Click OK to save the change. You may have noticed that the port number automatically disappears if it’s at the default of 80.
Take a look at Figure 8-10. The OverwriteDatasets and OverwriteDataSources properties are set to False by default. This prevents you from overwriting data sources and datasets that have been deployed. This will come in handy if your data sources are pointing to development or test database servers. When you deploy a project to production, you won’t overwrite existing data sources with development connection strings.

Figure 8-10. The OverwriteDatasets and OverwriteDataSources properties
Now that your project is configured, you can deploy the project. Follow these steps:
1. Right-click the project name and select Deploy as shown in Figure 8-11.

Figure 8-11. Deploy the project
Note
If your SSRS installation is local, you may experience permission problems deploying the project and viewing the web portal. See the section “Configuring Local SSRS Settings” in Chapter 1.
2. Review the Output window to see if the deployment was successful as shown in Figure 8-12.

Figure 8-12. The Output window
3. Now that the project is deployed, you can view the reports in the web portal. To find the URL to use, go back to SSRS Configuration Manager. This time select Web Portal URL. To open the web portal, click the URL as shown in Figure 8-13.

Figure 8-13. The Report Manager URL
The Visual Reports folder should now be found in the Home folder of the web portal as shown in Figure 8-14.

Figure 8-14. The new folder
Note
At the time of the SQL Server 2016 release, the web portal would sometimes fail to run after a restart of the server. If you see a Service Unavailable error, you should stop and start the service by using the Reporting Services Configuration Manager.
If you click the Visual Reports folder, you will see all the reports you created in Chapter 7. You can click a report to view it. Any parameters will be shown across the top. Figure 8-15 shows the Charts report.

Figure 8-15. The Charts report
If there is a reason to deploy an individual report, dataset, or data source, you can just right-click the object from the Solution Browser in SSDT and select Deploy.
Just as from SSDT, you can print or export the report. Older versions of SSRS used an ActiveX control for printing which caused many compatibility problems with modern web browsers. Currently the printer icon allows you to save the report as a PDF which can then be printed. The save icon allows you to export the report in several formats including PowerPoint.
Uploading Reports
Instead of deploying from SSDT, you can also publish a report by uploading to the web portal. Follow these steps to upload a report:
1. Launch the web portal.
2. While in the Home folder, create a new folder by clicking New ➤ Folder as shown in Figure 8-16.

Figure 8-16. Create a new folder .
3. Name the folder Upload Example and click Create.
4. Once the folder is created, click it to open it.
5. Click Upload and navigate to a report. The report files have the extension rdl and are found in the project folders as shown in Figure 8-17.

Figure 8-17. Navigate to a report
6. Once you select a report, click Open.
7. You should now see the report in the folder. Click the report to view it.
Instead of opening the report, you will see an error message as shown in Figure 8-18.

Figure 8-18. The error message
When you upload a report, it is not automatically linked to the data source. You can easily correct this by following these steps:
1. Click Upload Example in the path to navigate away from the error message.
2. Click the ellipsis next to the report name and select Manage.
3. This opens a page with many options. Select Data Sources. You will see a message about the data source error.
4. Click the ellipsis under Connect to as shown in Figure 8-19.

Figure 8-19. The data sources properties
5. This opens up a window at the Home folder. Click Data Sources.
6. Select the AdventureWorks2016 data sources as shown in Figure 8-20.

Figure 8-20. The Data sources folder
7. You should now see the correctly mapped data source as shown in Figure 8-21.

Figure 8-21. The corrected data source
8. Click Save.
9. Navigate back to the Upload Example folder and try running the report. It should now run as expected.
Obviously, it is easier to deploy from SSDT, but this information will be helpful if you do ever need to upload an individual report.
Creating Data Sources
The AdventureWorks2016 data source was created automatically when the project was deployed. You can also create data sources manually through the web portal. Follow these steps to create a data source:
1. Launch the web portal.
2. Click the Data Sources folder.
3. Click the ellipsis next to AdventureWorks2016 and then click Manage to open the properties.
4. Select the Connection String property and copy it to the clipboard as shown in Figure 8-22.

Figure 8-22. The Connection string property
5. Scroll down and click Cancel to close the properties.
6. Click New ➤ Data Source to open the New Data Source page.
7. Fill in TestDataSource for the Name.
8. Paste the previously copied connection string into the Connection string property.
9. Scroll down and click Test Connection.
10. Click Create.
11. You should now see both data sources in the folder.
While you may not need to create many data sources through this interface, you will need to use it to manage data sources. Whenever a database is moving to a new server, you will make the change here for the reports. In Chapter 9, you will learn about the Credentials section of the data source properties.
Deploying Report Parts
In addition to data sources, datasets, and reports, you can also deploy report parts. Report parts are the objects that make up reports such as charts, tables, and gauges. The published report parts can then be used with the Report Builder tool that will be covered in Chapter 10.
To publish an object on a report, you must mark individual items for publishing. Follow these steps to deploy the parts of a report:
1. If it’s not already open, launch SSDT and the project from Chapter 7.
2. From the Solution Explorer, double-click the Charts report to open it in design view.
3. If the Report menu is not visible, click the design canvas of the report.
4. Select Report ➤ Publish Report Parts which opens a dialog box showing the objects that can be published as shown in Figure 8-23.
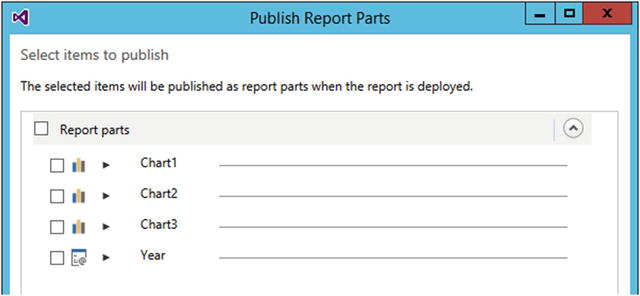
Figure 8-23. The Publish Report Parts dialog
5. Check Report Parts to select each item.
6. Click the arrow next to the first chart. This allows you to see a picture of the chart and also fill in a description.
7. Each item has the default name which will not be helpful in the web portal. Change the name of each to match Figure 8-24.

Figure 8-24. New names for each chart
8. Click OK.
9. In Solution Explorer, right-click the Charts report and deploy it.
10. Open the web portal.
11. Navigate to the Home folder.
12. You should see a new Report Parts folder.
13. Click the folder to see the published report parts as shown in Figure 8-25. You will use them in Chapter 10.

Figure 8-25. The Report Parts folder
Deploying Reports to SharePoint
Installing and configuring SSRS in SharePoint mode is beyond the scope of this book. I do think, however, that if you ever need to deploy reports to an existing SharePoint farm, you can come back to this chapter to learn how to do it. Just like native mode SSRS, you can publish reports either by uploading or from SSDT. This section assumes you are using SharePoint 2013 or later and that the SSRS document library has been configured properly.
Follow these steps to learn how to upload SSRS reports to a SharePoint report library:
1. Launch SharePoint and navigate to the report library. Figure 8-26 shows a typical report folder.

Figure 8-26. The SharePoint report folder
2. Click Files.
3. Click Upload Document as shown in Figure 8-27.

Figure 8-27. The Upload Document icon
4. From the Add a Document dialog, navigate to an SSRS report rdl file by clicking Browse.
5. Click OK.
6. On the Reports dialog, select Report Builder Report as the Content Type as shown in Figure 8-28.

Figure 8-28. The Reports dialog
7. Click Save. The report should now show up in the folder.
8. Because you uploaded the file, you will need to configure the data source. Click the ellipsis next to the report name.
9. This opens up a menu dialog; click the ellipsis on this dialog.
10. Select Manage Data Sources as shown in Figure 8-29.

Figure 8-29. The report properties menu
11. On the Manage Data Sources page, click the data source name.
12. On the data source’s property page, click the ellipsis as shown in Figure 8-30.

Figure 8-30. The data source properties
13. On the Select an Item dialog, navigate to the correct data source as shown in Figure 8-31. Click the Up button to navigate.

Figure 8-31. The Select an Item dialog
14. Click OK to save the data source name and dismiss the dialog box.
15. Click OK on the data source properties for the report to save the change.
16. Navigate to the report and test it.
You can also upload data source files (rds) or create them. To create a new data source, follow these steps:
1. Launch SharePoint and navigate to the Data Sources folder.
2. Click Files ➤ New Document as shown Figure 8-32.

Figure 8-32. The New Document icon
3. Select Report Data Source as shown in Figure 8-33.

Figure 8-33. The Report Data Source menu item
4. Fill out the properties on the Data Source Properties page as shown in Figure 8-34.

Figure 8-34. The Data Source Properties
5. Click OK to save the new data source.
To deploy reports and other objects from SSDT, you will need to configure the exact paths to the SharePoint library folders for each type of item in the project properties. Otherwise, the process is identical to deploying to a native mode instance. Figure 8-35 shows how to configure for my SharePoint site.

Figure 8-35. The properties when deploying to SharePoint
Summary
SSRS reports are not much value unless they are published where the end users can get to them. In this chapter you were introduced to the new web portal. You deployed reports from SSDT and by uploading them. If you have an SSRS instance installed in SharePoint mode, you also saw how to deploy reports to SharePoint.
Whenever data is concerned, security is of utmost importance. In Chapter 9, you will learn about the security aspects of SSRS.