
A major data breach is reported on an almost weekly basis. One of the first that caught my attention was the 2012 theft of South Carolina’s state taxpayer database. In 2015, hackers stole the electronic records of millions of US federal government employees. A report developer may not need to configure security, but he or she should be able to understand how SQL Server Reporting Services (SSRS) security works to assist the administrator if requested.
When deploying SSRS reports, there are two layers of security to consider: permissions at the data source and within SSRS. In this chapter, you will learn the security features of SSRS and how SSRS interacts with SQL Server security.
Understanding SQL Server Security
Even if an end user is allowed to run a report, the SQL Server instance my not return the requested data. The settings in the data source determine the credentials sent to SQL Server.
Note
A thorough review of SQL Server security is beyond the scope of this book. Data for reports can come from many other sources as well, such as Oracle databases and Analysis Services cubes . Consult vendor documentation to understand the security of any particular product.
In the case of SQL Server, two types of accounts will be used to connect: Windows logins and logins defined within the SQL Server instance. Both types of logins are mapped to database users which have specific permissions within the database. Another feature of SQL Server called Contained Databases allows you to create users directly within the database. Figure 9-1 illustrates these concepts.

Figure 9-1. Authentication within SQL Server
Setting Up an SQL Account
By default, SQL Server will accept only Windows authentication. SQL Server authentication can be enabled during installation, or you can configure it after the fact. To follow along with all of the examples in this chapter, SQL Server authentication must be enabled. If you installed your SQL Server instance locally, you will be able to modify the authentication properties. Otherwise, you will need to work with your database administrator to configure security on a development instance in your network. To change the authentication properties of SQL Server, follow these steps:
Launch SQL Server Management Studio (SSMS).
Type in the SQL Server name property and Authentication method as shown in Figure 9-2. If you are not sure about these properties, refer to the section “Determining the SQL Server Name” in Chapter 1.

Figure 9-2. The Connect to Server dialog
Caution Modifying the server authentication property requires a restart of SQL Server.
Click Connect.
In Object Explorer of SSMS, right-click the server name and select Properties.
Select the Security page
If the Server Authentication is set to Windows Authentication mode, switch it to SQL Server and Windows Authentication mode as shown in Figure 9-3.
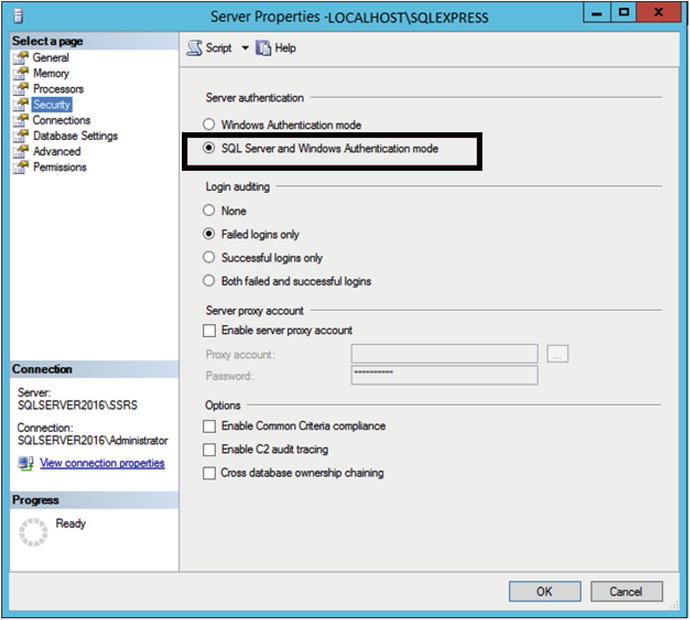
Figure 9-3. SQL Server and Windows Authentication mode
Click OK to accept the change.
Restart SQL Server by right-clicking the server name and selecting Restart.
Now that SQL Server is configured to accept SQL Server authentication, you will need to create a login and give it permissions. Follow these steps to set up the login:
In Object Explorer, expand Security.
Right-click Logins and select New Login.
This opens the Login – New dialog box.
Fill in SQLReportUser for the Login Name.
Select SQL Server Authentication.
Type in and confirm a password that you will remember.
Since this is just for an example, uncheck Enforce password policy as shown in Figure 9-4.

Figure 9-4. The SQLReportUser account properties
Click OK to create the account.
Right-click the account and select Properties.
Switch to the User Mapping page.
Check next to AdventureWorks2016 as shown in Figure 9-5.
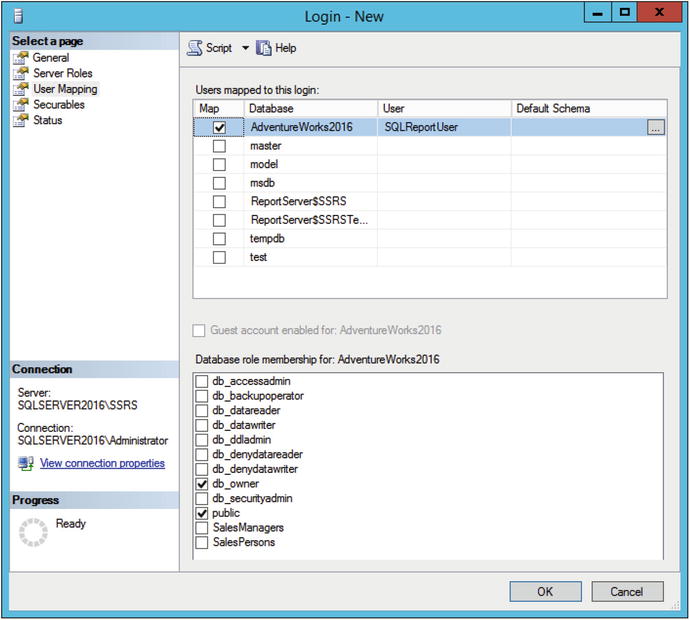
Figure 9-5. The User Mapping page
Check the db_owner role. In a production database, give only the rights needed. I’ve noticed that sometimes db_owner is automatically selected for new users in AdventureWorks, but it doesn’t stick. Go back and view the properties and reset it if needed.
Click OK to save the permissions.
Connecting to SQL Server
In Chapter 3, you learned how to create a data source and most likely used your Windows credentials to connect to SQL Server. In this section, you will create a new data source that uses a SQL Server account. Follow these steps to create a new data source in the project to accept SQL Server credentials:
Launch SQL Server Data Tools (SSDT) and open the solution from Chapter 6.
Right-click Shared Data Sources and select Add New Data Source.
On the General page, set the Name property to AdventureWorks2016SQL as shown in Figure 9-6.

Figure 9-6. The Name property
As you have done throughout the book, click the Edit button to set the Connection string property.
On the Credentials page, select Use this user name and password.
Type in the User name and Password from the account you previously created. The Credentials page should look like Figure 9-7.

Figure 9-7. The new credentials
Click OK to save the changes.
Double-click the Sales by Territory Matrix report to open it in design view.
In the Report Data window , open the properties of the AdventureWorks data source.
On the General page, select AdventureWorks2016SQL for the Use shared data source reference property as shown in Figure 9-8.

Figure 9-8. The new shared data source reference
Click OK to save the changes.
Preview the report to make sure it works.
Now the report is configured to use a SQL Server account to retrieve the data. When the project is deployed, the end users will connect to the web portal with their Windows accounts. SSRS will then connect to SQL Server with the account credentials that have been stored in the data source properties. Follow these steps to deploy the project and view the new data source in the web portal :
In the Solution Explorer, right-click the project name and select Properties.
Set the TargetServerURL to your web service URL (uniform resource locator) if it is not already set. See the section “Deploying Reports from SSDT” in Chapter 8 if you are not sure how to do this.
Click OK to save the changes.
Right-click the project name and select Deploy.
If the deployment was successful, launch the web portal. See the section “Deploying Reports from SSDT” in Chapter 8 if you need help with this.
Click the Data Sources folder.
Click the ellipsis next to the AdventureWorks2016SQL data source and select Manage.
This opens the properties of the data source. Scroll down to the Credentials section and view the properties. Notice that you can also specify a hard-coded Windows account. Figure 9-9 shows the Credentials section.

Figure 9-9. The data source credentials
You may be wondering why you do not specify As the user viewing the report all the time. In some cases, it is not possible. Following is a list of possible reasons to save hard-coded credentials in data sources:
End users or devices may not be part of the Windows domain.
End users may not be allowed to have direct rights in the database.
Subscriptions require hard-coded credentials.
The database server may not reside on the same server as SSRS.
Note
Kerberos delegation must be configured to forward credentials between servers. This is an advanced security topic beyond the scope of this book. To learn more about Kerberos delegation, see the Pluralsight course “Configuring Kerberos for SSRS.”
Configuring Site Security
SSRS security is role based. The roles have certain predefined permissions. Adding an account or group to a role allows the account or group to have the permissions defined by the role. Some aspects of security can be configured at the site, while others are based on location or object. In this section, you will learn about site security.
Note
For these examples, I will be using several Windows accounts created on a stand-alone Windows Server 2012 R2. In your environment, you may be running within a domain or on an isolated laptop running one of many end-user versions of Windows. Because there are so many variations possible, I will not walk you through creating the accounts.
I have created an information technology (IT) group and added the following local Windows accounts to the group on my server:
CIO
Director
Manager
TeamLeader
TeamMember
At the Site level of the web portal, there are two possible roles: System Administrator and System User. Any accounts or group members in the System Administrator role have full control of the site, including controlling security. The System User property is important for anyone who will be using Report Builder, which you will learn about in Chapter 10. To add an account to a site-level role, follow these steps:
Launch the web portal.
Click the gear icon and select Site Settings as shown in Figure 9-10

Figure 9-10. Select Site settings
This opens the site properties. Click Security.
Click Add group or user as shown in Figure 9-11.

Figure 9-11. Click Add group or user
For Group or user, type in CIO.
Select System Administrator as shown in Figure 9-12.

Figure 9-12. Adding an account
Click OK to create the role membership.
Repeat the process to add the Manager account to the System User role.
You can also remove accounts from the site-level roles on this page.
Configuring Folder and Report Security
Before you publish the first report in your company, you should plan the folder structure within the web portal to simplify security management. End users can view those folders and reports that they have rights to see. As a best practice, configure security at a folder level only. Security can be configured on individual reports, but that makes long-term management very difficult.
To reach a particular folder, an end user should have rights to the folders above it. By default, folders inherit permissions from the parent folder and reports inherit permissions from the folder in which they are located. Permissions should be set to be more restrictive as you travel down the path. For example, you may want to grant rights to everyone in the domain at the Home folder. Then create folders for each department under Home. Within each department folder, create folders for managers.
There are several roles defined at the folder and object level. Table 9-1 lists the roles and definitions as displayed on the Security page.
Table 9-1. The Folder- and Object-Level Roles
Role | Purpose |
|---|---|
Browser | May view folders and reports and subscribe to reports. |
Content Manager | May manage content in the Report Server. This includes folders, reports, and resources. |
My Reports | May publish reports and linked reports; manage folders, reports, and resources in a user’s My Reports folder. |
Publisher | May publish reports and linked reports to the Report Server. |
Report Builder | May view report definitions. |
Follow these steps to create and configure the folders for the IT department:
In the web portal, navigate to the Home folder. If you are in Site Settings, click SQL Server Reporting Services at the top of the page.
Click Manage Folder as shown in Figure 9-13.

Figure 9-13. The Manage Folder icon
This opens the Security page of the Home folder. Click New Role Assignment.
Type in Users. For a domain, this will be the Everyone group.
Check Browser as shown in Figure 9-14. This will give all users rights to run any report in the site unless the security in a folder has been overridden.
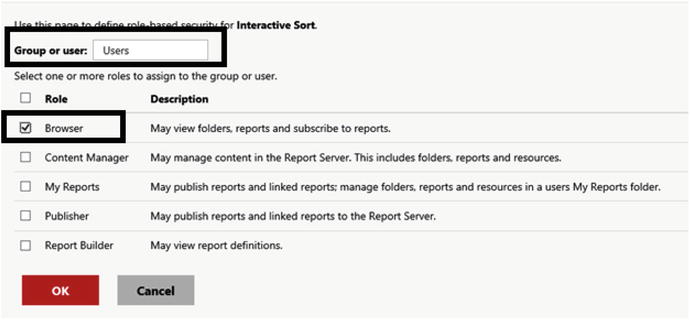
Figure 9-14. Add Users to the Browser role
Click OK to save the change.
Click the Home link to navigate back to the folders.
Click New Folder.
Fill in IT for the name and click Create.
Click the ellipses next to the new IT folder and select Manage.
This opens the folder properties. Click Security.
Click Customize security as shown in Figure 9-15.

Figure 9-15. The security page of the folder
This brings up a warning about breaking inheritance from the parent as shown in Figure 9-16. Click OK.

Figure 9-16. Confirm that security will be different
Click Add group or user.
Add the IT group to the folder in the Browser role and click OK.
Check the box next to BuiltinUsers. If you are working within a domain, remove the Everyone group.
Click Delete and OK to confirm.
Navigate back to the Home folder.
You now have a folder that can only be viewed by members of the IT group. Continue adding folders and modifying permissions using the skills learned in the previous steps according to Table 9-2 to set up security for the site.
Table 9-2. The Security for the Site
Folder | Account or Group | Role Membership |
|---|---|---|
Home/IT | IT | Browser |
Home/IT | Manager | Content Manager |
Home/IT | Manager | Report Builder |
Home/IT/Management | CIO, Director | Browser |
Home/IT/Management | Manager | Content Manager |
Home/IT/Management | Manager | Report Builder |
Home/IT/Management/Confidential | CIO | Content Manager |
Obviously, this is a simplified example, but it should illustrate how security should be configured. Figure 9-17 demonstrates how the number of accounts diminishes the further down you go in the path.

Figure 9-17. The folder permissions
To test, run the browser as any of the accounts to make sure that the account can only see the expected folders. Figure 9-18 shows the difference between what the Director and TeamLeader see when each is looking at the IT folder.

Figure 9-18. The Manager’s and TeamLeaders’s views of the folder
At this point, the Manager account has control of the content of most of the folders and permission to use Report Builder. You will see Report Builder in action in Chapter 10.
Sending Reports Automatically with Subscriptions
One of the nicest features of SSRS is the ability to schedule reports to run and be delivered automatically. The reports may be sent via e-mail or delivered to a network share. When delivering an e-mail report, either the report may be embedded in the e-mail message or a link can be sent.
Note
Subscriptions are supported with SQL Server Standard Edition and higher.
Because subscription delivery does not involve human intervention, there are two requirements that must be met for a subscription to be created for a particular report. All data sources used by the report must contain hard-coded credentials . Default parameters must be determined and configured in the subscription.
In previous versions of SSRS, an SMTP (Simple Mail Transfer Protocol) server within your domain was required to send reports through e-mail. Starting with SSRS 2016, it is now possible to use an e-mail server outside your domain such as gmail to send reports. To send reports to a network share, the share must be created. A Windows account must have permission to create the report in the share, and the appropriate end users must have permission to open the files. SQL Server Agent must also be running on the server that hosts the ReportServer database for both types of subscriptions.
Before you can send reports through e-mail, the SMTP account settings must be configured. Select the E-mail settings page to fill in the SMTP properties. See the Reporting Services Team blog found at https://blogs.msdn.microsoft.com/sqlrsteamblog/2016/07/15/deliver-reports-via-emailusing-an-email-server-outside-your-network/ for information about how to configure the settings for several types of services.
It is much simpler to configure the settings for delivery of a report to a network share than via e-mail. The example in this section will cover delivering the report to the share. When you configure a subscription to deliver a report to a share, you will need to specify a File Share Account which has permission to create the file. You can set up one account for the entire SSRS instance, or you can specify an account for individual subscriptions. Figure 9-19 shows the properties for the File Share Account that can be used for subscriptions delivered to network shares.

Figure 9-19. File Share Account properties
You will also need to create the share where the reports will be delivered. To configure a network share , follow these steps:
Navigate to the C: drive or another drive on your computer.
Create a new folder named Reports.
Right-click the folder and select Properties.
Select the Sharing tab.
Click Share which brings up the File Sharing dialog.
Add any accounts and permissions required for the share as shown in Figure 9-20.

Figure 9-20. The File Sharing dialog box
Click Share, Done, and Close to create the share and close the dialogs.
Once the network share is created, launch SSMS and make sure that SQL Server Agent is running. SQL Server Agent is the service which runs scheduled jobs for SQL Server. SSRS subscriptions are just a type of job as far as SQL Server is concerned.
Now that you have the infrastructure in place, you can create a subscription. Follow these steps to configure the subscription:
In the web portal, navigate to the Dynamic Reports folder.
The Sales by Territory Matrix report should be connected to the AdventureWorks2016SQL data source with stored credentials. If not reconfigure the data source.
Test the Sales by Territory Matrix report.
Navigate back to the Dynamic Reports folder.
Click the ellipsis next to Sales by Territory Matrix and select Manage.
Click Subscriptions.
Click New Subscription.
On the Subscription property page, type Sales by Territory in the Description property.
The Owner property should automatically default to your account.
For this example, accept the default schedule. For a production subscription, be sure to create a schedule. Figure 9-21 shows the properties so far.

Figure 9-21. The subscription properties
Scroll down to the Destination property and select Windows File Share.
Type in the path to the network share.
Select PDF for the Render Format.
If you wish to override the File Share Account , select Use the following Windows user credentials. Fill in the User Name and Password for the specific account.
Modify the Overwrite Options according to your requirements. This section of properties should look similar to Figure 9-22.

Figure 9-22. The delivery options of the subscription
Scroll down to the Report Parameters section.
Select a value for the Year parameter.
Once the Year value is set, the values for Territory will populate. Select a territory. The parameter properties should resemble Figure 9-23.

Figure 9-23. The Report Parameters of the subscription
Click Create Subscription.
The subscription should now be visible in the list as shown in Figure 9-24.

Figure 9-24. The new subscription
A SQL Server Agent job is created for each subscription. Unfortunately, the name of the job is a globally unique identifier (GUID), and you can’t tell by looking which job goes with each subscription. To figure out which subscription maps to each job, you will need to run a query like the following in your ReportServer database :
SELECT Name AS ReportName, ScheduleID AS JobName, s.[Description]FROM [Catalog] cJOIN Subscriptions s ON c.ItemID = s.Report_OIDJOIN ReportSchedule rs ON c.ItemID = rs.ReportIDAND rs.SubscriptionID = s.SubscriptionID;
Figure 9-25 shows the results of the query.

Figure 9-25. The report name mapped to the job name
To test the subscription, run the job. The job will report success once it kicks off the subscription. It will report success even if the report is not delivered. You can see the results by checking the share for the report or refreshing the Subscriptions page to see the status.
In previous versions of SSRS, you had to navigate to every folder and report to find and manage subscriptions. The web portal has a new feature called My Subscriptions . By clicking the gear in the menu, you will see a link to My Subscriptions. Here you can see the list of subscriptions owned by the account you are using and their locations. You can also enable, disable, or delete your subscriptions. Figure 9-26 shows the link and the list.

Figure 9-26. The new My Subscriptions feature
Securing Delivery
By default, report data travels through the network unencrypted. This may be a security risk in your environment. You can configure SSRS to use the secure socket layer (SSL) protocol. This is the network protocol used to connect securely that you see when buying something or visiting your banking web site. To properly configure SSL, you need to purchase a certificate from a trusted certificate authority.
Once you have obtained a certificate and installed it on the server, it can be configured by launching the Reporting Service Configuration Manager. On the Web Portal URL page, click Advanced. The SSL certificate can be bound to SSRS by clicking Add at the bottom of the Advanced Multiple Web Site Configuration dialog box. Figure 9-27 shows the dialogs you will use to configure SSL.

Figure 9-27. The dialogs for configuring SSL
Summary
Securing your reports is very important, but it can become very complex and difficult to manage if you don’t have a strategy before you start publishing reports. Make sure you figure out the layout of the folders and never configure security on a report, only on a folder.
Security is configured in two layers: at the data source and in SSRS. Predefined server and folder roles make security simpler to manage. You can also configure reports to be delivered automatically through subscriptions.
Chapter 10 covers creating reports directly from the web portal with Report Builder. Two types of reports new with 2016, KPIs and Mobile Reports, will be covered as well.