4
WRITING CODE THAT LOOPS

You just learned that you use conditional statements to run different branches of code depending on which conditions are met. Loops are another way you can control the order of your programs. With a loop, you can tell the computer to execute a block of code as many times as you want. This lets you reuse chunks of code again and again so that you don’t have to rewrite them!
In Swift, there are two main types of loops: for-in loops and while loops. The for-in loop tells the computer to run a loop a certain number of times, and it’s useful when you know right off the bat how many times you want the code to repeat. The while loop tells the computer to keep running a loop over and over until a certain condition is met, which is great when you’re more interested in repeating code based on events or conditions in your program. Let’s dig into each type of loop and learn more about it!
OPEN THE DEBUG AREA
Before we get started writing loops, let’s make sure your playground is set up to display the debug area. When you write for-in loops in the playground, the results sidebar on the right tells you only how many times a loop runs. To see the loop’s output, you need to display the debug area of the playground by selecting View ▸ Debug Area ▸ Show Debug Area (⌘-SHIFT-Y). If this menu says Hide Debug Area, then it’s already showing the debug area, and you don’t need to do anything.
When you show the debug area, it appears at the bottom of your playground by default, and you can drag the divider line at the top of it to make it taller or shorter.
LOOPING THROUGH RANGES AND COLLECTIONS WITH FOR-IN
A for-in loop tells the computer to run the loop over a range of numbers or for each item in a collection. We’ll talk more about collections in Chapter 6, but for now, think of a collection as a group of items—like a bag of marbles or a case of trophies. Let’s see how we loop through a range of numbers first.

SAY HELLO!
You can use a for-in loop to tell the computer something like, “I want to run this bit of code 4 times.” To do this, you write the for keyword, followed by a variable to count how many times the loop runs, then the in keyword, and finally the range of numbers that you want the loop to run through. Let’s write a simple for-in loop that prints your name 4 times:
for ➊number in ➋1...4 {
print("Hello, my name is Colin.") // Use your own name here!
}
The for-in loop begins with the keyword for, followed by a variable ➊ that will be used as a counter to go through the range of numbers. We named our counter variable number, but you can give this variable any name you want. After the counter variable comes the keyword in. This keyword tells the computer to expect a range of integers. After in, we provide the range that we want the for-in loop to use, 1...4 ➋. This is called a closed range from 1 to 4, and it indicates that the count starts at 1 and ends at 4. The three-dot symbol (... ) is the closed range operator.
Let’s add a line to our for-in loop so that we can see how number increases from 1 through 4. Add the following line right after the line that prints your name inside the loop:
print("And the value of number is now ➊(number).➋ ")
Inside the for-in loop, we use number just as we would any other variable. This statement prints a string that contains the value of number. To embed variables and constants into strings, you type a backslash and then enter the variable or constant you want to print in parentheses, just like we did at ➊. This prints the variable’s value with the rest of your string. Pretty cool!
To make the output prettier, at ➋ we also added an empty new line at the end of the sentence by writing the special character for a new line, . When that sentence is printed, the computer does not print but instead adds a new line, like when you press RETURN or ENTER on your keyboard.
Your screen should look like Figure 4-1. If you don’t see the printed text, make sure the debug area is turned on by pressing ⌘-SHIFT-Y.

Figure 4-1: Debug area display of a for-in loop
The for-in loop will run 4 times. The first time the loop runs, number is equal to 1; the second time it runs, it’s equal to 2; and so on until the final loop, when it’s equal to 4. When number reaches the end of the range 1 through 4, the loop ends.
In a for-in loop, when the counter, number, cycles through the loop, increasing from 1 to 4, we say that the counter iterates over the range from 1 to 4. Each time the code inside a for-in loop is run, we call that an iteration.
You can change these numbers to set different ranges to loop through. Try it out and see what happens!
SAY GOOD MORNING!
In addition to looping through a range of numbers, the for-in loop is useful for looping through collections. Here, you’ll use a collection called an array. We’ll talk more about arrays in Chapter 6, but all you need to know right now is that an array is a list of items stored in a constant or variable. When you use a for-in loop to go through an array, you’re telling your computer “for each item in the array, do something!” Let’s write code that greets kids.
➊ let kidsInClass = ["Gretchen", "Kristina", "Jimmy", "Marcus", ![]()
"Helen", "Eric", "Alex"]
➋ for kidsName in kidsInClass {
➌ print("Good Morning (kidsName)!")
}
At ➊, we make our array called kidsInClass, which contains seven strings. The square brackets tell the computer that we’re creating an array, and each string in our array is separated by a comma. (The arrow means that a long line has wrapped on the page—you don’t need to enter the arrow.)
To print “Good Morning kidsName!” for each name in the kidsInClass array, at ➋ we write for kidsName in kidsInClass, followed by braces and our code. The code inside the braces will run once for each item in the array. These kinds of loops always follow the format for constantName in collectionName, where constantName is a name you choose to call each item from the collection inside the loop.
At ➌, inside the for-in loop, we write the code to print a greeting for each name. To do that, we use kidsName just like it’s any other constant. kidsName exists only inside the braces of this loop, and it temporarily stores the current kid’s name as the for-in loop loops through the array. This way, we can print each name on each cycle of the loop to wish everyone a good morning!

TESTING CONDITIONS WITH WHILE LOOPS
A for-in loop is great when you know how many times you want the computer to do something, but sometimes you might want the computer to do something over and over until a specific condition is met. For that, you should use a while loop.
There are two kinds of while loops: while and repeat-while. Both contain blocks of code that will be executed over and over again as long as a condition is true. The difference between the while loop and repeat-while loop is that the while loop checks the condition before it runs its block of code, and the repeat-while loop checks the condition after it runs its block of code. Let’s look at some examples to see how each works!
GUESS MY NUMBER
The while loop keeps doing something until a certain condition is true. This works well for a guessing game, such as when you think of a number and make a friend guess what it is until they get it right. We can write a program that does this! You’ll pick a number between 1 and 20, and the computer will try to guess what it is. Write the following code in a new playground:
➊ import Foundation
let numberIAmThinkingOf = 7
➋ var currentGuess = -1
print("Thinking of a number between 1 and 20. Guess what it is.")
➌ while ➍currentGuess != numberIAmThinkingOf {
// Guessing a random number
➎ currentGuess = Int(arc4random_uniform(20)) + 1
print("Hmmm... let me guess. Is it (currentGuess)?")
}
// The right answer
print("You guessed my number! The correct guess was (currentGuess)!")
In this example, we use a special library, called the Foundation framework, that has the function we need to create a random number. To use this library, we write the line import Foundation ➊ at the top of our playground. (We’ll discuss functions in more detail in Chapter 7.)
Next, we create a constant called numberIAmThinkingOf and set it to be any number between 1 and 20. Then, at ➋, we create a variable called currentGuess to represent the computer’s guess and set it to -1. Setting the currentGuess variable to -1 is a good way to indicate that the computer hasn’t guessed yet.
The while loop starts with the keyword while at ➌, followed by a condition at ➍. In this case, the condition checks whether currentGuess is not equal to numberIAmThinkingOf. If the condition is true, that means the computer still hasn’t correctly guessed our secret number, and the statements inside the while loop run.
Because the while loop depends on a condition, it’s really important that you include some way for the condition to change inside the while loop, or it will run forever and never get to the next part of your program! Unlike a for-in loop, a while loop doesn’t have a counter that automatically increases or decreases. It’s up to you to control it!

We do that at ➎ by having the computer guess a new number between 1 and 20 and then put that new number into currentGuess. Don’t worry too much about completely understanding the line of code that does that; just know that Int(arc4random_uniform(20)) will create a random integer between 0 and 19, and we add a + 1 at the end of that line so we end up with a number between 1 and 20.
If you find that you’ve accidentally gotten yourself stuck in a loop that is running forever, the best thing to do is to comment out the while keyword by putting two slashes in front of it. That will stop the loop so you can figure out what went wrong.
When the computer finally guesses the correct number, the while loop ends and a nice message is printed to the console. The output should look something like Figure 4-2.
When you typed this program into a playground, how many times did your loop run? It’s likely a different number of times than in Figure 4-2. This number-guessing program is an example of something you can do with a while loop that you couldn’t do with a for-in loop. We have no way of knowing how many random guesses it will take until the computer gets the correct number, so we couldn’t write a for-in loop to do this. A while loop lets the computer keep guessing as many times as it needs until it gets the right answer.

Figure 4-2: Output from the number-guessing program
SHRINK AWAY
The repeat-while loop is very similar to the while loop except it’s written differently and the condition to end the loop is checked after the loop runs. We will test the repeat-while loop by deleting the letters in a sentence until it disappears.
Try out the following code:
import Foundation
var shrinking = "Help! I'm shrinking away!"
➊ repeat {
print(shrinking)
shrinking = ➋String(shrinking.characters.dropLast())
}
➌ while shrinking.characters.count > 0
In this example, we need to use a method that chops off the last character in a string. We need that same Foundation framework that we used in our guessing game, so enter import Foundation at the top of your playground. (We’ll discuss methods in more detail in Chapter 8.)

When your computer sees a repeat-while loop, it runs the block of code after the repeat keyword ➊ and then checks whether the condition after the while keyword ➌ is true. In our example, we start by creating a variable string called shrinking. In our repeat block, we print our string, and then we cut off the last character. You don’t have to memorize or understand the dropLast() method that does this; just know that the code at ➋ removes the last character from our string.
We are making a shorter string out of our shrinking string by taking off the last character and then saving that shorter string in the shrinking variable. This updates the value of shrinking to the new, shorter string. And in this case, we want to keep removing characters until we have no characters left. So the condition of our while loop is to repeat this process as long as the number of characters in shrinking is greater than 0. To determine the number of characters in a string, you enter .characters.count after the string name. Check out Figure 4-3 to see the incredible shrinking sentence!

Figure 4-3: Help! I’m shrinking away!
WHICH LOOP TO USE?
As you can see, there are several ways to create a loop in your code. It’s up to you, the programmer, to pick the one that’s right for what you need to do. Keep in mind there is often no single right answer because the for-in, while, and repeat-while loops can do the same thing, depending on how they’re written. You may find that you need a while or repeat-while loop when you don’t know how many times a loop needs to run, but you can accomplish almost every for-in loop with a while loop. It’s usually best to pick the one that you understand the best.
It’s also perfectly fine to change your mind later and try a new technique if you think that a different type of loop will work better for a particular situation. The first code you write doesn’t have to be perfect, and in fact (even for experienced programmers) it almost never will be! But the point of coding is to practice and problem-solve: write a little code, see how it works, and then go back and make it better.
NESTING AND SCOPE
So now you know how to write loops and conditional statements to make choices. You can also combine those elements in just about any way that you want. For example, you can put an if statement inside a for-in loop, a while loop inside an if block, or a for-in loop inside another for-in loop. When you combine loops and conditional statements, there are two important concepts you need to keep in mind: nesting and scope.
NESTING BLOCKS OF CODE
When you put one code block inside another block, it’s called nesting. So if you write an if statement in a while loop, you would call that a nested if statement. Remember that when we say code block, we are referring to the code between opening and closing braces, {}. As an example, enter the following code, which outputs a triangle-shaped pattern of asterisks and dashes:
➊ for count in 1...10 {
// NEST A
➋ if count % 2 == 0 {
// NEST B
var starString = ""
➌ for starCount in 1...count {
// NEST C
starString += "*"
}
➍ print(starString)
➎ } else {
// NEST D
var dashString = ""
for dashCount in 1...count {
// NEST E
dashString += "-"
}
print(dashString)
}
}
Take a look at Figure 4-4. We added some color to Xcode to help you see each nested block of code.
You can nest as many blocks of code as you want. In this example, we’ll refer to each block of code as Nest A, Nest B, Nest C, and so on. As you can see in Figure 4-4, our program contains an outermost Nest A, which includes all of the code inside the for count in 1...10 statement. Nest A contains two nested blocks of code, Nest B and Nest D. And each of those nested blocks of code also contains a nest: Nest C is inside of Nest B, and Nest E is inside of Nest D.

Figure 4-4: A nested if-else statement with nested for-in loops
Now let’s dig into the code and see what’s going on. At ➊, there’s an outermost for-in loop, which we call Nest A, that will run 10 times as count increases from 1 to 10. Inside that for-in loop, there’s a nested if-else statement at ➋ that will check whether count is even or odd. That if statement contains Nest B. To check if a number is even, we use the modulo operator (% ), which tells us what the remainder will be when an integer is divided by another integer. If a number is divided by 2 and the remainder is 0, then it must be an even number. So to figure out if count is even, we check whether count % 2 == 0.
If count is even, we print a string of stars (* ). We use count to determine how many stars to print. We do this by creating an empty starString and then using a nested for-in loop, Nest C, at ➌ to add a star each time starCount iterates from 1 to count. After the nested for-in loop is finished, at ➍ we print our starString, which now has count number of stars. We print a nested else statement ➎, which we’re calling Nest D. When count is odd, we print out a string of dashes instead of stars, as instructed in Nest E.
CONSTANT AND VARIABLE SCOPE
In programming, a variable has scope, which refers to where the variable exists and where it can be used. When you declare a constant or variable inside a nested block of code, that constant or variable does not exist outside that nested block. That means its scope is limited to the block of code in which it was declared and to any nested code in that block. Figure 4-5 shows the scope of the variables of our nested code.
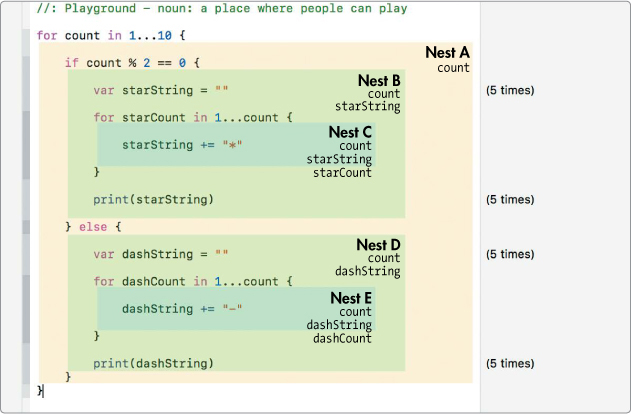
Figure 4-5: The scope of a variable or constant is limited to the nest in which it was declared, as well as any code nested in that nest.
There are five variables declared in our program: count, starString, starCount, dashString, and dashCount. The outermost nest, Nest A, can see only count. It doesn’t have access to any variables or constants inside its nested blocks of code, which means you can’t use variables or constants that are declared in Nests B or C. The variable starString is declared in Nest B. Nest B therefore has access to starString as well as anything created in Nest A, which includes count. Nest C has access to starCount, starString, and count. Similarly, in the else clause, Nest D has access to count and dashString, and Nest E has access to count, dashString, and dashCount. If you try to use a variable that a block of code can’t access because it’s outside its scope, you’ll get an error. For example, you can’t print dashString inside the outermost nest, Nest A.

Let’s take a look at another example. We’ll write code that creates a greeting. If it is morning, we want the greeting to be “Good Morning.” Otherwise, we want the greeting to be “Good Afternoon.” Enter the following code into your playground:
let isMorning = true
if isMorning {
var greeting = "Good Morning"
} else {
var greeting = "Good Afternoon"
}
print(greeting)
When you print greeting after this if-else statement, you get an error, as shown in Figure 4-6. The variable greeting is outside the scope of the if-else block, so the computer doesn’t know what greeting is.

Figure 4-6: Trying to access greeting outside of its scope gives an error.
To solve this problem, you must declare greeting outside the if-else block. Rewrite the greeting code as follows to output the greeting:
let isMorning = true
➊ var greeting = ""
if isMorning {
greeting = "Good Morning"
} else {
greeting = "Good Afternoon"
}
➋ print(greeting)
This time, we declared greeting as an empty string before the if-else block, at ➊. Then, we set greeting to be either “Good Morning” or “Good Afternoon” depending on whether isMorning is true or false. Finally, we print the greeting at ➋, after the if-else block, because it was declared in the same scope as the print statement.
WHAT YOU LEARNED
In this chapter, you learned how to repeat code using loops. You learned that you can use either a for-in loop or a while loop to accomplish many of the same goals. A for-in loop is perfect for looping through a collection of items and doing one thing for each item, and a while loop is better suited when you do not know how many times a loop needs to run.
In Chapter 5, we’ll introduce a new kind of variable in Swift—optionals. Optionals are variables that can either have a value or no value at all. They are useful when you need to create a variable, but you don’t yet know its value.