7
FUNCTIONS ARE A PARTY, AND YOU’RE INVITED

One of the most useful tools found in every programming language is the function. A function is a block of code that you can use again and again to perform a specific task. You can write your own custom functions, but Swift comes with lots of built-in functions. You’ve already used a few, like the print(_:) function, which displays a string in the console.
IN WITH THE INPUT, OUT WITH THE OUTPUT
Functions can take input and return output, although they don’t always have to. Input is information that you give to the function to perform its task, and output is something the function returns when it’s finished performing that task.
The type of input that a function can take is defined in its input parameters. The values you pass in for those parameters are called arguments. For example, the string that you put between the parentheses of the print(_:) function is an argument. Sometimes an argument will have an argument label that describes it. The print(_:) function doesn’t have an argument label, but we’ll learn more about labels later in the chapter.
NOTE
In this book, when we refer to a function with one unlabeled input parameter, we put a (_:) after the function name. You’ll see where that colon (:) comes into play soon!
Let’s look at an example in the playground:
print("Swift is awesome!")
In the debug area (press ⌘-SHIFT-Y), you’ll see:
Swift is awesome!
The print(_:) function takes an input value but does not have a return value. In this case, the input value is the string "Swift is awesome!". The print(_:) function displays the string it’s given in the debug console and then ends without returning anything. A function with no return value is sometimes called a void function. We’ll see an example of a function with both input parameters and a return value in “Return Values” on page 91.
By writing functions that work with input and return output, you can create all kinds of applications!
WRITING A CUSTOM FUNCTION
Let’s write a simple function that prints a haiku, which is a traditional Japanese poem composed of three lines, where the first and last lines have five syllables and the middle line has seven syllables. Enter this into your playground:
func➊ printAHaiku()➋ {
print("Input and output,")
print("This function needs neither one")
print("To print a haiku")
}
First, you write the func keyword ➊, followed by your function’s name. When you create a function, you must give it a name so you can call it when you want it to perform its task.
The rules for naming functions are the same as for naming variables: you start with a lowercase letter and capitalize each new word in the name using camel case. You should also give your function a name that describes what it does. Wouldn’t you agree that printAHaiku() is a great name for a function that prints a simple Swift haiku?
After the function name, there’s a pair of parentheses ➋. If your function has input parameters, you would include them inside these parentheses. In this example, you don’t have any input parameters, so you just leave the parentheses empty.
The body of the function is enclosed in braces. This is where you’ll write the function’s code. You put the opening brace ({) on the same line as the function name and the closing brace (}) on its own line at the end of the function. In this example, the body of the function contains all the print statements that print the haiku.

To use a function, you simply write its name followed by the parentheses with any arguments inside them. This is a function call. In this case, because printAHaiku() has no input parameters, you don’t need to pass in any arguments—just leave the parentheses empty.
To call printAHaiku(), add the following line to your playground after the closing brace of the function:
printAHaiku()
The console output is:
Input and output,
This function needs neither one
To print a haiku
Now that you’ve defined this function, you can call it any time you want, and the code inside the function will run. Make sure you have the debug area open (⌘-SHIFT-Y), as in Figure 7-1, so you can see the results.
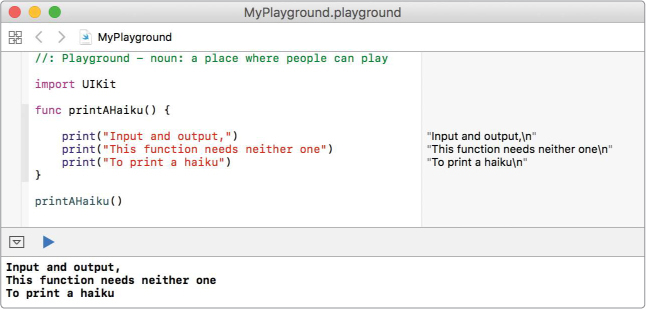
Figure 7-1: The function’s output is displayed in the debug console.
Try calling the printAHaiku() function a bunch of times!
FUNCTIONS DO EVEN MORE WITH INPUT PARAMETERS
In our first example, you saw how functions can save you time and effort. When you write a function, you can call it wherever you want instead of having to repeat blocks of code in many places. This is certainly cool, but the real power of functions comes when you pass in one or more input values to produce different results.
MAKING PARTY INVITATIONS
Let’s write a function called invite(guest:) that takes a person’s name as input and creates a personalized invitation to a birthday party. Enter the following into your playground:
func invite(➊guest: String) {
print("Dear (➋guest),")
print("I'd love for you to come to my birthday party!")
print("It's going to be this Saturday at my house.")
print("I hope that you can make it!")
print("Love, Brenna
")
}
If a function has an input parameter, you include it in the parentheses after the function’s name ➊. You format an input parameter with its name first (in this example, guest), then a colon (:), and finally its data type (String in this case).
By default, the parameter name also acts as the argument label, so guest will be the argument label when you call this function. (You’ll learn how to define separate parameter names and argument labels in “Argument Labels” on page 89.)
You write the data type of an input parameter after the colon, just like when declaring a variable. However, unlike with variable declarations, when defining function parameters, you must always declare the data type the function should expect; there’s no type inference here.

To use the input parameter inside the function, you simply use its parameter name, just as you would any other constant ➋.
Of course, defining a function isn’t enough. Now that the function is defined, let’s call it in the playground to see what happens. You can call a function that has input parameters by entering the function name followed by, in parentheses, the argument label, a colon, and the argument, like this:
invite(guest: "Cathy")
When you call a function by writing its name, Xcode’s autocomplete gives you a hint about what you’re supposed to pass in to the function. In this case, when you start writing invite, you’ll see a drop-down menu like in Figure 7-2.
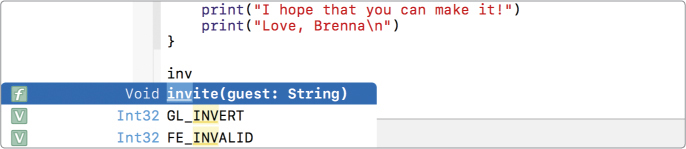
Figure 7-2: Xcode’s autocomplete will show you a function’s input parameters.
Press ENTER to autocomplete the function. Your cursor will move into the parentheses of the function (see Figure 7-3), where Xcode has automatically added some placeholder text telling you what type of input the function is expecting.

Figure 7-3: Xcode is waiting for you to fill in the guest parameter.
NOTE
If you pass something that isn’t a string to invite(guest:), such as invite(guest: 45), you’ll get an error because the function is expecting a string.
Simply type in "Cathy" or the name of another friend in place of String, and then press TAB to finish filling out the function call. It should look like Figure 7-4.

Figure 7-4: An invite(guest:) function call
Now that you know how to fill out the function call, call invite(guest:) three times, using your own friends’ names:
invite(guest: "Cathy")
invite(guest: "Meghan")
invite(guest: "Maddie")
The output looks like this:
Dear Cathy,
I'd love for you to come to my birthday party!
It's going to be this Saturday at my house.
I hope that you can make it!
Love, Brenna
Dear Meghan,
I'd love for you to come to my birthday party!
It's going to be this Saturday at my house.
I hope that you can make it!
Love, Brenna
Dear Maddie,
I'd love for you to come to my birthday party!
It's going to be this Saturday at my house.
I hope that you can make it!
Love, Brenna
With your invite(guest:) function, you’re able to quickly print three party invitations, each addressed to a different friend!
INVITING ALL YOUR FRIENDS AT ONCE
You can also write a function that invites all of your friends at once by passing in an array of strings as arguments instead of a single string. In the same playground where you wrote invite(guest:), write the following invite(allGuests:) function to test this. Notice that the parameter name is now plural because we’ll be inviting multiple guests at once.

func invite(allGuests: ➊[String]) {
}
In this example, when you declare the parameter of the function, you’ll notice that [String] is in square brackets ➊. The square brackets declare the data type as an array and String indicates the data type of the values in the array. By using [String], we declare this function’s input as an array of strings.
Inside the invite(allGuests:) function, we will want to use a for-in loop to go through our guests array and print an invitation for each guest. Remember how we just created a function that prints invitations? Let’s use that here! Add the following to your invite(allGuests:) function (the gray text shows the existing lines):
func invite(allGuests: [String]) {
for guest in allGuests {
invite(guest: guest)
}
}
In our for-in loop, we call the singular invite(guest:) function on each guest in the String array allGuests to invite each person to the birthday party. You might be wondering if invite(guest:) and invite(allGuests:) are the same function. After all, they’re both called invite. Despite sharing a name, however, they’re two different functions because they take different input parameters. This is a pattern that you’ll see often in Swift.
To use the invite(allGuests:) function, we first create an array called friends, which we will then use in the function call.
➊ let friends = ["Cathy", "Meghan", "Maddie", "Julia", "Sophie", "Asher"]
➋ invite(allGuests: friends)
First, we create an array of six friends ➊. Then we call the function with our new array as the function’s input ➋. This is the output you’ll see in the debug console (the --snip-- shows where we’ve omitted lines for space):
Dear Cathy,
I'd love for you to come to my birthday party!
It's going to be this Saturday at my house.
I hope that you can make it!
Love, Brenna
--snip--
Dear Asher,
I'd love for you to come to my birthday party!
It's going to be this Saturday at my house.
I hope that you can make it!
Love, Brenna
If you had to write out the invitation for each of these friends, it would take a lot of work. But with the power of functions, you’ve accomplished it with very few lines of code. Try creating your own array of friends; make it as long as you want! Then call the invite(allGuests:) function with your new array as input. What a piece of cake!
MESSAGING YOUR GUESTS
Imagine that the date of your party is fast approaching, and some of your guests haven’t RSVPed yet. You want to get a final headcount and let the guests know to bring a bathing suit because it’s going to be a slip-and-slide party. You can write a function that sends a custom message to each guest based on their RSVP status.

Your new function will take two input parameters: a String parameter for the guest’s name and a Bool parameter for the RSVP status, which is either true or false. Enter the following code in your playground:
func sendMessage(guest: String,➊ rsvped: Bool) {
print("Dear (guest),")
➋ if rsvped {
print("I'm so excited to see you this weekend!")
} else {
print("I hope that you can make it to my party.")
print("Can you let me know by tomorrow?")
}
print("We will have a huge slip and slide, so bring your bathing suit!")
print("Love, Brenna
")
}
When a function takes more than one input parameter, you add a comma between each one ➊. Each parameter needs to have a parameter name, followed by a colon and the data type of the parameter. You can create a function that takes as many input parameters as you want, and they don’t have to be the same type. In the sendMessage(guest:rsvped:) function, we’re passing in a String for guest and a Bool for rsvped.
In the function body, we check the rsvped value to see if it’s true ➋ and then print the corresponding message using an if-else statement. Notice, too, that the final print statements in the function definition will run whether the rsvped value is true or false because they’re outside the braces of the if-else statement.
If your guest has RSVPed, they’ll get this message:
Dear guest,
I'm so excited to see you this weekend!
We will have a huge slip and slide, so bring your bathing suit!
Love, Brenna
If not, they’ll get a polite note asking them to respond:
Dear guest,
I hope that you can make it to my party.
Can you let me know by tomorrow?
We will have a huge slip and slide, so bring your bathing suit!
Love, Brenna
Let’s call the function to see how it works. Try setting one guest’s rsvped value to true and another guest’s to false so you can see both messages in action.
sendMessage(guest: "Julia", rsvped: true)
sendMessage(guest: "Asher", rsvped: false)
As you can see, calling a function with more than one input parameter is similar to calling a function that has just one input parameter.
Xcode’s autocomplete will help you fill out the input values by providing the argument labels for you. All you have to do is pass in the value you want to use. After filling out the guest name, press TAB, and Xcode will put the cursor right where you need it to fill out the next input value. (See Figure 7-5.)

Figure 7-5: Pressing TAB after typing the guest’s name will move your cursor over to the next input field.
Xcode also tells you the data type of rsvped. Replace the placeholder text Bool with either true or false. If you try to pass in anything else, like a name or number, you’ll get an error.
ARGUMENT LABELS
Did you notice that when you call print(_:), you don’t put an argument label in front of the input value? You write:
print("Swift is awesome!")
And if you try to include a label, you’ll get an error:
print(inputString: "Swift is awesome!")
Some parameters have argument labels in function calls, and some don’t. By default, when you write a function, every parameter will have an argument label, and it will be the same as the parameter name. However, if you write a function and don’t feel like the argument label is necessary to make the code clear, then you can explicitly omit it in the function definition. In the print(_:) function, for example, it’s obvious that the input you pass in is a string that will be printed. Having to include an argument label like inputString every time you call print(_:) would be annoying.
You can also create an argument label for each parameter that is different from the parameter name. You do this by entering the argument label, the parameter name, a colon, and finally the parameter’s data type. You do all of this when you first declare the parameters inside the function parentheses after the func keyword. This is often done in Swift functions to make the function call look more like a sentence. Figure 7-6 illustrates the difference between an argument label and a parameter.
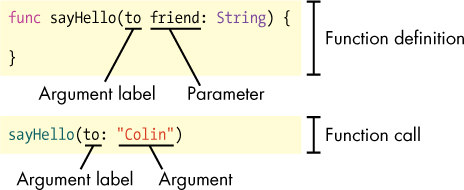
Figure 7-6: The sayHello() function has a custom argument label.
The input parameter of the sayHello(to:) function is friend, the argument label is to, and the passed-in argument in the function call is "Colin". If you didn’t have a separate argument label, when you called the function it would look like sayHello(friend:), which sounds less like a full sentence.
In this section, we’ll take a look at writing functions with custom argument labels. We’ll also show you how to write a function in which you omit the argument labels altogether.
ADDING A CUSTOM ARGUMENT LABEL
Let’s look at an example of how adding custom argument labels can make your code more readable. After your birthday party, you’ll want to send thank you notes to all of your guests. Write the following function in your playground:
func sendThankYou(➊to guest: String, ➋for gift: String) {
print("Dear (➌guest),")
print("Thanks for coming to my party and for the (➍gift).")
print("It was so great to see you!")
print("Love, Brenna
")
}
At ➊, we add a custom argument label, to, to the guest parameter that is passed in to the function. Similarly, at ➋, we add an argument label, for, to the gift parameter. The parameter names, guest ➌ and gift ➍, are used to refer to the parameters inside the function.
The argument labels, to and for, are used to label the arguments when the function is called, like this:
sendThankYou(to: "Meghan", for: "puzzle books")
Here you can see that to: is written in the function call before the first input value, and for: is written before the second input value. If a parameter has a custom argument label, you have to use it in your function call. Trying to use the parameter names instead will give you an error:
// This will not work
sendThankYou(guest: "Meghan", gift: "puzzle books")
Xcode’s autocomplete will always fill in the argument labels for you, so you don’t have to worry about calling a function incorrectly (see Figure 7-7).
Figure 7-7: Xcode autocompletes a function with the correct argument labels.
It’s common for programmers to use prepositions like to, from, or with as argument labels. In this example, the function is used to send a thank you note to a guest for a gift. The code sendThankYou(to: "Meghan", for: "puzzle books") reads more like a sentence than sendThankYou(guest: "Meghan", gift: "puzzle books").

REMOVING AN ARGUMENT LABEL
If you don’t want to use any argument labels in your function call, you can remove them by adding an underscore followed by a space in front of the parameter name. In the following example, we write a function for calculating volume that takes the three sides of a box as input. Because the function name makes it clear that you need to pass in three sides, you don’t really need argument labels to make the code more readable.
func volumeOfBoxWithSides(➊_ side1: Int, ➋_ side2: Int, ➌_ side3: Int) {
print("The volume of this box is (side1 * side2 * side3).")
}
We remove the argument labels for the sides by placing an underscore in front of side1 at ➊, side2 at ➋, and side3 at ➌.
Now when you call the function, you just enter the parameter values without any labels.
volumeOfBoxWithSides(3, 4, 6)
This function will output "The volume of this box is 72.". Wouldn’t it be useful if, instead of simply printing the volume of the box, you could store the result to use later in a variable or constant? Let’s find out how to do that with return values!
RETURN VALUES
Let’s try rewriting the volumeOfBoxWithSides(_:_:_:) function to return the volume instead of printing it to the console.
WHICH IS THE BIGGER BOX?
Say you have two differently shaped boxes and want to know which one will fit more stuff. First, write a volumeOfBox(_:_:_:) function that returns an Int for the box volume:
func volumeOfBox(_ side1: Int, _ side2: Int, _ side3: Int) ➊-> Int {
let volume = side1 * side2 * side3
➋ return volume
}
To give a function a return value, use a dash and a greater-than sign to form an arrow (->) just after the input parameters of the function ➊ and then enter the data type of the return value. Note that you don’t provide a name for the return value, just a data type. Inside the function body, you return the value by using the return keyword followed by the value that you want to return ➋. If you write a function that returns a value, then you must return that value inside the function, or you’ll get an error. The function ends after you return the value. If you write any code inside the function after the return statement, it will be ignored, because return exits the function.

Call the function on two different boxes to see it in action:

At ➊, the volumeOfBox(_:_:_:) function calculates the volume of a box with side lengths of 6, 5, and 3, and the return value of 90 is stored in a constant called volumeOfBox1. At ➋, volumeOfBox2 with side lengths of 8, 4, and 2 is given the value of 64. Now let’s print a message about which box is bigger:
if volumeOfBox1 > volumeOfBox2 {
print("Box 1 is the bigger box.")
} else if volumeOfBox1 < volumeOfBox2 {
print("Box 2 is the bigger box.")
} else {
print("The boxes are the same size.")
}
You should see the string "Box 1 is the bigger box." output in your debug console.
CONDITIONAL RETURNS
You may want to return a different value depending on a condition. Let’s write a function that takes an array of test scores and returns the average score. To get the average, you add the scores together and then divide by the total number of scores. Enter the following code in your playground:
func averageOf(_ scores:[Int]) -> Int {
➊ var sum = 0
➋ for score in scores {
sum += score
}
➌ if scores.count > 0 {
➍ return sum / scores.count
} else {
➎ return 0
}
}
First, we’ll need to find the sum of all the values. At ➊, we define an Int variable called sum and sets it to an initial value of 0. The for-in loop at ➋ goes through each value in the scores array and adds it to the sum variable. When the loop is complete, the variable sum holds the sum of all of the scores. After we calculate the sum, all that’s left is to divide it by the total number of scores, which is simply scores.count.
But what if the array is empty? You can’t divide something by zero—in math class or in Swift. In Swift, trying to divide by zero will give you a division-by-zero error and crash your program. Therefore, when doing division, always make sure the number you’re going to divide by is not zero, which is what we did by checking if scores.count > 0 at ➌. At ➍, we return the average by dividing the sum of the scores by the number of scores in the array using return sum / scores.count. That’s right! You can return any expression that evaluates to the correct data type, meaning we can skip the step of assigning the calculated average to a new variable and just return sum / scores.count because it evaluates to an Int.
In this function, we also need to return something when scores.count isn’t greater than zero, or we’ll get an error that the function is missing a return. We handle this by adding an else to our if statement that returns 0 ➎. You can test the code by calling the function on an array of scores and an empty array:

When you pass a full array of test scores into the averageOf() function, as we do at ➊, the average value of the scores is returned and shown in the results pane. If you pass in an empty array, as we do at ➋, the return value is 0.
NOTE
In this case, the else statement around return 0 isn’t really necessary. This is because if scores.count > 0, then the function will have ended already with return sum / scores.count. So if the computer has gotten past that if statement, then we know that scores.count > 0 must not have been true, and we could just have a return 0 without enclosing it in an else. However, the code is clearer and easier to understand if we leave the else statement in. Sometimes it’s better to write a little extra code to make something clearer to others than it is to use a tricky shortcut.
WHAT YOU LEARNED
You just added an important tool to your Swift tool belt—creating and calling your own functions! Functions are used extensively in programming to do all sorts of amazing things!
In Chapter 8, we’ll show you how to create custom objects by writing a class definition. This will let you make constants and variables with types other than the ones already included in Swift, which will come in handy when you create apps!