
6
TITLE SEQUENCES IN PRODUCTION: THE CAMERA AND THE EDIT
Real-World Cameras vs. CG Cameras
Whether real or computer generated (CG), cameras play a fundamental role in the creation of title sequences. In this chapter we explore the essential properties and applications of both real-world and CG cameras. By mastering their features, you will be able to swiftly achieve the look and feel you are seeking with greater precision.
First and foremost, real-world cameras fit into two basic categories: film cameras and video cameras:
• Film cameras record film frames on film stock—film strips of celluloid with a light-sensitive emulsion that is developed through a process similar to developing negatives from a roll of still-picture film. Film stock sizes include 8mm and Super 8mm, 16mm and Super 16mm, 35mm, and 70mm. If you or your client shoot footage for a title sequence using a film camera, you should take into account the time needed to manage film stocks and film-to-tape transfer (see Chapter 1).
• Video cameras record frames on a variety of recording media such as miniDV tapes, tapeless media such as P2 solid-state cards used with some Panasonic models, the XDCAM optical discs used by some Sony models, and Compact Flash cards used by RED cameras.
Computer-generated cameras allow you to animate your title sequence in virtual worlds by flying through and framing your elements, utilizing similar properties and parameters to real-world cameras. When you begin a project, both After Effects and Motion have a default invisible camera embedded in the project. This camera is invisible in the layers and it behaves almost like a fixed two-dimensional camera. You can move your graphical elements right and left to simulate a camera pan, but you can’t move the camera itself. If you create a custom camera, you can manipulate that camera like real-world cameras, changing its position, rotation, focus, and other properties.
 Note: Although the introduction of HD in the production and postproduction workflow has led to a considerable drop in the use of film cameras in recent years, they are still widely used for shooting commercials, title sequences, and music videos, in addition to mainstream feature films. Aspiring movie title designers should still be aware of and able to support translation from film to digital formats for postproduction.
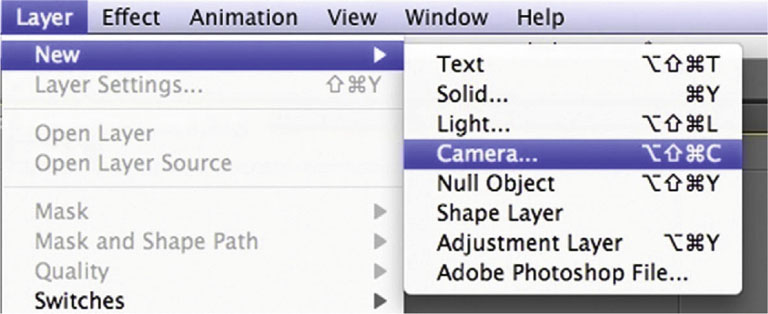
In After Effects you can create a camera by choosing from the menu Layer | New | Camera (or by pressing the shortcut keys Option+Command+Shift+C). Make sure that you have already created a composition; otherwise you won’t be able to create a camera!
Figure 6.1 In After Effects you can create a new camera by choosing from the menu Layer | New | Camera.
In Motion you can create a camera by selecting Object | New | Camera or by clicking the New Camera icon on the toolbar.
Figure 6.2 In Motion you can create a camera by selecting Object | New | Camera.

Figure 6.3 In Motion you can also create a camera by clicking the New Camera icon on the toolbar.

Although a camera has been added to the project, it has no effect on 2D groups (in Motion) or 2D layers (in After Effects). This is how you can fix this issue:
In Motion, after a camera is added to a project, you have the option to switch your groups to 3D mode or to remain in 2D mode. When you add a camera to a 2D project, a dialog box appears, asking if you want to convert your 2D groups to 3D groups. Regardless of your immediate answer, you can later toggle your groups from 2D to 3D (or vice versa) by clicking the icon on the status column in your layer tab (see Figure 6.4). The first icon (three flat boxes viewed from above) signifies a 2D group. The second icon (three boxes viewed with perspective) signifies a 3D group.
Figure 6.4 In Motion you can toggle your groups from 2D to 3D (or vice versa) by clicking the icon on the status column in your layer tab.
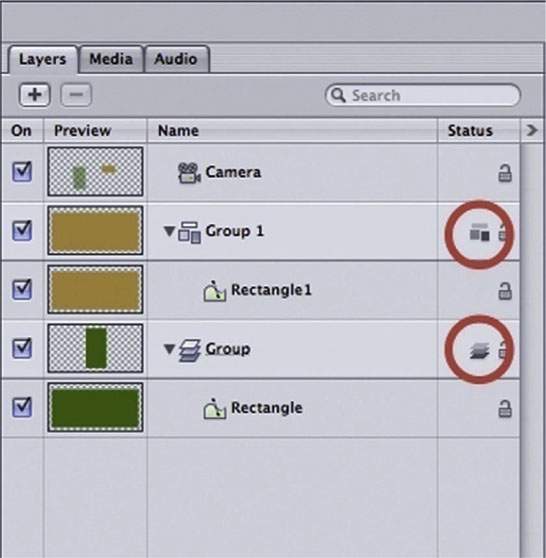
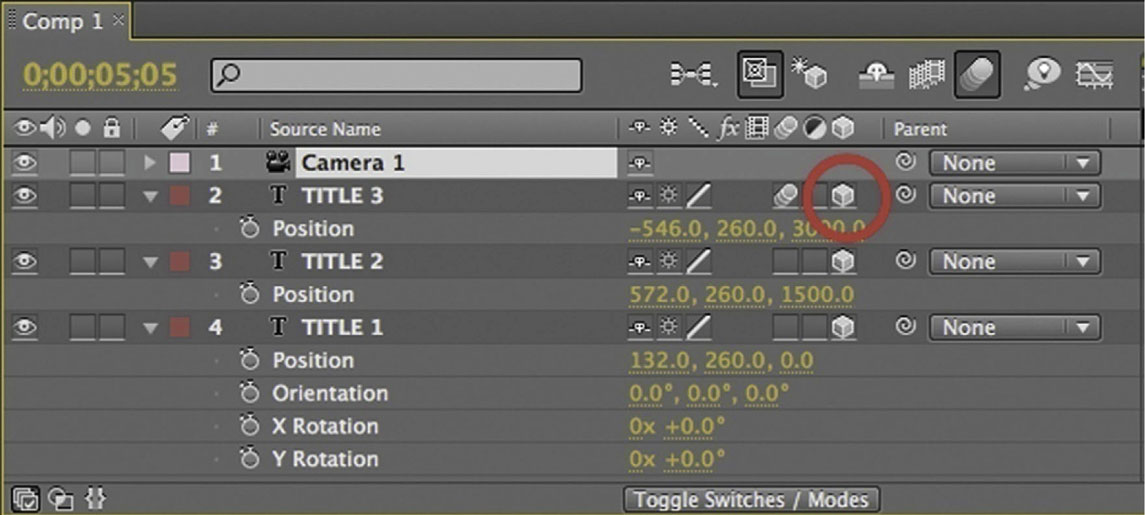
Figure 6.5 In After Effects you can toggle-switch your layers from 2D to 3D by clicking the corresponding 3D layer icon in your timeline.
Et voilà! Once you have converted your layers or groups into 3D elements, they will respond to your camera movement, focus, and other changes.
In the next sections we will take a close look at formats, speed, lenses, focus, f-stops, focal length, aperture, and shutter speed for both real and computer-generated cameras.
Formats and Aspect Ratios
Before you start working on your project, you need to determine which format you are going to deliver your final video render in. If you are creating a title sequence for a client, the client will make the decision. But if you are creating a title sequence for a friend or for your own demo reel, you’ll need to choose the best format to suit your needs. This decision will not only affect the graphic elements you create, it will also affect the format you shoot in, your camera decisions, and the aspect ratio for your frame.
Figure 6.6
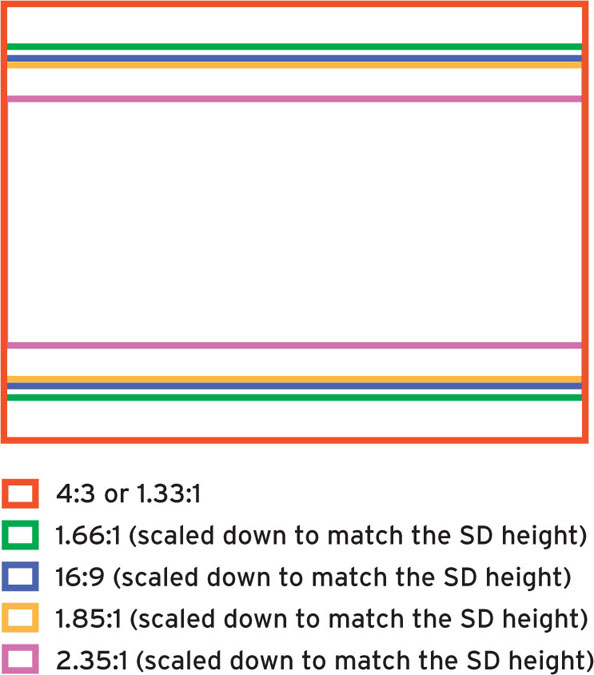
The aspect ratio is the relationship between the height and the width of your frame and is important to know before shooting footage or creating graphics for your title sequence.
In film cameras, each film format utilizes a different aspect ratio. The aspect ratios for 8mm, Super 8mm, and 16mm film are 1.33:1 (or 4:3). Super 16mm aspect ratio is 1.66:1, and 35mm aspect ratios are 1.33:1, 1.85:1, or 2.35:1, depending on the lenses, camera mattes, and cinema projectors.
When you are working with video cameras or in digital postproduction, the horizontal and vertical pixel dimensions of your project and frame format determine your frame size and aspect ratio. For example, SD NTSC video is 720 pixels wide and 480 pixels tall and its aspect ratio is 4:3. HD video dimensions are either 1280 × 720 or 1920 × 1080 pixels, and the aspect ratio is 16:9. Common video frame sizes are shown in Table 6.1.
Table 6.1 Common Video Frame Sizes

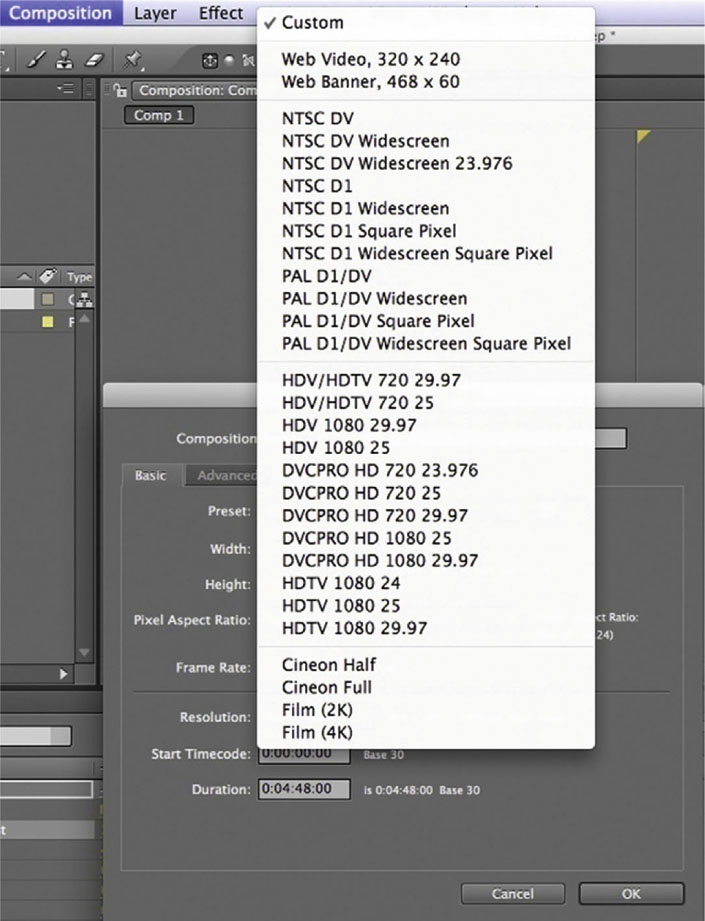
In After Effects you can create a new composition by choosing Composition | New Composition. Pick your composition settings from the Presets pull-down menu, and pick your custom frame size.
Figure 6.7 In After Effects you can pick your custom frame size from the presets pull-down menu in your New Composition window.
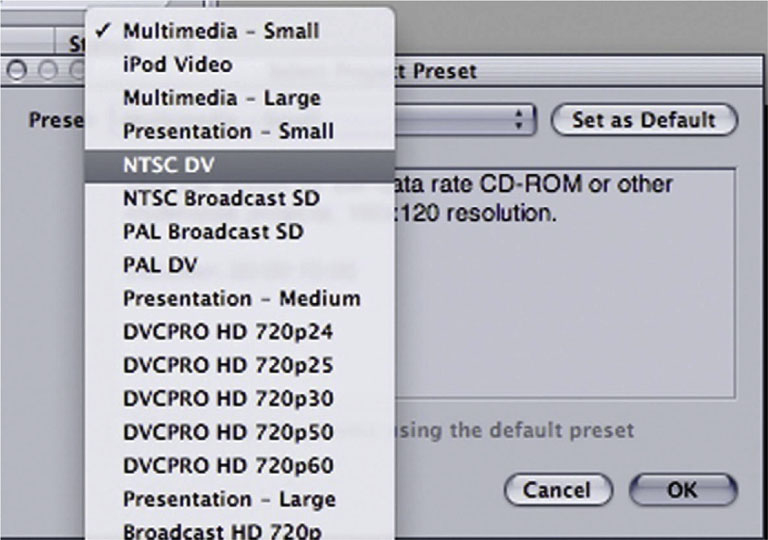
In Motion you can create a new project by choosing File | New and either picking one of the project Presets from the pull-down menu or setting your own custom frame size.
Figure 6.8 In Motion you can create a new project by choosing File | New and picking one of the project Presets from the pull-down menu.
 Note: An intervalometer is often used for time-lapse shots. It can shoot at extreme intervals such as one frame per second or one frame per hour, allowing you to shoot and view in a compressed amount of time a natural phenomenon that would otherwise take a long time to unfold if shot and played in real time (for example, a flower blooming or a sunset). On the other hand, a speed control device is used to change the camera recording frame rate, usually between 5 and 70 fps, even during a shot. It allows you to slow down (and then eventually speed up) a shot to bring attention to a detail that it would be otherwise too fast to perceive (such as an athlete jumping an obstacle and grazing over it by a hair).
Speed and Frames Per Second
To better understand the concept of speed, imagine that your film or video camera is a still camera that takes a specific number of pictures every second. The number of images photographed each second is referred to as the frame rate and is measured in frames per second (fps).
You’ll need to determine the fps whether you use a video or film camera (where the fps of your camera determines the speed at which the camera advances and records each frame) or whether you start a project in After Effects or Motion (where the frame rate of your project determines how quickly frames are played back).
A film camera’s default recording speed is 24 fps, but internal or external devices, such as intervalometers or speed controls, allow recording at different frame rates.
A video camera’s default recording speed is 29.97 fps in NTSC (the video standard defined by the National Television Standards Committee) systems and 25 fps in PAL (Phase Alternating Line, the interlaced video format used by many European countries) systems. Also note that an increasing number of camera models offer the user the option to record at variable frame rates (for example, the Panasonic HVX-200 can record between 12 fps and 60 fps).
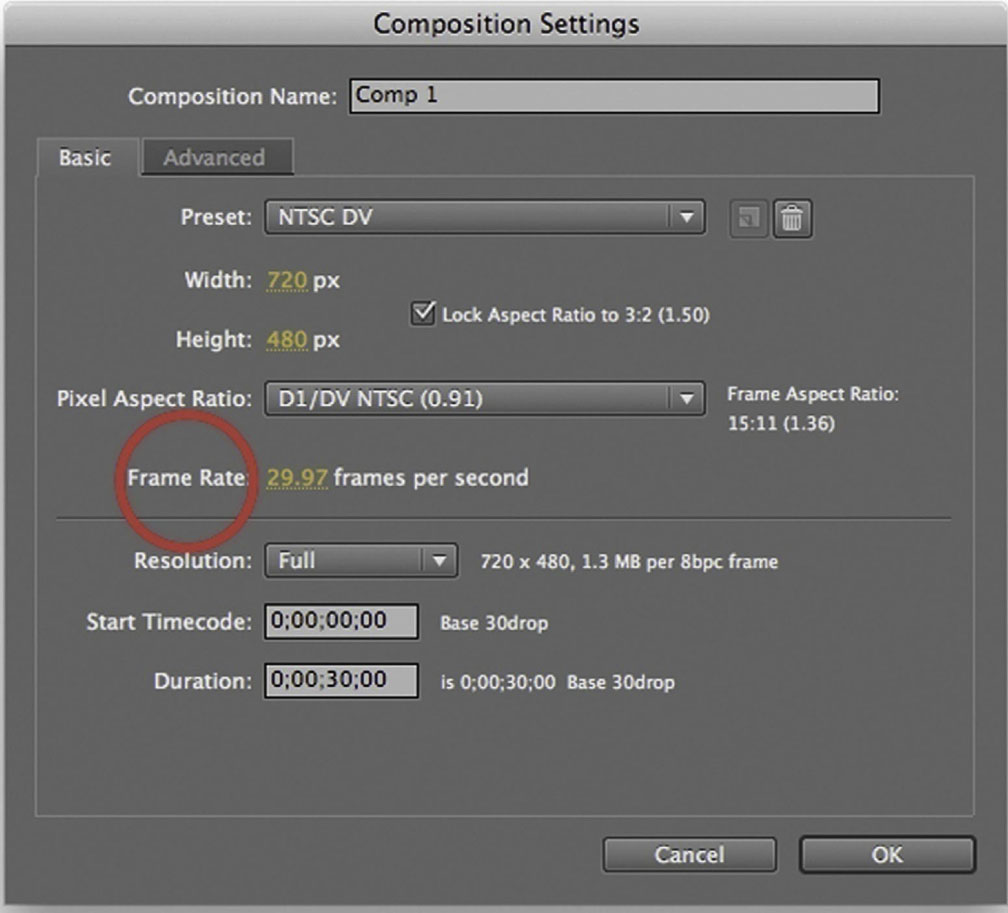
CG cameras don’t generally have a frame rate property. To change the frame rate, you’ll need to change the frame rate of your project. In After Effects you can set or change the frame rate of your project by choosing Composition | Composition Settings.
Figure 6.9 In After Effects you can set or change the frame rate of your project by choosing Composition | Composition Settings and change your Frame Rate value.
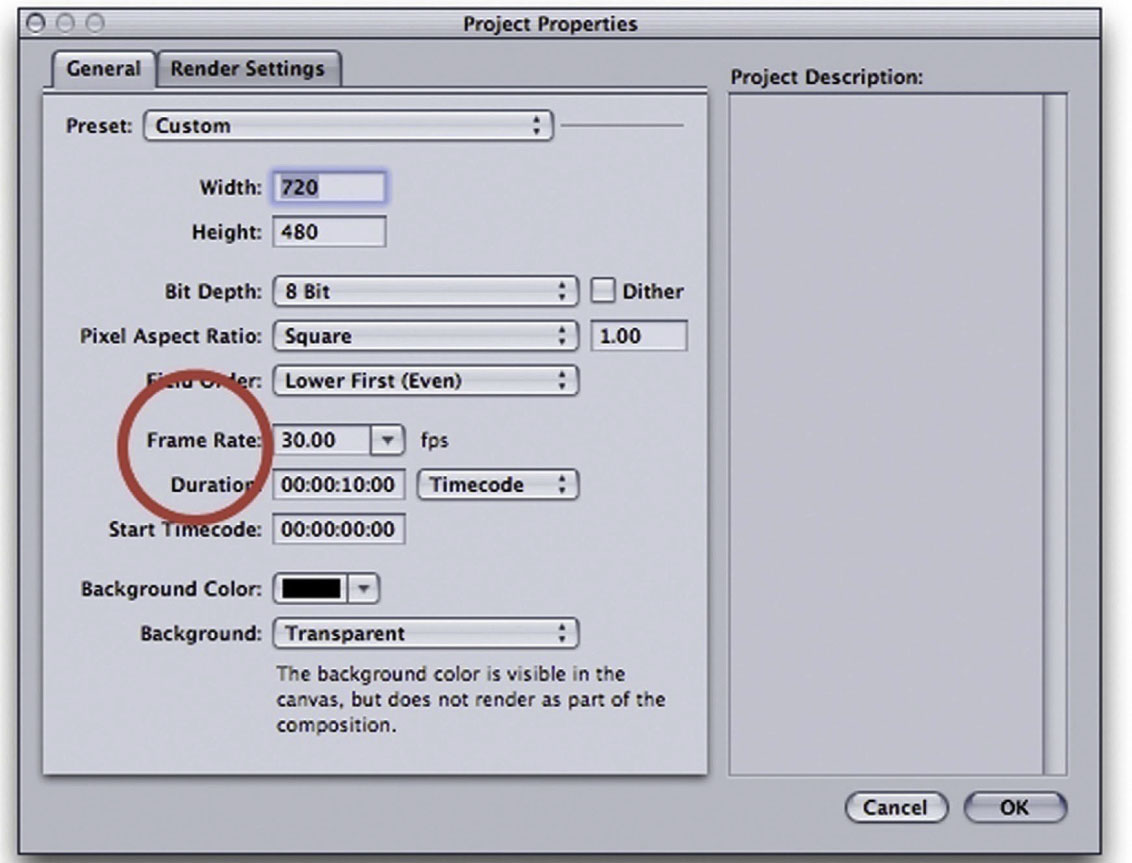
In Motion you can set your project’s frame rate by choosing File | New and selecting Custom from the project preset pull-down. Common frame rates are shown in Table 6.2.
Table 6.2 Common Frame Rates

Figure 6.10 In Motion you can set your project’s frame rate by choosing File | New and selecting Custom from the project preset pull-down.
Compressing and Expanding Time
Recording at speeds other than the default speed creates a temporal effect that changes how the moving image is perceived. The following are two common situations in which you will perceive a time compression or expansion:
• Slower frame rates (e.g., 9, 12, 16 fps) produce fast-motion shots. In fact, if the playback frame rate is higher than the recording frame rate, the action will appear to move faster. For example, images recorded at 12 fps (low frame rate) and played back at 24 fps will create a fast-motion effect. In this case it will take 1 second to play back 2 seconds of recorded material. Think of the early silent films, which were shot at 18 fps and played back at 24 fps, creating that typical fast-walking movement á la Charlie Chaplin.
• Faster frame rates (e.g., 36, 48, 60 fps) produce slow-motion shots. If the playback frame rate is lower than the recording frame rate, the action will appear to move slower. For example, images recorded at 48 fps (high frame rate) and played back at 24 fps will create a slow-motion effect. In this case it will take 2 seconds to play back 1 second of recorded material.
Figure 6.11 Slow-motion and fast-motion shots.

Time Remapping and Variable Frame Rates
In shooting footage for your title sequence, it’s important to identify the shots that might need to be recorded at higher frame rates well ahead of time, ideally during the preproduction of your project. Unfortunately, that doesn’t happen as often as one would like it to. At the editing table, when someone might ask, “Wouldn’t it be great if we had a slow-motion (or a time-lapse) here?” Wouldn’t it be great if you could say, “Sure! Let’s do it?” Here are three common scenarios and ways of changing frame rates in postproduction:
• If you speed up a shot or create a time lapse in postproduction, you won’t really lose any image quality or information. For example, if you shot a hummingbird at 24 fps and you decide to speed it up to 12 fps, you would just have to cut one frame from every two and wouldn’t actually have any picture playback quality loss. Luckily, tools such After Effects allow you to conform the current frame rate of a video to a lower one (see the following figures).
• On the other hand, if you tried to create a slow-motion effect after you recorded the images at a default frame rate (e.g., you shot your hummingbird at 24 fps and you decide to slow it down to 48 fps), you’ll have to duplicate (rather than cut) your frames, which could potentially be problematic and create some stutters in the playback. Once again, After Effects comes to your aid by allowing you to conform the current frame rate of a video to a higher one (see the following figures).
 Note: Variable frame rates are widely used today. By expanding and contracting time, you can reveal and underline details in your actions that would otherwise be subtle and that can play a key role in the unfolding of your story. Next time you see a music video, title sequence, or commercial, pay close attention and see whether you notice the application of variable frame rates.
• Finally, if you want to play your video at your recorded frame rate, then create a slow-motion effect, and then return to normal playback speed (e.g., you play back your hummingbird at normal speed and right when it’s reaching the flower’s nectar, you create a slow-motion effect, and then return to the regular frame rate playback), you can do so using variable frame rates in postproduction with After Effects’ and Motion’s Time Remap features (see the following figures).
Figure 6.12 In After Effects you can conform your video clip to a higher or lower frame rate by choosing File | Interpret Footage | Main from the menu.

Figure 6.13 To access the Time Remap feature in After Effects, first select your video layer, then choose Layer | Time | Enable Time Remapping. Click on the Graph Editor icon in your Timeline to display the Graph Editor and modify the velocity curves and keyframes.
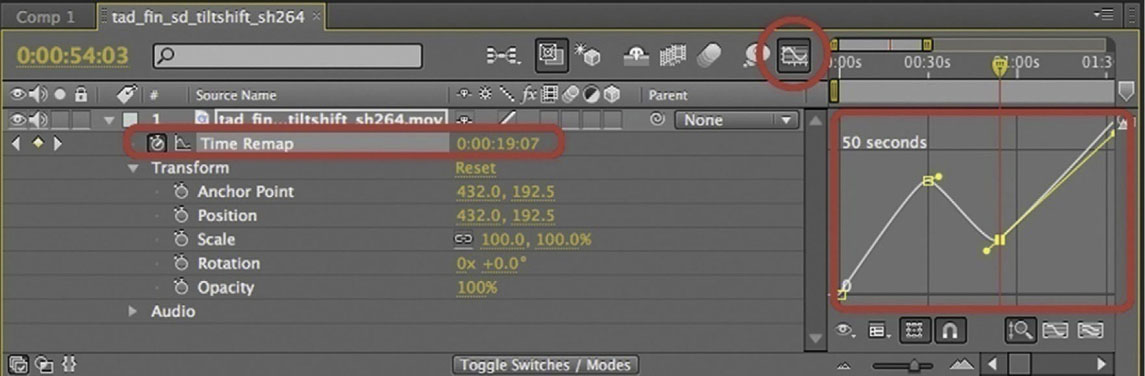
Figure 6.14 In Motion you can access the Time Remap feature through Inspector | Properties tab | Timing, where you can select Constant speed from the Time Remap pull-down.
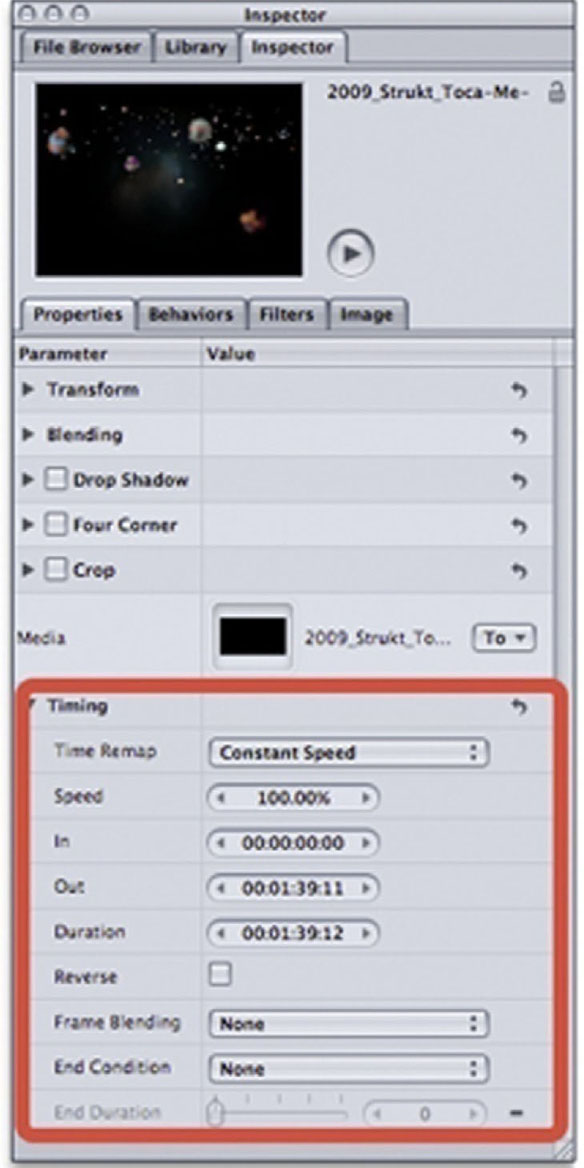
Figure 6.15 In Motion you can access the Variable Speed Time Remap feature from the Inspector | Properties tab, were you can also pick the powerful Frame Blending option called Optical Flow. Different from a motion-blur frame-blending algorithm, Motion’s optical flow algorithm determines the application of the blur on the extra frames created by the slow-motion effect by analyzing the clip’s directional movement of the pixels. The result is a significant increase in the image quality of the slow motion.
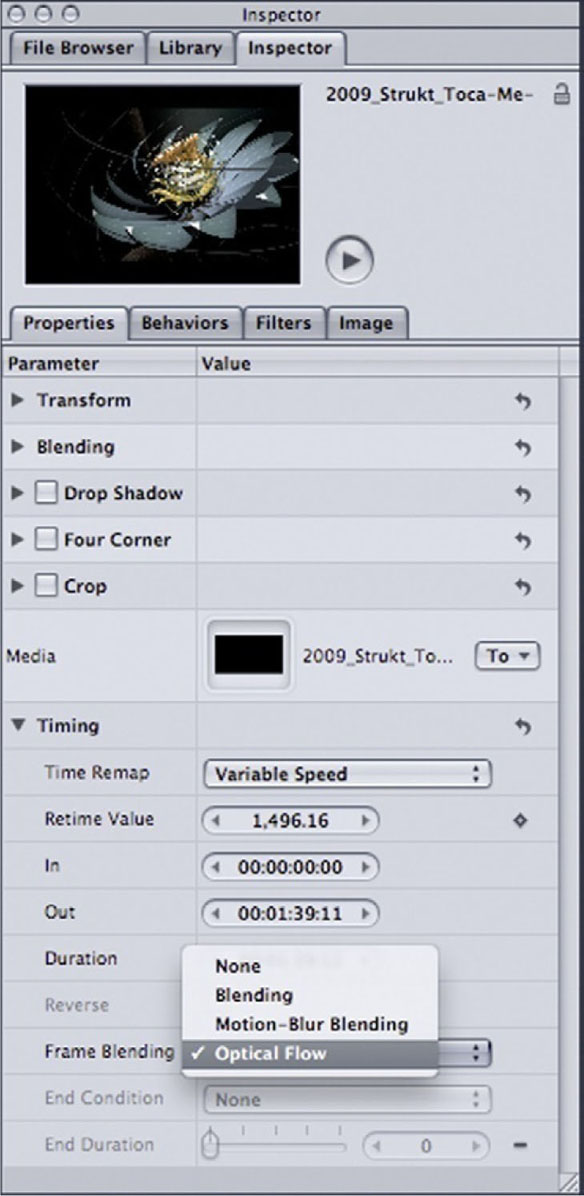
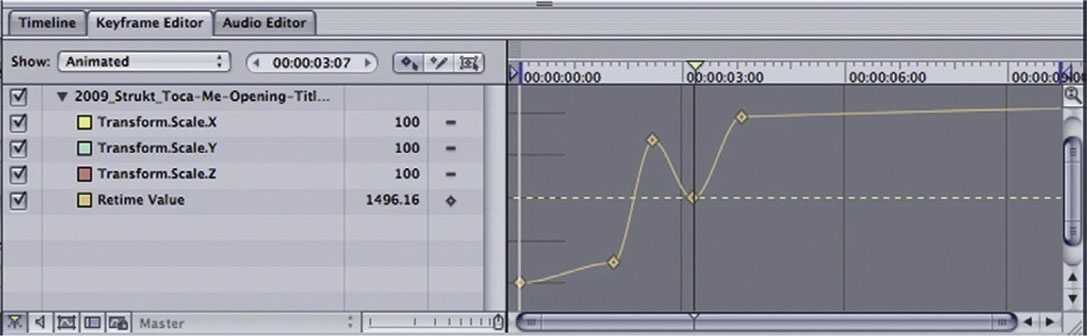
Figure 6.16 In Motion the velocity curves and keyframes can be modified in the Keyframe Editor tab in the timing pane.
Lenses
Whether you use a real or a computer-generated camera, one of the first decisions to make is what lens to use. By deeply understanding how to use and modify your lenses’ parameters, you’ll be able to master the look and feel of your final title sequence.
Camera lenses have three main features that you’ll want to take close note of: focus, f-stop, and focal length. These three features respectively allow you to modify your image sharpness, exposure (whether it appears darker or lighter, underexposed or overexposed), and framing.
Focus
Adjusting the focus of your camera lens allows you to control whether your frame is sharp (in focus) or soft (out of focus). Both film and video camera lenses have focus rings, which allow you to focus on objects at different distances from the camera. Keep in mind that you can focus only on one distance at a time (exceptions are wide-angle lenses, where most of the frame appears in focus; see the subsection called “Focal Length” later in the “Lenses” section).
In film cameras, lenses’ focus rings are often labeled in meters and/or feet. They display intervals from the closest point where the lens is able to focus to the farthest. If, for instance, the focus ring is set to 8 feet, the plane of critical focus will be 8 feet away; all objects 8 feet away from the camera will be in focus, and objects in front of or behind the plane of critical focus will appear out of focus. The farther something is from the plane of critical focus, the more it will be out of focus. This is referred to as depth of field (see the section, “Depth of Field”).
Video camera lenses often have an unmarked focus ring. Focus measurements generally appear on the camera’s viewfinder or LCD screen and are measured by arbitrary values (e.g., 0–99), which do not correspond to feet or meters but can be used as a point of reference to record the focus at a given time during the shot or to perform a focus pull during a particular shot (see the section, “Camera Movement”).
After Effects and Motion cameras do not have focus rings. Instead they have a focus parameter, which you can adjust manually to achieve the look you are seeking.
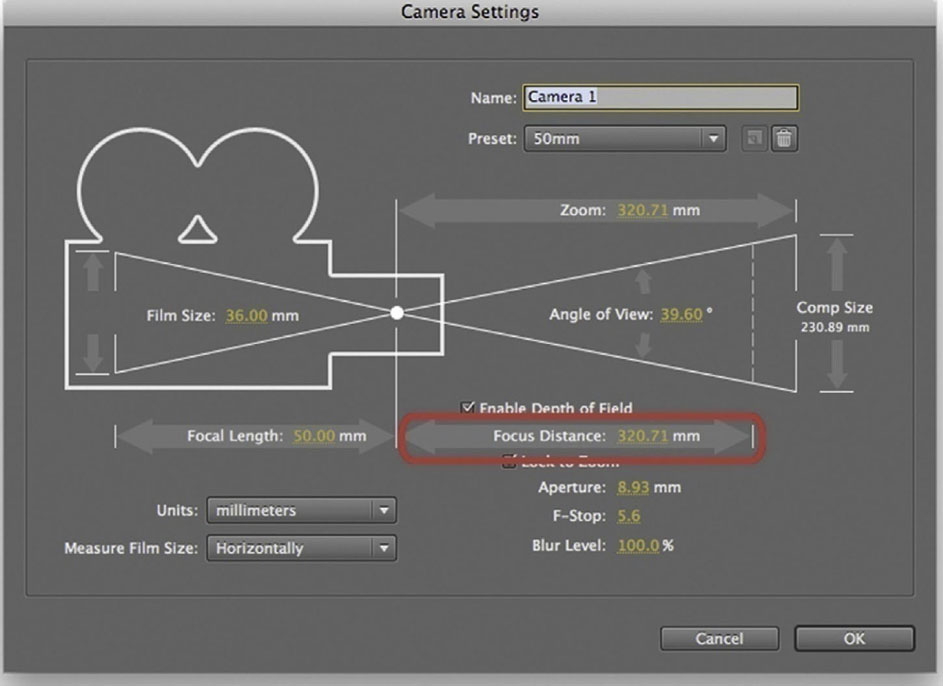
In After Effects you can change the Focus Distance parameter, located under the camera options in your timeline; it is also accessible from the main camera settings window, which can be opened by double-clicking the camera layer in the Timeline panel or selecting the layer and then choosing Layer | Camera Settings. Similar to most of the parameters in After Effects, you can keyframe the focus distance so that within a given shot you can manipulate when and how quickly your image shifts from soft to sharp focus, or vice versa.
Figure 6.17 In After Effects you can change the Focus Distance parameter from the main camera settings window.
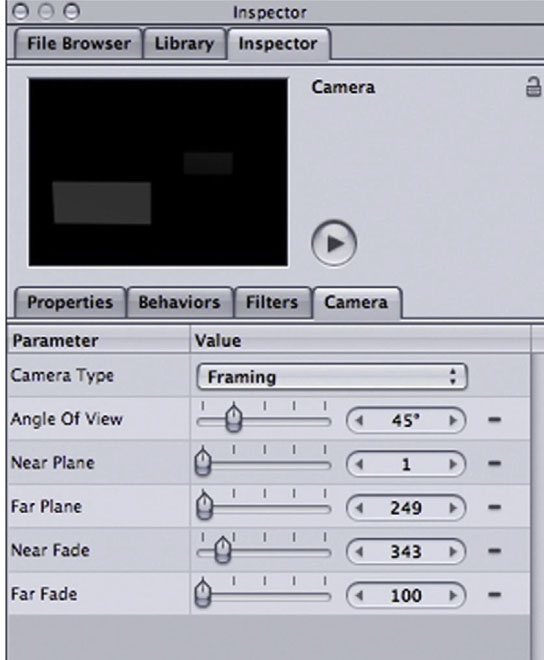
Motion doesn’t have a focus parameter per se. If you select your camera (either in the layers tab or in your timeline tab) and then take a look at the Inspector | Camera tab, the Near Plane and Far Plane parameters allow you to set the pixel limit of the layers you want to display in front of the camera (Near Plane) or far away from the camera (Far Plane). For example, increasing the Near Plane parameter to 100 pixels will avoid layers positioned 100 pixels in front of the camera to be visible. The Near Fade and Far Fade parameters will allow you to fade the object’s visibility based on the Near Plane and Far Plane pixel values, resulting in a smoother transition.
Figure 6.18 In Motion you can change your Near Plane and Far Plane parameters in the camera’s Inspector tab.
Aperture and F-Stops
F-stops are numerical values used to control the amount of light that each lens allows into the camera, therefore affecting the exposure of your shot. Think of your eyes when they react to a bright environment; the pupil reduces its diameter to allow less light to reach the retina so that you are able to see a correctly exposed image. The opposite happens when you enter a darker environment; your pupil expands in diameter to allow as much light in as is necessary or possible. A camera lens is constructed in similar fashion. Located in the back of film lenses you can find the iris, a metal diaphragm that closes and opens depending on the f-stop values that you select on the f-stop ring. This aperture regulates the amount of light reaching the film plane. If the f-stop is not set properly, it will cause your shot to be overexposed (the image will be overly bright) or underexposed (the image will be overly dark).
You can find an f-stop ring on film cameras, but video cameras don’t have one. Depending on the model of your video camera, you might find a wheel, commonly identified as the iris, which allows you to change the f-stop value of your exposure. Generally the f-stop value is indicated in the viewfinder or LCD screen of your video camera.
Depending on the film lenses and video cameras, f-stop numerical values can range from 1 (or “open” in video cameras) to 22 (or “close” in video cameras), 1 corresponding to a larger diaphragm opening (allowing more light in, as for filming in darker areas), and 22 corresponding to a smaller opening (allowing less light in, as for filming in bright sunlight). Lower f-stops allow more light in; higher f-stops allow less light in.
Figure 6.19

To determine the correct exposure, and therefore the f-stop, a cinematographer uses a light meter, an instrument that measures incident light (light that falls on a subject) or reflective light (light that is bounced off the illuminated subject). Most light meters have a parameter to set before taking a light reading: the Exposure Index (EI), also called ASA (American Standards Association) or film speed, which rates how sensitive a film stock is to light.
For video cameras you need to check the manual or online resources to find out at the ASA at which your camera has been rated and the equivalent EI if your camera uses film stock.
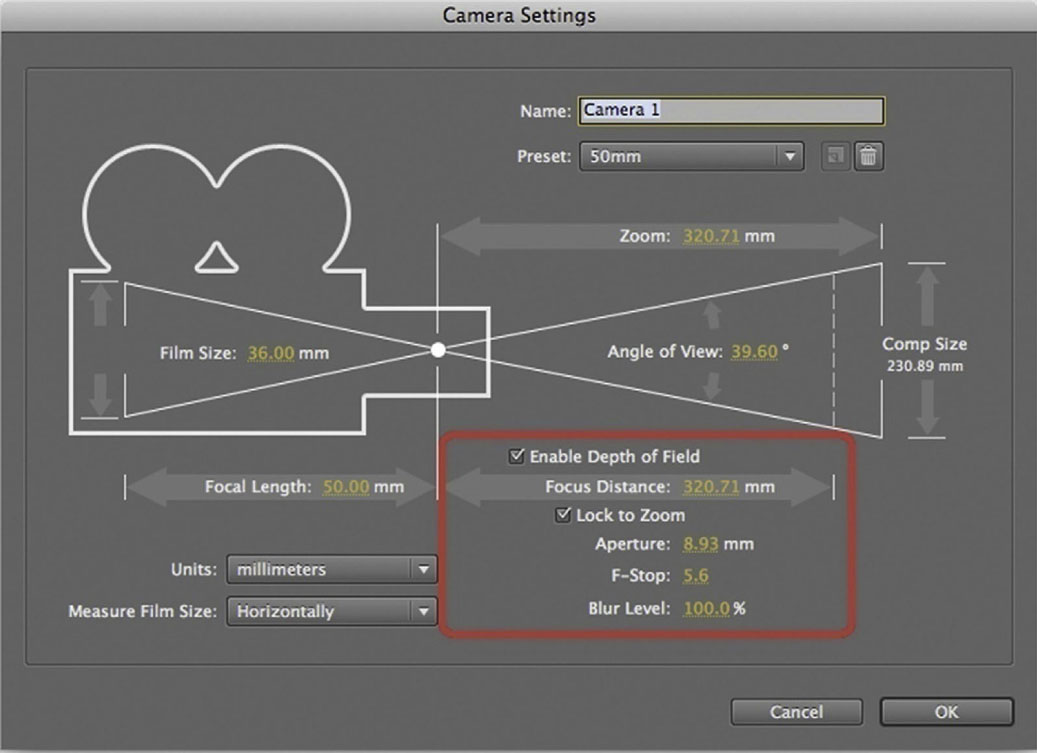
In After Effects you can set or change your exposure by changing the f-stop parameter in the Camera Settings window. Make sure that you check the Enable Depth of Field box so that you can access and modify the f-stop. When you modify the f-stop, the Aperture parameter changes to match it. As opposed to real-world cameras, After Effects’ f-stop values range from 0 (changing the Aperture to 504400, creating a darker exposure of your composition) to 1,429,795 (changing the Aperture to 0, creating a brighter exposure of your composition).
Figure 6.20 In After Effects, in the Camera Setting window, make sure that you check the Enable Depth of Field box so that you can access and modify the F-Stop, Aperture, and Blur Level parameters.
Focal Length
The focal length is the measurement from the center of the lens to the film plane. (In film cameras it corresponds to the point where the light entering the lens reaches and exposes the emulsion of the film.) It is usually expressed in millimeters (mm). For example, if a lens is a 25mm lens, it will be physically shorter than a 50mm lens. Visually, it translates into how wide or narrow a view the lens provides; a lower value such as 10mm provides a wider angle of view, and a higher value such as 70mm gives a narrower angle of view.
Figure 6.21
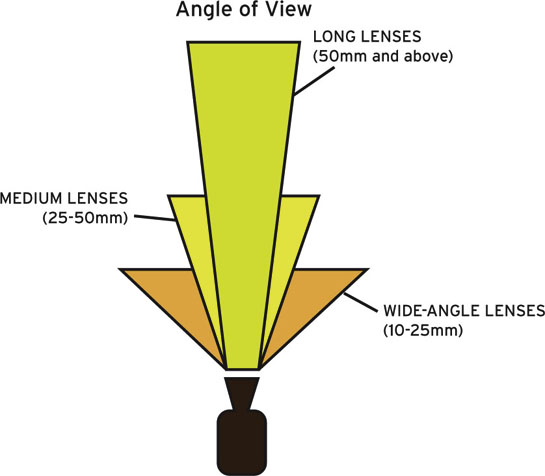
Lenses fall into two main categories: zoom and prime. Zoom lenses, most commonly found in video cameras, have a variable focal length and they are identified in terms of their range (for example, a zoom lens ranging from 70–300mm is referred to as a 70–300 lens). Prime lenses, most commonly found in film cameras, have a fixed focal length and can be grouped into three main categories:
• Short lenses (or wide-angle), ranging between 10mm and 25mm
• Normal lenses (or medium), ranging between 25mm and 50mm
• Long lenses (or telephoto), ranging from 50mm and up
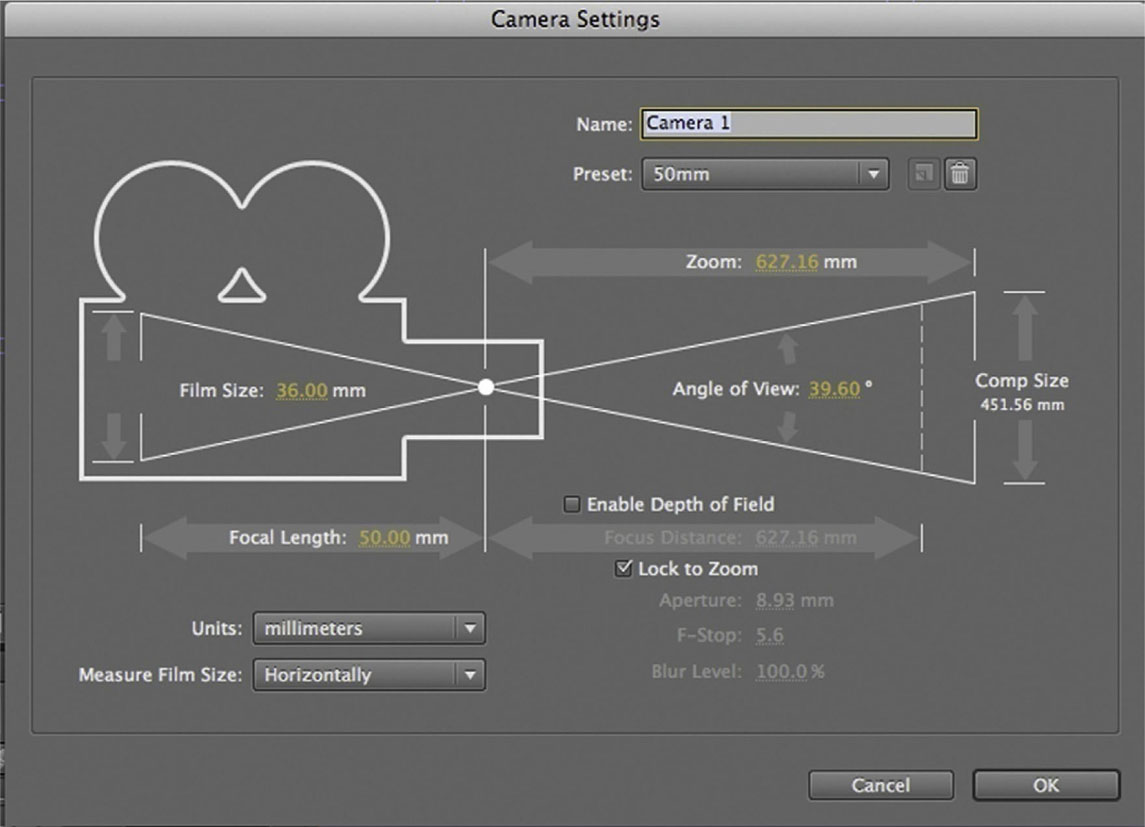
In After Effects you can decide which lens you want to use by selecting one of the presets from the preset pull-down in the Camera Settings window, or you can select your own by changing the Focal Length parameter on the lower left part of the window.
Figure 6.22 In After Effects you can select the lens you want to use by changing the Focal Length parameter in the Camera Settings window.

In After Effects, the Focal Length parameter can range between 7mm (wider lens) and 206264mm (an extremely long lens). The focal length of any given camera can’t be keyframed. To achieve a visual result similar to that of a zoom lens, you need to keyframe the Zoom parameter, accessible from both the Camera Settings window and the Camera Options in your timeline (see the section, “Camera Movement”). If you want to achieve the effect of a cut between two different shots using different focal lengths (such as a cut between a medium lens to a wide-angle lens), it might be convenient to use two different cameras in your composition. Simply create a new camera or duplicate your existing camera and change its settings, then edit it in your timeline. Just remember that if you have multiple cameras overlapping in your timeline, After Effects gives priority to the one on the uppermost layer.
Figure 6.23 In After Effects you can use two different cameras in your composition to cut between two different shots using different focal lengths.
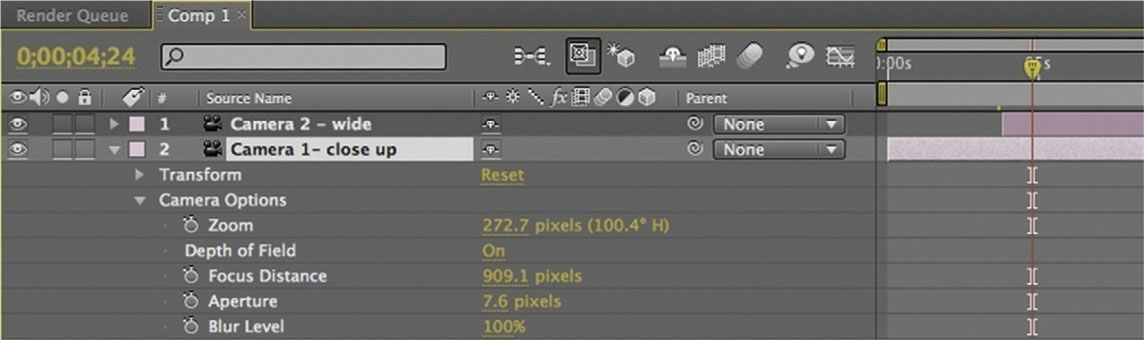
Figure 6.24 In Motion you can change the camera’s lens by modifying the Angle of View parameter in the camera’s Inspector tab.

Depth of Field
Depth of field is the range in which objects appear in focus.
Great depth of field (or long depth of field) signifies a longer range in which objects appear in focus, and it visually translates to more elements in your picture being in sharp focus. For example, when you want to achieve a look of everything being exposed and available for the viewer to look at, as in the title sequence in Intolerable Cruelty, you want to use greater depth of field.
Less depth of field (or shallow depth of field) signifies a shorter range in which objects appear in focus, and it visually translates into very few elements in your frame being in focus. You would use this technique when you want to achieve a look of mystery and gradually reveal parts of the frame, as in the title sequence in Gattaca (1997).
The depth of field varies depending on the exposure (f-stop), focal length (wide angle or long lenses), focus, and film format (8mm, 35mm). Table 6.3 will help you choose your camera and lens settings to achieve the desired depth of field.
Table 6.3 Ways to Control Depth of Field

In After Effects you can easily control your depth of field. In the Camera Settings window you need to make sure that the box by Depth of Field is checked, and additional parameters will become available: Focus Distance, Aperture, F-Stop, Blur Level, and Film Size:
• Focus Distance is the distance from the camera to the plane that is in perfect focus.
• Aperture is the size of the lens opening; increasing the aperture increases the depth-of-field blur.
• F-Stop values are linked to the Aperture ones; when you modify the F-Stop, the values for the Aperture change to match it, and vice versa.
• Blur Level is the amount of depth-of-field blur in your project. Higher values increase the blur; lower values reduce the blur. A setting of 100% creates a natural blur, depending on your other camera settings.
• Film Size is the image size of the film, which is directly related to the composition size.
Shutter Speed and Angle
Shutter Speed
The shutter speed refers to how long each frame is exposed to the light entering the lens. In film cameras, the shutter is a rotating disk that covers the aperture when the next frame moves into position to be exposed. While each frame is exposed, the shutter rotates 360 degrees and the next frame advances.
Typical shutter speeds range from 1/24 to 1/500 of a second. A shutter speed of 1/500 means that each frame is exposed for 1/500 of a second. Shutter speed values directly affect the exposure and motion blur of your image. Lower, meaning slower, shutter speeds such as 1/24 require less light coming into the lens and require a higher f-stop, such as f22. Higher, or faster, values such as 1/1000 will require more light coming into the lens and a lower f-stop like f1.
Slower shutter speeds used in combination with camera movement or a moving object create more motion blur. Because the shutter rotates more slowly, it exposes each frame to light longer. The frame will look blurry because the camera has captured a longer fraction of the object’s movement. The faster the object is moving, or the faster the camera movement, the blurrier it will look. If you are not able to easily see whether a shot has motion blur or not, stop the playback and advance the footage frame by frame; if you notice that each frame appears a bit blurry, the footage was shot with a low shutter speed. Using slower shutter speeds such as 1/24 is a typical choice when you want a film-quality look. Using even lower values such as 1/12 produces even blurrier, almost dream-like images.
Higher shutter speeds used in combination with camera movement or a moving object create sharper images and sometimes a strobe-like effect. The shutter rotates faster, exposing each frame to light for shorter periods of time. Even if an object is moving, it will look sharp because the camera has captured only a very small fraction of its movement. Action movies generally use high shutter speeds to keep all the action in sharp focus. Keep this in mind while you are filming footage for your title sequence, since this simple parameter can have a huge impact on the emotional value of your project.
Shutter Angle
In film cameras, the shutter (rotating disc) is cut at an angle to allow the frame to be exposed; this is referred to as the shutter angle and it is measured in degrees. A typical film camera’s shutter angle is 180 degrees, also referred to as a half-moon shutter because of the circle being cut in half. The shutter angle also affects motion blur and the exposure of the frame. Lower angle values such as 90 degrees allow in half as much light as a 180-degree shutter angle and create less motion blur.
Shutter Angle and Motion-Blur Options in After Effects
In After Effects, if you want to make the movement of your graphical elements appear smoother and more natural, you need to purposefully add a motion blur. First, you want to click on the Enable Motion Blur composition switch at the top of the Timeline panel to enable or disable motion-blur rendering for previews. Then you can enable motion blur for each layer individually by clicking the Motion Blur icon on the corresponding layer. Keep in mind that adding motion blur, depending on your workstation, slows your preview and rendering time. A typical workaround is to disable motion blur while working on your project, then enable it later when you need to preview portions of your work.
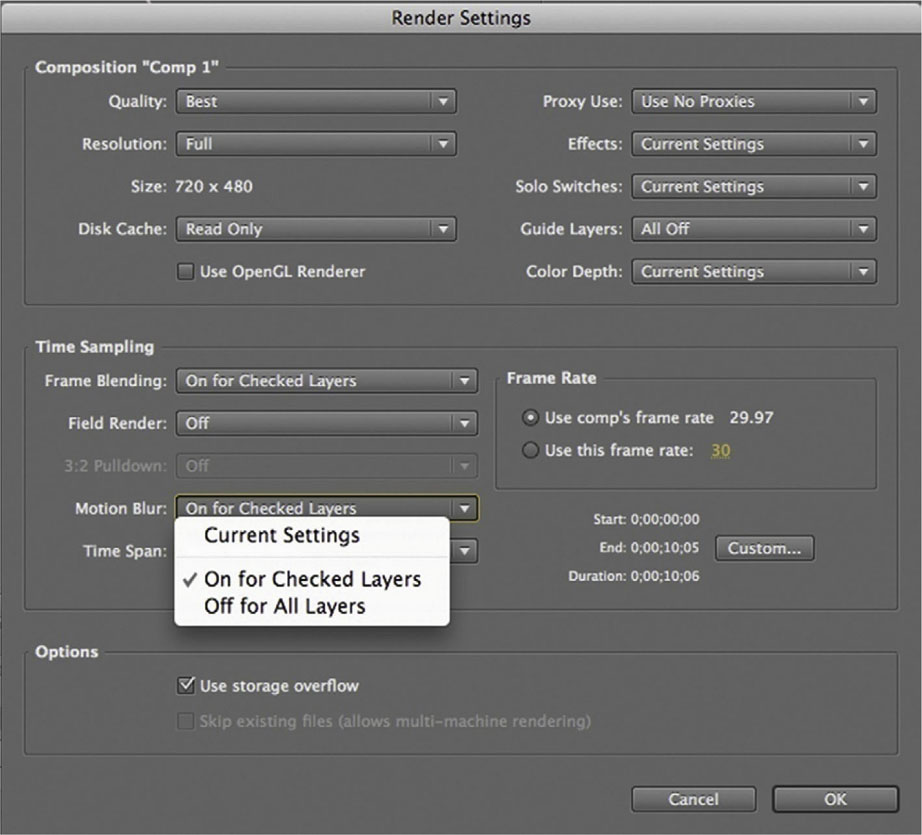
Remember that you can modify the render settings in the Render Queue panel to enable or disable motion-blur rendering for your final output.
Figure 6.25 In After Effects click on the Enable Motion Blur composition switch at the top of the Timeline panel to enable or disable motion-blur rendering for previews. Then you can enable motion blur for each layer individually by clicking the Motion Blur icon on the corresponding layer.
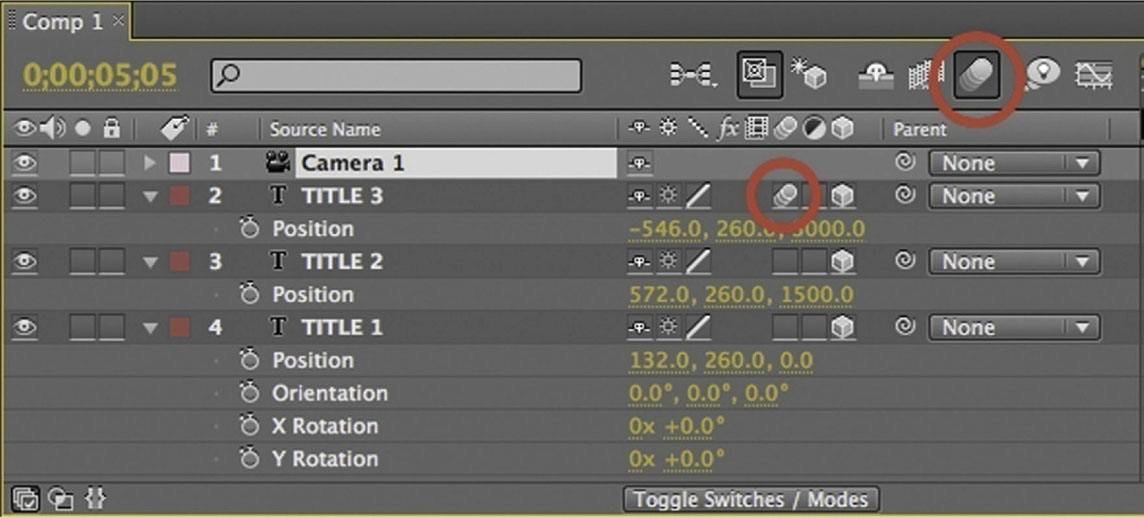
Figure 6.26 In After Effects you can enable or disable the Motion Blur from your Render Settings window.
In addition to the Enable Motion Blur switch, After Effects offers you the option to change the composition’s shutter angle. You can affect the shutter angle by choosing Composition | Composition Settings (or typing the shortcut Command+K) and selecting the Advanced tab. As with film cameras, the Shutter Angle setting in After Effects is measured in degrees, but its values range from 0 to 720° (rather than 360°). A value of 1° creates almost no motion blur and results in a sharp image, as opposed to a value of 720°, which creates a large amount of motion blur. Explore the different settings to see how they change the look and feel of your title sequence.
Figure 6.27 In After Effects you can change the composition’s shutter angle by choosing Composition | Composition Settings and selecting the Advanced tab.

Composing a Shot: Camera Framing and Movement
Composing a shot is the way you position, arrange, and move your camera to frame the graphic elements or subjects of your shots. In this section we explore the options you will face when you have to frame a shot and move your camera.
Camera Framing
When you’re deciding your framing, you have a variety of options to consider: the image size, the angle, and the height of your camera.
Image Size
The position of the camera affects the framing of your shot and therefore your subject’s size in the frame; the closer you move your camera to the subject or your graphical elements, the bigger they will appear. There are three basic camera positions:
• Long shot (LS). A long shot frames the full human body or the entire graphical element. Long shots convey a general sense of the space and environment. The subjects of your composition are prominent, but the background definitely dominates the frame.
• Medium shot (MS). A medium shot includes, for example, a person from the waist up, providing more detail than the long shot.
• Close-up (CU). A close-up could include just a person’s head, creating a tight and confined frame.
The subject matter you are shooting, or the subject of the film you are shooting for, will determine which shots to use and when to change or not change them within the title sequence. If the movie is a cold and terrifying one, and you want the audience to have that impression from the very beginning of your title sequence, you should probably pick a long shot or even an extreme long shot and leave it frighteningly still (see the opening title sequence of Alien). If your movie is a thriller that unfolds over many faceted points of view and you want to convey this feeling, you might decide to edit in multiple close-ups and medium shots (see the opening titles for the movie In the Cut).
In creating your scene by editing and articulating shot by shot, keep in mind that one of the most common editing structure starting points is LS-MS-CU, which represents a natural and logical progression of moving closer to your subject while guiding the audience’s attention to your storytelling (see “Editing Footage for a Title Sequence” later in this chapter).
• Extreme close-up (ECU). A shot framed tighter than the close-up to frame a very specific detail of someone or something.
• Medium close-up (MCU). A shot framed somewhere between a medium shot and a close-up.
• Medium long shot (MLS). A shot framed somewhere between a medium shot and a long shot.
• Extreme long shot (ELS). A shot framed wider than a long shot, where a subject occupies a very small portion of the frame.
• Wide shot (WS). A shot framed even wider than an extreme long shot, in which a subject occupies an incredibly small portion of the frame or is not even visible.
In After Effects and Motion you can determine your image size by moving your camera’s position, Z (depth value), to a positive or negative number. In After Effects a negative Z value will move the camera’s position back so that it creates a long shot or extreme long shot, and a positive Z value will move the camera forward so that it creates a medium or close-up shot. In Motion it is exactly the opposite.
Level and Angle of Framing
When a camera is referred to as low-level, it is usually placed close to the ground. A high-level framing refers to a camera that is higher than the eye level of a character. Changing the camera level can create visually interesting compositions, but it can also affect how the audience views and empathizes with the subjects being portrayed. For example, if a shot is positioned at a low level to frame a close-up of a child (rather than a high-angle shot looking down at the child), the emotional empathy shifts toward the child.
For a real-world camera, you change the level simply by raising or lowering the tripod, without tilting the camera. In After Effects you can modify your camera’s level by increasing (moving the camera level higher) or decreasing (moving the camera level lower) the Y value of both the position and the point of interest. In Motion, simply modify your camera’s Y position value.
For the angle used in framing, there are two typical angle categories: low-angle and high-angle shots. A low angle is when the camera position is low and the camera is tilted up; it is used, for example, when you are on the beach and you tilt the camera up to frame a pelican flying above your head. A high angle is when the camera position is high and the camera is tilted down. This is used when, for example, when you tilt the camera down to frame the beach, to convey the pelican’s point of view.
Be aware of how the camera angle can affect a viewer’s feelings and connection to certain subjects. A high-angle shot can evoke vulnerability, smallness, and dependence, whereas a low-angle shot can evoke power, subjugation, and grandiosity.
In After Effects you can change the angle of your camera by modifying the X Rotation, Y Rotation, and Z Rotation parameters of your camera’s Transform properties (see Figure 6.28). These values produce results similar to a camera mounted on a tripod.
Figure 6.28 In After Effects you can change the angle of your camera by modifying the Rotation parameters of your camera’s Transform properties.

When you change your camera’s X Rotation value, a positive value will tilt your camera up, and a negative value will tilt your camera down. When you change your camera’s Y Rotation value, a positive value will pan your camera right, and a negative value will pan your camera left. Finally, when you change your camera’s Z Rotation value, a positive value will rotate your camera right, and a negative value will rotate your camera left.
Figure 6.29 In Motion, before you change the angle of your camera, make sure that your Camera Type in your HUD is set to Viewpoint.
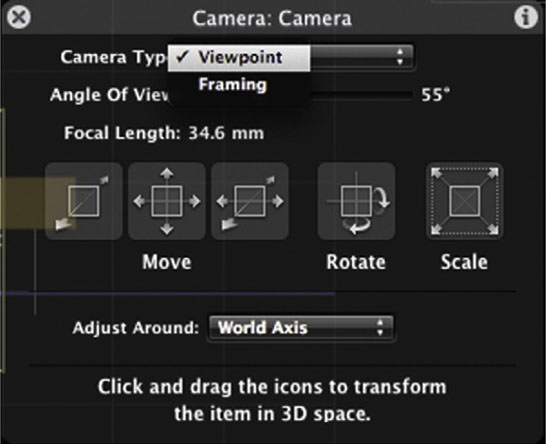
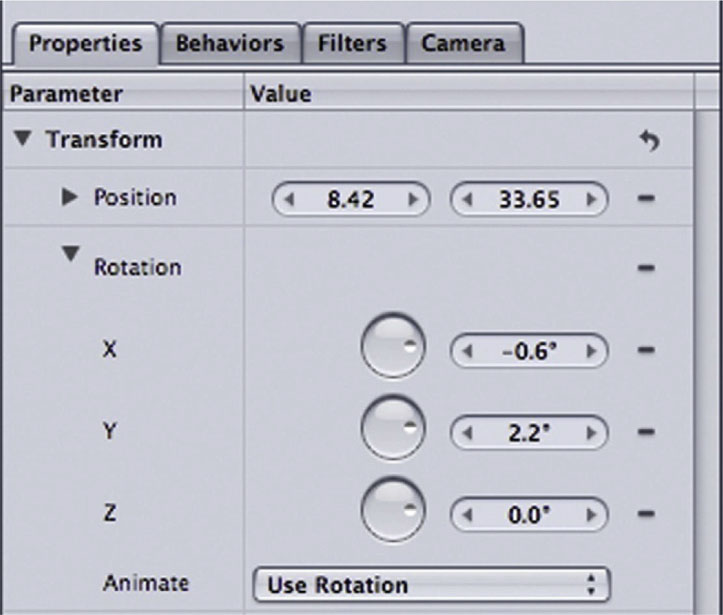
In Motion, you change the settings similarly by changing the Rotation X, Y, and Z values in the Inspector’s Properties tab. Make sure that your Camera Type in your HUD or in your Inspector’s Camera tab is set to Viewpoint.
When you change your camera’s X Rotation value, a positive value will tilt your camera up, and a negative value will tilt your camera down. When you change your camera’s Y Rotation value, a positive value will pan your camera left, and a negative value will pan your camera right. When you change your camera’s Z Rotation value, a positive value will rotate your camera left, and a negative value will rotate your camera right.
Figure 6.30 In Motion, you change the angle of your camera by changing the Rotation X, Y, and Z values in the camera’s Properties tab.
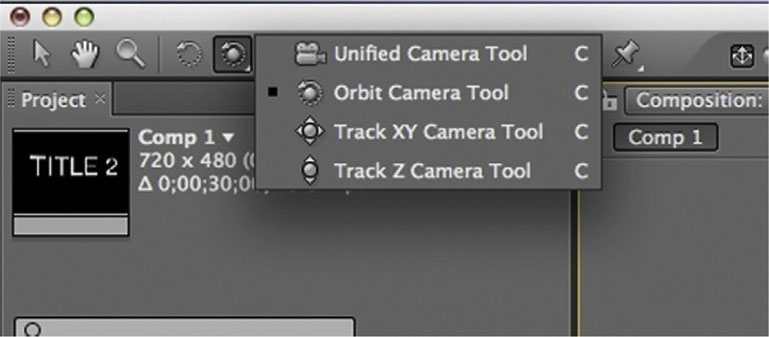
If you already framed your object and you want to rotate your camera around it rather than tilting or panning away from it, there is a simple solution. In After Effects, select the Orbit Camera tool from the Tools panel (or press C to toggle between all 3D camera tools). When you select this tool and you click and drag in your Active Camera view panel, your camera rotates around the point of interest.
Figure 6.31 In After Effects you can toggle between 4 camera tools by pressing C.
In Motion you first need to locate either your HUD or your Inspector’s Camera tab and change your Camera Type to Framing.
Then, in the Inspector’s Properties tab, change the Rotation X, Y, and Z values. Now your camera rotates around your object rather than pivoting on its own body.
Another option is to click and drag the Orbit tool in the 3D view tools of your Active Camera view (see the following figures), or click and drag your Rotate XYZ tool in the 3D Transform HUD control.
Figure 6.32 In Motion, if you want to rotate your camera around an object, you first need change your Camera Type to Framing.
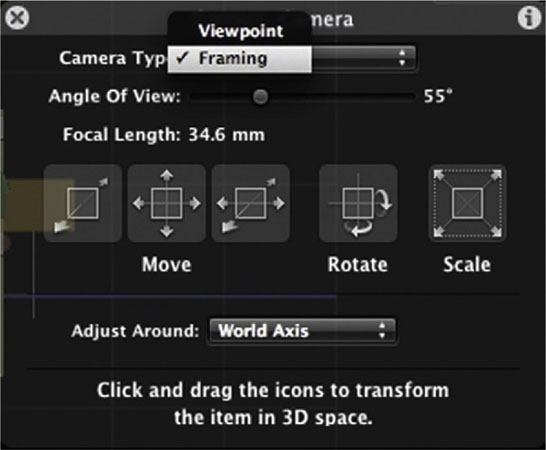
Figure 6.33 You can now click and drag the Orbit tool in the 3D view tools of your Active Camera view to rotate your camera around your object.

Figure 6.34 You can also click and drag your Rotate XYZ tool in the Camera’s HUD.

Camera Movement
So, now that we have talked about choosing your framing and the angle you want to use, it’s finally time to move the camera! Moving a camera allows you to approach an object, retreat from it, rotate around it, or fly through it; moving the camera can profoundly affect how the audience perceives the space on-screen and off. Let’s analyze some of the most common movements:
• Pan. The camera looks from right to left, or vice versa. The camera body itself does not move, but it pivots, as though set on a tripod, to horizontally scan the environment or to follow a particular action.
• Tilt. The camera looks up and down. Similar to panning, the camera body does not move; it simply pivots to vertically scan up and down.
• Zoom. The camera lens is adjusted to frame an object farther or closer. Once again, the camera itself does not move its position. A zoom in narrows the field of view, whereas a zoom out expands it.
• Dolly or tracking/trucking. The entire camera body moves horizontally in any direction: forward, backward, side to side, or even in a circular or diagonal movement. A dolly in moves the camera closer to a subject; a dolly out moves it away. A dolly shot changes the camera’s perspective.
• Rack focus (or pull focus). The focus of the camera lens changes within a shot, so that objects positioned at different distances from the camera fall in or out of focus. For example, within one shot you change the camera’s focus from a person in the distance to someone right in front of the camera. A rack focus can be very useful if performed in combination with a dolly move.
• Handheld. Camera operators use their bodies, as opposed to a tripod or a dolly, as the support for the camera. The camera is aimed at the subjects more freely and generally results in a shaky image, often giving the viewer a sense of participating in the action.
• Steadicam. A handheld camera shot without the shakiness. The Steadicam is a device that mounts on the camera operator’s body and provides balance and fluidity for a shot.
• Pedestal. A pedestal up or pedestal down (ped up/ped down) vertically raises or lowers the camera. This camera movement can also be referred to as booming up or down. A jib arm or a crane are commonly used for pedestal shots.
• Aerial. A very elevated shot, typically filmed from planes and helicopters. This gives the viewer a strong sense of place and is commonly used as a background or a transitional shot.
 Note: A crane is a mechanical elevating arm mounted on a rolling vehicle. A crane arm moves horizontally and vertically in any direction; a crane is most commonly used to move from above to below a subject (and vice versa), a movement that is impossible to achieve with a dolly. A jib arm is a smaller and simpler version of a crane; its arm is not mechanical and it is generally operated manually. Its smaller models can be mounted on a tripod.
Figure 6.35

Motivations for Camera Movements
Camera movements are powerful yet can be distracting and unnecessary if not chosen carefully. Before you decide on camera movements, you should ask yourself, “How does this camera movement benefit this shot?” If there’s no answer to that question, don’t do it! The most effective camera movements are the ones that are motivated by an event or an action in the story. Here are some common motivational applications of camera movements:
• Dolly or pan the camera to follow the action of a subject or a graphical element moving in space.
• Pan or dolly around to increase tension and curiosity, to explore a new environment, or to simply to add visual interest to a shot.
• Move the camera to achieve a point of view (POV) shot of a moving subject or to change a particular established viewpoint.
• Slowly dolly into a subject or graphical element for a dramatic effect.
CG Camera Movements
Most of the camera movements explored in the previous section can be replicated in CG cameras. Here’s a quick reference:
• Pan. In After Effects, keyframe the X value of the camera’s point of interest. In Motion, set your Camera Type to Viewpoint and keyframe the Y Rotation value in the Inspector’s Properties tab. Alternatively you can enable the Record Animation button and use the Rotate XYZ icon in the HUD.
• Tilt. In After Effects, keyframe the Y value of the camera’s point of interest. In Motion, set your Camera Type to Viewpoint and keyframe the X Rotation value in the Inspector’s Properties tab, or use the Rotate XYZ icon in the HUD.
• Zoom. In After Effects, keyframe the Zoom parameter in the timeline’s Camera Options. In Motion, select the camera, then click on the Add Behavior icon on the toolbar and select Camera | Zoom In/Out. In the HUD change the Zoom value of this behavior.
Figure 6.36 Zoom In/Out behavior as it appears in the HUD.

Figure 6.37 In Motion, select the camera, then click on the Add Behavior icon on the toolbar and select Camera | Dolly.
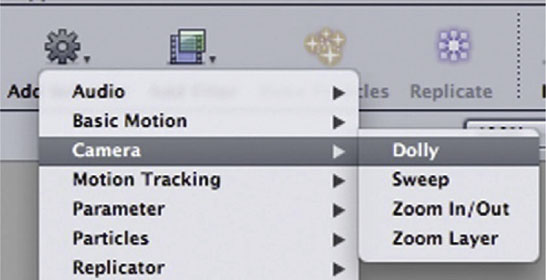
Figure 6.38 Dolly behavior as it appears in the HUD.
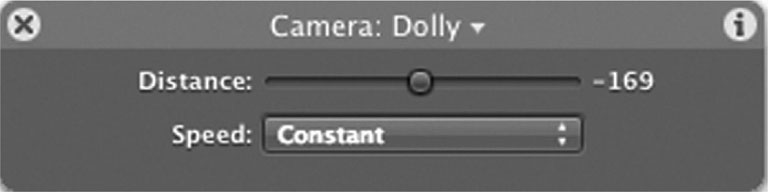
• Dolly. In After Effects, keyframe the Z value of the camera’s position in the timeline, or use the Track Z Camera tool. In Motion, either keyframe the Z Position value in the Inspector’s Properties tab or apply a dolly behavior. To apply a behavior, select the camera, then click on the Add Behavior icon on the toolbar and select Camera | Dolly. Change the Distance parameter in the HUD; a positive value creates a dolly in and a negative value creates a dolly out.
• Rack focus. In After Effects, keyframe the Focus Distance in the timeline’s Camera Options. In Motion, a rack focus is not possible at this time, but you could mimic it by keyframing the blurriness of your objects.
• Handheld. In After Effects, apply a Wiggle expression to the camera’s Position values.
Figure 6.39 To simulate a handheld effect in After Effects, apply a Wiggle expression to the camera’s Position values.

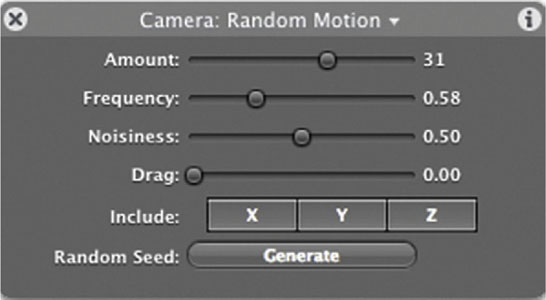
Figure 6.40 To simulate a handheld effect in Motion, click on the Add Behavior icon on the toolbar, select Simulations | Random Motion, and change its parameters in the HUD.
• Steadjcam. In After Effects and Motion, use a combination of the pan, tilt, dolly, and zoom techniques indicated previously.
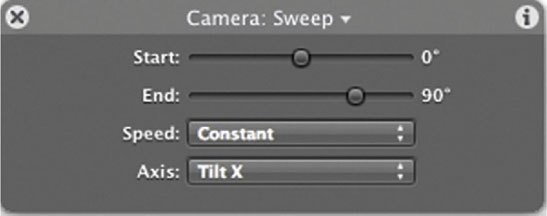
• Ped. In After Effects, keyframe the Y value of the camera’s position, or use the Orbit Camera tool. In Motion, set your Camera Type to Framing and keyframe the X Rotation value in the Inspector’s Properties tab. If you want to create the same camera movement without keyframes, select the camera, then click on the Add Behavior icon on the toolbar and select Camera | Sweep. In the HUD, select a Start and an End degree value and set your Axis to Tilt X.
Figure 6.41
Understanding Green-Screen Production
There are a number of factors to take in consideration when you’re embarking on a green-screen production shoot. First, if you’ve never attempted it before, I’d highly recommend giving it a test run. Grab your camera, a flat-colored background (it doesn’t necessarily have to be green, but at the very least it should be a color that is not present in your props or the skin tone or wardrobe of your talent), and shoot a few seconds of footage, capture it, and key it. Following are some of the issues that might arise in this process and how to deal with them:
• Light the green screen evenly. The green screen should be lit evenly across its entire surface. This is such an important task that you should plan on dedicating a sufficient number of hours to getting it right. Depending on the size and quality of the screen (some green screens in sound stages are already pre-lit, have a grid above them to hang lights, or don’t have a grid; some green-screen sets have a fabric background that needs to be elevated and set up with rolling stands), and depending on how many crew members you have and their experience, this is a task that could take anywhere from one or two hours to up to five or six.
One tool that will be particularly helpful is a waveform monitor, a visual representation of the levels of luminosity in the frame. If the green screen is lit correctly, when you point your camera at it, you should see a flat horizontal line. This means that the screen is lit evenly, from left and right. In fact, the left part of the waveform monitor corresponds to the left part of your frame and the right part corresponds to the right portion of your frame. When a person stands in the middle of the frame, you will see their luminosity visually represented in the waveform, breaking the flat horizontal line of your green background.
There are a number of tools that allow you to display a waveform interpretation of your frame, from the old-school analog waveform monitors, which connect directly to the output of your camera, to the digital ones in the form of software that can be used when you connect the output of your camera to a laptop or computer that runs the waveform software.
In addition to waveform monitors, you could use a light meter (by taking light readings of different areas of the green screen and making sure that they are consistent throughout) or, if none of these tools are available to you, as a last resort you can use the zebras in your camera. By enabling the zebras in your camera and changing the iris values, you can see if the zebras are expanding evenly throughout the green screen.
• Pay attention to the green spill. Having the green color of the screen spill onto your talent or set is something to avoid like the plague. Avoiding it in the first place will save time in postproduction that would have been spent on removing unwanted green color casts. Why does green spill happen? Remember that surfaces have different amounts of reflectivity, whether shiny or dull. Take, for instance, the useful bounce board used in production. A simple, white foam core, placed appropriately, can pick up light and bounce it onto the desired subject or area. When shooting in a green-screen environment, inevitably the green walls, lit with the stage lights, will bounce green all around them. There are a number of solutions to either avoid or at least reduce the amount of green spill:
• Leave plenty of distance between the talent and the lit green screen. This distance really depends on the size of the screen and on the framing of your shot. A good rule of thumb is to have your talent walk as much away from the green wall so that:
• ○ The lighting aimed at the green screen wall doesn’t illuminate them.
• ○ They are still surrounded by green screen while they perform their take (for example, if they need to walk forward or right to left).
• Use magenta (minus green) gels. Using magenta gel over lights that illuminate your talent reduces the amount of green spill on their bodies.
• Use Duvatine. When you are shooting a frame that doesn’t include their feet, you could place a piece of Duvatine—a solid black cloth—by the foot of your talent so that you can avoid green spill coming from the floor.
• Pay attention to shadows. In shooting your footage, keep an eye out for accidental shadows on the green screen. Some shadows might be created by the lighting illuminating the talent; others might be created by lights hitting other grip or props on the edge of the set. Shadows on a green screen prevent the screen from being lit evenly and will cause some delay when you’re attempting to key in postproduction. As mentioned above, increasing the distance of the talent from the back screen is a simple solution, but when that is not possible (such as when the screen is too small and the talent can’t move far from it), you might have to resort to other solutions, such as flooding the light so that the shadows won’t be too prominent or even adding a diffusion gel.
• Use different lighting setups for foreground/background. When setting up for a green-screen shoot, you should plan to have enough lamps available so that you can have two different lighting setups: one for the background and another for the talent or sets. The reason for this is that you want to be able to control the lighting for the green screen on its own. Let’s say that you’re shooting a medium shot of five people that you will use for their respective title cards. The talent will most likely have different skin tones, hair color, or wardrobe that will require different lighting. If the lighting setup that is illuminating the talent also affects the green screen, when you make slight adjustments in the lighting position or intensity, that will affect the background. As a result, your green screen won’t be evenly lit anymore. Keeping the lighting setups separate will give you more freedom with quickly changing scenes and talent without affecting the green screen lighting and, ultimately, the overall quality of the key in postproduction.
• Use green light bulbs. If possible, when lighting your green screen, use green light bulbs so that your green screen will be more vibrant and easier to key. There are a number of options available, one of them being the Kino-Flo green bulbs.
• Avoid using shiny objects, props, or even green wardrobe for the talent. It goes without saying that shiny objects will reflect green, and green wardrobe will be keyed out in postproduction, leaving a hole instead of the talent’s clothes.
• Control your lighting sources. Depending on the location of your set, you might have to spend some time controlling additional lighting sources such as windows (if you shoot for a prolonged amount of time, the outdoor lighting will change throughout the day and cause a variation in the color temperature of your footage; this is not particularly evident while shooting, but it will definitely jump out when you’re editing shots together in postproduction). There might also be overhead lights or light spilling around from an adjacent area. Before you start shooting, take a look around you and verify that you don’t have any external light sources that might affect the way you control the light on your set.
• Check your camera settings. Your camera settings have a profound influence on the quality of your keyed footage. Other than deciding your frame size and recording setup, you should make a conscious decision about what shutter speed to use. A lower shutter speed will result in the movements of your talent being smooth, and the footage will have more motion blur, which will be harder to key. A higher shutter speed will result in the movements of your talent being a bit more choppy, and the footage will have less motion blur, which will be easier to key.
• Camera movement. If you are planning to execute some camera movements, you are entering a higher level of difficulty, which requires knowledge in 3D motion tracking.
• Instant gratification. If time permits, and if you will need to match live footage with some motion graphics or still pictures created in postproduction, a very useful tool to have on set is Conduit Live, a stand-alone nodal capture tool designed for live, real-time video compositing. When you connect your camera to a laptop or computer, this software will allow you to create a quick key of the source image coming from the camera and upload an image on top of it to verify whether it creates the look you are seeking.
• Less green, more talent: Maximize the screen area. Always keep in mind that when you are shooting on a green screen, you are going to key out all the green background and use only the talent or props you shot. This is why, when framing a shot, you should frame it as tightly as possible, to maximize the use of your frame and resolution. For example, when you’re framing a person in a long shot you shouldn’t leave any unnecessary head or feet room. Still, you’ll have so much green on the talent’s right and left that it is a waste of resolution and screen space. Most cinematographers, when dealing with these types of shots, rotate the camera 90 degrees so that they can shoot more of the talent and less green screen. This trick will allow the editor to have better resolution in post, which will allow for a better key.
Editing Footage for a Title Sequence
The role of the title designer on a title sequence can vary greatly. For example, in many cases, the designer will be called on to create a title sequence completely from nothing. Basically, the designer is given the opportunity to create all the elements involved. This model is exemplified by Kyle Cooper’s role in the title sequence for Se7en, in which Cooper was given the task of generating the sequence largely under his own direction.
The Se7en title sequence is not only famous for being crafted by Cooper’s individual style; it’s more because Cooper captured the entire story the film tells in his title sequence. Not everyone is Kyle Cooper; most designers don’t end up being in control of the footage they work with. It can be a situation in which the film’s editor will cut the sequence and then provide it to the title designer. The title designer might also be tasked with editing the footage that was given to him or her and then adding the titles to that.
Editors are one of the three people on a film, alongside the screenwriter and the director, who have the greatest impact on the final product. Choosing the shots that comprise the final film can completely change an actor’s performance, and the twists and turns of a director of photography’s camera work, all by deciding what stays and what goes.
Three Kinds of Edits
The most crucial decision an editor makes is when to transition from one shot to another. The most common and obvious transition between shots is a cut. Cuts are the very simple switching from one shot to the next. If a cut is done correctly, it should not be noticed by the audience (unless of course the audience is a bunch of editors!). Cuts should be smooth and logical.
Figure 6.42 Dissolves are meant to show the passage of time.
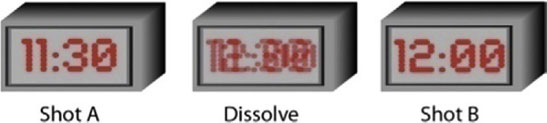
The next kind of transition, a dissolve or mix, is done for the purpose of being noticed by the audience. New editors sometimes dissolve way too often missing the purpose of dissolving, which is to demonstrate to the audience that time has passed. The most obvious example of this is when the camera is close up on a clock showing that the time is 11:30 a.m., then it dissolves from 11:30 to the clock showing that it is noon. It demonstrates that a half hour has passed, whereas cutting would probably just confuse an audience.
The third and final form of an edit is a fade. A fade takes one shot and dissolves it to either black or sometimes white. (White is rarely used, but it is quite effective when a character is consumed by light or acquiring a superpower.) Typically, the fade to black indicates that a major chapter of the film or the film itself has ended.
The Rules and Art of the Edit
Editing a film is both a technical necessity and an art. Walter Murch’s famous book, In the Blink of an Eye, (Silman-James Press, August 2001) discusses the art of editing on a philosophical level. However, there are some standard rules from which to start. There are criteria that will definitely indicate when it is a good time to transition. Roy Thompson’s book, The Grammar of the Edit (Focal Press, March 2009), is a great book to read in conjunction with Murch’s book; Thompson’s reveals the foundational film editing rules, whereas Murch’s delves more into conceptual territory.
The foundation of every edit is motivation. Motivation can be somewhat elusive, but it’s generally an indicator to the audience that something they don’t see in the frame right now deserves their attention. So, it can be as obvious as an actor in the frame going, “What is that?” and pointing, and then we cut to an incoming meteor. Not every motivation is this obvious; they can be extremely subtle, but rule number one in editing is that if there is no reason to cut from one shot to another, then don’t!
This could be cutting when a character glances in a direction, adding a sound effect such as a phone ring or a knock at a door. In Murch’s book, he discusses how often he finds that he cuts when an actor blinks, and that blink alone could be a motivation to cut. Unmotivated edits will make the audience feel lost in a film. One of my favorite examples of this scenario is in Ed Wood’s infamously awful classic, Plan 9 From Outer Space (1959), when inexplicably, in the middle of a two-person dialogue, the editor cuts to a shot of the radiator. The two characters were not discussing the radiator; if they were, the edit would have been motivated.
Sometimes motivation is inherent in a scene; other times the editor will be forced to create a motivation to change shots. The one most people are familiar with is what Thompson calls an action edit, where a character’s actions are followed, such as a person coming to a door and there’s a cut to a close-up of their hand turning the doorknob. Also quite common is the screen position edit, where the viewer’s attention is directed by what’s going on onscreen to another location, as in the preceding meteor example.
Motivations can be a visual abstraction; for example, let’s say that we have a scene where people are having an evening dinner. A cut from a plate to the full moon can be motivated by the similarity of the two shapes. This is called a form edit. Similar to form edit is a concept edit, the difference being in a concept edit you cut from two shots that have a similar meaning rather than a similar visual composition. So, as a character falls to her death, there’s a cut to another character dropping an egg that cracks.
In Thompson’s book he discusses five kinds of edits; the fifth is the combined edit, in which all of the preceding forms are rolled into one cut. This type of cut is extremely uncommon and will require much planning.
Three Kinds of Edits for Title Designers
When editing the footage elements of a title sequence, there are extra considerations to take into account. Let’s begin by establishing the three most common situations you will run into. The first situation is that the title designer is given the freedom to run a complete production (much like a short film). The title designer may in some cases be building the title sequence on his own. Typically this is when a title designer has some prestige and the producers put their trust in this artist.
Now, this places a great deal of control over the situation in the hands of the designer. For example, since Saul Bass did the title sequence for the film The Man with the Golden Arm (1955), it has not been uncommon for the title sequence to be a completely animated or created sequence, without any shot footage. This allows the title designer to construct each frame; therefore, title designers can set up the frame so that the title is part of the animation. Each frame is designed with ample room for the title to sit comfortably.
The second situation is when the title designer is not given a finished edit of the background footage for the title sequence; rather the title designer is given shots to assemble as she basically pleases, in order to tweak it so that the footage times well with the titles. This also allows the title designer the opportunity to choose the shots with the composition that lends itself to having titles placed over it.
The third situation is the most dangerous: The designer is provided an already edited sequence to use as a background plate for the title sequence. So, if the work is already done, why is this the most dangerous situation? First, background footage that has been shot for the purpose of being a background for the title sequence should be fantastic, but this is not always the case. Also, if the footage was assembled before a color scheme and design style for the title sequence have been decided on, that means that the editor did not know whether the chosen shots would work with type over them!
Another issue that can pop up in this scenario is that when the first title list is given to a designer, that is rarely the final list. There’s always someone who got left out, or a new injection of money into the small indie project means that new executive producers have to be added to the list. Meaning that the whole timing of the edit may have to change. So, this is clearly not the ideal situation, but often as a designer you are not in an ideal situation.
As with everything on a film production, planning is key. Just because footage is going to be used as background for a title sequence, that doesn’t mean that it should be removed from the storyboarding process. In fact, storyboarding is fairly crucial. Think of it like this: If it’s not storyboarded, the production team may go to the shot without being aware that they need to leave room in the frame for titles!
So, before the cut begins, it is absolutely crucial that everyone knows what the plan is. Does the editor know the narrative being told in the title sequence? Does the editor know the text size, color, position, and amount of time the titles will need? The following tutorial takes you through a variety of techniques for efficiently editing a title sequence.
How to Edit Footage for a Title Sequence
Editing footage for the purpose of integration with animated text as part of a title sequence will draw on a number of your abilities. You will be completing the frame of shots that were designed for the purpose of adding text. So, proceeding carefully is very important.
Software Setup
Working in an integrated environment is highly appealing for a project like this, where motion graphics meet editing. Unfortunately for most users, Apple’s Final Cut Pro (the choice of most film and TV editors today) and Adobe After Effects (the industry standard for basic compositing and motion graphics) don’t “talk” to one another without third-party software. This software is Automatic Duck’s Pro Import AE, which will allow you to open FCP timelines in AE. However, this product will set you back around $495.
Another solution is that if you have After Effects, you likely have Premiere Pro, or if you have Final Cut Pro, you will likely have Motion. Premiere Pro’s got kind of a bad rap; it’s actually a very useful piece of editing software, of equal strength to FCP. Motion, Apple’s motion graphics software, though not quite After Effects, will be up to the task. For this tutorial I’ll use Final Cut and Motion.
Music
Depending on how they like to work, one of the first things many editors decide on is music, even if it’s temporary, to get a feeling for the right mood and pace of the edit. Since this tutorial will be demonstrating a noir-esque, suspenseful title sequence, the supplied music follows that style. Now, with these considerations made, we can begin.
Tutorial: Editing Footage for a Title Sequence
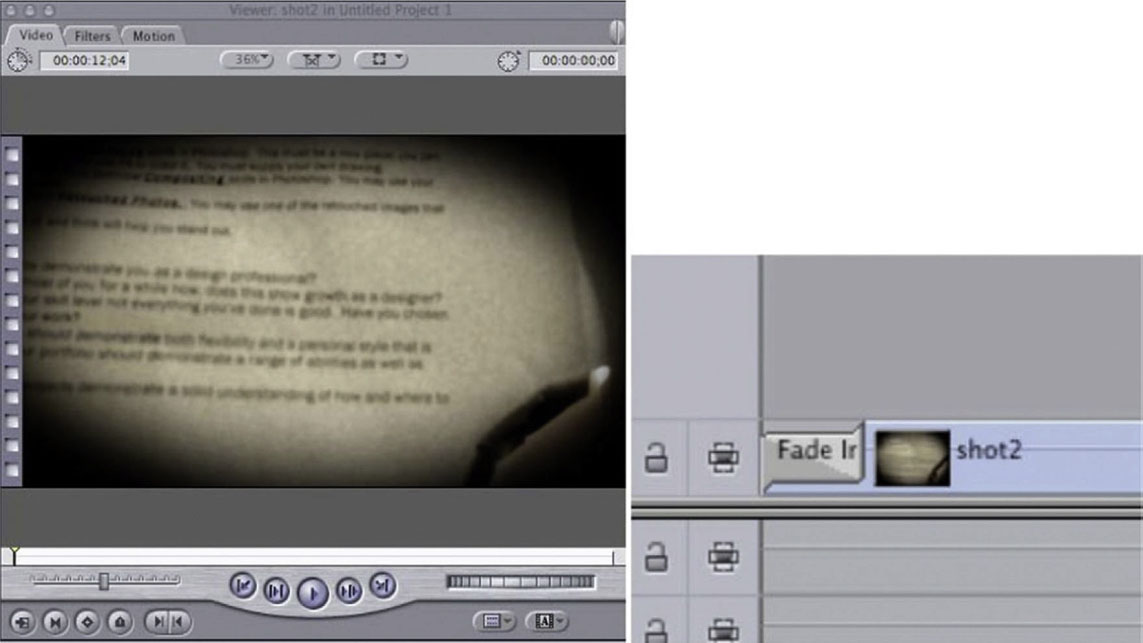
1 Import shots 1–4 into Final Cut and open our shot 1 in the Viewer. So that we have time to fade the shot up and put up our first title, I set my In and Out points so that the shot is roughly 6 seconds long. Now, the first half of the shot is less interesting than the second half, where the burning of the paper is more obvious, so I decided to use the last 6 seconds. After I was happy with the edit, I placed the first shot in the Sequence. I added a fade in/fade out transition to have our title fade up from black in the first second.
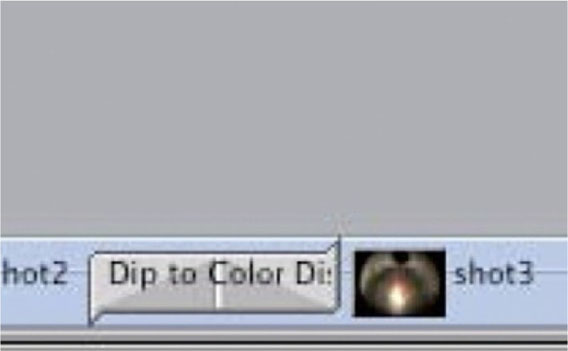
2 To keep the established mood, I added a 1-second Dip to Black Transition from shots 1 to 2, 2 to 3, and 3 to 4. Remember, transitions have meaning, so we now imply that the events we are observing as audience members are occurring over a long period of time.
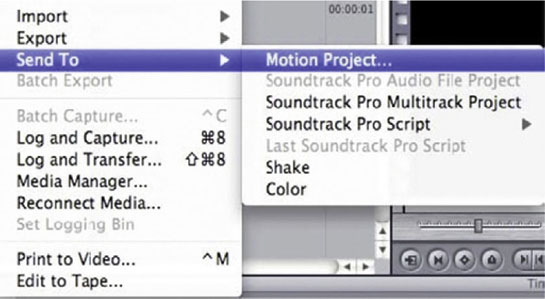
3 Once we are happy with the basic edit, it’s now time to add in our titles, so go to File | Send To | Motion Project.
4 In Motion, create a title using the Text tool. Place the title in the frame in an appropriate place. Keep in mind that these shots were framed knowing that there would be titles added later, so there are plenty of great spots in each frame for a title.
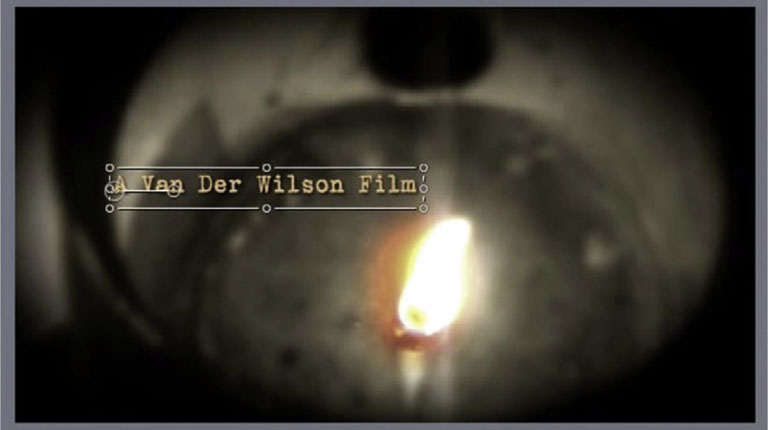
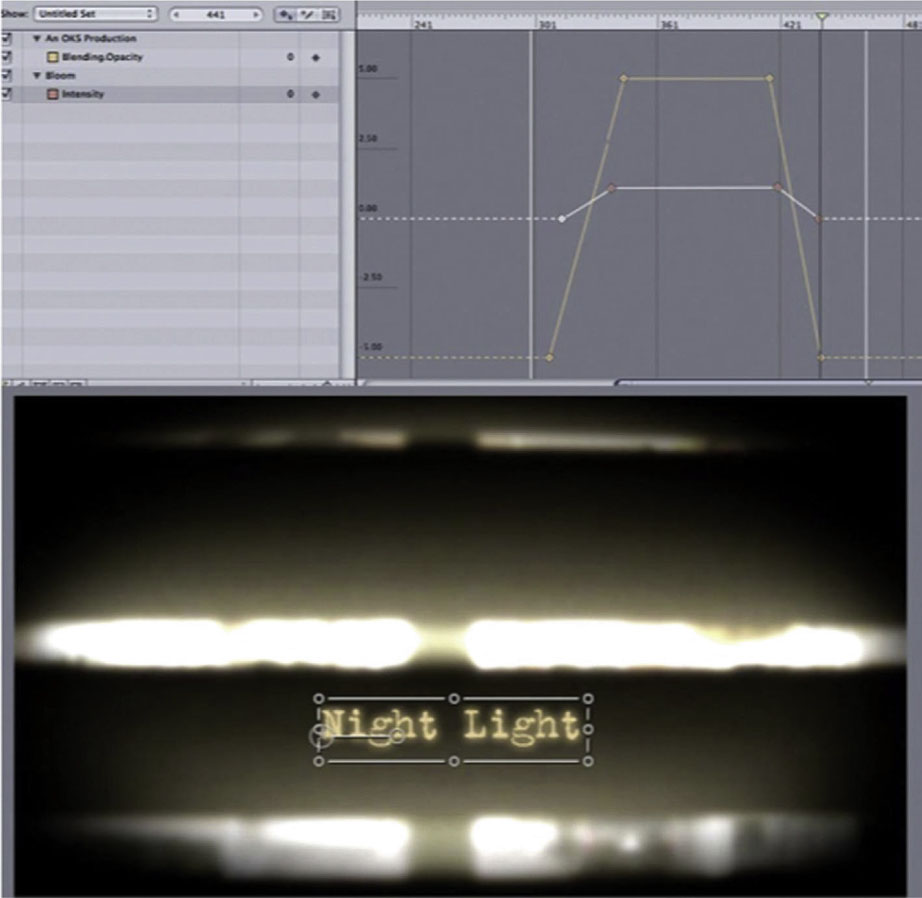
5 Done-Now we can add in our text animation. For this title I used Opacity going from 1–100 and I added the Bloom effect (Library | Image Units | Stylize | Bloom) to give it a backlit glow. For the Bloom effect I animated the Intensity parameter. Once you have one title that you like the animation of, you can duplicate it several times and then go in and change the source text so that you don’t have to set up the keyframing for each title individually.
Tutorial: Creating a Title Sequence with a Virtual Camera
Virtual cameras work pretty closely to the way you would expect a real camera to work. In the following tutorial we animate a title sequence in which a camera flies through a sky scene with clouds.
1 Import the bluesky.psd document into After Effects as a Composition Cropped Layers.

2 Go to each cloud layer and turn on the 3D Switch.

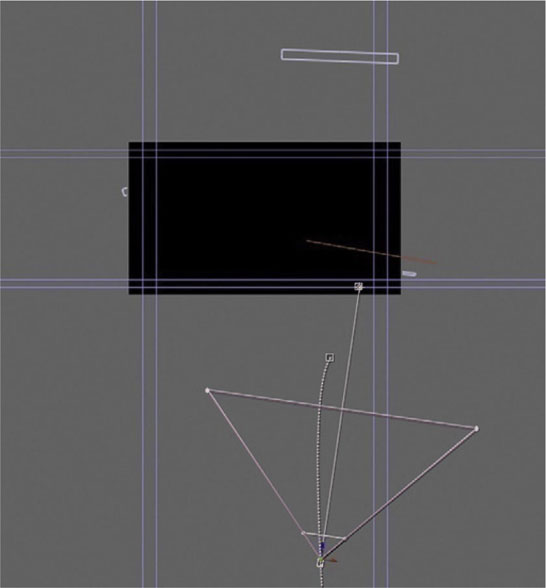
3 Switch to the Top camera view and move the clouds so that they are spread out in Z space.

4 Next we will create our virtual camera. Create a new camera layer by going to Layer | New | Camera. Use the preset for 20mm. This will give us more options for taking advantage of the virtual camera’s Depth of Field effects.
5 Now that we have our camera layer, add your first text layer. Flip on its 3D Switch. Place it behind the first cloud in Z space.

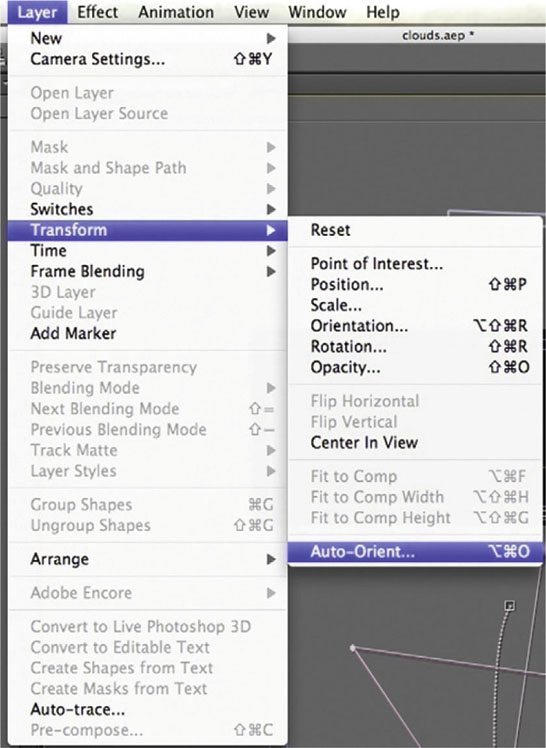
6 With your clouds and text layers highlighted, go to Layer | Transform | Auto-Orient and Orient Towards Point of Interest. This basically means that the clouds and text layers will turn to face the camera wherever you place or turn the camera.
7 Animate the camera traveling through the scene, using both the Point of Interest and Position to move the camera to each cloud. Have the camera pause for 3 seconds at each cloud to allow for the animation of each title.
8 Done - In that 3-second window, during the first second animate the cloud’s Opacity from 100–0 while you animate the text’s Opacity from 0–100. This will give the impression that the cloud goes away to reveal the title. Hold the animation for 1 second, then have the cloud reappear by animating the Opacity from 0–100 (also fade out the title at this point by setting the Opacity to 0%).

Pop!Tech 2008: A Case Study
• Motion Graphics Studio: Trollbäck + Company
• Creative Director: Jacob Trollbäck
What was the main concept and inspiration for this conference’s opening titles?
We were discussing scarcity and abundance and they felt like very organic concepts to us, so we spent a lot of time looking at nature references, and that led to thoughts on different organic ways to construct the type.
Were there any challenges that came up when you were combining live action and motion graphics?
We shot all ink, powder pigment, and ferrofluid, which is a really cool oily, magnetic liquid, with the RED camera. We also created and shot some plastic letters that we poured ink into. There actually weren’t any huge issues with combining the live action with the type in After Effects. We do it all the time. Don’t get me wrong, it took time and was a pain. Christina Ruegg and Stina Smith, two extremely talented designers and animators, did all that hard work.
The choice of imagery that creates (Abundance) and destroys (Scarcity) the type is very effective. How were you able to balance and integrate visual imagery and typography in such a manner?
Well, the idea that the word Scarcity would dry out and disappear was central to the idea, and that is setting the stage for Abundance to come in with a bang. We discussed color a lot, and while we ended up with a mostly monochromatic piece, we really liked how the red exploded onto the scene, like a flower bursting into life.
The seamless integration of type and imagery, storytelling, and editing in this piece definitely provokes an emotional reaction in the audience. Can you elaborate on that?
In all our work, we are trying to make people feel something. All our inspiration comes from insightful moments and experiences. We try to distill all that emotional power into small injections of pure emotion. The [sound]track, once again by Michael Montes, definitely helps.
Anything else you would like to add?
Like all good communication, the piece is strictly curated and choreographed, but the goal must always be to make it look effortless.
Figure 6.43a Still frames from “Pop!Tech 2008”, created by Trollbäck + Company.
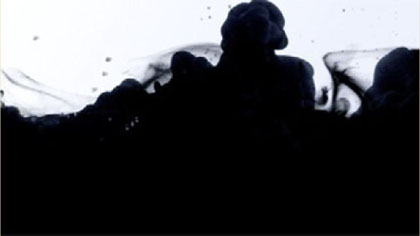
Figure 6.43b

Figure 6.43c

Figure 6.43d
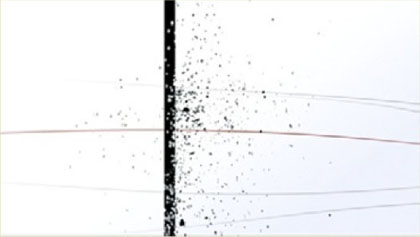
Figure 6.43e

Figure 6.43f

Figure 6.43g

Figure 6.43h
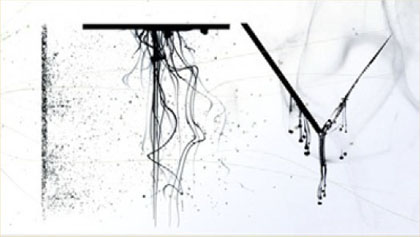
Figure 6.43i

Figure 6.43j

Figure 6.43k
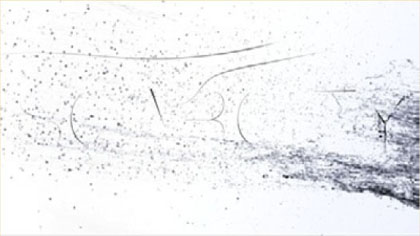
Figure 6.43l
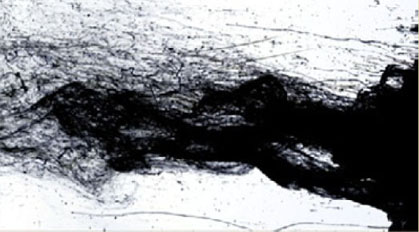
Figure 6.43m

Figure 6.43n

Figure 6.43o

Figure 6.43p
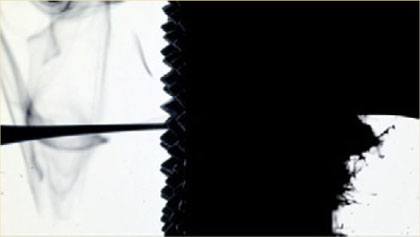
Figure 6.43q

Figure 6.43r
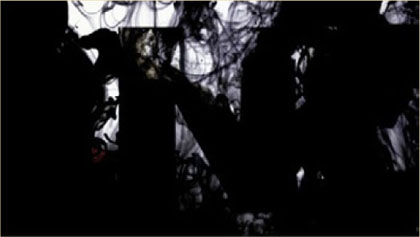
Figure 6.43s
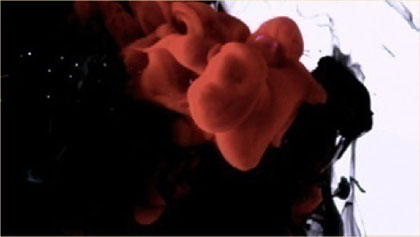
Figure 6.43t
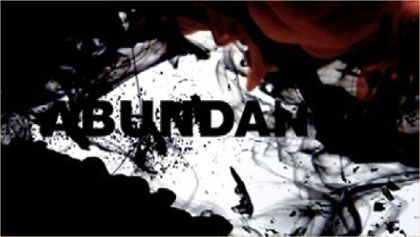
Figure 6.43u

Figure 6.43v

Figure 6.43w

Figure 6.43x
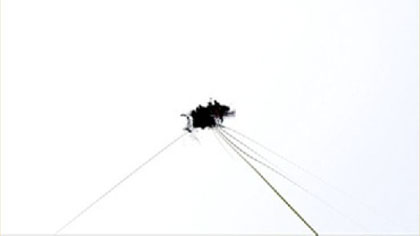
Figure 6.43y
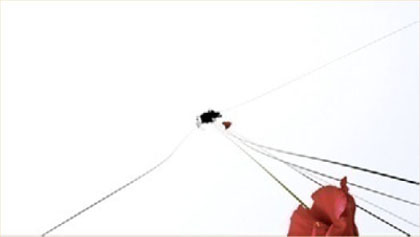
Figure 6.43z

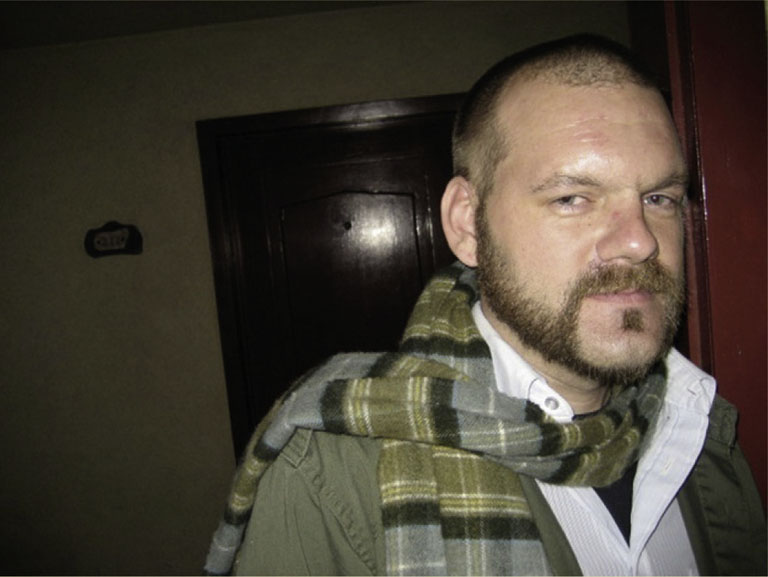
Interview: Ben Radatz on Title Design
Figure 6.44 Ben Radatz.
Can you talk a bit about yourself and your background?
I’m a pretty easy read; work is also my hobby, so I spend an unhealthy amount of time behind my desk. I have a great wife, a couple of dogs. Solid roof. No complaints.
I moved to Kansas City in ’94 to attend KCAI in the hopes of becoming a Disney animator, but it wasn’t long before I’d forgotten about that and was off tinkering with early versions of Premiere and After Effects, making experimental type and collage animations. I was usually more interested in seeing how far I could push the software than I was the actual content of the work itself, but that gave me a good library of techniques and ideas that I was then able to apply to more substantial work.
As a senior I was awarded the Princess Grace Foundation’s Young Filmmaker Award, which afforded me a full year to work on my senior thesis project—this pretentious, confusing, 20-minute-long abstract live-action/animation hybrid thing. But it went over well on the festival circuit, and that gave me the post-grad encouragement I needed to continue making my own work.
How did MK12 start out?
MK12 started out as something entirely different than what it is now. While I working part-time at my first animation job, I got a call from an investor who had been referred to me by a professor at KCAI. He’d been following the success of Napster and other media portals and wanted to build something similar, and he hired me to design it. Not knowing anything about Web design, I recruited several of my KCAI friends/fellow filmmakers-turned-Web-designers. We’d work on the site by day, and at night we’d come back in and work on short film projects, a few of which became the work we’re still best known for.
A year later, the investor wasn’t seeing a profit and bailed out, leaving us jobless. He was kind enough to let us keep our machines, though, and we took our small reputation, set up shop in my old apartment, and gave it a go. Our exposure in film festivals eventually lead to calls from networks and agents, and we gained momentum from there.
Commercial work has always been a means to an ends for us; we’re all filmmakers and artists at heart, and the work we’re paid to do affords us the ability to continue on with our own projects. Not that we’re any less proud of our commercial work, though; we’re fortunate to have worked on some great jobs with some very talented people. But it’s usually only because of our in-house work that we’re able to work on jobs we like.
How did you get to specialize in motion graphics, and in particular, film titles?
As with most things we do here, by accident. When we got started, the term motion graphics wasn’t all that prevalent, and it hadn’t occurred to us that we’d be able to make a living at it. We figured that we’d be doing the same as before, more or less, only now with clients instead of a boss. But festivals like ResFest and Conduit—along with cheap workstations and an abundance of bored ex-rave-flyer designers—gave motion graphics some momentum. Add to that an army of jobless animators and title designers displaced by the closing of the bigger title companies, and overnight, boutiques with ironic names became the new agency go-to.
Much of the early work we did got swept up in all of that, and though we’ll argue when called motionographers, it’s where we found our core audience.
A lot of our in-house work is type-driven and experimental in nature, and that’s gotten us some attention from feature directors wanting title sequences or animated vignettes in their films, and we’re often afforded a lot of trust in our interpretation and execution of the job, which usually leads to a better piece overall, leading to more calls, etc. We love creative collaborations with like-minded people, and we really feel at home working on films.
And if you look back at our work, it’s not hard to spot our love for title sequences. It’s an art form for which we have a tremendous amount of respect and admiration, the pioneers of which aren’t credited nearly enough in the pages of pop-art history.
How do your life experience, interests, and passions influence your work?
We don’t like to think that we have a “house style”; almost every piece that we make is the result of some new tangent or meme bouncing around the studio at the time. And we acknowledge that the best work often comes from personal experience and interpretation, so we try to create an environment in which everyone is welcome to pursue their own tangents and influence the creative direction of the studio.
And many of our influences are defined by our geography: The Midwest is a treasure trove of flea markets and obscure mythology. Summer months spawn road trips down unmapped service roads, uncovering lost ephemera and absorbing the nuances between county lines. And being in Kansas City itself is a source of inspiration. It’s a cornerstone of American folklore, but for more obtuse reasons: cabaret, jazz, the Mob, Jesse James, Disney, Pollack, Benton, Burroughs. The list goes on. It’s good energy to plug into.
What are your guidelines/preferences in regard to font size and readability for theatrical releases, broadcast, and/or smaller screens?
There really aren’t set guidelines for designing on-screen type anymore; any game you play these days, for example, uses type that challenges legibility, even on the biggest HDTVs. We usually just use common sense: design it as we wish, throw it on a couple of TVs or a screen, and adjust as needed.
In film, font size is almost always dictated by lawyers and agents; every name is assigned a percentage of the main title based on his or her role in the film. So it is a bit more restrictive than television in that regard, but we just work around it.
What kind of guidelines (if any) do you receive from the studios in regard to title card order, font size, or size distinction between executives, main title, and primary and secondary talent?
The title card order is always dictated by the studio, and there’s definitely a science to it that we’ll probably never understand. And that’s fine with us; our concerns are compositional and narrative; names are just text at that point.
What are your general guidelines to determine the duration of each title card?
Again, that’s usually dictated by the studio. Most single cards run for 3–5 seconds, with gang cards up for 7 or 8 seconds.
Do you have any preferences and/or motivations in regard to transitions (dissolves, camera movements, hard cuts, etc.) from the titles to the film (or vice versa) and from one title card to another?
It all depends on the type of film we’re working on. Some call for choppier, more staccato pacing, others for graceful camera moves and a softer tone. We usually go out of our way to avoid cuts, though; we just feel that there are far more interesting ways to get from A to B. But we’re certainly no strangers to hard cuts—they have their purpose also.
It’s usually up to us to propose a transition from the titles into the film, and we’ll work back and forth with the editor until we have something that everyone’s happy with.
Can you talk about the use of color and lighting in the work you do?
Most of the work that we do inhabits a hybrid live-action/graphic/2½D world, and we’re always testing new recipes for getting those elements to work together. When we shoot we have a pretty good idea of how we’ll be working the footage into the overall mix, and we’ll usually light accordingly. But we don’t have a set technique that we take from one project to another; unless we’ve hit oil, we’ll usually shelf a technique after having done it once. It just helps keep the work fresh and us entertained.
Can you talk about the relevance of editing in the work you do?
We usually replace the word editing with pacing when we work on a project; as I mentioned, we generally prefer continuous camera moves and graphic transitions over hard cuts. I suppose the only reason behind that is to do something different and unpredictable. But as a viewer, it’s also nice to feel as though you’re immersed in a larger world, of which you’re only seeing a fraction. More so than with edits, continuous action implies this well.
Do you generally work on your titles with the score already in place? If so, how does that affect your work?
There’s no real standard here, and our jobs are pretty evenly split between having music up front and adding it on at the end. If we don’t have music to work with, we’ll speak with the composer (or to whomever will be licensing the music, if that’s the route) to get a feel for what the mood and tempo of the score will be. We don’t work with a temp track, because that has a tendency to influence the work, even when you’re mindful of it. So instead we’ll work on good-sized chunks and then tie them together once we’re able to.
If we had it our way, we’d have the track from the start. Music (and audio in general) is such a big character in any animated piece, and it gives us an opportunity to really play up the relationship between the visuals and the track. But it seems to work equally well the other way; since we’re not able to exploit the nuances of the track, we’ll put our efforts elsewhere. It just comes out differently—not bad, just different.
At what point in the production/postproduction process of a film do you generally get involved?
Most of the title work we’ve done has been with Marc Forster (The Kite Runner, Stranger than Fiction, Quantum of Solace), and he likes to lock in his team as early as possible, so we usually have plenty of time to knock around ideas. In terms of actual work, though, that comes at the end of the production, not only because we often need yet-unshot footage to work with but also because it is important to us that the director feels involved in the process and pleased with our direction, which is usually impossible during production. We’re the least of his/her concerns when shooting.
As a creative director, can you elaborate on the dynamics with your team of designers, 3D artists, and illustrators?
We’re a fairly democratic studio in that anyone here with a good idea has the opportunity to influence the course of a project, and we’ve mastered the art of passing projects around the studio so that everyone can add to them. Most of us are generalists and are able to develop full shots (or in some cases full projects) on our own, so our pipeline can stay fluid, and we don’t keep a set blueprint for working through a job. That spontaneity helps us approach each project from a different perspective, which almost always translates well in the final work. Narrative pieces are the exception, though, as it’s important to establish a solid pipeline to ensure narrative and visual continuity.
In either case, we’ll either make sure that everyone is privy to the same thoughts and information, or we’ll appoint a creative lead, the responsibilities of which are to filter and interpret the collective thoughts of the studio, not necessarily dictate the aesthetics of a project singlehandedly.
Is there a typical length of time you are given (or a minimum amount of time you request) when you work on a title sequence project?
We’ll usually know about a title sequence project long before we start working on it, so at least we can get some ideas going, but in terms of actual production, it’s usually a two- to three-month affair.
Can you elaborate on the research you do in your projects, and how it affects your work?
Our ideal working scenario is to develop projects from the ground up, which gives us an opportunity to inject our own interests and influences without competing with an existing idea or style. In cases like these, our research is probably already done, or at least well under way. We have a cache of ideas and techniques on the back burner, waiting for the right project. And more often than not those are informed by our own personal interests and experiments.
If research is required, we do try to limit ourselves to nonvisual (or at least nondesigned) material so as not to influence our general direction. On Stranger Than Fiction, for example—in which Will Ferrell plays an auditor with OCD—we did a lot of research into what actually constitutes compulsive behavior and used that to inform our designs. And because he does work for the IRS, we dug up our old tax returns for further inspiration.
What are your main goals/objectives when you are working on a title sequence?
Most important is that the director is happy with our work, because at the end of the day, it’s their film, and while we do make films of our own, a title sequence is not the right venue for our personal tangents, unless called for. And it matters that the sequence is an accurate reflection of the film itself; perhaps not so much in content or texture, but more in spirit. A title sequence usually sets the tone of the film, so it’s important that we communicate that clearly.
We’d hope that the sequence is progressive, novel, and poignant. And then, of course, we’d hope that it’s our best work to date.
What are the most challenging aspects of your work?
We try to avoid doing the same thing twice, so the biggest challenge is probably developing new techniques, especially given the turnaround of most commercial work.
What are your favorite parts or aspects of the work you do?
Meeting and working with like-minded people and learning from them. Finding the right aesthetic or technique for a project. Brainstorming good ideas.
How does technology affect your work?
We’re a small studio in a midsize town; we wouldn’t be here if not for affordable technology and the means to work with people on the coasts or overseas. We try not to let technology describe our work, but it certainly enables it.
Throughout your career, approximately how many titles (or type-oriented motion graphics) have you worked on?
Not counting our own films, we’ve produced three title sequences and contributed graphic animation to four features.
What are your favorite titles you’ve worked on?
Not to speak for everyone here, but I’m sure we’d agree that Quantum of Solace was at least the most memorable, in that it was more of an experience than a job. We shut down the studio for months, learned new software, produced some fantastic early designs, stayed out in London, talked gun safety with Daniel Craig, ran a three-day shoot on one of the most famous stages in the world, and met the Princes at the premiere. And Marc Forster is about as genuine and inspired as they come, so it’s always great to work with him. We shot the sequence with Simon Chaudoir, whose work we’d been drooling over years before. In all, a very deep and immersive project, all of which really informed the outcome of the piece.
What are your favorite titles (if different from the ones you worked on)? Favorite graphic designers, type designers, or motion designers? Favorite font (either from a font foundry or custom-made)?
Not surprisingly, the Bond titles will always be favorites around here, as with all the work of Binder, Ferro, Bass. A fairly predictable list, truth be told, but is so for good reason.
David Carson designed a font called Thaitrade, which was our house font for almost seven years. It has a great presence and honesty … a very stable font. But we’ve now side-graded to Univers, just to switch things up.
Do you have any advice that you’d like to give to novice title designers?
Don’t think of yourself as a title designer. Good title sequences really are works of art, and that should be your focus. The screen should only be the outlet, not the medium.
What are you working on now?
We’re currently working on a new short film to be released sometime in the spring of 2010, and we just wrapped up a cinematic for Harmonix’s next iteration of Rock Band. And we’ll be doing some in-film animation on a currently top-secret feature, which will probably be in theaters early next year.