
You can't paste a picture into your Web browser, and you can't paste MIDI music information into your word processor. But you can put graphics into your word processor, paste movies into your database, insert text into Photoshop, and combine a surprising variety of seemingly dissimilar kinds of data. And you can transfer text from Web pages, email messages, and word processing documents to other email and word processing files; in fact, that's one of the most frequently performed tasks in all of computing.
Most experienced PC users have learned to trigger the Cut, Copy, and Paste commands from the keyboard, without even thinking. For example:
Highlight some material in the document before you (see Figure 7-2).
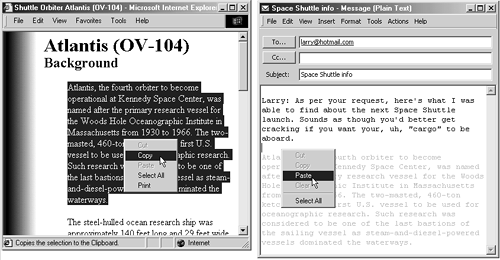
Figure 7-2. Suppose you want to email some text you find on a Web page to a friend. Left: Start by dragging through it and then choosing Copy from the shortcut menu (or choosing Edit→Copy). Now switch to your email program, and paste it into an outgoing message (right).
In most cases, this means highlighting some text (by dragging through it) in a word processor, layout program, email application, or even a Web page in your browser.
Use the Cut or Copy command.
You can trigger these commands in any of three ways. First, you can choose the Cut and Copy commands found in the Edit menu of your document window. Second, you can press the keyboard shortcuts Ctrl+X (for Cut—think of the X as representing a pair of scissors) or Ctrl+C (for Copy). Finally, you can right-click the highlighted material and choose Cut from the shortcut menu.
When you do so, the PC memorizes the highlighted material, socking it away on an invisible storage pad called the Clipboard. If you chose Copy, nothing visible happens. If you chose Cut, the highlighted material disappears from the original document.
At this point, most people take it on faith that the Cut or Copy command actually worked; but if you're in doubt, you could always check the ClipBook Viewer, described on Section 3.2.2.2.
Click the cursor to indicate where you want the material to reappear.
This may entail switching to a different program, a different document in the same program, or simply a different place in the same document. (Using the Cut and Paste commands within a single document may be these commands' most popular function; it lets you rearrange sentences or paragraphs in your word processor.)
Choose the Paste command.
Here again, you can do so either from a menu (choose Edit→Paste), by right-clicking and choosing Paste from the shortcut menu, or from the keyboard (press Ctrl+V). The copy of the material you had originally highlighted now appears at your cursor—that is, if you're pasting into a program that can accept that kind of information. (You won't have much luck pasting, say, a paragraph of text into Quicken.)
The most recently cut or copied material remains on your Clipboard even after you paste, making it possible to paste the same blob repeatedly. Such a trick can be useful when, for example, you've designed a business card in your drawing program and want to duplicate it enough times to fill a letter-sized printout. On the other hand, whenever you next copy or cut something, whatever was already on the Clipboard is lost forever.
Tip
Office 2000 is an exception; it doesn't wipe out the Clipboard's contents when you copy something new. In fact, it hangs onto the last twelve chunks of copied material. When it comes time to paste the material back into a document, you can use the Clipboard toolbar to specify which item you want to paste.
As useful and popular as it is, the Copy/Paste routine doesn't win any awards for speed; after all, it requires four steps. In many cases, you can replace that routine with the far more direct (and enjoyable) drag-and-drop method. Figure 7-3 shows how it works.

Tip
To drag highlighted material to a spot that's off the screen, drag the cursor until it approaches the top or bottom edge of the window. The document scrolls automatically; as you approach the destination, jerk the mouse away from the edge of the window to stop the scrolling.
FREQUENTLY ASKED QUESTION : When Formatting is Lost
How come pasted text doesn't always look the same as what I copied?
When you copy text from, for example, Word, and then paste it into another program, such as the Notepad, you may be alarmed to note that the formatting of that text (bold, italic, the choice of font, size, and color, and so on) doesn't reappear intact. There could be several reasons for this problem.
For example, not every program offers text formatting; Notepad, for example, doesn't. And the Copy command in some programs (such as Web browsers) doesn't pick up the formatting along with the text; when you paste something you've copied from Internet Explorer and paste it into Word or WordPad, you get plain, unformatted text.
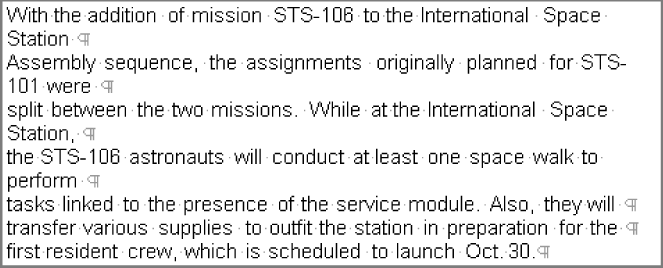
Finally, a note on text wrapping: Thanks to limitations built into the architecture of the Internet, email messages aren't like word processor documents. The text doesn't flow continuously from one line of a paragraph to the next, such that it reflows when you adjust the window size. Instead, email programs insert a press of the Enter key at the end of each line within a paragraph.
Most of the time, you don't even notice that your messages consist of dozens of one-line "paragraphs"; when you see them in the email program, you can't tell the difference. But if you paste an email message into a word processor, the difference becomes painfully apparent—especially if you then attempt to adjust the margins, as shown here.
To fix the text, you have to delete the invisible carriage return at the end of each line. Veteran PC users sometimes use the word processor's search-and-replace function for this purpose.
Several of the built-in Windows programs work with the drag-and-drop technique, including WordPad and Outlook Express. Most popular commercial programs offer the drag-and-drop feature, too, including email programs and word processors, Microsoft Office programs, and so on.
As shown in Figure 7-3, drag-and-drop is ideal for transferring material between windows or between programs. It's especially useful when you've already copied something valuable to your Clipboard, because drag-and-drop doesn't involve (and doesn't erase) the Clipboard.
The most popular use for the drag and drop technique, however, is rearranging the text in a single document. In, say, Word or WordPad, you can rearrange entire sections, paragraphs, sentences, or even individual letters, just by dragging them—a terrific editing technique.
Tip
When you use drag-and-drop to move text within a document, you move the highlighted text, deleting the highlighted material from its original location. If you press Ctrl as you drag, however, or when you drag text onto the desktop, you make a copy of the highlighted text.
As shown in Figure 7-4, you can even drag text or graphics out of your document windows and directly onto the desktop. There your dragged material becomes an icon—a Scrap file.
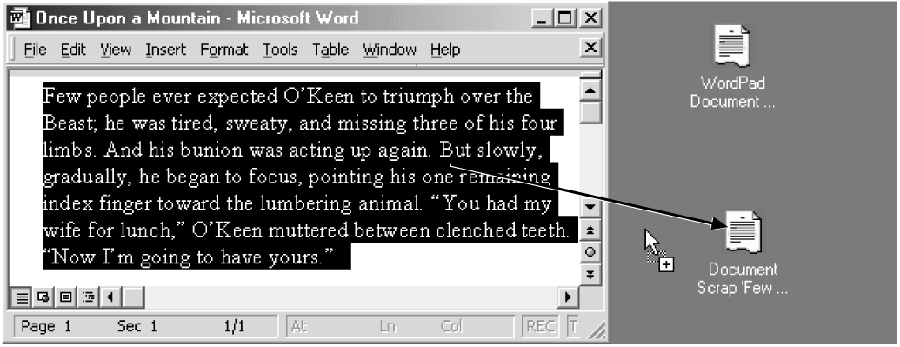
Figure 7-4. When you drag material out of the document window and onto the desktop, you get a Scrap file. You can view a Scrap file just by double-clicking it, so that it opens into its own window.
When you drag a clipping from your desktop back into an application window, the material in that clipping reappears. Drag-and-drop, in other words, is a convenient and powerful feature; it lets you treat your desktop itself as a giant, computer-wide pasteboard, an area where you can temporarily stash pieces of text or graphics as you work.
Here's yet another, much less popular relative of Copy and Paste: the Insert Object command, which is available in most Windows programs. (You may hear it referred to as Object Linking and Embedding, or OLE, or even "oh-LAY.")
Using OLE, you can insert material from an OLE server application (such as part of an Excel spreadsheet) into a document running on an OLE client application (such as Word). The spreadsheet material appears in the Word document, but when you click the spreadsheet in Word, the menus on your screen change to those of Excel! You can then manipulate the spreadsheet data using any of the standard Excel tools. (When you click on another part of the Word document, the menus revert to their original form.)
Some applications can function only as an OLE server or an OLE client; others can be both. Generally speaking, you'll have better results if you use two applications that are designed to share data with each other, such as Microsoft Office applications.
To insert data using OLE, choose Insert→Option in the OLE client program. You'll be prompted for the file you want to insert, or offered the chance to create a new document to embed. As the name Object Linking and Embedding implies, you can either create a link to another kind of document or embed it:
Linking means that you're grabbing a material from an OLE server document (such as an Excel spreadsheet) and inserting it into a document running on an OLE client (such as Word). In this scenario, the transferred material remains "live." If you edit the spreadsheet in Excel, the changes you make will appear in the spreadsheet portion of the Word document the next time you open it.
Figure 7-5. Top: You can insert many different kinds of "objects" into a Microsoft Word or WordPad document: a Paint file ("Bitmap Image"), Image Document (something you've scanned), an Excel chart or spreadsheet ("Worksheet"), a sound or video clip, and so on. Bottom: You may prefer to slap an entire existing document file into the middle of the one you're now editing. Do that using the Create from File tab. Remember to turn on "Link to file" if you want the data to update automatically when the source file is edited separately.
The advantage of this arrangement is that the linked file (the spreadsheet) isn't actually saved as part of your Word document, so the Word file doesn't grow any larger. The disadvantage is that if you move or distribute the Word document, the link gets broken, and the spreadsheet doesn't go along for the ride.
Embedding inserts the OLE server material (such as the spreadsheet) directly into the client document (the Word file). The client document therefore becomes much larger; furthermore, changes you make to the server document aren't reflected in the embedded copies. The advantage of this method, however, is that you can at least email the Word document it to someone without losing the embedded spreadsheet.

Tip
OLE isn't nearly as popular as drag-and-drop or Copy/Paste, despite the apparent flexibility it provides. That's because OLE has a reputation for behaving erratically; the high hopes that Microsoft had for it as a cornerstone of its application technology haven't panned out. If you decide to use OLE, it's best to do so using Microsoft applications on a fast computer with plenty of memory.