
The Start→Programs→Accessories submenu contains a handful of shortcuts to faxing, dialing, and conferencing programs. This section presents each one in turn.
Windows 2000 Pro lets you send and receive faxes directly from your desktop. All you need is a fax modem, a standard component on most modern PCs.
You can fax a document as easily as printing it. In fact, the fax modem shows up in your Printers Folder as just another printer (Figure 9-2).
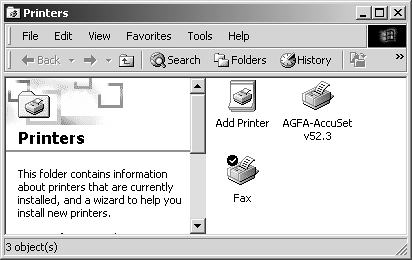
Figure 9-2. To Windows 2000, a fax device is just another printer. It's not, however, a shared printer, meaning that you can't share your fax with others on your network.
If your PC has a fax modem, you're already set to send faxes (see "Sending a fax" in the next section); the presence of a fax printer icon in your Start→Settings→Printers window tells you so. To make sure it's set up the way you like it (and to turn on your ability to receive faxes), proceed like this:
Choose Start → Programs → Accessories → Communications → Fax → Fax Service Management.
As a reward for that massive mouse trek, the Fax Service Management program appears.
In the console (left) pane, click Devices. In the details (right) pane, right-click your fax modem's name; select Properties from the shortcut menu.
The fax modem's Properties dialog box appears.
On the General Tab, specify whether or not you want to be able to receive faxes.
The "Enable send" box is turned on by default, but you should indicate your return fax number in the TSID (transmitting station identifier) box. If you want your PC to receive incoming faxes, turn on "Enable receive." If you have a different fax number for receiving faxes, enter it in the CSID (call subscriber identifier) box.
Note
If you want your PC to receive faxes, you have two wiring options. First, you can dedicate a phone line just to your modem. Second, if you'd rather let your modem share your regular voice line, you can use the "Enable manual answer for the first device" option described on the next page.
If you allow incoming faxes, you can indicate how long the PC should wait (how many rings) before answering the phone when a fax call comes in.
On the Received Faxes tab, specify how you want incoming faxes to be handled.
If you'd like them printed automatically, turn on "Print on" and use the drop-down menu to choose a printer. If you'd rather have them saved as files on your hard drive, turn on "Save in Folder" and indicate where you want the files saved.
Finally, you can ask Windows to route incoming faxes automatically to the In box of your email program. That's a convenient setup—it helps you consolidate your communications, regardless of their sources—but it works only if you meet a long list of requirements. Unfortunately, this feature works only if you have a MAPI -enabled email program. Microsoft Outlook is; Outlook Express isn't. (If your email program isn't MAPI-happy, the "Send to local email inbox" checkbox is dimmed.)
Click OK. Close Fax Service Management.
Next, complete the user information for faxing. Choose Start→Control Panel, and then double-click the Fax icon to open the Fax Properties dialog box. On the User Information tab, type in the information you'd want to appear on the fax cover page (see Step 5 on the next page). The other Properties tabs are:
Cover Page. Lists the fax cover pages you've designed. (See "Creating Cover Pages" later in this section.)
Status Monitor. These checkboxes let you specify how you'd like to be notified when a fax comes in or goes out. Display the status monitor means that you'll see a small progress-bar dialog box; Display icon on taskbar adds a system Tray icon for faxing, offering quick links to the Fax Queue, your folder of faxes, and the Fax Monitor. Play a sound, of course, means that you'll hear a sound effect when you receive a fax. (To change the sound, open Sounds & Multimedia in Control Panel and look for Incoming Fax in the Sound Events list.)
The Enable manual answer for the first device is for people who have only a single phone line for both voice and fax calls. If you turn this on, when a call comes in, an "Answer this call?" dialog box will open. If you pick up your phone handset and hear a fax tone, click Yes. Otherwise, click No, and proceed with your normal voice call. (If the caller tells you a fax is about to arrive, you can turn on the Answer Next Call checkbox in the Fax Monitor window. Your PC will answer the next call.)
Advanced Options. This tab's buttons open the Fax Service Management Console, Fax Help, and Add a Fax Printer programs.
Sending faxes couldn't be more convenient; there's no printout to throw away, no paper involved. Your PC sends the fax directly to a fax machine's brain. Here's the whole process, step by step:
Open up whatever you want to fax (a word processing document, spreadsheet, or whatever). Choose File → Print.
The Print dialog box appears.
Choose Fax in the Select Printer drop-down menu (or click the fax icon); then click OK or Print.
The Send Fax wizard appears. If this is the first time you've run the wizard, a dialog box asks if you want to edit your user information, as described in the previous section. If you've already done so, select "Keep the current user information" and click OK.
On the Recipient and Dialing Information page, type the name and fax number of the recipient (see Figure 9-3).
Figure 9-3. If the fax number isn't local, turn on the Use Dialing Rules checkbox, and then choose the appropriate dialing rules from the drop-down list. (See page 160 for instructions on defining "locations" for dialing.) If you're using dialing rules and you're calling a place that doesn't require an area or city code, type the first three digits in the first Fax Number box, and the rest in the next text box.
You can also click Address Book to select someone's name in your Windows Address Book (see Section 12.4.5). If your Address Book information included the recipient's fax number, you can skip to Step 5.
Click Add, and then repeat this step for any additional recipients. Click Next.
Now you're invited to add a cover page to your outgoing fax.
Turn on "Include a cover page," if you like, and then select a cover-page template from the drop-down list.
This list is empty unless you've designed a cover page or two (see Section 9.2.1.4). When you choose a cover page, you can also type a subject line and note to appear on it.
Click Next. On the Scheduling Transmission page, specify when you want to send the fax.
Add your company's billing code information, if necessary.
Tip
If you find yourself frequently specifying a later time (such as off hours, to reduce interference with normal work) or a certain billing code for your faxes, consider changing the default settings for this screen. Choose Start→Settings→Printers. In the Printers window, right-click the fax printer icon; select Printing Preferences from the shortcut menu. Specify the default sending time you prefer (and billing code, if appropriate), and click OK twice. (If you duplicate the fax icon in the Printers window, you can use these techniques to give each "fax printer" different billing codes, default send times, and other settings.)
If you're wondering how Windows 2000 knows "when discount rates apply," it doesn't. You must tell it; open the Fax Service Management program. Right-click "Fax Service on Local Computer," and select Properties from the shortcut menu. On the General tab, you can set the actual discount rate times in your area.
Click Next.
The final screen shows you a summary of your outgoing fax's settings.
Click Finish to send the fax (or to prepare it to wait until the time you specified).
Windows 2000 will send the fax automatically at the specified time.
If it begins to dial at an inopportune time—or if you discover a typo just as your PC tries to send the fax—you can cancel the fax attempt by clicking the End Fax Call button in the Fax Monitor (Figure 9-4).
Figure 9-4. The End Fax Call button is available when the Fax Service is dialing the number. It's grayed out as soon as the connection is made. The Fax Monitor window doesn't close on its own, by the way; close it manually by clicking its close button.
Your recipient is in for a treat. Faxes sent by a PC come out looking twice as crisp and clean when a real fax machine receives them (because they were never scanned in with a typical fax machine's crude scanner on your end).


When a fax arrives at your modem, you may or may not hear the incoming ring, depending on your modem's settings. You see a fax icon on the Tray, and a Fax Monitor window opens (Figure 9-4).
To look at or print a copy of a fax, right-click the Fax icon in the Tray, and select My Faxes from the shortcut menu. In the My Faxes folder, double-click either Received Faxes or Sent Faxes. Double-click a fax to open it in the Imaging Preview viewer program (or whatever graphic program you've associated with TIF files; see Section 7.6). You can print out a fax just as you would any image file.
GEM IN THE ROUGH : Incomprehensible Fax Names
One would think that as clever as computers are, they'd figure out some way to list your faxes other than by a long string of meaningless letters and numbers. And the availability of a thumbnail view isn't helpful with this sort of file.

The solution is to rename your fax files—or at least the ones you need to keep track of. Right-click a fax name and choose Rename from the shortcut menu. Use easily recognizable names. But don't change the filename extension (.tif); if you do, you won't be able to double-click a fax's name to open it.
You can idle away many pleasant hours designing your own cover pages. You do that on the Cover Page tab of the Fax control panel.
In addition to placing informational fields on your cover page as shown in Figure 9-5, you can paste in graphics, such as your company logo, and dress up the page with lines and shapes, courtesy of the drawing tools at the bottom of the window.
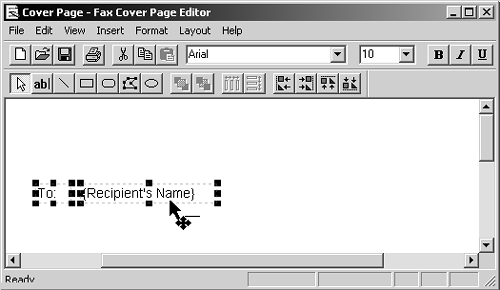
Figure 9-5. Start by choosing InsertRecipientName. A form field appears, which you can drag anywhere on the page. When you send a fax, Windows will fill this box with the name of the person who's getting your fax. Use the other Insert commands to place other fields on your cover page, such as your own contact information, the date and time, and so on.
When the cover page looks good, choose File→Save, type a memorable name, and click Save. From now on, this template will be one of your cover-page options whenever you send a fax.
HyperTerminal is a relic from the days when all dial-up services were text-based (like an old BBS), not graphically based (like the Web). You can still use HyperTerminal for direct serial and modem connections, but now it can also serve as a Telnet client (a program that can access text-based systems like bulletin boards and public-library systems).
To configure a Telnet session using HyperTerminal, choose Start→Programs→Accessories→Communications→HyperTerminal. Enter a descriptive name in the New Connection box then click OK.
In the Connect To dialog box, click the Connect Using drop-down list and select TCP/IP (Winsock), as shown in Figure 9-6. Click OK to make the Telnet connection. Finally, enter your login ID and start the session.

This program walks you through the creation of new Internet account. Details are on Section 11.1.3.
This program lets you use your local network or the Internet to collaborate and communicate with other people by typing messages, sending video images back and forth, speaking to each other via microphone and speaker, drawing on a virtual "white board," and even using each other's software. All of this works best on a LAN, but it also works over the Internet if both sides have a fast connection.
Start NetMeeting by choosing Start→Programs→Accessories→Communica¬tions→NetMeeting. A wizard walks you through the process of filling in your name and email address, specifying the Internet Locator Service (ILS) directory that will list you, specifying your connection speed (such as modem or cable modem), adjusting your microphone and speaker levels, and so on.
The ILS directory is a server on the Internet with which you can register; you'll be able to communicate with any other registered user. However, you can also communicate with another NetMeeting client directly, without an intervening server, as long as you know the IP address of the other computer. While using a server is more practical on the Internet, you're better off connecting directly when using NetMeeting on an office network.
After you've set up NetMeeting, schedule a time with your collaborators, just as you might schedule a conference call. Everybody has to be on the Internet (or office network) at the same time.
Note
Each participant must have either Phone Dialer or NetMeeting open; otherwise, you'll see a message that the person you called is not able to receive Internet calls.
To make a call, open NetMeeting and choose Call→New Call (Figure 9-7).
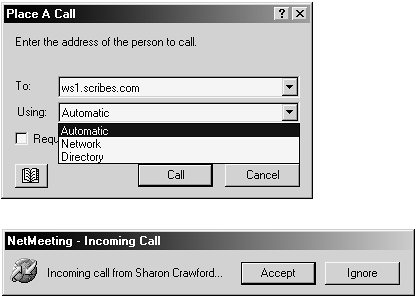
Figure 9-7. Lower right: Enter a host address either the TCP/IP address or the fully qualified domain name. In addition to the Telnet default port (23) you can also use alternative ports such as 110 for the POP3 service. Upper left: Enter your login ID and begin the session.
After you click the Call button, your computer attempts to connect to the addressee. At the other end, the recipient sees a message like the one at right in Figure 9-7. When you're connected, you'll see a window like the one in Figure 9-8.
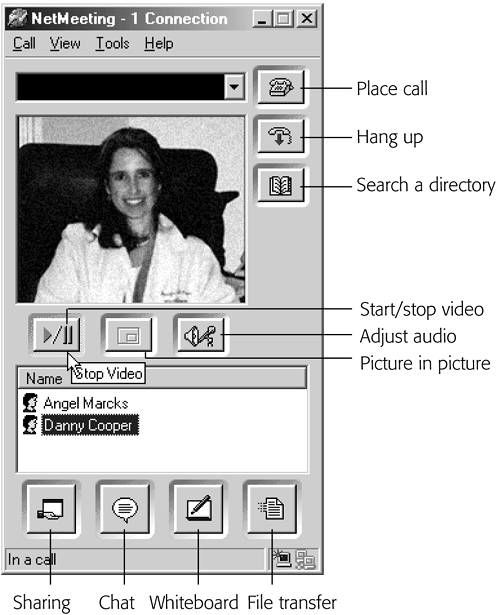
Figure 9-8. The four buttons on the NetMeeting window don't have labels—not even tooltips. If you're lucky enough to have video equipment hooked up, you can even participate n a videoconference.
Once your meeting is underway, you can perform four remarkable stunts, which correspond to the four icons at the bottom of the NetMeeting window (Figure 9-8). Once you figure out how they work, the amount of travel time and plane fares you can save using NetMeeting adds up quickly. Here's what they do:
Amazingly enough, other people in your meeting can use your programs—editing one of your Word documents or typing numbers into your Excel spreadsheet, for example—even if they don't have Word or Excel on their machines.
It works like this:
Launch the program you want everyone to be able to use. Then click the Sharing button (the first one on the left) on the NetMeeting screen.
The Sharing window appears, as shown in Figure 9-9.
Figure 9-9. click Allow Control. "Automatically accept requests for control" means that the other user can take control through the Control menu. "Do not disturb with requests for control right now" means that if anyone else asks for control, they won't get it (and you won't even have to refuse the request). If you're the one sharing the application, you can regain control simply by clicking inside the program window.
Click the name of the program you want to share, and then click Share.
Note, in particular, the Desktop, which is always listed in the Share Programs window. If you share it, then everybody else in the meeting can see what you see as you work in Windows. As far as NetMeeting is concerned, the Desktop is simply another program that you can share.
Under most circumstances, the other people in the meeting can just look at the program you're using. But if you'd like others in your meeting to be able to control the application—to edit the documents and use the menus, for example, proceed as follows:
Click Allow Control.
Instantly, a new window appears on the screens of the other participants, showing exactly what you see in your copy of the program. When you move your cursor, it moves on their screens; when you open a dialog box, they see it, too. Because your microphone is working during a NetMeeting meeting, you can use this feature to collaborate on documents, teach somebody a new program, or help somebody troubleshoot a PC.
And if you've shared your Desktop, giving away control means that other people can even manipulate your computer files and folders! They can open folders, rename or delete files, make backup copies, and perform any task that you can yourself, from wherever on the Internet to happen to be.
Just clicking Allow Control, however, is not enough to transfer control of a program to one of your collaborators. He must also choose Control→Request Control from his shared-program window; only then can he edit your documents or manipulate your desktop.

It's worth noting, by the way, that all of this controlling and sharing requires an enormous amount of data to be shuttled over the wires. Depending on the speed of your connection, the cursor may seem jerky and everything may feel very slow; that's normal, especially if you're connecting via standard dial-up modems.
Click the Chat button to open a window where you can type messages to others participating in the connection, exactly as in an Internet chat room. Opening the Chat window on your computer causes it to open on the screens of the other participants as well.
Select View→Options to change the look of the Chat window.
Click the Whiteboard button to open a shared version of Paint (page 201). All participants can use the whiteboard—adding notes or drawings. Figure 9-10 shows the Whiteboard and Chat windows.
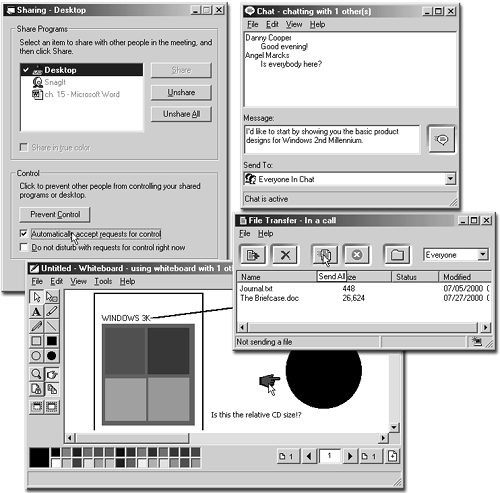
Figure 9-10. These four windows correspond to the four buttons shown at the bottom of the previous figure. Clockwise from top left: The Sharing window, which lets other people see what you're doing on your desktop and in your applications; the Chat window; the File Transfer window; and the Whiteboard, which lets you and your comrades work together on a design.
Tip
If you attempt to change or discard the whiteboard, you're asked to confirm the action; other people using the whiteboard will see it simply vanish without offering a chance to save the contents. In other words, check with others in the NetMeeting before closing the window.
To copy a picture or portion of another open document to the whiteboard, select Tools→Select Area. Your cursor changes to crosshairs; drag it around the area you want to capture. (You may first have to position the other document's window on the screen so that you can see the portion you want to grab.) When you release the mouse button, the selected area pops on to the whiteboard. Similarly, you can paste a whole window to the whiteboard by selecting Tools→Select Window.
If the whiteboard gets too crowded, add a page in front of the current page by selecting Edit→Insert Page Before. (Choose Insert Page After to add a page after the current page.)
To send a file or files to anyone (or everyone) in the NetMeeting, click the File Transfer button. Use the drop-down menu to specify who gets the file; choose File→Add File to specify the file you want to send; finally, to send the files on their way, click the Send All files button (Figure 9-10), or right-click one file and choose Send a File from the shortcut menu.
If your PC has a microphone and speakers , audio is automatically turned on during a NetMeeting, so that everybody else can hear whatever you say. Note, however, that you may not be able to hear anybody else while you're speaking. Some sound cards don't offer this full-duplex audio feature; in that case, you'll get more of a CB radio effect—half-duplex communication—where only one person can speak at a time. (In that case, you may want to say, "Over!" after each comment.)
You can send video to only one other person in the meeting, and if you're using NetMeeting over a standard modem connection, "video" may be a generous term. You may find that the picture is jerky and grainy, more like a series of still images than a TV broadcast. However, when you connect over an office network, the image quality is much better. Click the Start Video button to begin transmitting; click Stop Video when you've had enough.
This item simply opens up your Network and Dial-up Connections folder, as described in Section 14.1.
You can use this program to dial a phone connected to your computer, via your modem; you can even use its Edit→Add To Speed Dial List command to build up a list of numbers you dial frequently.
But Phone Dialer would be fairly uninteresting if that were all it did. (After all, practically every phone comes with a speed-dial function these days.) Phone Dialer is really another tool for IP Telephony (using the Internet for phone conversations) and video conferencing; its features overlap considerably with NetMeeting.
To communicate using Phone Dialer, you need a microphone and a sound card (if you want to be heard by the other participants) and a video camera (if you want to be seen). To contact one other person, you need only his modem's phone number; to contact someone else on your network (or another company's network), you need her computer name, IP address, or Internet directory name.
To place a voice call, click the Dial button in the Phone Dialer toolbar to open the Dial dialog box (Figure 9-11, top). After you click Place Call, the active call window appears on the screen (Figure 9-11, bottom).

Figure 9-11. Enter a computer name, as shown, or an IP address (in the format 192.168.1.54). You can also use Phone Dialer simply to dial your phone (if it's connected to the same line as your modem). To do so, select Phone Call and enter a telephone number. Bottom: In the Preview window at the top, you can adjust both the incoming and outgoing sound levels. Click the Take Call icon or Reject Call icon.
Receiving a call requires that you have Phone Dialer running. When you receive an incoming call, the Preview and Internet Call dialog boxes open automatically (Figure 9-11), and you may hear a sound.