8. Playing and Managing Music with iTunes
Listening to Music
iTunes is a multimedia marvel that supports visual media such as movies and TV shows. However, iTunes is better known for its audio features, including its support for podcasts, audiobooks, Internet radio, and mobile phone ringtones, and it’s best known for its flexible and powerful music features. I only have so much room to cover iTunes here, so I’m going to focus on these music features, including ripping audio CDs, navigating the Music library, adding tags and lyrics, viewing album artwork, managing playlists, and more.
Let’s begin with the most basic iTunes task: listening to music. Follow these steps to listen to music with iTunes:
1. If you want to listen to an audio CD, insert the CD into your Mac. If iTunes asks whether you want to import the CD, click No. (See “Ripping Music from Audio CDs,” later in this chapter, to learn how to import tracks from an audio CD.) By default, iTunes automatically connects to the Internet and attempts to identify a CD you have inserted. If it finds it, it displays the CD’s information, including the CD name, track names, times, artist, and genre, in the Content pane. If iTunes finds information for a CD, it remembers that information and displays it each time you insert the CD.
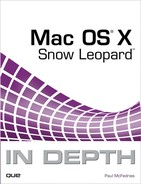
2. Use the Source list on the left side of the iTunes window to choose the source that contains the music you want to listen to. This will usually be the Music library, but if you inserted an audio CD in step 1, select the CD when it appears in the Source list. At the bottom of the iTunes window is the Source Information display. This shows you the total number of songs in the source, how long it plays, and the total disc space used.
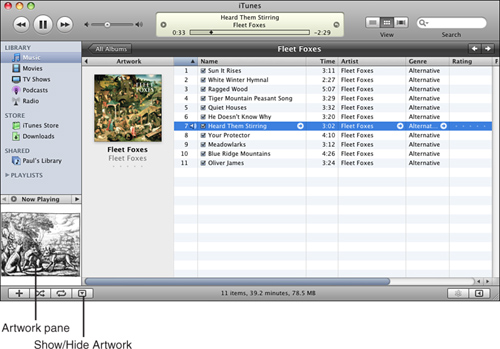
3. Click the Play button in the upper-left corner of the window (when playing, this becomes the Pause button). (You can also select Controls, Play or press the spacebar.) As a song plays, a speaker icon appears next to it in the Content pane to indicate it is the current song, and information about that song appears in the Information window (see Figure 8.1).
Figure 8.1 Click the Play button to begin playing the selected audio source.
4. Control the volume of the sound by dragging the Volume slider to the left to turn it down or to the right to turn it up. You can also control the volume by pressing the ![]() -up arrow and
-up arrow and ![]() -down arrow keys. To toggle the sound off and on, press Option+
-down arrow keys. To toggle the sound off and on, press Option+![]() +down arrow.
+down arrow.
5. To pause a song, click the Pause button. (You can also select Controls, Pause or press the spacebar.)
Note
![]()
Using the Volume slider within iTunes changes the volume of iTunes relative to your system’s volume. If you can’t make the music loud or quiet enough, set your system volume level and then change the iTunes volume with the slider.
There are a lot of other ways to control tunes, as the following list shows:
• Double-click any song to play it.
• When a song is playing and you click and hold the Rewind or Fast Forward button, the song rewinds or fast-forwards until you release the button.
• When a song is playing, drag the playhead on the timeline (see Figure 8.1) to the right to move ahead in the song or to the left to move back in a song. When you release the playhead, the song resumes playing at that point.
• When a song is playing, click on the timeline at the point you want the song to play. The playhead jumps to the point on which you clicked, and the song plays from that position.
• If a song is not playing or a song is playing but you single-click (but don’t hold down) the Rewind or Fast Forward button, the previous or next song, respectively, is selected. (If the previous song was playing, the next one starts to play when you jump to it.) You can also select Controls, Next (or press ![]() -Right arrow) or Controls, Previous (or press
-Right arrow) or Controls, Previous (or press ![]() -Left arrow) to move to the next or the previous song.
-Left arrow) to move to the next or the previous song.
• To remove a CD, select it in the Source list and select Controls, Eject Disc. (You can also press ![]() -E, click the Eject button that appears next to the CD on the Source list, or press the Eject button on your keyboard.)
-E, click the Eject button that appears next to the CD on the Source list, or press the Eject button on your keyboard.)
Viewing Information While Listening to Tunes
You can view different information in the Information window, such as the name, artist, and album of the currently playing song. When you first view this window, it contains a timeline bar that represents the total length of the song being played. A black diamond (the playhead) indicates the relative position of the music you are hearing at any point in time compared to the total length of the song.
At the top of the Information window is a line of text that shows the song currently playing (even if it is paused). What appears on the second line of text changes over time; it rotates between the artist name and the album name. You can freeze this display on a specific attribute, such as album name, by clicking the text. Each time you click, the information changes from album to artist to album again. Whichever one you last clicked remains showing in the window.
Note
![]()
When you freeze information in the Information window, it remains frozen until the next track is played, at which point it starts rotating again.
Underneath the album, artist, and song name line is the timeline. The value shown on the left end of the timeline is always the time position of the playhead. As a song plays, the playhead moves to the right; the portion of the timeline representing the amount of song that has been played is shaded (everything to the left of the playhead). The value shown on the right end of the timeline can be either the total time of the track or the track’s remaining time (indicated by a negative value). You can choose the value that is displayed by clicking the time; if total time is shown, it becomes remaining time and the reverse.
Note
![]()
When you play a CD containing music from various artists, the artist will be shown on the top line of text next to the song name for each song. The artist displayed on the lower line of text will be Various Artists.
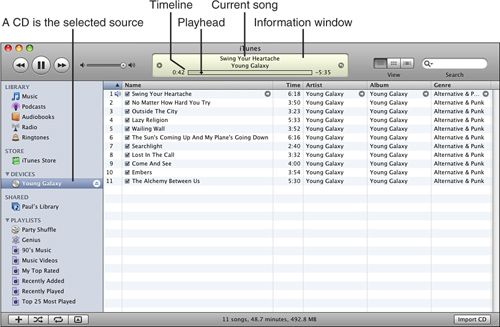
If you click the Show Current Song button, which is the curved arrow located at the right side of the Information window (see Figure 8.2), the song currently playing is selected in the Content pane; this is indicated by blue highlighting. This can be handy when you are working with other music sources while listening to a song because you can click this button to quickly return to the song that is playing.
Figure 8.2 Click the Change Display icon to display the volume levels in the Information window.
Finally, if you click the Change Display button (see Figure 8.2), the display becomes a graphical representation of the volume levels at various frequency groups. You can return to the song information by clicking the button again.
Note
![]()
The Information window changes based on the context of what you are doing. You have seen how it works when you listen to music. When you rip music to your Library (see “Ripping Music from Audio CDs,” later in this chapter), the information and tools you see in the Information window are related to the import process. Similarly, when you burn a CD, the Information window shows burn-related data and tools.
Controlling the Order of Tunes
Playing a source from start to finish and controlling the volume are useful and required tasks, but with iTunes you can take control of your music so that you hear only what you want to hear, in the order in which you want to hear it. The following sections show you how iTunes lets you take control of your tunes. For example, in the next section you’ll learn how to choose the songs you want to hear.
Let’s face it—you probably don’t like every song on a CD no matter how much you like the CD on the whole. With iTunes, you can choose the songs that play when you play a source. You can cause a song to be skipped by deactivating its check box. When the source plays, every song whose check box is deactivated is skipped.
Tip
![]()
Along with a CD’s information, iTunes remembers the settings you make for a CD and reuses them each time you insert and play the CD. This includes skipping songs, changing the order in which they play, and so on.
To have iTunes include and thus play the song again the next time you play the source, activate its check box again.
iTunes determines the order in which songs play by the order in which they are shown in the Content pane, starting from the top of the pane and moving toward the bottom. By default, songs are listed and therefore play in the order they appear on a CD, from track 1 to the last track on the disc. However, you can make songs in a source play in any order you choose. There are a couple of ways to do this.
You can change the order in which songs are listed in the Content pane (and thus the order in which they play) by dragging the songs up or down (you can’t do this when the Music is the source). When you change the order of the songs in the pane, you change the order in which they play.
You can also change the order of tracks by sorting the Content pane by the various attributes shown, such as Track Number, Song Name, Time, Artist, and so on. You can do this by clicking the column heading of the attribute by which you want to sort the list. When you do so, the tracks are sorted by that column. To change the direction of the sort (from ascending to descending or from descending to ascending), click the Sort Order triangle; the sort direction is reversed and the songs will be reordered accordingly. Just as they do when you move songs around manually, they will play in the order in which they are listed in the pane. (This isn’t so useful when you listen to a CD because many of the attributes, such as artist, genre, and album are the same. However, when you use playlists or display more attributes, this can be very handy.)
The column on which the pane is sorted is indicated by the column heading being highlighted in blue—this defaults to the first column, which is the Track Number (which, by the way, is the only unnamed column because it applies only to audio CDs and to no other sources; see Figure 8.2). (When a CD is the source, the Track Number column is always the first or leftmost column in the Content pane.) When you select a different column, its heading becomes blue to show that it is the current sort column.
Note
![]()
If you have manually reordered a CD by dragging songs up and down in the Content pane, that order is remembered and used when you sort the CD by the first column (Track Number). To put songs back in their original order, drag them so that track 1 is at the top, track 2 is next, and so on.
You can also tell which column is the current sort column by the Sort Order triangle. It appears only in the sort column. When the triangle points down, the sort is descending. When the triangle points up, the sort is ascending.
Playing Music Randomly
For a little variety, you can have iTunes play songs in a source randomly using its Shuffle feature: click the Shuffle button located at the bottom of the window (second one from the left) or select Controls, Shuffle, Turn On Shuffle. The songs are reordered in the Content pane and play in the order in which they are listed (which should be in a random fashion). The Shuffle button is highlighted in blue to indicate that it is active.
To return the source to the order you have set for it (or its original order if you haven’t changed it), click the Shuffle button again or select Controls, Shuffle, Turn Off Shuffle.
By default, Shuffle works by randomly shuffling songs. To change this, select Controls, Shuffle, and then select one of the following commands:
• By Songs—Choose this option if you want songs to be shuffled randomly.
• By Albums—Choose this option to randomly select an album, play all its songs, and then randomly choose the next album to play.
• By Groupings—Choose this option if you want iTunes to randomly choose groupings of songs to play (such as compilations).
Repeating Tracks
Sometimes, you just can’t get enough of the music to which you are listening. In that case, you can set iTunes to repeat an entire source or to repeat only a single song. To repeat your tunes, check out these pointers:
• To have iTunes repeat an entire source, select Controls, Repeat, All or click the Repeat button located at the bottom of the window (third one from the left). The Repeat button becomes highlighted to show you that it is active, and the source repeats when you play it.
• To repeat only the selected song, select Controls, Repeat, One or click the Repeat button a second time. A “1” appears on the Repeat button to indicate that only the current song will be repeated.
• To turn off the repeat function, select Controls, Repeat, Off or click the Repeat button until it is no longer highlighted in blue.
Tip
![]()
Using Repeat, you might hear a song you don’t like all that much more than once. Remember to deactivate the Select check box for any songs you don’t want to hear. They are skipped no matter how you play the source.
Controlling iTunes from the Dock
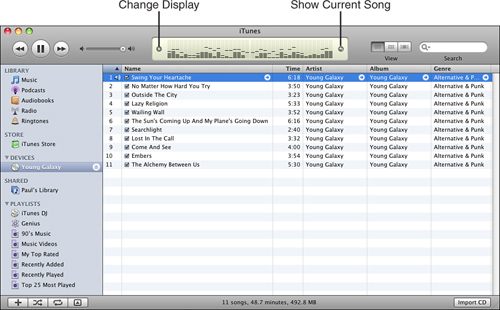
The iTunes icon on the Mac OS X Dock enables you to control iTunes at any time, even when the iTunes window is in the background, when its window is minimized, or when the application is hidden. When you Control-click the iTunes Dock icon (or right-click if you have a two-button mouse), the iTunes menu appears (see Figure 8.3). At the top of this menu is the iTunes command, which moves you into the iTunes window. Just under that is the Now Playing section that provides information about the song currently playing (if no music is selected or playing, you won’t see this section). You can control iTunes by selecting a command on the iTunes Dock menu. For example, you can pause the music by selecting Pause. After you select a command, the menu disappears and you can get back to what you were doing.
Figure 8.3 Use the Dock menu to control iTunes even when you can’t see the application.
Tip
![]()
If you use iTunes as much as I do, you’ll want the application running all the time. Open the iTunes Dock menu and select the Open at Login command. This adds iTunes to your list of Login items so it opens each time you log in to your Mac.
Controlling iTunes with the iTunes Widget
First, configure the iTunes widget to appear when you use the Dashboard (see Chapter 28) by performing the following steps:
![]() To learn more about the Dashboard, see “Working with Dashboard and Widgets,” p. 561.
To learn more about the Dashboard, see “Working with Dashboard and Widgets,” p. 561.
1. Open the Dashboard.
2. Click the plus sign (+) located in the lower-left corner of the desktop. The Dashboard bar appears.
3. Drag the iTunes widget from the bar onto the location on your desktop where you want it to be when you open the Dashboard.
4. Close the Dashboard.
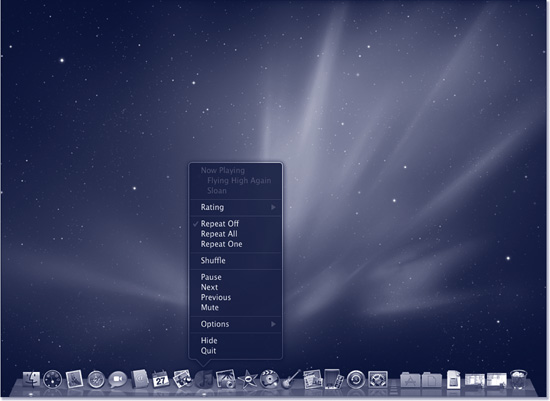
When you want to use the iTunes widget, open the Dashboard. Your widgets appear, including the iTunes widget (see Figure 8.4). Some of the controls look slightly different than they do within iTunes, but they work in the same way. Use the controls, such as rotating the Volume wheel to change volume, and then hide the Dashboard again by pressing its key or clicking someplace else.
Figure 8.4 The iTunes widget is another way to control iTunes when you aren’t working with the application directly.
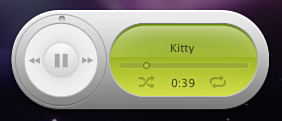
One control that isn’t so obvious is the one that enables you to select a music source from within the iTunes widget. Open the widget and wait for a moment or two. An i appears at the bottom of the widget near its center. Click this button and you see the Select a Playlist pop-up menu. Choose a playlist on this menu and click Done. You can play the source you selected by clicking the widget’s Play button and control the music with the widget’s other controls.
Customizing iTunes
You can configure iTunes in various ways to suit your style. I discuss iTunes preferences throughout this chapter, but let’s take a look here at the general preferences and the playback preferences. To display with the iTunes preferences, select iTunes, Preferences (or press ![]() -,).
-,).
Setting General iTunes Preferences
On the General pane of the iTunes Preferences dialog box are several settings you might want to use:
• Library Name—When you share music across a network, use this field to name your Library so other users know what it is.
• Show—Use the Show check boxes to determine if specific sources appear on the Source List. For example, to hide the Ringtones source, deactivate its check box.
• Source Text—Use this drop-down list to change the font size of the sources shown in the Source list. The options are Small (default) and Large.
• List Text—This setting changes the size of the text used in the Content pane. Again, your options are Small and Large.
• When You Insert a CD—Use this pop-up menu to choose what iTunes does when you insert a CD into your Mac’s optical drive. The default is Ask to Import CD. If you always click Yes when iTunes asks to import the CD, choose Import CD in this list to avoid the dialog box each time you insert a CD. To learn about the Import Settings button, see “Configuring iTunes to Import Music,” later in this chapter.
• Automatically Retrieve CD Track Names from Internet—When this check box is activated, iTunes looks for CD data online as soon as you insert a CD.
• Check for new software updates automatically—This check box controls whether iTunes checks for updates and lets you know when they are available. Because it is a good idea to use the current version, you should leave this check box activated. Mac OS X’s Software Update feature also checks for iTunes updates.
Setting iTunes Playback Preferences
You can use iTunes Playback preferences to control how your music plays. For example, you can get rid of the gap of silence between songs or make songs play back at a consistent volume level. You can take advantage of these features by using the Playback pane of the iTunes Preferences dialog box. On this pane, you can configure the following preferences for your music (see Figure 8.5):
Figure 8.5 Control how your music sounds with the Playback preferences.
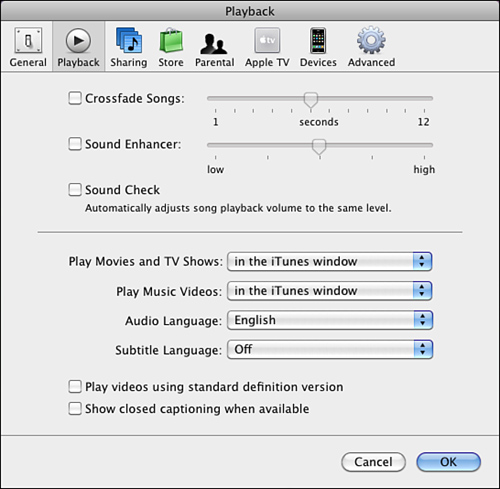
• Crossfade Songs—This effect causes one song to fade out and the next one to fade in smoothly, eliminating the gaps of silence between songs. To turn it on, activate the Crossfade Songs check box and use the slider to see the amount of fade time. If you move the slider to the left, songs fade out more quickly. If you set it to 0, there is no fading and as soon as one song ends, the next one starts. If you move the slider to the right, songs overlap; as one song starts to fade out, the next start to fade in so you hear them both at the same time. Click OK to put the new setting into effect.
Note
![]()
The Crossfade Songs setting does not impact audio CDs. Because there is a physical gap between tracks on the CD, iTunes can’t do anything about it. This setting applies to other sources, such as your Music source and playlists.
• Sound Enhancer—This effect is iTunes’ attempt to add depth and enliven the quality of your music. The actual result of this effect is a bit difficult to describe, so the best thing to do is try it for yourself. Activate the Sound Enhancer check box and use the slider to set the relative amount of enhancement. Click OK and then listen to some music. It if sounds better to you, increase the amount of the effect. If not, decrease it or turn it off.
• Sound Check—This effect sets the relative volume level of all songs to be the same. It is useful if you have changed the relative volume level of songs and want to have all your music play at the same volume level. To implement this effect, activate the Sound Check option and click OK.
Ripping Music from Audio CDs
If you have audio CDs, you’ll want to import them to your iTunes Library so the music they contain is always available to you.
Configuring iTunes to Import Music
When you import CDs into your Library, you choose the encoding format you use. The options are as follows:
• MP3—MP3 is the acronym for the audio compression scheme called Moving Picture Experts Group (MPEG) audio layer 3. The revolutionary aspect of the MP3 encoding scheme is that music data can be stored in files that are only about 1/12 the size of unencoded digital music without a noticeable degradation in the quality of the music. A typical music CD consumes about 650MB of storage space, but the same music encoded in the MP3 format shrinks down to about 55MB. Put another way, a single 3.5-minute song shrinks from 35MB on audio CD down to a paltry 3MB or so in MP3 format. The small size of MP3 files opened up a world of possibilities.
Although the MP3 format is still widely used, when you work with iTunes, you’re better off using one of the newer formats it supports, such as AAC.
• AAC—The primary successor to MP3 is called Advanced Audio Coding (AAC). This format is part of the larger MPEG-4 specification. Its basic purpose is the same as that of the MP3 format: to deliver excellent sound quality while keeping file sizes small. However, the AAC format is a newer and better format in that it can be used to produce files that have better quality than MP3 at even smaller file sizes.
The AAC format also enables content producers to add copy protection schemes to their music. Typically, these schemes won’t have any impact on you (unless of course, you are trying to do something you shouldn’t).
One of the most important aspects of the AAC format is that all the music in the iTunes Store is stored in it; when you purchase music from the store, it is added to your computer in this format.
• WAV—The Windows Waveform (WAV) audio format is a standard on Windows computers. It has been widely used for various kinds of audio, but because it does not offer the same benefits in terms of quality versus file size as the MP3 or AAC formats do, it is mostly used for sound effects or clips people have recorded from various sources. Millions of WAV files are available on the Internet that you can play and download.
You can load WAV files into iTunes, and you can even use iTunes to convert files into the WAV format. However, because MP3 and AAC are much newer and better file formats, you aren’t likely to want to do this very often.
• AIFF—The Audio Interchange File Format (AIFF) provides relatively high-quality sound, but its file sizes are larger than MP3 or AAC. As you can probably guess from its name, this format was originally used to exchange audio among various platforms and applications.
As with the WAV format, MP3 and AAC formats provide a trade-off between better sound quality versus file size, so you aren’t likely to use the AIFF format very often. The most typical situation in which you might want to use it is when you want to move some music or sound from your iTunes collection into a different application that does not support MP3 or AAC.
• Apple Lossless—The goal of this format is maximum sound quality. As a result, files in this format are larger than they are in AAC or MP3. However, Apple Lossless files are slightly smaller than AIFF or WAV files. If you have a sophisticated ear, high-quality sound systems, and discriminating taste in music (whatever that means), you might find this format to be the best for you. However, because storing music in this format requires a lot more space on your computer and on an iPod, you will probably use the AAC or MP3 format more often.
Before you start importing music to your Library, choose the import options (mainly format and quality levels) you want to use. Here are the steps to follow:
1. Select iTunes, Preferences, display the General tab, and then click Import Settings to open the Import Settings dialog box (see Figure 8.6).
Figure 8.6 Here, you can see that the AAC format (the AAC Encoder) is selected.

2. Select the format in which you want to add music to your Library on the Import Using menu. For example, to use the AAC format, select AAC Encoder. To use the MP3 format, select MP3 Encoder. Or, select Apple Lossless Encoder to maximize the quality of your music.
Note
![]()
The Custom option enables you to configure specific settings the encoder uses. If you want to check it out, select Custom on the Setting menu and explore the options you see.
3. Select the quality level of the encoder you want to use on the Setting menu. The options you see in this list depend on the format you selected in step 2. If you chose AAC Encoder, you have four quality options: High Quality, iTunes Plus, Spoken Podcast, and Custom. If you chose MP3 Encoder, you have four options: Good Quality, High Quality, Higher Quality, and Custom. If you selected the Apple Lossless Encoder, you have only the Automatic option.
Tip
![]()
In most cases, choosing an encoder isn’t a difficult decision. If hard drive space is a factor for you, you use an iPod, or you don’t have the ears of a music expert, the AAC encoder is the way to go. If you demand perfection, use the Apple Lossless Encoder.
In the Details box, you see a summary of the settings you have selected. For example, you see the data rate of the encoder, such as 128Kbps, and the processor for which the encoder has been optimized.
4. Activate the Use Error Correction When Reading Audio CDs check box to cause iTunes to more closely control the encoding process. You should use this option only if you notice problems with the music you add to your Library, such as cracking or popping sounds. If that happens, activate this check box and try the import process again.
5. Click OK to return to the General tab.
6. Activate the Automatically Retrieve CD Track Names From Internet check box to have iTunes download information about a CD so that information is added to the Library when you import the CD.
7. Click OK to put the settings into effect.
Adding Audio CDs to Your Library
Use these steps to add a CD to your Library:
1. Insert the CD you want to add to your Library. iTunes attempts to identify it. When it does, the CD appears in the Source list and is selected. Depending on your importing preferences, you may be presented with a dialog box to import the CD. You can click Yes to have iTunes import all of the songs automatically, or No so that you can determine what you want to import.
2. If there are songs you don’t want to add to the Library, deactivate their check boxes; only songs with their check boxes activated are imported. Unless you really hate a song or disk space is at a premium, it is generally better to import all the songs on a CD. If you don’t like to hear specific songs, you can use the check box in another source, such as in your Library, to cause those songs to be skipped when you play that source.
3. Click the Import CD button. The import process starts (see Figure 8.7).
Figure 8.7 iTunes in the middle of importing a music CD.
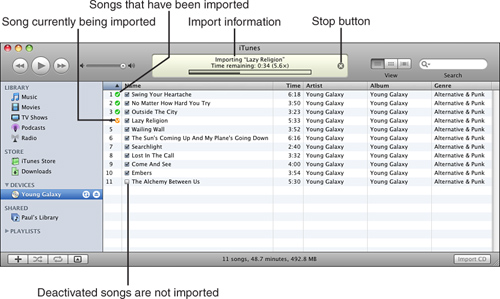
The Information window shows information related to the import process, such as the name of the song currently being imported and the rate at which the import process is happening.
The rate of the import process depends on the hardware you are using, the import settings, and other tasks your computer might be performing. In most cases, the import process occurs at a much greater rate than the playing process. For example, with moderate hardware, you can usually achieve import rates exceeding 7x, meaning 7 minutes of music can be imported in 1 minute of time.
An orange circle with a squiggly line inside it marks the song currently being imported. When a song has been imported, it is marked with a green circle containing a check mark.
If you want to stop the import process for some reason, click the Stop button (the small x within a circle) in the Information window.
When the process is complete, you hear a tone, and all the songs are marked with the Import Complete icon.
During the import process, you don’t have to listen to what you are importing. You can select a different source, such as a playlist, and play it while the CD is being imported. This slows the import speed slightly, but probably not enough to bother you.
4. Eject the CD when the import process is complete. You can put the CD away somewhere because you probably won’t need to use it again.
Adding Audio CDs to the iTunes Library Quickly
The import process moves along pretty quickly, but you can make it even faster by following these steps:
1. Gather a pile of your CDs in a location close to your Mac.
2. Choose your import preferences (encoder and quality), as described earlier.
3. Select iTunes, Preferences, and display the General tab.
4. In the When You Insert a CD pop-up menu, select Import CD and Eject. This causes iTunes to begin the import process immediately when you insert a CD. When the import process is complete, the CD is ejected automatically, too.
5. Click OK to close the dialog box.
6. Insert the first CD you want to import. iTunes starts importing it automatically. When the process is complete, the CD is ejected automatically.
Tip
![]()
When you are finished importing your CDs, you might want to reset the When You Insert a CD menu to Show Songs to prevent accidentally importing a CD more than once.
7. Insert the next CD you want to import. Again, iTunes imports the music and ejects the disc when it is done.
8. Repeat step 7 until all the CDs you want to be able to use in iTunes have been imported.
Adding Music from Other Sources to Your iTunes Music Library
While audio CDs are likely to be a major source of the music you add to your Library, they certainly don’t need to be the only one. You can purchase music from the iTunes Store easily and quickly. And, you can add any audio file to your Library, such as files you download from the Internet.
Purchasing Music from the iTunes Store
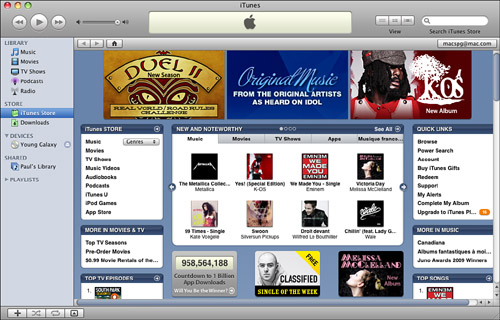
When you select the iTunes Store source, you move to Apple’s online iTunes Store (see Figure 8.8). You can use the various links, buttons, and search tool to find music in which you are interested. You can then preview that music; adding the music to your Library is as simple as clicking the Buy Now button for albums or individual songs. Once downloaded, the music is added to your Library and you can listen to it and use it mostly like music you import from CD. (There are some limitations imposed by the copyright protection, but you aren’t likely to encounter those.) All the music you purchase is also stored in the Purchased playlist.
Figure 8.8 The iTunes Store offers a lot of great music, not to mention videos and podcasts.
Importing Audio Files into Your Library
Another potential source of music for your Library is the Internet. There are millions of audio files there, and you can download these files and add them to your Library.
1. Locate the files you want to add to your Library. For example, find the MP3 files on your hard drive or go to a website that has audio files, such as MP3 files, and download them to your computer.
2. Select File, Add to Library. You see the Add To Library dialog box.
3. Use the dialog box to move to and select the folder containing the files you want to add or to select the files you want to add to the Library.
4. Click Open. The files you selected are imported into your Library.
Browsing and Searching Your Music Library
It won’t be long until you have a large Library with many kinds of music in it. In fact, you are likely to have so much music in the Library that you won’t be able to find songs you are interested in just by scrolling up and down the screen. In this section, you learn how to find music in your Library, first by browsing and then by searching. When you browse, you can choose to use three views: List, Grid, and Cover Flow.
Browsing in the Library with the List View
The Browser enables you to find music by browsing:
1. Click the List view button, which is the View button closest to the Information window.
2. Select Music on the Source list. This focuses iTunes’ attention on the music content in your collection.
3. If you don’t see the Browser, select View, Browser (or press ![]() -B). The Browser appears between the Information window and the Content pane (see Figure 8.9). The Browser has three columns: Genre, Artist, and Album. The columns start on the left with the most general category, Genre, and end on the right with the most specific category, which is Album.
-B). The Browser appears between the Information window and the Content pane (see Figure 8.9). The Browser has three columns: Genre, Artist, and Album. The columns start on the left with the most general category, Genre, and end on the right with the most specific category, which is Album.
Figure 8.9 The Browser offers a good way to find songs in your Library.
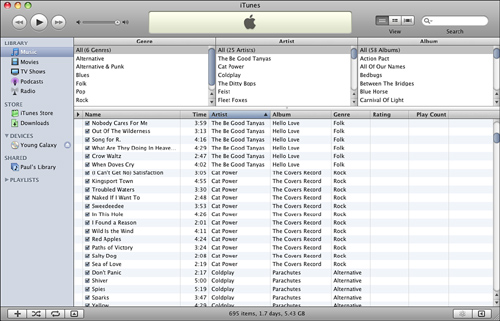
If you don’t see the Genre column in the Browser, open the General pane of the iTunes Preferences dialog box and activate the Show Genre When Browsing check box.
The contents of the path selected in the Browser are shown in the Content pane that now occupies the area below the Browser. At the top of each Browser column is the All option, which shows all the contents of that category. For example, when All is selected in the Genre column, you see the contents of all the genres for which you have music in the Library.
4. To start browsing your Library, select the genre in which you are interested by clicking it. When you do so, the categories in the other two columns are scoped down to include only the artists and albums that are part of that genre.
Note
![]()
The Source information at the bottom of the window always reflects the selections you’ve made in the Browser.
5. To further limit the browse, click an artist in which you are interested in the Artist column. The Album column will be scoped down to show only those albums for the artist selected in the Artist column (see Figure 8.10). Also, the Content pane shows the songs on the albums listed in the Album column.
Figure 8.10 You can narrow your browsing by selecting a genre and then an artist.
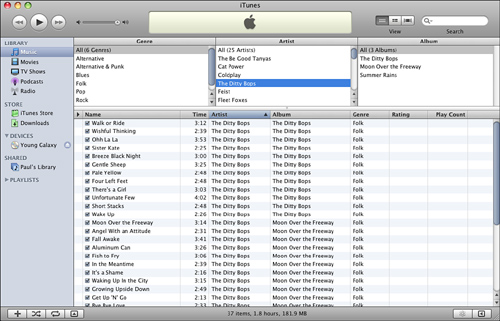
6. To get down to the most narrow browse possible, select the album in which you are interested in the Album column. The Content pane shows the tracks on the selected album.
7. When you have selected the genre, artist, and album categories in which you are interested, you can scroll in the Content pane to see all the tracks included in the music you are browsing.
To make the browse results less narrow again, select All in one of the Browser’s columns. For example, to browse all your music again, click All in the Genre column.
I hope you can see that you can use the Browser to quickly scan your Library to locate music you want to hear or work with. As you use the Browser more, you come to rely on it to get you to a group of songs quickly and easily.
Browsing in the Library Using the Grid View
The List view is useful, but it doesn’t really provide you with a good sense of the collections of music you browse because the tracks appear in a list with no respect to how the tracks are collected. Use the Grid view to browse the Music source while seeing the groups of music you are browsing:
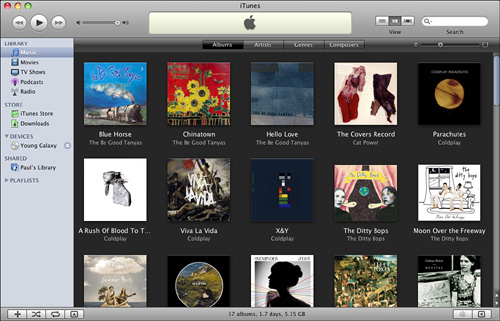
1. Click the Grid view button, which is the middle View button. The music in the Content pane is grouped by album or collection and you’ll see the artwork associated with each group.
2. Select a grid by clicking a category button: Albums (see Figure 8.11), Artists, Genres, or Composers.
Figure 8.11 Using the Grid view, you get to see how the music you are browsing is grouped, along with its artwork.
Browsing in the Library with the Cover Flow View
I admit that browsing music only in a digital format does lose something when compared to looking through a collection of CDs. There’s something appealing about flipping through a set of CDs, especially when you stumble upon one you haven’t listened to in a while. If you like to do this, the Cover Flow view will appeal to you. To use it to browse your music, perform the following steps:
1. Click the Cover Flow view button, which is the rightmost View button. The Browser is replaced by the Cover Flow browser (see Figure 8.12). Here, you see the album art associated with the music you’re browsing; this looks similar to a collection of CDs. The album facing the screen directly is associated with the music at the top of the Content pane (this is the music currently in focus). You see the album name and artist just below the album in focus. The covers to the right of this one represent music lower in the Content pane, whereas the covers to the left represent music higher in the Content pane.
Figure 8.12 The Cover Flow view enables you to flip through your music collection to browse it.
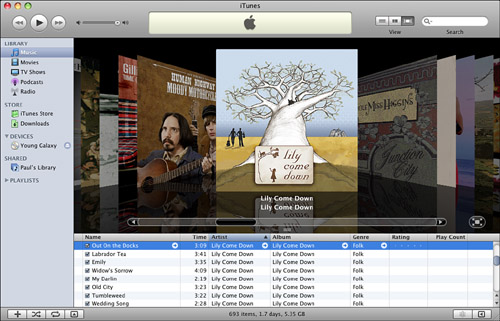
2. To browse ahead in your music, click an album cover to the right of the one in focus; to browse back in your music, click a cover to the left of the one in focus. The farther to the left or right you click, the more covers you jump ahead or back, depending on which direction you click. For example, if you click on an album immediately next to the one in focus, you move ahead or back one album. If you click all the way to edge of the screen, you jump ahead or back by multiple albums.
Tip
![]()
You can also use the scroll bar and scroll box to browse your music. Click the right arrow button at the right end of the scrollbar or drag the scroll box to the right to move ahead, or use the left arrow button or drag the scroll box to the left to move back. The scroll tools enable you to browse even a large collection of music quickly. But it isn’t quite as fun as using the flip technique.
As albums come into focus, you see their content at the top of the Content pane.
3. When music comes into focus that you want to hear, double-click it to start playing it.
As you flip through albums, music you happen to be playing continues to play as you bring other music into focus. If you don’t play the music you are browsing, after a couple of seconds of inactivity the covers flip back to the music currently playing so that it comes back into focus.
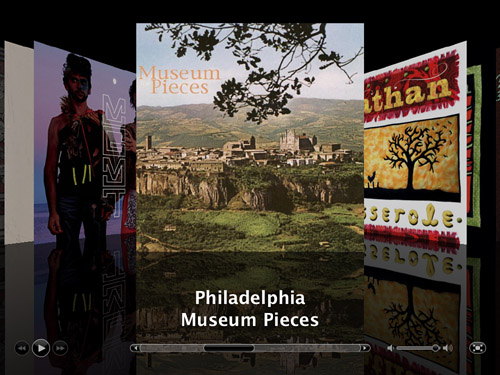
To see a full screen browser with playback controls, click the Full Screen button, which is just to the right of the scroll bar. The desktop is replaced by a full screen browser; use the controls at the bottom to control playback or browse the source (see Figure 8.13).
Figure 8.13 The Full Screen browser is nice to look at, but you can’t use anything else on your Mac while it appears.
Searching Your Music Library
You can use iTunes Search tool to search for specific content. You can search for content (music, audiobooks, video, and so on) by any of the following criteria:
• Artist
• Album
• Composer
• Song (track name)
To search for music in your Library, perform the following steps:
1. Select the source you want to search. (For example, click the Music source to search your entire music collection.) As you might surmise, you can search any source in the Source list—such as a CD, playlist, and so on—by selecting it and then performing a search.
2. To choose a specific attribute by which to search, such as Album, click the Magnifying Glass icon and choose the search attribute on the drop-down list that appears. If you don’t choose a specific attribute, All is used, which searches all the available attributes.
3. Type the data for which you want to search in the Search tool. As you type, iTunes searches the selected source and presents the songs that meet your criterion in the Content pane. It does this on the fly, so the search narrows with each keystroke. As you type more text or numbers, the search becomes more specific.
4. Keep typing until the search becomes as narrow as you need it to be to find the content in which you are interested.
5. To refine your search by attribute, open the Magnifying Glass icon and choose the attribute to which you want to limit the search. For example, if you want to see only results that have your search term as the Artist attribute, choose Artist. The search results are limited to only those tracks that match the current criteria (what you typed and the attribute you selected).
Tip
![]()
The current search attribute is marked with a check mark on the Magnifying Glass drop-down list.
By the way, searching works the same way regardless of the current view.
After you have found content with a search, you can play it, add it to playlists, and so on.
To clear your search, click the Clear Search button that appears in the Search tool after you have typed in it. The songs shown in the Content pane are again determined by your selections in the current view.
Removing Tunes from the Music Library
Not all that glitters is gold, nor are all tunes that are digital good. Sometimes, a song is so bad that it just isn’t worth the hard disk space it consumes. To remove songs from your Library, ditch them with the following steps:
1. Find the songs you want to delete by browsing or searching.
Tip
![]()
Remember that you can stop a song from playing by deactivating its check box in the Content pane. If you aren’t sure you want to dump a song permanently, use that method instead so you can always listen to the song again if you change your mind about it.
2. Select the songs you want to trash. They become highlighted to show you they are selected
3. Press the Delete key. You are prompted to confirm that you really want to delete the song you have selected.
4. If you see the warning prompt, click Remove to confirm the deletion. You see another prompt asking whether you want the selected files to be moved to the Trash or you want to keep the files on your computer. (If you have disabled the warning prompt, you move directly to the second dialog box.)
5. Click Move to Trash to move the files so you can get rid of them entirely. The selected songs are deleted from your Library, and their song files are moved to the Trash. The next time you empty that receptacle, those songs are gone forever.
If you just want to remove the references to files from the iTunes Library but not delete the song files, click Keep Files. The songs are removed from the Library, but the song files remain in their current locations (and so you could always add the songs to your Library again later).
You should never delete music you purchased from the iTunes Store unless you are absolutely sure you never want it again or you have that music backed up elsewhere. You can download music you purchased from the store only one time. After that, you have to pay for it to download it again.
Of course, songs you delete probably might not really be gone forever. You can always add them back to the Library again by repeating the same steps you used to place them in there the first time. This assumes you have a copy somewhere, such as on a CD or stored in some other location. If you imported the music from your hard disk and had iTunes move the song’s files to your iTunes Music folder, your only copy resides in your iTunes Library, so make sure you have such music backed up before you delete it if you might ever want it again.
Understanding and Using Tags
Browsing and searching music is fast and easy, even if you have thousands of songs in your Library. This functionality is enabled because each track in your Library has data—also called tags—that categorize and identify that track for you. Genre, artist, and album are just three of the possible tags for each track in iTunes. There are many more items of information that iTunes manages.
Tags fall into two groups: tags that iTunes assigns for you and that you can’t change, and tags that you or iTunes assigns and that you can change.
Tags that iTunes assigns and that you can view but can’t change include the following:
• Kind—This identifies the type of file the track is, such as Protected AAC audio file, AAC audio file, MP3, and so on.
• Size—The amount of disk space required to store the track.
• Bit Rate—The quality level at which the track was encoded. Larger numbers, such as 128Kbps, mean the track was encoded at a higher quality level (and also has a relatively larger file size).
• Sample Rate—The rate at which the music was sampled when it was captured.
• Date Modified—The date on which the track file was last changed.
• Play Count—The number of times the track has been played.
• Last Played—The last time the track was played.
• Profile—A categorization of the track’s complexity.
• Format—The format in which the track was encoded, such as MPEG-1, Layer 3.
• Channels—Whether the track is stereo or mono.
• Encoded with—The tools used to encode the track, such as the version of iTunes used, the version of QuickTime, and so on. This applies only when you use iTunes to encode the track.
Note
![]()
Not all tracks have all the data fields listed. You will see only data that is applicable to a specific track. For example, only music purchased from the iTunes Store has information about the purchase.
• ID3 Tag—ID3 tags are data formatted according to a set of specifications. If a track’s data has been formatted with this specification, the ID3 version number will be shown.
• Purchased by, Account Name, and FairPlay Version—If a track was purchased from the iTunes Store, this information identifies who purchased the music and which account was used. The FairPlay version information relates to the means by which the track is protected.
• Owner, Narrator, Published—This information is provided for audiobooks that you add to your Library, such as those from Audible.com. The owner is whoever purchased the book. The narrator is who reads the book. Published identifies when the book was published.
• Where—This shows a path to the track’s file on your computer along with its filename.
Tags collected for songs that you can change include the following:
• Name—This is the name of the track.
• Artist—The person or group who performs the track.
• Album Artist—Often used to indicate Various Artists for soundtracks and other compilation albums.
• Album—The name of the album or compilation from which the song comes.
• Grouping—This is a label you can assign to group tracks together. You can then organize tracks by their group, collect them in playlists, and so on.
• Composer—The person who is credited with composing the track.
• Comments—This is a free-form text field in which you can make comments about a track.
• Genre—This associates a track with its genre, such as Jazz or Classical.
• Year—The year the track was created.
• Track Number—The track’s position on the CD from which it came, such as “2 of 12.”
• Disc Number—The number of the CD or DVD. This is meaningful for multiple-disc sets.
• BPM—The track’s beats per minute.
• Part of a Compilation—When activated, this check box indicates that the track is part of a compilation, meaning a CD or other grouping that contains tracks from a variety of artists.
When you add a song to your Library, no matter how you add it, iTunes adds as much of this data as it can find for each song.
When you insert a CD, iTunes attempts to get that CD’s information from an online CD database, which is why it connects to the Internet. If iTunes finds the CD in this database, the information for that CD is applied to the CD and carried into the Library if you import the tracks from that CD into iTunes. If you purchase music from the iTunes Store, it also contains many of these tags. If content you add to your Library doesn’t have tags, you’ll have to add them yourself (which isn’t hard to do, as you’ll soon see).
Even if content you add does have tags, you can add or change the data in the previous list.
So, why should you care about all these tags? There are a couple of reasons.
First, as you already know from Chapter 5, “Searching Your Mac,” you can use tags to find music you’re interested in.
Second, you can use tags to determine which tracks are included in your playlists. For example, you can configure a playlist to include the last 25 songs you have played from the Jazz genre. This is just a basic example—you can get much more sophisticated than this. In fact, you can include several combinations of tags as criteria in playlists to create interesting sets of music to listen to.
When you view music in the Browser and in the Content pane, all the information you see results from the tags associated with that music, such as artist, title, album, time, kind, and so on. You can also view tags in other contexts.
Viewing Tags in the Info Window
To view the Info window, select a track in your Library and select File, Get Info or press ![]() -I. The Info window appears; at the top of the window, you see the name of the track whose information you are viewing (see Figure 8.14). This window has six panes that apply to music and a seventh that can be used with video content.
-I. The Info window appears; at the top of the window, you see the name of the track whose information you are viewing (see Figure 8.14). This window has six panes that apply to music and a seventh that can be used with video content.
Figure 8.14 The Info window enables you to view the tags associated with tracks, and you can change many of them.
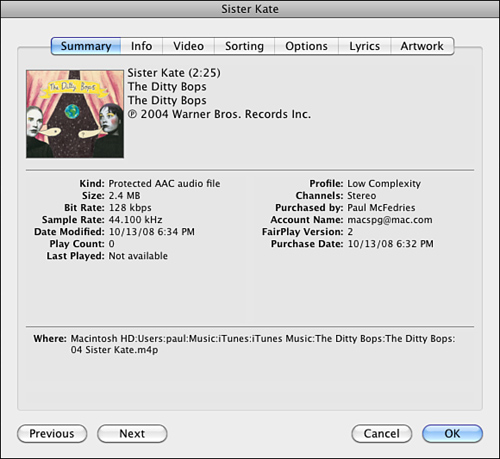
The Summary pane provides a summary view of the track’s tags that you can’t change on the tab, starting at the top with any album art associated with the track and including its name, length, artist, and album. In the center part of the pane, you see the data that iTunes manages. (You can view this data, but you can’t change it.) At the bottom of the pane, you can see the path to the track’s file on your computer.
When you click the Info tab, you see the tags you can change.
The other three panes of the window that relate to music content—Sorting, Options, Lyrics, and Artwork—are used to configure specific aspects of a track.
You can view information for other tracks in the selected source without closing the window. Click Next to move to the next track in the source you are viewing (such as your Music) or Previous to move to the previous track. When you do so, the next or previous track’s information is displayed in the Info window.
Labeling a Track in the Info Window
Typically, if you have imported a CD or purchased music from the iTunes Store, you shouldn’t change the data that came from the source, such as name, artist, album, track number, and so on. Occasionally, a CD’s information will include an error when it is added (such as a misspelling in the artist’s name); you’ll probably want to fix such mistakes. You can certainly add data to empty fields.
You can use the Info window to change a track’s tags, as you can see in the following steps:
1. Open the Info window for the track that has tags you want to add or change.
Tip
![]()
If a genre by which you want to classify music isn’t listed on the menu, you can add it to the menu by selecting Custom on the menu and then typing the genre you want to add. That genre will be added to the menu and associated with the current track. You can use the genres you create in this way just as you do the default genres.
2. Click the Info tab.
3. Enter or change the information shown in the various fields. For example, you can change the track’s name or artist. Or you might want to add comments about the track in the Comments box.
4. To change a track’s genre, select the new genre from the Genre menu.
5. When you are done entering or changing tags, click OK. The Info window closes, and any changes you made are saved.
Tagging Multiple Tracks at the Same Time
You can change some tags, such as Genre, for a group of tracks at the same time. This can be a faster way to enter tags because you can change multiple tracks in one window. Here are the steps to follow:
1. Select the tracks whose tags you want to change.
2. Open the Info window. You’re prompted to confirm that you want to change the information for a group of tracks.
3. Click Yes to clear the prompt. The Multiple Item Information window appears (see Figure 8.15). The information and tools in this window work in the same way as they do for individual tracks. The difference is that the information and settings apply to all the tracks you have selected.
Figure 8.15 You can use this window to change the data for multiple tracks at the same time.
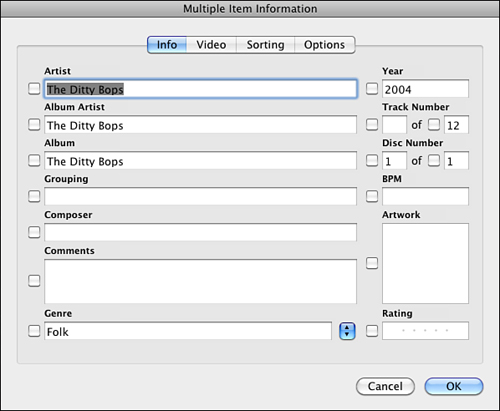
4. Enter data in the fields, make changes to existing data, or use the other tools to configure the tracks you have selected. As you change information, the check box next to the tag becomes activated to show that you are changing that tag for all the selected tracks.
5. When you are finished making changes, click OK. The window closes, and the changes you made will be saved.
Tip
![]()
Many iTunes dialog boxes have a check box you can activate to prevent the dialog from being displayed again. For example, if you don’t want to be warned when you use the Multiple Item Information tool, activate the Do Not Ask Me Again check box.
Most of the fields in the Multiple Item Information dialog box are pretty straightforward, such as Artist, Album, and so on. You’ll learn about others when you read about changing a track’s options later in this chapter. The same options apply as for an individual track; you can just change multiple tracks at the same time by using the Multiple Item Information dialog box.
Setting Tags in the Content Pane
You can also edit tags within the Content pane:
1. Click once on a track to select it.
2. Click once on the tag you want to edit. The tag is highlighted to show that it is ready to be edited.
3. Type the new information, choose a value on the tag’s drop-down list (such as to set equalization for a track), or click to set a value (for example, to rate a track).
4. Press Return. The changes you made are saved.
Changing Sorting Tags
By default, iTunes uses and tracks default tags for sorting purposes, such as its title, artist, and so on. However, you can add sorting tags in case the default tags aren’t sufficient. To do this, perform the following steps:
1. Select a track, open the Info window, and click the Sorting tab.
2. Enter the information by which you want iTunes to sort the track in the related Sort fields. For example, enter information in the Sort Artist field. You can change the name of the artist for sorting purposes without changing the name of the artist that is associated with the track on audio CD or from the iTunes Store.
3. Click OK. When you sort music, any information you entered in the Sort fields is used instead of the default tags.
Configuring a Track’s Options
You can configure a number of options for the tracks in your Library, including the following:
• Volume Adjustment—You can change a track’s relative volume so it is either louder or quieter than normal. This is useful if you like to listen to tracks recorded at a variety of volume levels, because the volume remains somewhat similar as you move from track to track.
• Equalizer Preset—You can use the iTunes Equalizer to configure the relative volume of sound frequencies. When you set an Equalizer preset for a track, the settings in that preset will be used each time the track plays.
• Rating—You can give tracks a rating from one to five stars. You can use ratings in various ways, for example, to create criteria for playlists (for example, include only my five-star songs) or to sort the Content pane.
• Start and Stop Time—You can configure tracks to start or stop playing at specific times in the track. This can be useful if you don’t want to hear all of a track, for example, when a track has an introduction you don’t want to hear each time it plays.
• Remember Playback Position—When this option is enabled, iTunes (and an iPod) starts playing a track from the point at which you last played it. This is an incredibly useful option for tracks that are audio books, podcasts, or videos because you can stop playing that content and do something else, such as listen to or watch other content. When you come back to a track with this option enabled, iTunes and an iPod will pick up where you left off. This prevents you from hearing or seeing the same content again or from searching for the point at which you stopped listening or watching.
• Skip when Shuffling—If this option is enabled for a track, the track is skipped when you play iTunes in the Shuffle mode. This is useful for tracks you don’t want to hear when you shuffle (such as those that make sense only in the content of the album from which they come) or for content that doesn’t make sense when you shuffle (such as episodes of a podcast or an audio book).
Note
![]()
iTunes is pretty smart and makes your listening and viewing life as easy as possible. For example, when you add podcasts, video, or audio books from the iTunes Store to your Library, the Playback Position, Skip, and Gapless options are set appropriately. If you add this kind of content from other sources, you should make sure these options are set the way you want them to be.
• Part of a gapless album—Some tracks are designed to be heard with no gap between them, such as those from a live album. When a track is part of such an album, activating this option removes any gap between songs. iTunes recognizes most gapless albums automatically, but you can manually configure this setting if you need to.
Configuring Track Options in the Info Window
You can configure a track’s options in the Info window by performing the following steps:
1. Select the track whose options you want to set.
2. Open the Info window.
3. Click the Options tab (see Figure 8.16).
Figure 8.16 Using the Options tab, you configure a track’s optional settings.

4. To set the track’s relative volume, drag the Volume Adjustment slider to the left to make the track quieter or to the right to make it louder.
5. To apply an equalizer preset to the track, choose the preset you want to be used when the track plays on the Equalizer Preset menu. On this menu, you see a large number of presets that are available to you. When you choose one, the track’s playback is adjusted accordingly. For example, if you choose Bass Booster, the relative volume of the bass frequencies is increased.
6. To rate the track, click the dot representing the number of stars you want to give it in the Rating field. For example, to give the track three stars, click the center (third) dot. Stars appear up to the point at which you click. In other words, before you click, you see a dot. After you click a dot, it becomes a star, as do the rest of the stars to its left.
Tip
![]()
If you want to configure options for a group of tracks, select those tracks and open the Info window. Use the resulting Multiple Song Information window to make changes to all the tracks at the same time.
7. To set a track’s start time, activate the Start Time check box and enter a time in the format minutes:seconds. When you play the track, it starts playing at the time you enter. The default value is 0:00, which makes sense because that is the starting point for a track.
8. To set a stop time, activate the Stop Time check box and enter a time in the format minutes:seconds. When you play the track, it stops playing at the time you enter. The default stop time is the total track length, which also makes sense. Notice that the default stop time is very precise, even going to two decimal places beyond a second.
Note
![]()
When you set a start or stop time, you don’t change the track file in any way. You can play the whole track again by deactivating the Start Time or Stop Time check box.
9. If you want iTunes to remember the point at which you stopped playing a track and to start playing the track at that point the next time you play it, activate the Remember Playback Position check box. If you always want the track to start playing at the current Start Time, leave the box deactivated.
Tip
![]()
To determine the start or stop times you want to use, play the track and use the times displayed when the playhead is at the position where you want the track to start or stop playing.
10. If you want the track to be skipped when you shuffle (when the track is an audio book, for example), activate the Skip When Shuffling check box.
11. If the track is part of a gapless album, activate the Part of a Gapless Album check box.
12. Click OK.
Rating Tracks in the Content Pane
You can also rate tracks in the Content pane. To do so, follow these steps:
1. Scroll in the Content pane until you see the Rating column.
2. Select the track you want to rate. Dots appear in the Rating column for that track.
3. Click the dot representing the number of stars you want to give the track. The dots up to and including the one on which you clicked become stars.
Working with Lyrics
In the Info window, you’ve seen that there is a Lyrics tab. As you probably can guess, you can store lyrics, or any other text for that matter, for a track on this tab. You can then view the text you store there by using the Info window, or you can display the lyrics on an iPod.
Adding Lyrics to a Track
The first step is to find or create the lyrics you want to associate with a track. Although it might be a lot of fun figuring out the lyrics for tracks by listening to them and writing them down yourself, I’m going to assume you have better things to do with your time. In that case, it’s easy to look up lyrics for most artists on the Web.
Most of the lyrics available on the Web come from a person who listened to the music (as opposed to the published source). This means that there can be errors in the lyrics you find. You can correct them yourself or look for a more reliable source.
You can then copy and paste the lyrics you find onto the Lyrics tab. Here’s how:
1. Open your web browser and move to www.google.com.
2. Search for artistname and lyrics, where artistname is the name of the artist with which the track is associated. The result is likely to be several sites that provide lyrics for that artist.
3. Click a link to move to one of the sites. These sites typically organize lyrics by album.
4. Find the track for which you want lyrics, and click it. The lyrics appear.
5. Select the lyrics and copy them to your Mac’s Clipboard.
Now that you have the lyrics, you can apply them to a track by performing the following steps:
1. In iTunes, open the Info window for the track whose lyrics you just copied.
2. Click the Lyrics tab.
3. Paste the lyrics you copied into the Lyrics pane (see Figure 8.17).
Figure 8.17 I’ve pasted the lyrics for the song Mushaboom into the Lyrics tab.
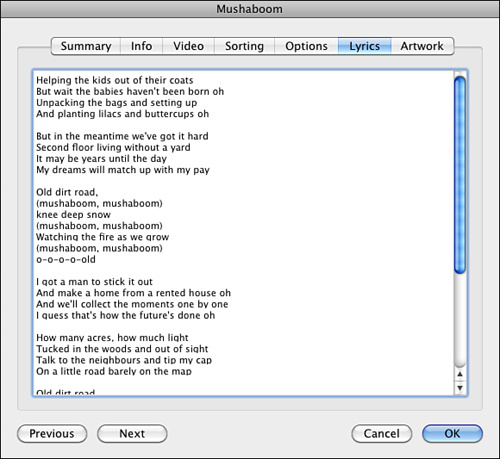
4. Click OK. The lyrics are saved with the track.
Viewing Lyrics for a Track
After you have added lyrics for a track, you can view those lyrics in iTunes by selecting the track and opening the Lyrics pane of the Info window.
Tip
![]()
You can also view lyrics on newer iPod models by clicking the Select button until the lyrics are displayed on its screen.
Adding and Viewing Album Artwork
Many CD and album covers are works of art, and it would be a shame never to see them just because your music has gone digital. With iTunes, you don’t need to miss out, because you can associate artwork with tracks and display that artwork in the iTunes window.
To enjoy artwork with your tunes, you need to first associate artwork with your music. There are a number of ways to do this. All the music you purchase from the iTunes Store includes artwork, so any music you buy has artwork automatically. And, if you have an iTunes Store account, iTunes can be configured to automatically download artwork for music you add to your Library in other ways, such as when you import an audio CD. If the artwork for music isn’t in the iTunes Store because the music itself isn’t there, you can add artwork to music manually or semi-automatically.
After artwork has been added to your music, you can easily view it in iTunes.
If you burn discs for your music, having artwork associated with your music is good because you can use iTunes to print jewel case covers that include this art.
Configuring iTunes to Download Album Artwork Automatically
One of the cool features of iTunes is that it automatically downloads artwork from the iTunes Store. As you read earlier, when you purchase music from the store, its art comes with it. What you might not expect is that as long as you have an iTunes Store account, iTunes also downloads art associated with music you add to the Library from other sources, such as audio CDs you import.
After you have an iTunes Store account, open the iTunes Preferences dialog box, click the Store tab, activate the Automatically Download Missing Album Artwork check box, and click OK. iTunes automatically retrieves artwork for all the albums in your Library that it can. As you add other music to your Library by importing it, iTunes retrieves any artwork it can automatically.
The limitation to this feature is that for iTunes to automatically download an album’s artwork, that album must be available in the iTunes Store. This isn’t a big limitation because a huge amount of music is available there, so the odds are good that any music you add to your Library will be there, which means most of your music will get artwork automatically.
Adding Artwork for Songs Manually
If music isn’t available in the iTunes Store, you can add it manually. Or you might want to associate artwork that isn’t the default album cover with a track. For example, you might want to add the artist’s picture or some other meaningful graphic to tracks.
You can add one or more pieces of art to tracks by using the following steps:
1. Prepare the artwork you are going to associate with a track. You can use graphics in the usual formats, such as JPG, TIFF, GIF, and so on.
Tip
![]()
You can often find album artwork on Amazon.com by searching for the artist, album, or song title. Click the album art and save the image to your Mac so you can use it in iTunes using the process below.
2. Select the track you want to work with.
3. Open the Info window and then click the Artwork tab (see Figure 8.18). If the selected track has artwork with it, you see it in the Artwork pane.
Figure 8.18 You use the Artwork pane to add artwork to a song.

4. Click Add. A dialog box that enables you to choose an image appears.
5. Select the image you want to associate with the track.
6. Click Choose. The image is added to the Artwork pane of the Info window.
You can use the slider under the image box to change the size of the previews you see on the Artwork pane. Drag the slider to the right to make the image larger or to the left to make it smaller. This doesn’t change the image; instead, it only impacts the size of the image as you currently see it in the Info window. This is especially useful when you associate a lot of images with a track because you can see them all at the same time.
7. Repeat steps 4–6 to continue adding images to the Artwork pane until you have added all the images for a track.
Tip
![]()
You can also add artwork to a track by dragging the image file from your desktop onto the Artwork pane of the Info window or onto the Artwork pane of the iTunes window (select View, Show Artwork Pane, or press ![]() -G).
-G).
8. To change the order of the images, drag them around in the image box. If a track has more than one graphic, place the image that you want to be the default on the left side of the image box.
9. Click OK. The window closes and the images are saved with the song.
Viewing Album Artwork
To view a track’s artwork, do one of the following:
• In List View (or in Grid view when you’re viewing a particular album, artist, or composer), select View, Show Artwork Column (or press ![]() -G) to add the Artwork column (see Figure 8.19).
-G) to add the Artwork column (see Figure 8.19).
Figure 8.19 You can view the artwork associated with a track in the Artwork pane.
• Click the Show/Hide Artwork button, which is the fourth button from the left under the Source list. The Artwork pane appears and displays the artwork associated with either the currently playing song or the currently selected song (see Figure 8.19). At the top of the artwork, you see Selected Item, which indicates you are viewing the artwork associated with the selected track, or Now Playing, which indicates you are viewing artwork associated with the track currently playing.
• Move the pointer over the artwork and click when the pointer becomes the hand icon to see a larger version in a separate window. The title of the window is the name of the track with which the artwork is associated.
• To choose between viewing artwork associated with the selected track or the track currently playing, click the arrow button or text at the top of the Artwork pane. The artwork changes to the other option (for example, if you click Now Playing, it becomes Selected Song), and you see the appropriate artwork for that track.
• If you select the Now Playing option, the artwork changes in the Artwork pane and in the separate art window as the next track plays (unless, of course, the tracks use the same artwork, and even then the track title in the separate artwork window will change). When nothing is playing or selected, you see a message saying so in the Artwork pane.
• If the track has more than one piece of artwork associated with it, click the arrows that appear at the top of the pane to see each piece of art. You can click on each image to open it in a separate window too.
Customizing the Content Pane
There are a number of ways to customize the columns (tags) that appear in the Content pane. What’s more, you can customize the Content pane for each source. The customization you have done for a source (such as a CD or playlist) is saved and used each time you view that source.
You can select the tags (columns) that are shown for a source by using the following steps:
1. Select the source whose Content pane you want to customize. Its contents appear in the Content pane.
2. Select View, View Options or press ![]() -J. You see the View Options dialog box (see Figure 8.20). At the top of the dialog box, you see the name of the source for which you are configuring the Content pane. You also see all the available columns that can be displayed. If a column’s check box is activated, that column is displayed; if not, it won’t be shown.
-J. You see the View Options dialog box (see Figure 8.20). At the top of the dialog box, you see the name of the source for which you are configuring the Content pane. You also see all the available columns that can be displayed. If a column’s check box is activated, that column is displayed; if not, it won’t be shown.
Figure 8.20 You can set the columns shown in the Content pane with the View Options dialog box.
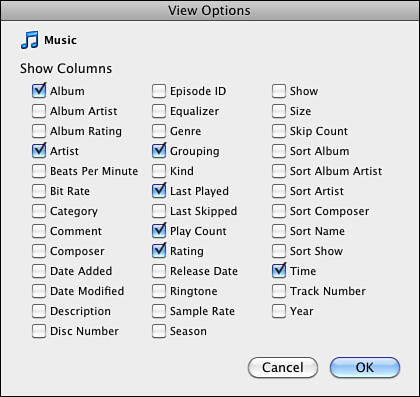
3. Activate the check boxes next to the columns you want to see.
4. Deactivate the check boxes next to the columns you don’t want to see.
5. Click OK. When you return to the Content pane, only the columns you selected are shown for the source.
Not all columns apply to all types of content. For example, the Season column is intended for TV shows to display what season a particular track (episode) appeared in. iTunes doesn’t limit the columns available in the View Options dialog box based on the source you’ve selected. If you include a column for a source that doesn’t really apply, just open the View Options dialog box again and deactivate its check box.
Following are some other ways to customize the Content pane:
• You can change the width of columns in the Content pane by pointing to the line that marks the right boundary of the column in the column heading section. When you do, the cursor becomes a vertical line with arrows pointing to the left and right. Drag this to the left to make a column narrower or to the right to make it wider. The rest of the columns move to accommodate the change.
• You can change the order in which columns appear by dragging a column heading to the left or to the right. When you release the mouse button, the column assumes its new position and the other columns move to accommodate it.
• You can sort the Content pane by any of the columns shown, by clicking the column heading by which you want the pane to be sorted. The tracks are sorted according to that criterion, and the column heading is highlighted to show it is the current sort column. To change the direction of the sort, click the Sort Order triangle, which appears only in the Sort column. When you play a source, the tracks play according to the order in which they are sorted in the Content pane, starting from the top of the pane and playing toward the bottom (unless you have the Shuffle feature turned on, of course).
Building and Listening to Standard Playlists
Although they aren’t as smart as their younger siblings (smart playlists), standard playlists are definitely useful because you can choose the songs included in them and the order in which those songs play.
Creating a Standard Playlist
You have two ways to create a playlist. One is to create a playlist that is empty (meaning it doesn’t include any songs). The other is to choose songs and then create a playlist that includes those songs.
The place you start depends on what you have in mind. If you want to create a collection of songs but aren’t sure which specific songs you want to start with, create an empty playlist. If you know of at least some of the songs you are going to include, select them first and then create the playlist. Either way, you’ll end up in the same place.
Creating an Empty Standard Playlist
You can create an empty playlist from within iTunes by using any of the following techniques:
• Select File, New Playlist.
• Press ![]() -N.
-N.
• Click the Create Playlist button, which is the + icon at the bottom of the Source list.
Tip
![]()
iTunes keeps playlists in the Source pane in alphabetical order within each group (standard and smart playlists). So, when you rename a playlist, it jumps to the location in the standard playlist section on the Source list to be where it belongs.
Whichever method you use will result in an empty playlist whose name is highlighted to show you that it is ready for you to edit. Type a name for the playlist and press Return. The playlist is renamed and selected. The Content pane is empty because you haven’t added any songs to the playlist yet. You will learn how to do that later in this section.
Tip
![]()
You can select a group of songs that are next to one another by clicking the first song, holding down the Shift key, and then clicking the last song. You can select multiple songs that aren’t next to one another by holding down ![]() key while you click them.
key while you click them.
Creating a Standard Playlist with Songs in It
If you know some songs you want to place in a playlist, you can create the playlist so it includes those songs as soon as you create it. Here are the steps to follow:
1. Browse or search the Library to find the songs you want to be included in the playlist. For example, you can browse for all the songs in a specific genre or search for music by a specific artist.
Tip
![]()
When you add a new album to your Library, use this technique to quickly create a playlist to make it easy to listen to. Select all the songs in the album and then use the New Playlist from Selection command. You can use the resulting playlist to easily select the new album for your listening pleasure.
2. In the Content pane, select the songs you want to place in the playlist.
3. Choose File, New Playlist from Selection. A new playlist appears on the Source list and is selected. Its name is highlighted to indicate that you can edit it, and you see the songs you selected in the Content pane.
iTunes attempts to name the playlist by looking for a common denominator in the group of songs you selected. For example, if all the songs are from the same artist, that artist’s name is the playlist’s name. Similarly, if the songs are all from the same album, the playlist’s name is the artist’s and album’s names. Sometimes iTunes picks an appropriate name, and sometimes it doesn’t.
Tip
![]()
For still another way to create a playlist, try this: Select a group of songs and drag them onto the Source list. When you do so, iTunes does the same thing it does when you create a playlist using the steps in this section.
4. While the playlist name is highlighted, edit the name as needed and then press Return. The playlist is ready to listen to and for you to add more songs.
Tip
![]()
You can also move songs from one playlist to another one. Just select a playlist containing tracks you want to add to the playlist instead of the Library in step 1.
Adding Songs to a Playlist
The whole point of creating a playlist is to add songs to it. Whether you created an empty playlist or one that already has some songs in it, the steps to add songs are the same:
1. Select the Music source.
2. Browse or search the Music source (or other source) so that songs you want to add to the playlist are shown in the Content pane.
Tip
![]()
You can add the same song to a playlist as many times as you’d like to hear it.
3. Select the tracks you want to add to the playlist by clicking them (remember the techniques to select multiple tracks at the same time).
4. Drag the selected songs from the Content pane onto the playlist to which you want to add them. As you drag, you see the songs you have selected in a ghost image attached to the pointer. When the playlist becomes highlighted and the cursor includes a plus sign (+), release the mouse button. The songs are added to the playlist.
Tip
![]()
If you double-click a playlist, it opens in a separate window. You can drag songs onto this window to add them to the playlist. This is helpful when you have a lot of playlists and other items on your Source list because you can arrange the iTunes window and the playlist window so you can see both easily at the same time.
5. Repeat steps 2–4 until you have added all the songs you want to include in the playlist.
6. Select the playlist on the Source list. Its songs appear in the Content pane. Information about the playlist, such as its playing time, appears in the Source Information area at the bottom of the iTunes window.
Note
![]()
The Source Information area becomes very important when you are creating a CD because you can use this to make sure a playlist will fit onto a CD.
Removing Songs from a Playlist
If you decide you don’t want one or more songs included in a playlist, select the songs you want to remove in the playlist’s Content pane and press the Delete key. A warning prompt appears. Click Yes and the songs are deleted from the playlist.
Tip
![]()
You can add a song to a standard playlist by opening its contextual menu, choosing Add to Playlist, and then choosing the playlist to which you want to add that song.
Setting the Order in Which a Playlist’s Songs Play
Just like other sources, the order in which a playlist’s songs play is determined by the order in which they appear in the Content pane (the first song is the one at the top of the window, the second is the next one down, and so on). You can drag songs up on the list to make them play earlier or down in the list to make them play later.
Note
![]()
When you delete a song from a playlist, it isn’t deleted from the Library. It remains there so you can add it to a different playlist or listen to it from the Library. Of course, if it is included in other playlists, it isn’t removed from those either.
You can also change the order in which songs will play by sorting the playlist by its columns. You do this by clicking the column title in the column by which you want the Content pane sorted. You can set the columns that appear for a playlist by selecting View, View Options, as you learned to do earlier.
Listening to a Standard Playlist
After you have created a playlist, you can listen to it by selecting it on the Source list and using the same controls you use to listen to other sources. You can even search in and browse playlists just as you can the Library or CDs. (That’s the real beauty of iTunes; it works the same way no matter what the selected source is!)
Note
![]()
You can’t sort a playlist by dragging songs up or down unless the playlist is sorted by the Track Number column (always the first column in the Content pane unless you are viewing the Library, in which case it is always the first column with information in it). If songs bounce back when you try to reorder them, click the Track Number column to make it the sort column. Then you’ll be able to drag songs around to change their order.
Deleting a Standard Playlist
If you decide you no longer want a playlist, you can delete it by selecting the playlist on the Source list and pressing the Delete key. A prompt appears; click Yes and the playlist is removed from the Source list. Even though you’ve deleted the playlist, the songs in the playlist remain in the Library or in other playlists for your listening pleasure.
Note
![]()
The only time tracks or other content are actually removed from your Library is when you delete them while the Music source is selected. You should do this only when you are absolutely sure you won’t want those tracks again. If you are working with playlists, deleting tracks removes them from only the current playlist so you can always add them again later if you change your mind.
Building and Using Smart Playlists
The basic purpose of a smart playlist is the same as a standard playlist—that is, to contain a collection of tracks to which you can listen, put on a CD, and so on. However, the path smart playlists take to this end is completely different from that of standard playlists. Rather than choose specific songs as you do in a standard playlist, you tell iTunes the kind of tracks you want in your smart playlist and it picks out the tracks for you and places them in the playlist. For example, suppose you want to create a playlist that contains all your classical music. Rather than picking out all the songs in your Library that have the Classical genre (as you would do to create a standard playlist), you can use a smart playlist to tell iTunes to select all the classical music for you. The application then gathers all the music with the Classical genre and places that music in a smart playlist.
Understanding Why Smart Playlists Are Called Smart
You create a smart playlist by defining a set of criteria based on any number of tags. After you have created these criteria, iTunes chooses songs that match those tags and places them in the playlist. For example, suppose you are a big-time Elvis fan and regularly add Elvis music to your Library. You could create a playlist and manually drag your new Elvis tunes to that playlist. But by using a smart playlist instead, you could define the playlist to include all your Elvis music. Anytime you add more Elvis music to your Library, that music is added to the playlist automatically so it always contains all the Elvis music in your Library.
You can also base a smart playlist on more than one attribute at the same time. Going back to the Elvis example, you could add the condition that you want only those songs you have rated four stars or higher so the smart playlist contains only your favorite Elvis songs.
As the previous example shows, smart playlists can be dynamic; iTunes calls this live updating. When a smart playlist is set to be live, iTunes changes its contents over time to match changes to the music in your Library. If this feature isn’t set for a smart playlist, that playlist contains only those songs that met the criteria at the time the playlist was created.
Finally, you can also link a smart playlist’s conditions by the logical expression All or Any. If you use an All logical expression, all the conditions must be true for a song to be included in the smart playlist. If you use the Any option, only one of the conditions has to be met for a song to be included in the smart playlist.
Creating a Smart Playlist
You can create a smart playlist by performing the following steps:
1. Select File, New Smart Playlist or hold down the Option key and click the New Playlist button, which becomes the New Smart Playlist button when the Option key is pressed down. You see the Smart Playlist dialog box (see Figure 8.21).
Figure 8.21 The Smart Playlist dialog box enables you to create playlists based on a single tag or on many of them.
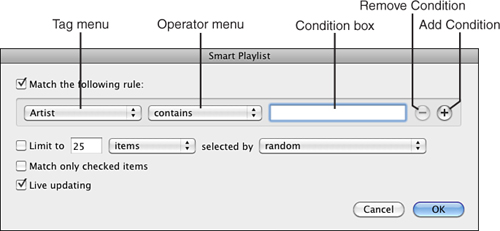
Tip
![]()
You can also create a new smart playlist by pressing Option-![]() -N.
-N.
2. In the Tag menu, select the first tag you want the smart playlist to be based on. For example, you can select Artist, Genre, My Rating, or Year, among many others. The Operator menu is updated with operators that are applicable to the attribute you select. For example, if you select Artist, the Operator menu includes text operators such as Contains or Starts With, whereas if you select Bit Rate, the Operator menu includes numeric operators such as Is or Is Greater Than.
3. In the Operator menu, select the operator you want to use. For example, if you want to match data exactly, select the Is operator. If you want the condition to be more loose, select an operator such as Contains or Is Less Than.
4. Use the Condition box to type the condition you want to match. The more you type, the more specific the condition is. As an example, if you select Artist in step 1, select Contains in step 2, and type Elvis in this step, the playlist finds all songs that include Elvis, Elvis Presley, Elvis Costello, Red Elvises, and so on. If you type Elvis Presley in the Condition box, instead, iTunes includes only songs whose artist includes the full phrase Elvis Presley, such as Elvis Presley, Elvis Presley and His Back-up Band, and so on.
Note
![]()
As you make selections on the Attribute menu and type conditions in the Condition box, iTunes will attempt to automatically match what you type to tags in your Library. For example, if your Library includes Elvis music and you use Artist as an attribute, iTunes will enter Elvis Presley in the Condition box for you when you start typing “Elvis.”
5. To add another condition to the smart playlist, click the Add Condition button. A new, empty condition appears. At the top of the dialog box, the Match menu also appears.
6. In the second condition’s Tag menu, select the second tag on which you want the smart playlist to be based. For example, if you want to include songs from a specific genre, select Genre on the menu.
7. In the second condition’s Operator menu, select the operator you want to use.
8. Use the Condition box to type the condition you want to match.
9. Repeat steps 5–8 to add more conditions to the playlist until you have all the conditions you want to include (see Figure 8.22).
Figure 8.22 This smart playlist is approaching the genius level; it now includes three conditions.

Tip
![]()
If you want to remove a condition from a smart playlist, click the Remove button (the minus sign) for the condition you want to remove.
10. In the Match pop-up menu, select All if all the conditions must be met for a track to be included in the smart playlist, or select Any if only one of them must be met. For example, you could create a smart playlist based on multiple Artist conditions and the playlist would feature music by those artists. In this case, you would choose Any so that if a song were associated with any of the artists for which you created a condition, it would be included in the playlist. As a contrasting example, if you want the playlist to include songs you have rated as three stars or better by a specific artist, you would include both of these conditions and then select All in the menu so that both conditions would have to be met for a song to be included (a song is both by the artist and is rated with three or more stars).
Note
![]()
If you include more than one condition based on the same tag, you usually don’t want to use the All option because the conditions will likely be mutually exclusive, and using the All option will result in no songs being included in the playlist because no song will be able to meet all the conditions at the same time.
11. If you want to limit the playlist, activate the Limit To check box. If you don’t want to set a limit on the playlist, leave the check box deactivated and skip to step 15.
Tip
![]()
Limiting a playlist by disk space is useful when you want to do something else with that playlist, such as burning a CD. You could set the playlist to be limited to 700MB to ensure all its songs will fit on one disc. (The exact limit depends on the specific drive and disc media you use.)
12. Use the Limit To pop-up menu to select the parameter you want to use to limit the playlist; by default, this menu has Items selected. Your choices include the number of songs (Items on the menu), the time the playlist will play (Minutes or Hours), and the size of the files the playlist contains (MB or GB).
13. Type the data appropriate for the limit you selected in the Limit To box. For example, if you selected Minutes in the menu, type the maximum length of the playlist in minutes in the box. If you selected Items, enter the maximum number of songs that can be included in the playlist.
14. Select how you want iTunes to choose the songs it includes based on the limit you selected by using the Selected By menu. This menu has many options, including Random, Most Recently Played, and Most Recently Added.
15. If you want the playlist to include only songs whose check box in the Content pane is activated, activate the Match Only Checked Items check box. If you leave this check box deactivated, iTunes includes all songs that meet the playlist’s conditions, even if you have deactivated their check boxes in the Content pane.
16. If you want the playlist to be dynamic, meaning that iTunes updates its contents over time, leave the Live Updating check box activated. If you deactivate this check box, the playlist includes only those songs that meet the playlist’s conditions when you create it.
17. Click OK to create the playlist. iTunes adds the smart playlist to the Source list, and its name is ready for you to edit. Also, the songs in your Library that match the criteria in the playlist are added to it and the current contents of the playlist are shown in the Content pane.
18. Type the playlist’s name and press Return. The smart playlist is complete.
Listening to a Smart Playlist
Listening to a smart playlist is just like listening to other sources: You select it on the Source list and use the playback controls to listen to it. The one difference is that, if a smart playlist is set to be live, its contents can change over time.
Note
![]()
Just as with other sources, when you select a smart playlist, its information is shown in the Source Information section at the bottom of the window. This can be useful if you want to create a CD or just to see how big the playlist is (by number of songs, time, or file size). Remember, though, that because a smart playlist’s contents can change over time, its source information can also change over time. So, just because a smart playlist fits on a CD today doesn’t mean it still will tomorrow (or even later today).
Changing a Smart Playlist
To change the contents of a smart playlist, you change the smart playlist’s criteria (remember that iTunes automatically places tracks in a smart playlist based on your criteria). Use the following steps to do this:
1. Select the smart playlist you want to change.
2. Select File, Edit Smart Playlist. The Smart Playlist dialog box appears, and the playlist’s current criteria are shown.
3. Use the techniques you learned when you created a playlist to change its criteria. For example, you can remove conditions by clicking their Remove buttons. You can also add more conditions or change the other settings for the playlist.
Tip
![]()
You can also edit a smart playlist by selecting it and opening the Info window (which also opens the Smart Playlist dialog box). Plus, you can open the playlist’s contextual menu by right-clicking (two-button mouse) or Control-clicking it (one-button mouse) and selecting Edit Smart Playlist.
4. Click OK. Your changes are saved and the contents of the playlist are updated to match the current criteria.
You can also change a smart playlist by using the same techniques you use on other sources such as sorting it, selecting the columns you see when you view it, and so on.
Tip
![]()
To delete a smart playlist, select it on the Source list and press Delete. Confirm the deletion at the prompt (if you see it), and the playlist is removed from the Source list.