15. Managing Your Email
Managing Email with Apple Mail
Mac OS X ships with the Apple Mail application (which I’ll just call Mail from now on), which is an elegant, full-featured, and easy-to-use email client. Mail offers a tidy, straightforward interface, but that surface simplicity hides a wealth of powerful and useful features. Covering all of those features would require a dozen chapters of this size, so I’ll just hit the highlights here. These include configuring the Mail preferences, particularly the all-important task of setting up your email accounts; receiving email and sending your own messages and replies; using mailboxes and rules to organize your email; working with message attachments; and using Mail to follow your favorite RSS feeds.
Configuring Apple Mail
Before you can start using Mail to work with your email, you need to configure the accounts it uses. If you entered account information in the Setup Assistant when you installed Mac OS X, those accounts are configured for you already. For example, if you set up or entered the information for your MobileMe account in the Setup Assistant, your MobileMe email account is configured in Mail automatically.
If you are like most Mac users, you probably have more than one email account; you can use Mail to access any or all of them.
There are also several other areas that you don’t necessarily have to configure to use Mail, but I have included them in the section “Configuring Email Accounts” so that all the configuration information is together for your reference.
Before proceeding to the next few sections, click the Mail icon in the Dock to launch Mail, and then open the Mail preferences by selecting Mail, Preferences (or by pressing ![]() -,).
-,).
Configuring General Mail Preferences
Using the General pane of the Mail preferences dialog box, you can configure the following preferences:
• Default Email Reader—Use this pop-up menu to select the email application that Mac OS X uses as the default. If you want to use Mail, you don’t need to make a selection on this menu. If you want to use another application, choose Select on the menu and use the resulting sheet to select the application you want to use instead of Mail.
• Check for New Messages—Use this pop-up menu to determine how often Mail checks for new mail. Select Manually to disable automatic checking; otherwise, select the frequency with which you want Mail to check for new email automatically, such as Every 5 Minutes (the default interval).
• New Messages Sound—Use this pop-up menu to choose the sound that Mac OS X plays when new mail is received, or select None to disable the new mail sound. Mail can also play sounds for the following events: mail error and mail sent. To turn these sounds off, deactivate the Play Sounds for Other Mail Actions check box.
Tip
![]()
You can use custom mail sounds by selecting Add/Remove on the New Messages Sound pop-up menu and selecting the custom sound you want to use. Mail places the sound file you select in the Library/Sounds folder in your Home folder. You can then choose it on the pop-up menu in Mail and other applications, such as iChat.
• Dock Unread Count—Use this pop-up menu to configure how Mail’s icon on the Dock indicates when you have new mail and how many new messages you’ve received. Choose Inbox Only to have only unread messages in your inbox displayed on the icon. You can also choose All Mailboxes or, to disable the Dock indicator, choose None.
• Add Invitations to iCal—Use this pop-up menu to determine how Mail handles iCal invitations you receive. Select Automatically to have them added to your iCal calendar when you receive them, or select Never if you don’t want them added to your calendar.
• Downloads Folder—Use this pop-up menu to determine where Mail stores file attachments from the email messages you receive. Leave the default Downloads folder selected, or choose Other and then select a different folder.
• Remove Unedited Downloads—Use this pop-up menu to determine when Mail deletes file attachments that you haven’t changed. The options are Never, When Mail Quits, and After Message Is Deleted.
• If Outgoing Server Is Unavailable—Use this pop-up menu to select what to do when the server you use to send email is not accessible. You can have Mail display a list of alternative servers, or have Mail automatically try to deliver the email again later.
• When Searching All Mailboxes, Include Results From—Use these check boxes to determine if the Trash, Junk, or Encrypted Messages folders are included in searches. If a folder’s check box is activated, it will be included.
• MobileMe—Click this button to use MobileMe to keep your Mail information synchronized on each machine you use. Use the resulting MobileMe pane to configure the synchronization you want to use.
![]() To learn how to use MobileMe to synchronize information, see “Using MobileMe to Synchronize Important Information on Multiple Macs,” p. 435.
To learn how to use MobileMe to synchronize information, see “Using MobileMe to Synchronize Important Information on Multiple Macs,” p. 435.
Configuring Email Accounts
The most basic configuration for Mail is the email accounts you are going to access with it. Before you get started, gather the following information for each mail account you want to configure in Mail:
• Account type—There are four types of email accounts with which Mail can work. A MobileMe account is one provided by Apple’s MobileMe servers. A Post Office Protocol (POP) account is provided by most ISPs. An Internet Message Access Protocol (IMAP) is similar to a POP account but offers additional features, and an Exchange account is provided by an Exchange server, which is used on many business networks.
Note
![]()
When you use a MobileMe email account with Mail, it is configured as an IMAP account. In Mail, it is treated as its own category because it is part of your MobileMe account.
• Your email address—This should be self-explanatory.
• Incoming mail server—This is the address of the server that handles retrieving your email. For POP accounts, it often looks something like pop.isp.net.
• Your email username—This is your username for your email account, which might or might not be the same as your username for your Internet account. Typically, this is everything before the @ in your email address.
• Your email password—This is the password for your email account, which might or might not be the same as that of your Internet access account.
• Outgoing email server or Simple Mail Transfer Protocol (SMTP) host—This is the address of the server that handles sending your email.
• SMTP port—You need to know whether your SMTP server uses a port other than the standard port 25 (such as port 587).
• SMTP Authentication—You need to know whether your SMTP server uses authentication.
• SMTP username—This is the username for your SMTP server; it is usually the same as your email username, but it isn’t always.
• SMTP password—Again, this is usually the same as your email password.
After you have gathered this information, you are ready to configure the email accounts. You can use the Accounts pane of the Preferences dialog box or the Add Account command.
To add email accounts to Mail, do the following:
1. Use either of the following techniques to get started:
• If you have the preferences dialog box open, click the Accounts button to see the Accounts pane, and then click the Add Account button (the plus sign at the bottom of the list of accounts).
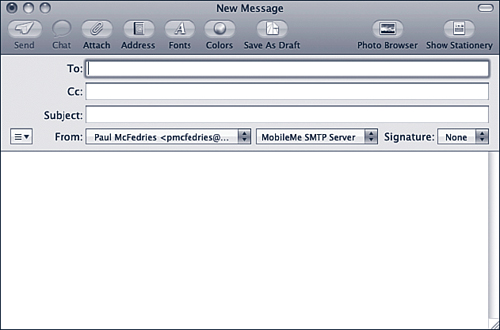
• In Mail, select File, Add Account. Figure 15.1 shows the dialog box that appears.
Figure 15.1 If you configured a MobileMe account when you installed Mac OS X, your MobileMe email account is configured in Mail automatically.
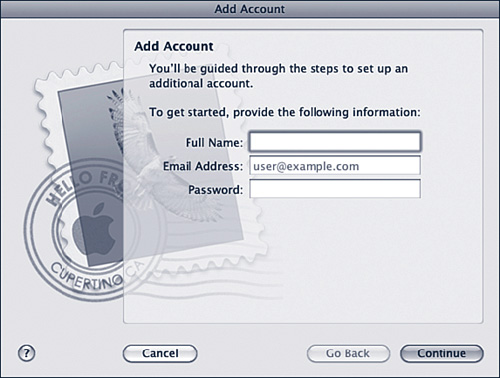
2. Enter the account information, including your full name, email address, and password.
Note
![]()
What you enter in the Full Name field is what appears next to your return email address shown in the Email Address data field. If a recipient uses Mail, he sees your full name instead of your email address.
3. Click Continue. For all account types except MobileMe, the incoming Mail Server sheet appears. For MobileMe accounts, Mail activates the information you entered and if it is correct, the account is configured and you move directly to the Conclusion sheet; skip to step 9.
4. Select the account type from the Account Type pop-up menu.
5. Enter a description of the account in the Description field.
6. Enter the Incoming Mail Server, enter your username (typically everything before the @ in your email address) and password, and then click Continue. Mail checks the connection using the information you entered. If the information works, you see the Outgoing Mail Server sheet. If not, you’ll need to correct it before you can move ahead.
7. Enter the SMTP server address for the account in the Outgoing Mail Server box. If an SMTP server is already configured, you can choose to use it by selecting it on the drop-down list.
8. If the SMTP server for the account uses authentication, activate the Use Authentication check box and configure the User Name and Password fields in the sheet; the username and password might or might not be the same as those for the incoming mail server. Click Continue when you are finished configuring the outgoing mail server. Mail checks the connection to make sure it can communicate with the server. If it can, you see the Account Summary sheet, which means the account has been configured successfully. If not, you’ll need to correct the configuration until it can communicate with the server.
9. Click Create.
After you have created one or more accounts, you return to the Account pane and the accounts you have configured are shown in the left part of the pane. Next, configure mailbox behavior for each account.
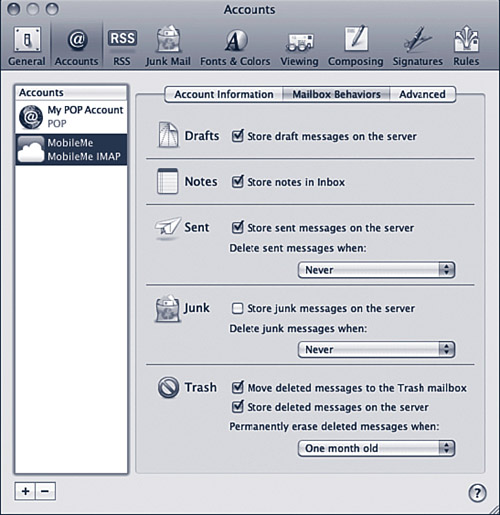
Select the account you want to configure and click the Mailbox Behaviors tab. This tab provides several controls you can use to control how the account you are configuring behaves. The options you see depend on the type of account you are creating. For example, you see fewer options for a POP account than you do for other types. Because MobileMe accounts are popular with many Mac users, you see the options you can configure for MobileMe accounts in the following list and in Figure 15.2. You can configure the options on this tab for other account types in a similar way, although the specific options you have might be different:
• Use the check box in the Drafts area to determine whether messages are stored on the MobileMe server when you are writing them. This causes email that you are writing to be saved on the MobileMe server as you are writing it. If you write email offline, you don’t want to select this. If you use a broadband connection to the Net, you can activate the Store Draft Messages on the Server check box to have your drafts stored online as you write them.
• You can use Mail to create and manage notes, which are text documents you can create and store within Mail. If you want your notes to be stored in your Inbox, activate the Store Notes in Inbox check box. If you leave this deactivated, you can access notes via the Notes folder.
• Use the controls in the Sent area to determine whether sent messages are stored on the server and when sent messages are deleted. Usually, you don’t want to save sent messages on the server because those messages count against your total storage allowance for your account. If you do want sent messages to be stored on the server, activate the Store Sent Messages on the Server check box. Then use the Delete Sent Messages When pop-up menu to select how often the sent messages are deleted. The options are Never, One Day Old, One Week Old, One Month Old, or Quitting Mail.
• Use the Junk controls to configure how Mail handles messages that are classified as junk. Similar to the first two options, you can select to have junk mail stored on the server; if you select to allow this, use the pop-up menu to determine when junk mail is deleted from the server.
• Use the Trash controls to configure how trash is handled. If you want deleted messages to be moved to the Trash mail box, activate the Move Deleted Messages to the Trash Mailbox check box. If you want deleted messages to be stored on the server, activate the Store Deleted Messages on the Server check box, and to determine when deleted messages are actually erased, use the Permanently Erase Deleted Messages When pop-up menu. The options are Never, One Day Old, One Week Old, One Month Old, or Quitting Mail.
Figure 15.2 You can configure these special mailbox actions when using a MobileMe mail account.
Configure these behaviors for each account using similar options.
Finally, configure the Advanced options for each account using the following steps (again, these assume a MobileMe account; other account types might have different options):
1. Select the Account you want to configure and click the Advanced tab. Just as with the Mailbox Behaviors tab, the specific controls you see depend on the type of account you are configuring (see Figure 15.3).
Figure 15.3 These are the Advanced controls for a MobileMe email account.
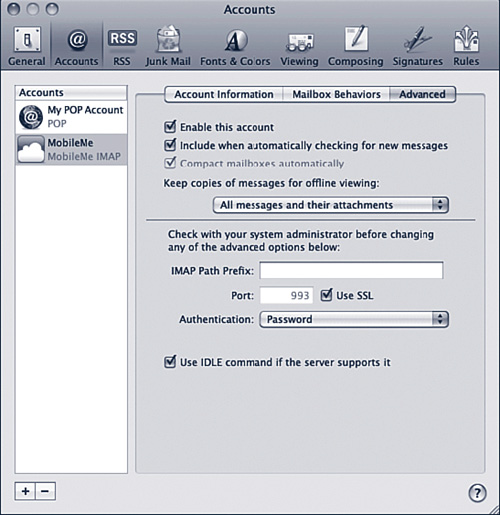
2. Use the Enable This Account check box to enable or disable the account. If you disable an account, it won’t be used.
3. Activate the Include When Automatically Checking for New Mail check box if you want this account always included when Mail automatically checks for mail. If you deactivate this check box, you must manually check for mail for this account.
4. If enabled, activate the Compact Mailboxes Automatically check box to have Mail automatically compress your mailboxes to minimize the storage space they require.
5. Use the Keep Copies of Messages for Offline Viewing pop-up menu to determine what Mail does with the messages it receives when you are not connected to the Internet. For example, if you select All Messages and Their Attachments, all your messages and any attachments they contain are downloaded to your Mac so you can view them even if you aren’t connected to the Net. If you select Only Messages I’ve Read, only the messages you have read are downloaded to your Mac. Choose All Messages, but Omit Attachments to download messages but not their attachments or Don’t Keep Copies of Any Messages if you don’t want any information to be downloaded to your Mac (you’ll have to be connected to the Internet to be able to read messages).
Note
![]()
Other options are available at the bottom of the Advanced pane, but you aren’t likely to use them unless you are specifically directed to do so by the administrator of the email system you are using.
6. Select another account or close the Preferences dialog box. Mail prompts you to save your changes.
Using steps similar to these, you can add the rest of your email accounts to Mail to work with them all from the Mail application. As you read previously, the steps for a specific account depend on the type of email account you are adding. Just use the specific configuration information provided for each account and repeat the previous steps.
Note
![]()
Mail can’t access an AOL email account. However, you should be able to add just about any other email account to it. In fact, Mail is pretty smart about some other email services. For instance, if you add a Google Gmail account, Mail automatically connects and adds all of the settings for you.
Setting RSS Preferences
You can use Mail and other applications to receive and read RSS feeds. The RSS preferences can be used to determine how RSS feeds are handled on your Mac.
![]() To learn how to work with RSS feeds, see “Working with RSS Feeds,” p. 345.
To learn how to work with RSS feeds, see “Working with RSS Feeds,” p. 345.
Setting Junk Mail Preferences
Use the Junk Mail pane to configure Mail’s Junk Mail feature.
![]() To learn how to configure and use Mail’s junk mail feature, see “Handling Junk Mail,” 341.
To learn how to configure and use Mail’s junk mail feature, see “Handling Junk Mail,” 341.
Setting Fonts & Colors Preferences
Use the Fonts & Colors pane of the Mail preferences window to control how text appears in Mail windows:
• Use the various Select buttons to select the font and size for the Mailbox font, Message list font (the pane in which all the messages in a mailbox are listed), the message font (which is the font used for messages you read), the note font, and the fixed-width font.
• If you prefer a fixed-width font for plain-text messages, activate the Use Fixed Width Font for Plain Text Messages check box.
• If you want different levels of quoted text to use different colors, activate the Color Quoted Text check box and select the colors for each level using the pop-up menus.
Setting Viewing Preferences
Using the Viewing pane of the Mail Preferences window, you can control the following viewing options:
• Use the Show Header Detail pop-up menu to determine how much information is shown in the header of email messages you receive. Your choices are Default, None, All, or Custom. If you select Custom, you can select the specific data you want to see in the header of your messages.
Note
![]()
Note that the Show Header Detail pop-up menu affects mail you have already downloaded. For example, you can select an email message to read and then select a level of header detail from the Show Header Detail pop-up menu to change the header information for the mail you are reading.
• Activate the Show Online Buddy Status check box if you want the status of people whom you have designated as being online buddies to be displayed. This helps you know when these people are online so you can chat with them.
• Activate the Display Unread Message with Bold Font check box if you want messages that you haven’t read yet to appear in bold in the Mail List pane.
Tip
![]()
You can show all header information in messages by selecting View, Message, Long Headers or by pressing Shift-![]() -H.
-H.
• Unactivate the Display Remote Images in HTML Messages check box if you want only the text portion of HTML messages that you receive to be displayed. If you receive a lot of spam, it’s a good idea to deactivate this box so you can choose which images are displayed; otherwise, you might be unpleasantly surprised by images in spam messages.
Note
![]()
Mail uses the Safari HTML rendering engine to display HTML messages. This improves the formatting you see when you view HTML messages and makes HTML messages fully interactive.
• Deactivate the Use Smart Addresses check box if you don’t want Mail to substitute a person’s name (from the Address Book) for her email address when you receive mail from her.
• Activate the Highlight Related Messages Using Color check box, and select a color by using the color button. Threads (a series of messages connected by replies to an original message) in your mailbox are highlighted with the color you select so you can spot related messages more easily.
Setting Composing Preferences
The Composing pane of the Preferences window controls various composing options, which include the following:
• Use the Message Format pop-up menu to set the default format for new messages you can create. Your options are Plain Text and Rich Text. You can override your default choice for specific messages.
Tip
![]()
For example, if you select Plain Text as your default format, you can create a message in the Rich Text format by creating the message and selecting Format, Make Rich Text (Shift-![]() -T). If you select Rich Text, you can select Format, Make Plain Text (Shift-
-T). If you select Rich Text, you can select Format, Make Plain Text (Shift-![]() -T) to create a plain-text message.
-T) to create a plain-text message.
• Select As I Type on the Check Spelling pop-up menu to have Mail check your spelling as you type messages. Choose When I Click Send to have Mail check spelling when you send a message, or Never to disable spell check.
• Activate the Automatically check box and then select Cc: on the pop-up menu to include yourself in the Cc block of every message you send. If you prefer to include yourself on the address list for a message but hide your address from the other recipients, select Bcc: on the pop-up menu.
• Activate the Automatically Complete Addresses check box to have Mail look up addresses in your Address Book or on specific LDAP servers. Then click the Configure LDAP button and use the resulting sheet to configure the servers on which you want Mail to look up addresses.
• Activate the When Sending to a Group, Show All Member Addresses check box to list members of a group by their names in an email that you send to a group (rather than listing just the group name).
• If you want to highlight email addresses when you are sending them outside of safe domains, activate the Mark Addresses Not in This Domain check box and enter the domain you want Mail to consider safe in the box. For example, you might want to be careful about sending messages outside your work domain. In that case, you would activate the box and enter your company’s domain (such as company.com) in the box. Whenever you address messages to someplace other than that domain, the address is highlighted in red.
• Use the Send New Mail From pop-up menu to choose the account from which new email will be sent (your default account). You can choose Account of Last Viewed Mailbox to choose the account in which you most recently read email, or you can choose a specific account. This impacts only the default email account from which new email is sent. You can always override this choice when you compose a new message.
• Use the Create Notes and To Dos In pop-up menu to choose the default account for notes and To Do items you create in Mail. The options are the same as for the default send account.
• Use the controls in the Responding area to configure how Mail handles reply messages. To use the same mail format as the original message (such as plain text), activate the Use the Same Message Format as the Original Message check box. If you don’t activate this, your reply uses your default format. To include the original message’s text in your reply (which is a good idea so you can use quoting), activate the Quote the Text of the Original Message check box. Activate the Increase Quote Level box to have Mail indent each message’s text by one level; this makes an email conversation clearer because you can more easily see the flow of the mail threads. If you choose to use quoting (which you should), use the radio buttons to determine whether the entire message is quoted or only the selected part. The second option is preferable because, if you don’t select any text in the original message when you reply to it, the entire text is quoted, which is the same thing the Include All option does anyway. However, if you want to reply only to a specific part of a message, you can select it and only that part is included in the message. This provides better context for your reply.
Setting Signature Preferences
You can configure signatures to be attached to your email messages. You can have as many signatures as you would like, and you can select a default signature or select one each time you compose a new message:
1. Click the Signatures icon to open the Signatures pane of the Mail Preferences window. The accounts you have configured are shown in the far left pane. The list of signatures you have configured are shown in the middle pane, while the far right pane shows the detail for a selected signature (see Figure 15.4).
Figure 15.4 Adding a signature to your emails is easy to do and the signature can be shared across your email accounts.
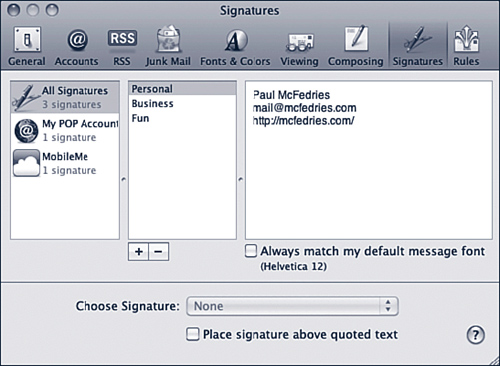
2. Select the account for which you want to configure a signature, or select All Signatures to make the signature available to all accounts.
3. Click Add Signature (+). A new signature appears in the center pane and its name is highlighted to indicate that it is ready to edit. Default text for that signature is shown in the far right pane.
4. Name the signature by typing a name in the highlighted area.
5. Edit or replace the signature text in the far right pane. You can use just about anything you’d like for your signature.
6. If you want your signature to always appear in your default font, activate the Always Match My Default Message Font check box. Underneath this check box, you’ll see what your default font currently is.
7. If you created signatures under the All Signatures category, drag them onto each account under which you want to be able to use them.
8. Select one of the email accounts in the far left pane.
9. If you want a signature to be added to messages from that account, select an option on the Choose Signature pop-up menu. You can choose a signature by name, or choose At Random to have Mail select from one of the signatures each time you create a new message, or In Sequential Order to have Mail choose each signature in the order in which they are listed. If you choose None, no signature will be added automatically. In any case, you can always choose from the available signatures on the Signature menu in the New Message window.
10. Activate the Place Signature Above Quoted Text check box, and your signature will be placed above any text that is quoted when you reply to a message. Signatures appear at the bottom of a message by default. When you use quoting, this can be odd because your signature appears after the quoted text instead of after the part you wrote. Use this check box to ensure that your signature appears after what you write and above the quoted text.
Here are a few more signature tips:
• Change signatures—To change a signature, select it and edit it in the far right pane.
• Select a default signature—When you have more than one signature created for an account, drag the one you want to be the default to the top of the Signature list.
• Copy a signature—You can make a copy of a signature by selecting its text and selecting Edit, Copy. Then paste the text into a new signature. This is useful if you want to base a new signature on one you have previously created.
• Delete a signature—You can delete a signature by selecting it and clicking Remove (-). After you confirm the deletion in the prompt, the signature is no longer available.
Setting Rules
You use the Rules pane to set up automated mail rules.
![]() To learn how to create rules for your email, see “Configuring and Using Rules for Email,” p. 339.
To learn how to create rules for your email, see “Configuring and Using Rules for Email,” p. 339.
Receiving, Sending, and Replying to Email
If you have used an email application before, such as Entourage or Eudora, using Mail to send, receive, and reply to email will be familiar to you after you learn about the Mail interface.
The main Mail window has four sections. The top section contains the Mail toolbar. The second section from the top is the Message List, in which you see the list of items in the selected mailbox. The lower section of the Mail window is the Reading pane in which you read a mail item that is selected in Message List. All your mailboxes are in the Mailbox pane, which appears along the left side of the Mail window (see Figure 15.5).
Figure 15.5 The Mail application uses four panes to enable you to browse, view, and organize your email.
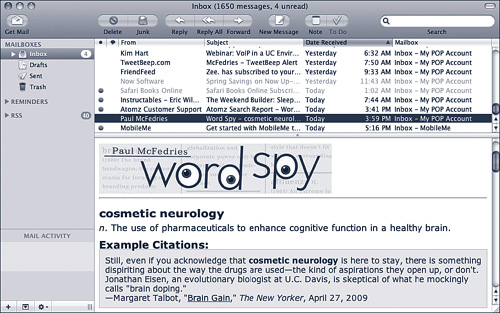
The Message pane of the Mail window behaves much like a Finder in List view. For example, you can change the width of the columns, sort the list of messages, and so on. The columns in the default Mail window are the following (from left to right in Figure 15.5):
• Message status
• Buddy availability
• From
• Subject
• Date Received
• Mailbox (this column only appears if you have multiple email accounts)
The Mailbox pane shows all your mailboxes. You can show the Mailbox pane by selecting View, Show Mailboxes (Shift-![]() -M). You can close the pane by selecting View, Hide Mailboxes (Shift-
-M). You can close the pane by selecting View, Hide Mailboxes (Shift-![]() -M). You can control the width of the pane by dragging the handle located at the bottom of the edge it shares with the other panes so it is the width you want it to be. At the bottom of the Mailbox pane you see Mail Activity, which displays the progress of Mail when it is sending or received email messages.
-M). You can control the width of the pane by dragging the handle located at the bottom of the edge it shares with the other panes so it is the width you want it to be. At the bottom of the Mailbox pane you see Mail Activity, which displays the progress of Mail when it is sending or received email messages.
Note
![]()
If you use a MobileMe, IMAP, or Exchange email account, the Drafts, Junk, and Sent Messages mailboxes appear and have folder icons. These are folders stored on your Mac, whereas the other mailboxes are stored online. If you configured a MobileMe email account to store messages online, they are stored in the online folders rather than those stored on your Mac.
The Mailbox pane contains several mailboxes and folders by default. The Inbox is used to store all your received mail; within the main Inbox is a mailbox for each of your email accounts. You can expand or collapse the contents of a mailbox by using its expansion triangle. You also see Drafts, Sent, and Trash mailboxes; the purpose of each of these should be self-evident. You might also see Drafts and Sent Messages folders for specific types of email accounts.
Retrieving and Reading Email
There are several ways to retrieve email from your accounts, including
• Setting Mail to retrieve your mail automatically using the General pane of the Mail Preferences window
Note
![]()
The first three methods listed retrieve mail for all the email accounts you have configured in Mail (for those accounts that are enabled and that you set to be included in the Retrieve All action using that account’s settings).
• Clicking the Get Mail button on the Mail toolbar
• Pressing Shift-![]() -N to get new mail in all your accounts
-N to get new mail in all your accounts
• Selecting Mailbox, Get New Mail in accountname, where accountname is the account from which you want to retrieve your mail
When you get mail, it is placed in the Inbox mailbox for the account to which it was sent. All email is accessible via the top Inbox account, which includes the contents of each account’s inbox.
Tip
![]()
You can temporarily hide the Reading pane by double-clicking the border between the Message List and the Reading pane. The Reading pane disappears and the Message list consumes the entire Mail window. Double-click the bottom of the Mail window to reopen the Reading pane. You can change the relative height of the two panes by dragging the resize handle located in the center of the bar between the two panes.
When you receive email, Mail’s Dock icon indicates that you have new email and shows you the total number of new messages you have received. If you chose to have Mail play a sound when new mail is received, you hear that sound when mail is received. When you open the Mail icon on the Dock, a list pops up that shows you all the windows open in Mail, as well as some useful commands (see Figure 15.6).
Figure 15.6 When you receive new mail, Mail lets you know how many messages you have received (four in this case); you can quickly access the mailboxes containing the new messages by opening the Mail icon on the Dock and selecting Inbox.

When you select Inbox on the Dock menu, you move into Mail to read your email; each unread message has a blue dot in the Status column to indicate that it is a new message. The number of new messages is also indicated next to the Inbox mailbox.
Tip
![]()
You can also create a new message or check for new email from the Mail Dock menu.
If you have more than one email account, each account has its own Inbox. To see all your inboxes, click the expansion arrow next to the Inbox icon (see Figure 15.7). The Inbox for each of your accounts appears. Select an Inbox to see the messages for that account only, or select the Inbox icon to see all your messages at the same time.
Figure 15.7 Each of my email accounts has its own Inbox, as you can see, listed under the Inbox icon.

Reading Individual Messages
To view the contents of a mailbox or folder, select it in the Mailbox pane. The Message list shows the messages contained in that mailbox or folder. To read a message, select it in the Message list and read it in the Reading pane.
Tip
![]()
In Mail, you can display the contents of more than one mailbox at a time. To do so, select File, New Viewer Window (Option-![]() -N). In the new Viewer window, select the mailbox whose contents you want to view. You can have as many Viewer windows open as you want. For example, you might select to have a Viewer window open for each of your mail accounts.
-N). In the new Viewer window, select the mailbox whose contents you want to view. You can have as many Viewer windows open as you want. For example, you might select to have a Viewer window open for each of your mail accounts.
To read your mail, use the following shortcuts:
• Scroll down in a message by pressing the spacebar.
• Move up and down the messages in the Message List using the up- and down-arrow keys.
• Double-click a message to read it in its own window.
Note
![]()
You can see the activity of Mail as it downloads messages in a separate Activity window. To see the Activity window, select Window, Activity (or press ![]() -0).
-0).
Working with Email Threads
As you read and reply to messages, each message and its replies become a thread, as in a thread of conversation about a topic (or at least started from a topic). If the Highlight Related Messages Using Color preference is set, Mail highlights all the messages in a thread with the color you select (it is light blue by default). You can also select to organize a mailbox by threads so that all the mails that form a conversation are grouped together.
Tip
![]()
Mail automatically tracks a list of people to whom you have sent email. This list is called the Previous Recipients list. When you enter an email address in the To field, Mail attempts to match what you are entering to the recipients on this list. If it finds a match, it fills in the rest of the address for you. You can view the list by selecting Window, Previous Recipients. On this list, you can view addresses of people who have sent you email or delete addresses from the list, or add addresses to your Address Book.
To organize messages in the Message List pane by threads, select View, Organize by Thread. A thread column is added to the left side of the Message List pane. Messages that are part of a thread are highlighted in the selected color and are grouped together. Select View, Organize by Thread again to return the Message pane to its previous organization. The messages in a thread are sorted just like other messages in the Message List pane.
Following are some thread tips (these apply when you use the Organize by Thread command):
• The first message in the thread is a summary of the other messages. Select that message to see each sender, title, and date of each message in the thread. At the top of the summary message is the name of the first message in the thread, who started it, and when the first message was sent.
Tip
![]()
If the mailbox you are viewing has several messages in it, select those that are interesting to you; hold down the Shift key to select contiguous messages or hold down the ![]() key to select messages that are not contiguous. Select View, Display Selected Messages Only. The other messages in the mailbox are hidden and you can quickly read the messages you selected (using the shortcuts mentioned in the previous list). To see all the messages in the mailbox again, select View, Display All Messages.
key to select messages that are not contiguous. Select View, Display Selected Messages Only. The other messages in the mailbox are hidden and you can quickly read the messages you selected (using the shortcuts mentioned in the previous list). To see all the messages in the mailbox again, select View, Display All Messages.
• You can collapse a thread by clicking the expansion triangle next to the summary message. The thread collapses so you see only the summary message. You can also collapse a thread by clicking the up and down arrow icon in the Status column for a message in the thread.
• Select View, Expand All Threads to expand all the threads in a selected mailbox, or select View, Collapse All Threads to collapse all the threads in a selected mailbox.
Note
![]()
If you don’t organize by threads, messages in threads are still highlighted with the color indicated in Mail’s preferences settings.
If the person who sent you a message is in your Address Book and has an image on the related address card, that image appears in the upper-right corner of the email message.
Tip
![]()
Mail defines the messages that make up a thread by a special header element. This means you can change the subject of a reply in a thread and Mail will still recognize that the message is part of the thread. However, not all applications can do this and sometimes header information is removed from a message; therefore, it is usually better to leave the subject as it was when the thread was started.
Writing and Sending Email
Writing email in Mail is also quite similar to other email applications. You can create a new mail message in several ways, including the following:
• Click the New button on the toolbar.
• Select File, New Message.
• Press ![]() -N.
-N.
• Right-click a name in the To, From, or Cc block for a message you are reading in the Reading pane and then select New Message on the resulting pop-up menu. A message is created and is addressed to the person whose name you clicked.
• Open Mail’s Dock menu and select Compose New Message.
Tip
![]()
If you point to the From block on an email message and click, a pop-up menu appears. On this menu, you can see the email address of the person, chat with the recipient, create a new message, open the related address card (if the recipient has a card, that is), or create an address card. You can also create a smart mailbox for all the mail from that person (you’ll learn about smart mailboxes later in this chapter).
When you create a new message, you see the New Message window (see Figure 15.8). Creating the message is straightforward. If the message is not already addressed, type the email address(es) in the To and Cc fields. Mail attempts to match what you type to the addresses in your Address Book or on the list of previous recipients that Mail maintains automatically. The addresses that match what you type appear on a drop-down list. You can move up and down this list with the up- and down-arrow keys. To select an address on the list, highlight it and it is entered in the message’s address box. (If there is only one address for the name you type, it is selected by default.) You can enter multiple addresses in an address field by typing a comma and then repeating the previous steps to add more addresses. When you have added all the addresses in the To field, press Tab to move to the next field.
Figure 15.8 If you have used other email applications, Mail’s New Message window will no doubt look familiar.
To use your Address Book to address a message, open the Address Book by clicking the Address icon on the New Message window’s toolbar or by pressing Option-![]() -A. An Addresses window appears that contains the contacts in your Address Book. Browse or search the window to find the people or groups to whom you want to send the message. Select the person or group to whom you want to send mail, and click To or Cc to send those addresses to the respective fields in the New Message window.
-A. An Addresses window appears that contains the contacts in your Address Book. Browse or search the window to find the people or groups to whom you want to send the message. Select the person or group to whom you want to send mail, and click To or Cc to send those addresses to the respective fields in the New Message window.
Tip
![]()
When an address is selected on the drop-down list that appears when Mail attempts to match the address you are typing, you can add it to the message and be ready to enter the next address by typing a comma.
Enter the subject of the message in the Subject field.
Select the account from which you want to send the mail using the Account pop-up menu (your default account is listed automatically). (If you have configured only one account, this menu isn’t displayed.)
Tip
![]()
You can add a Bcc (blind carbon copy) address line by selecting View, Bcc Address Field or by pressing Option-![]() -B. You can add a Reply To address line by selecting View, Reply-To Address Field (or by pressing Option-
-B. You can add a Reply To address line by selecting View, Reply-To Address Field (or by pressing Option-![]() -R). You can use the Reply-To Address Field to enter an address to which people should reply if it is different from the return address associated with your account.
-R). You can use the Reply-To Address Field to enter an address to which people should reply if it is different from the return address associated with your account.
Mail uses the following three rules to determine the account that is used to send a new message:
• If you have selected a mailbox associated with an account (such as the Inbox for an account), that account is the default for a new message.
• If you selected a default account for new mail on the Composing pane of the Preferences dialog box, that account is used for new mail.
• When you reply to a message, the account to which the original message was sent is selected automatically.
Select the signature you want to use from the Signature pop-up menu. The default signature for the selected account is inserted, but you can use the menu to choose a different one.
Tip
![]()
You can also control Mail’s spell checker using the Spelling commands on the Edit menu. You can open the Spelling and Grammar window by selecting Edit, Spelling and Grammar, Show Spelling and Grammar. You can configure the spell checking by selecting Edit, Spelling and Grammar, Check Spelling and then choosing the option you want, such as While Typing.
There are two ways to create the body of the message. One is to just type the text and use Mail’s formatting tools to format if you use the RTF format. The other is to use one of Mail’s email templates.
To create your own message, move into the body and type your message. As you type, Mail checks your spelling according to your preferences. If you use the Check As I Type option, when Mail identifies a misspelled word, it underlines the word in red. You can Control-click or right-click a misspelled word to pop up a menu that enables you to change the word to the correct spelling, ignore the spelling, or learn the word that Mail thinks is misspelled.
You can right-click or Control-click any word, misspelled or not, to perform a number of actions on it, such as searching for the word on your Mac using Spotlight, searching the Web via Google, looking up the word in the Dictionary application, and so on.
To use a template, do the following:
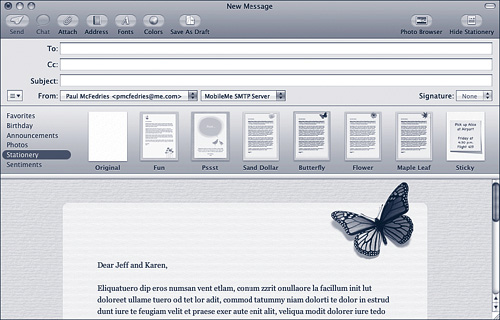
1. Click the Show Stationery button in the toolbar. The available templates appear below the header information.
2. Select a category to see the templates in that category.
3. Select a template, and it appears in the lower pane.
4. Change its content to be what you want it to be; some templates include images that you can’t change (see Figure 15.9). You can change the template for a message without deleting any text you’ve input.
Figure 15.9 Mail’s stationery enables you to create fancy emails with just a click.
Tip
![]()
While you’re composing a message, you can save it in the Draft mailbox by either selecting File, Save (![]() -S) or clicking the Save As Draft button on the New Message toolbar. You can leave a message you are working on in your Draft folder as long as you’d like. If you close it, you can open it to work on it again by selecting the Draft folder and double-clicking the message. As you work, Mail saves your messages as drafts periodically, but you can use the command to save them manually.
-S) or clicking the Save As Draft button on the New Message toolbar. You can leave a message you are working on in your Draft folder as long as you’d like. If you close it, you can open it to work on it again by selecting the Draft folder and double-clicking the message. As you work, Mail saves your messages as drafts periodically, but you can use the command to save them manually.
Right-click an empty section of the message body to open its contextual menu to gain quick access to various commands, such as formatting commands for an RTF message, Spell Checker controls, and quoting commands.
To send a message, do one of the following:
• Click the Send button on the toolbar.
• Select Message, Send.
• Press Shift-![]() -D.
-D.
Replying to Email
Replying to messages you receive in Mail is also similar to other applications. By default, Mail marks the different levels of quoting with different colors along with a change bar. As with other applications, you can select the message to which you want to reply and click Reply on the toolbar; select Message, Reply; or press ![]() -R, which replies to only the sender of the message. You can also click Reply All; select Message, Reply All; or press Shift-
-R, which replies to only the sender of the message. You can also click Reply All; select Message, Reply All; or press Shift-![]() -R to reply to everyone to whom the original message was sent.
-R to reply to everyone to whom the original message was sent.
Note
![]()
You should always quote carefully in your replies. Quoting makes email much more effective because it gives the reader a good context for the information you are providing. Quoting in a plain-text message is much easier; formatting often gets in the way of clear quoting.
You can use the same tools to reply to a message as you use to write a new message.
You can also perform the following actions on mail you have received:
• Reply with iChat—Select Message, Reply with iChat or press Shift-![]() -I if the sender of the message is available via iChat.
-I if the sender of the message is available via iChat.
Tip
![]()
You can open a message’s contextual menu to access many useful commands, such as Reply, Reply All, Forward, and so on.
• Forward—Select Message, Forward or press Shift-![]() -F to forward a message to other recipients.
-F to forward a message to other recipients.
• Redirect—Select Message, Redirect or press Shift-![]() -E to redirect the message to someone else. The difference between redirecting and forwarding a message is that when you redirect a message, the email address of the message’s original sender’s still appears in the From field so the person to whom you redirect the message can reply to the message to send email to the person who sent the message. If you forward a message and the recipient replies to it, the reply comes to you because your address becomes the From address on a forwarded message.
-E to redirect the message to someone else. The difference between redirecting and forwarding a message is that when you redirect a message, the email address of the message’s original sender’s still appears in the From field so the person to whom you redirect the message can reply to the message to send email to the person who sent the message. If you forward a message and the recipient replies to it, the reply comes to you because your address becomes the From address on a forwarded message.
Note
![]()
You might be tempted to bounce spam email that you receive. However, this usually doesn’t do any good because most spam includes a bogus return address, so your bounced message has no legitimate place to go. You can use the Bounce command to respond to email from legitimate organizations that have sent unwanted email to you. Hopefully, the bounce results in your address being removed from the related mailing list. Use Mail’s Junk Mail feature to deal with spam.
• Bounce—Select Message, Bounce or press Shift-![]() -B to bounce a message back to the sender. When you do so, the bounce message that is sent makes it appear as if your email address is not valid.
-B to bounce a message back to the sender. When you do so, the bounce message that is sent makes it appear as if your email address is not valid.
Organizing Your Email
Mail provides many tools you can use to organize various aspects of your mail. These include using mailboxes, smart mailboxes, and smart mailbox groups, as well as automating your mail with rules.
Using Mailboxes to Organize Your Email
You can create your own mailboxes to organize your messages. The mailboxes you create are also shown in the Mailbox pane. You can also create nested mailboxes to create a hierarchy of mailboxes in which you store your messages.
1. Select Mailbox, New Mailbox or click the Add Mailbox button (+) at the bottom of the Mailbox pane to see the New Mailbox sheet.
2. On the Location pop-up menu, select the location of the mailbox you are creating. If you select On My Mac, the folder is created on your computer. If you use an IMAP or MobileMe account, you can select that account to create a folder on that account’s server. (Remember that if you store the folder on a server, the contents of that folder count against your storage quota.)
3. In the New Mailbox sheet, enter the name of the mailbox you want to create. To create a nested mailbox, enter the name of each mailbox separated by a slash (/). For example, to create a mailbox called Receipts within a mailbox called Mail to Keep, you would enter Mail to Keep/Receipts.
4. Click OK.
Tip
![]()
You can place a folder within another folder by dragging its icon onto the folder in which you want to place it.
The mailbox is created and appears on the Mailbox pane. If you have created a mailbox that contains other mailboxes, you can use its expansion triangle to expand or collapse it.
You can move messages from one mailbox to another in the following ways:
• Drag and drop a message from the Message List pane to a mailbox.
• Drag messages from the Message List pane in one Viewer to the Message List pane in another Viewer; this copies the messages in the mailbox shown in the second Viewer window.
• Select messages and select Message, Move To; then select the mailbox to which you want to transfer the messages.
• Select messages and select Message, Copy To; then select the mailbox to which you want to create a copy of the selected messages.
• Select messages and select Message, Move Again to move the selected messages into the same mailbox into which you most recently transferred mail (Option-![]() -T).
-T).
• Open a message’s contextual menu and select the Move To, Copy To, Move Again, or Apply Rules command.
• Select messages and select Message, Apply Rules (Option-![]() -L); then select a rule that transfers the messages.
-L); then select a rule that transfers the messages.
Using Smart Mailboxes to Organize Your Email
You can use smart mailboxes to organize your email automatically based on criteria you define. For example, you might want to store all the email you receive from a group of people with whom you are working on a project in a specific folder. Rather than having to place these messages in the folder by dragging them out of your Inbox individually, you can create a smart mailbox so that mail you receive from these people is automatically placed in the folder. You can create smart mailboxes for many needs like the one mentioned here; if you can define a set of conditions for which you want something done, then you can create a smart mailbox to have the action you want to happen done for you automatically.
Smart mailboxes have the gear icon and are purple. To create a smart mailbox, complete the following steps:
1. If you want to create a smart mailbox based on the data in an existing message, select that message.
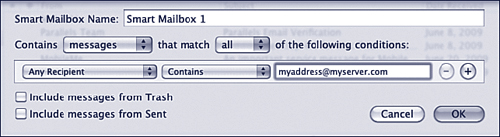
2. Select Mailbox, New Smart Mailbox or open the Add pop-up menu and select New Smart Mailbox. The Smart Mailbox sheet appears. If you selected a message in advance, Mail automatically includes the condition Any Recipient Contains address, where address is the address of the person who sent the selected message (see Figure 15.10).
Figure 15.10 Mail automatically adds an initial condition to the smart mailbox if you select a message in advance.
3. Name the smart mailbox by typing its name in the Smart Mailbox Name box.
4. Select the first condition for the mailbox on the first pop-up menu in the conditions box; by default, this menu shows From, which bases the condition on the name or email address in the From field. There are many other choices, including Entire Message, Subject, Date Received, and so on.
5. Select the operand for the condition on the second pop-up menu. What you see on this menu depends on the condition you selected. Common choices include Contains, Does Not Contain, Is Equal To, and so on.
6. Enter the condition text or date in the text box.
7. To add another condition, click the + button.
8. Repeat steps 4–6 to configure the second condition.
9. If you have configured more than one condition, select All on the pop-up menu above the condition list if all the conditions must be true for mail to be stored in the smart mailbox, or select Any if only at least one of the conditions must be true.
Tip
![]()
To remove a condition, click the Remove (-) button next to the condition you want to remove.
10. If you want messages that are in the Trash folder to be included in the smart mailbox, activate the Include Messages From Trash check box.
Tip
![]()
To change the conditions for an existing smart mailbox, open its contextual menu and select Edit Smart Mailbox. Use the resulting Smart Mailbox sheet to make changes to the smart mailbox.
11. If you want messages that are in the Sent folder to be included in the smart mailbox, activate the Include Messages From Sent check box.
12. Click OK. Mail creates the smart mailbox and populates the mailbox with any mail that meets its conditions.
Using Smart Mailbox Folders to Organize Your Smart Mailboxes
If you want to organize your smart mailboxes, you can create a smart mailbox folder and then place your smart mailboxes within it (you can’t put smart mailboxes within regular mailboxes/folders):
1. Select Mailbox, New Smart Mailbox Folder.
2. In the sheet that appears, name the new smart mailbox folder and click OK. The smart mailbox folder is created.
3. Drag smart mailboxes into the smart mailbox folder to place them there. When you do, an expansion triangle appears so that you can expand the folder to see its contents.
Configuring and Using Rules for Email
You can automate the handling of your email by configuring and using rules. For example, you could set up a rule where the Mail Dock icon bounces when you receive a message from a particular person or with a particular subject line. Mail comes with one predefined rule that looks for any messages from Apple and formats those messages to display with a blue background in the message list.
To create and implement rules, you use the Rules pane of the Mail Preferences window:
1. If you want to create a rule based on the data in an existing message, select that message.
2. Open the Mail Preferences window and click the Rules icon to open the Rules pane.
3. Click Add Rule to open a Rule sheet to define the rule you are creating. If you selected a message in advance, Mail automatically includes the condition Any Recipient Contains address, where address is the address of the person who sent the selected message.
4. Use the Description text box to enter a name for the rule.
5. Use the If pop-up menu to determine whether at least one criterion (select Any) or all the criteria (select All) in the rule must be met for the actions in the rule to be taken.
6. Use the first condition pop-up menu to select the item on which the rule will act. You can select any of the fields in a mail message. You can also select from various criteria, such as whether the sender is in your Address Book.
7. Use the Operator pop-up menu to select how the item relates to the value you enter (such as Contains, Is Equal To, and so on).
8. Enter the value for which the rule is implemented, if applicable, or use a pop-up menu to select a value. (Some conditions, such as Sender Is in My Address Book, don’t require any values.)
9. To add more conditions, click the Add button (+) and repeat steps 6–8 to create additional conditions for the rule.
10. Use the Action area to select the action that will be performed by the rule, by making a choice from the first pop-up menu and making other choices from the other pop-up menus or fields related to that choice.
The actions you can select are Move Message, Copy Message, Set Color of Message, Play Sound, Bounce Icon in Dock, Reply to Message, Forward Message, Redirect Message, Delete Message, Mark as Read, Mark as Flagged, Run AppleScript, or Stop evaluating rules. You can include multiple actions in the same rule.
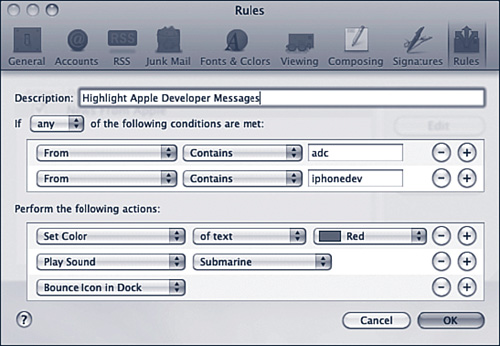
11. Click the Add button next to the action and repeat step 9 to create and configure additional actions. When you are done, review the rule you have created. For example, the rule shown in Figure 15.11 checks to see whether a message is from either Apple Developer Connection (which includes adc in its address) or iPhone Developer Connection (which has iphonedev in its address). For matching messages, the rule sets the message text to red, plays the Submarine sound, and bounces the Mail Dock icon.
Figure 15.11 A typical Mail rule
Tip
![]()
You can remove conditions or actions by clicking the Remove button (–).
12. Click OK. Mail creates the rule and prompts you to apply the rule to the messages in the current mailbox.
13. Click Apply to run the rule now, or click Don’t Apply to skip this step. You return to the Rules pane and see the rule you created on the list of rules.
Note
![]()
If you apply a color in a rule, that rule appears in that color in the Rules pane. Messages already in a mailbox that meet the rule’s criteria are also shown in the color applied by the rule.
You can use the Edit and Duplicate buttons to edit or duplicate rules and the Remove button to delete rules.
Any future messages you receive that meet the criteria for a rule are acted upon by that rule. You can also manually apply rules to messages by selecting messages and selecting Message, Apply Rules (Option-![]() -L).
-L).
Tip
![]()
Manually applying rules is a good way to test your rules to ensure that they do what you intended.
Handling Junk Mail
Unfortunately, no matter how careful you are with your email address, it might eventually get on a junk mail list. And after it gets on one such list, it will probably get on many, and your inbox will overflow with junk mail. Fortunately, Mail includes some built-in tools for dealing with junk mail.
You can configure Mail’s Junk feature via the Junk Mail pane of the Mail preferences dialog box (see Figure 15.12).
Figure 15.12 Use the Junk Mail pane to configure Mail’s junk feature.
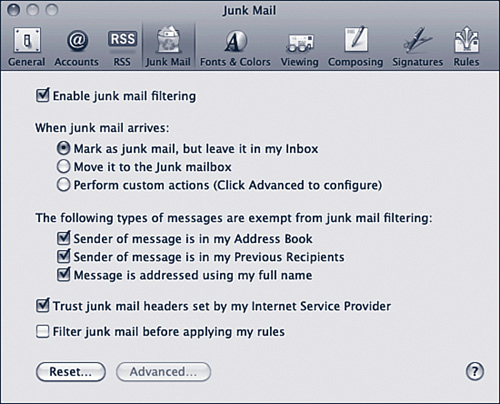
The Junk feature has four modes:
• Disabled mode—In this mode, Junk Mail filtering is inactive and doesn’t do anything. You can disable Junk Mail filtering by deactivating the Enable Junk Mail Filtering check box.
• Training mode—In this mode (which is the default), Mail applies its Junk Mail rules to your messages. This causes Mail to color the message light brown, indicating that Mail thinks the message is junk. You use this mode to fine-tune Junk Mail filtering so that it correctly filters your messages to identify the junk. When you view a message that has been correctly identified as junk, don’t do anything. When a message has been identified as junk but it isn’t, click the Not Junk button. If you find a message that is junk, but Mail has not identified it as such, click the Junk button on the toolbar. You can place the Junk Mail feature in the Training mode by clicking the Mark as Junk Mail, But Leave It in My Inbox radio button.
• Automatic mode—After some time has passed and you are confident that Junk Mail filtering is working properly, you can move into Junk Mail’s Automatic mode by clicking the Move It to the Junk Mailbox radio button. Mail creates a Junk folder in the Mailbox pane and asks you whether it should move all the identified junk mail to this folder. Click Yes. In Automatic mode, the Junk Mail filter moves all the messages it identifies as junk into the Junk folder. You should review the contents of this folder periodically to ensure that no messages you want to keep are in this folder by mistake. If there are messages you want, move them to a different folder. Then delete all the messages in the Junk folder.
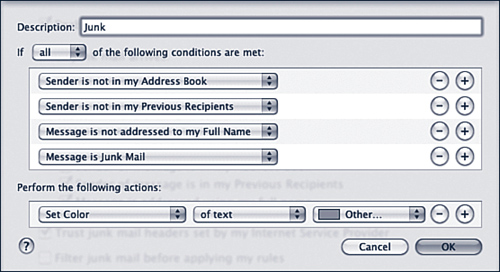
• Custom mode—You use this mode to configure the rules used by the Junk filter. To activate this mode, click the Perform Custom Actions (Click Advanced to Configure) radio button. Then click the Advanced button to open the Advanced configuration sheet. You move to a Rules sheet and the default Junk rule is ready to edit, as shown in Figure 15.13. (Mail’s Junk Mail feature is actually just a special mail rule.) You can change this mail rule just like any rule you create on the Rule pane to change how Mail handles junk mail. If you open the Junk rule, you see that this is simply a rule that acts on any messages that are from people who are not in your Address Book, are not on your Previous Recipient list, are not addressed to your full name, or are marked as Junk. In the Training mode, this rule changes only the color of the messages. In the Automatic mode, it moves the messages to the Junk folder.
Figure 15.13 Use the Advanced configuration sheet to edit the default Junk rule.
By activating the related check box on the Junk Mail pane of the preferences dialog box, you can exempt email messages from the Junk Mail filter in the following situations:
• The sender of a message is in your Address Book.
• The sender of a message is on the list of Previous Recipients.
• The message is addressed to your full name (most spam uses an email address).
If your Internet service provider (ISP) provides junk mail headers that attempt to identify junk mail by its own rules and you want Mail to recognize and use those headers, activate the Trust Junk Mail Headers Set by My Internet Service Provider check box.
You can also specify if the Junk Mail filter should run before your other rules are applied. This makes sense, as spam should be removed or tagged as such before Mail does anything else with it.
If you click the Reset button, the Junk Mail feature is returned to its default state. This also removes any learning the filter has done, so you have to repeat the training process.
Sending and Receiving Files with Email
One of the most valuable uses of email is to send and receive attachments. Again, Mail handles file attachments similarly to other email applications you might be accustomed to.
Attaching Files to Your Email
Attaching files to messages you send can be done in the following ways:
• In the message to which you want to attach files, select File, Attach File (Shift-![]() -A). Then, use the Choose File sheet to select the files you want to attach.
-A). Then, use the Choose File sheet to select the files you want to attach.
• Click the Attach button on the New Message window’s toolbar. The Choose File sheet appears; use it to select the files you want to attach to a message.
• Drag the files onto the New Message window.
When you place a file in a new message window, you see a thumbnail preview of the file with its icon, the filename, and its size in parentheses. If the file type is one that can be displayed in the message, such as a TIFF image or a PDF file, you actually see the contents of the file in the body of the message.
By default, Mail displays the contents of files you attach if it can. If the contents of the file are being displayed and you would rather see just an icon, open the file’s contextual menu and select View as icon. The file is displayed as an icon instead. To view the file’s content again, open the menu and select View in Place.
File attachments must be encoded before they can be sent. When a file is encoded, it is translated into a string of text. The application that receives the message must then decode that message so the files become usable. Encoding and decoding is handled automatically, and you can’t select the encoding method used.
You should also compress files you attach to email messages. Under Mac OS X, you can compress any file in the Zip format using the Finder’s Compress command. Simply select the files you want to attach to an email message, open the contextual menu, and select Compress. The files you selected are placed in a Zip file. You can then rename the file (don’t change the .zip file extension) and attach the Zip file to the message you are sending.
Sending Windows-Friendly Attachments
Sending file attachments is simple except for one thing—the Windows versus Mac situation, which raises its ugly head in the area of file attachments, too. Basically, Mac and Windows operating systems use different file format structures. Mac files have two “forks,” whereas Windows files have only one. This is sometimes a problem when you send files to Windows users because they end up with two files. One is the usable file and one is unusable to them (the names of the files are filename and _filename). Recipients can use the first one and safely ignore the second one. However, it is still confusing for them.
Mail includes a solution for this problem, which is called sending Windows-Friendly Attachments. This causes Mail to strip the second file away, so the Windows recipient receives only one file for each attachment.
However, Mac users who receive Windows-friendly attachments might lose some features, such as thumbnail preview or information about the file. In the worst case, the file might be unusable.
You can choose to attach files as Windows-friendly by activating the box in the Attach File dialog box. If you always want to send files in the Windows-friendly format, select Edit, Attachments, Send Windows Friendly Attachments.
Unless you always send files to other Mac users or only to Windows users, you have to decide whether to use the Windows-friendly option each time you attach files. You should either use this option when you send files to Windows users (if you don’t know which type of computer the recipient uses) or not use it if you are certain the recipient uses a Mac.
Using Mail’s Photo Browser
Because you’re likely to use Mail to email photos that you manage in iPhoto, you can access the Photo Browser by clicking the Photo Browser button in the New Message toolbar. You can use the Photo Browser to easily find photos in your iPhoto Library and drag them onto a new message window to add them to an email you create. Use the Browser’s tools to find the images you want to send and then drag them onto a new message window.
Using Files Attached to Email You Receive
When you receive a message that has files attached to it, you see the files in the body of the message. As when you send files in a message, you see the file’s icon, name, and size. If the file can be displayed in the body, such as a TIFF or PDF, the contents of the file are displayed in the message. You can use the file attachments in the following ways:
• Select File, Save Attachments. Use the resulting sheet to move to a location and save the attachments.
• Select File, Quick Look Attachments. A Quick Look window appears and shows a preview of the document. Depending on the document type, you might be able to scroll and navigate the Quick Look to see more of the document.
• Click the Save button next to the attachment information at the top of the message. Use the resulting sheet to move to a location and save the attachments.
• Click the Quick Look button next to the attachment information at the top of the message. Depending on the document type, you might be able to scroll and navigate the Quick Look to see more of the document.
• If multiple files are attached, click the expansion triangle next to the attachment line in the message’s header and work with each file individually.
Tip
![]()
If the contents of the file are being displayed and you would rather see just an icon, open the file’s contextual menu and select View as icon. The file is displayed as an icon instead. To view the file’s content again, open the menu and select View in Place.
• Double-click a file’s icon to open it.
• Drag a file’s icon from the message onto a folder on your Mac’s desktop to save it there.
• You can open the attachment’s contextual menu and select one of the listed actions, such as Open Attachment, which opens it in its native application; Open With, which enables you to select the application in which you want the file to open; Save Attachment; or Save to Downloads folder, which saves the attachment in your designated Downloads folder.
Tip
![]()
If you have trouble viewing a message and the folder into which you want to store the file attachments, double-click the message to open it in its own window. Then you can resize the window so you can more easily see the folder into which you want to drag it.
If the files you receive are compressed, you must uncompress them before you can open them.
![]() To learn more about uncompressing files, see “Downloading and Preparing Files,” p. 308.
To learn more about uncompressing files, see “Downloading and Preparing Files,” p. 308.
Working with RSS Feeds
RSS feeds are streams of information that change as times passes. Many websites, especially news sites, offer RSS feeds to which you can subscribe. You can use Mail to read RSS feeds, which is convenient because they are delivered to your Inbox automatically.
![]() To learn more about RSS feeds, see “Browsing and Configuring RSS Feeds,” p. 289.
To learn more about RSS feeds, see “Browsing and Configuring RSS Feeds,” p. 289.
Adding RSS Feeds and Configuring Mail to Manage Them
To add an RSS feed to Mail, choose File, Add RSS Feeds. The RSS Feeds sheet appears. In the Collections pane, you see your bookmarks from Safari. At the top of this pane, the All RSS Feeds option is selected and you see all of the RSS feeds available to you in the right pane. To add one of these feeds, select it and click Add.
To enter the URL to a feed, click Specify the URL for a Feed in the RSS Feeds sheet; then enter the URL in the resulting Feed URL sheet (see Figure 15.14) and click Add.
Figure 15.14 Adding RSS feeds to Mail makes keeping up with dynamic information easier.

All feeds appear in the RSS Feeds mailbox by default, but you can place them in your Inbox if you prefer. If you want feeds to appear in your Inbox, activate the Show In Inbox check box.
You can also move feeds from the RSS Feeds mailbox to your Inbox by clicking the Up arrow button that appears when you select a feed. Likewise, you can move a feed from your Inbox to the RSS Feeds mailbox by pointing to a feed in the Inbox and clicking the Down arrow button.
Lastly, configure your RSS feed preferences by opening the RSS pane of the Mail Preferences dialog box, shown in Figure 15.15. Use the following pop-up menus to configure how RSS feeds are managed:
• Use the Default RSS Reader menu to choose the application that you want to use by default to read feeds. The three options are Mail, Safari, or Other (which you can use to choose a different application).
• Use the Check for Updates menu to determine how frequently Mail checks for updates to your feeds. The choices are Manually, Every 30 Minutes, Every Hour, or Every Day.
• Use the Remove Articles menu to determine when Mail removes articles in your feeds. The options are Manually or after specific periods of time, such as a day, one month, two months, and so on.
Figure 15.15 Use the RSS pane to configure Mail’s RSS feature.

Reading RSS Feeds
After you add feeds to Mail, you can read them by selecting a feed in the Inbox if that is where it is stored or by selecting the RSS Feeds mailbox. The articles in the selected feed appear in the Message List. Choose one to read it in the Reading pane.
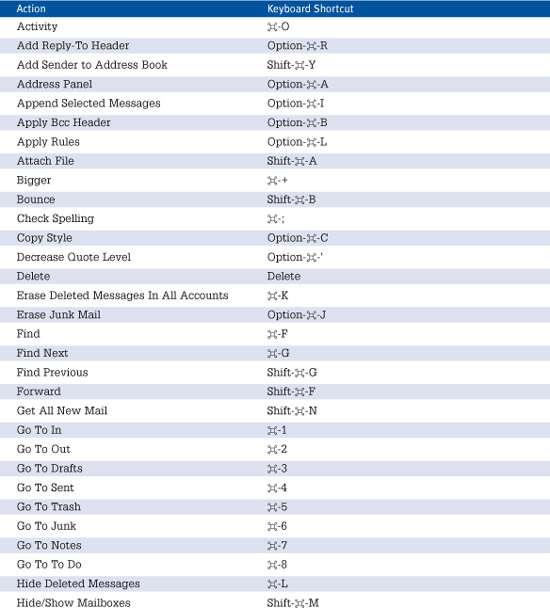
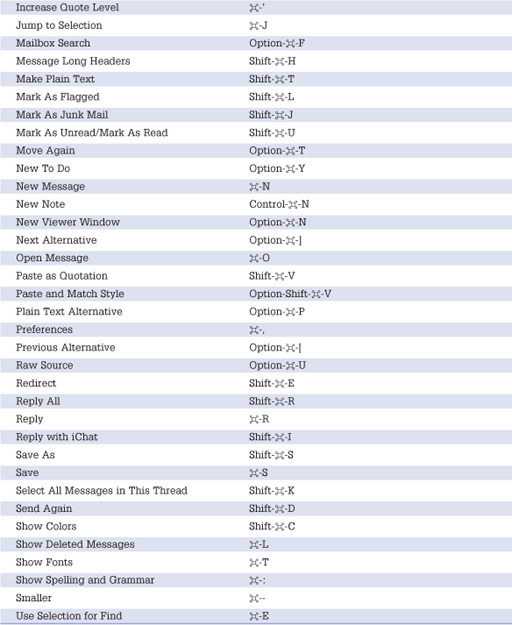
Apple Mail Keyboard Shortcuts
Table 15.1 shows keyboard shortcuts for the Mail application.
Table 15.1 Keyboard Shortcuts for Mail