3. Getting to Know Mac OS X Finder Windows
Learning Finder Window Basics
You’ll spend most of your Mac OS X time doing things that are creative, fun, entertaining, and educational, which is as it should be, because your Mac is eminently suited to all of those worthy activities. However, you’ll also spend a significant amount of Mac OS X time on activities that are, to be honest, not so fun and interesting. I’m talking here about the day-to-day tasks associated with your files, folders, discs, removable drives, and hard drives. This is the less glamorous and cool side of Mac OS X, but it’s a side you can’t avoid.
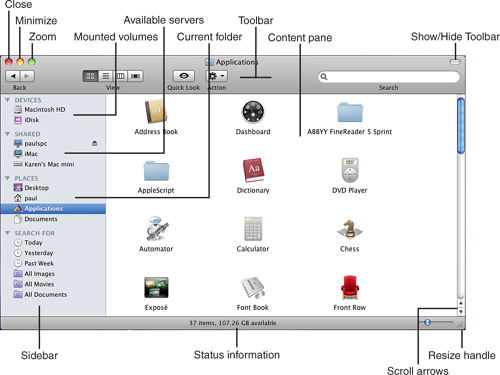
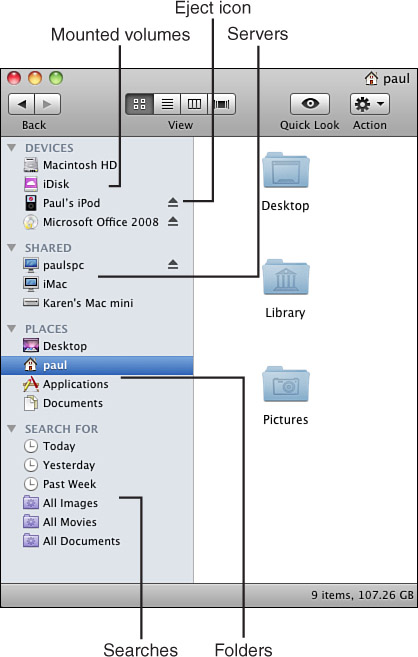
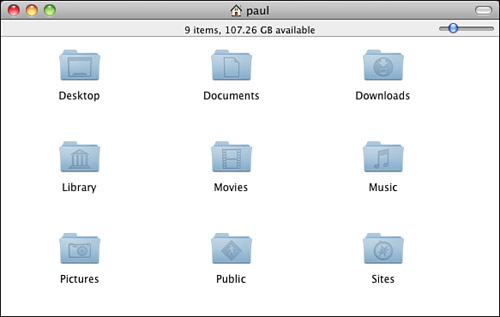
Fortunately, these workaday Mac chores are made easier by Finder, which is the application you use to work with everything from files to drives. This section introduces you to all the basic Finder techniques you’ll need. To get you started, Figure 3.1 points out the major features of a typical Finder window.
Figure 3.1 A typical Finder window and its features.
Opening Finder Windows
You can open Finder windows in several ways. If you click the Finder icon on the Dock, one of two things can happen:
• If no Finder windows are currently open, a new Finder window appears showing the contents of the default location you select (initially, this is your Home folder, but you can select any folder you’d like).
• If at least one Finder window is already open, Finder displays the window you used most recently.
You can also open a new Finder window by selecting File, New Finder Window (![]() -N). When you open a new Finder window, you see the contents of your default location (this is initially set to be your Home folder).
-N). When you open a new Finder window, you see the contents of your default location (this is initially set to be your Home folder).
The Mac OS X Finder uses a web-like model in that each new Finder window you open starts a “chain” of windows (thus, the Back and Forward buttons in the Finder window toolbar). The first window in every new chain you start by using the New Finder Window command is always the folder you define as the default. You can have many window chains open at the same time, which is another similarity to web windows. (You can quickly jump into specific folders using the toolbar, the Sidebar, the Go menu, and keyboard shortcuts.)
![]() To learn how to navigate Finder windows, see “Navigating Finder Windows,” p. 50.
To learn how to navigate Finder windows, see “Navigating Finder Windows,” p. 50.
By default, when you open an item (such as a folder), its contents replace the contents of the previous item that appeared in the Finder window you were viewing. (You can change this behavior globally with a preference setting.) You can also override this behavior so the new Finder window is separate from the first one by holding down the ![]() key while you double-click an icon. This opens a new chain of Finder windows, with the contents of the item you opened displayed in the first window.
key while you double-click an icon. This opens a new chain of Finder windows, with the contents of the item you opened displayed in the first window.
Tip
![]()
This default behavior assumes that the toolbar and Sidebar are shown in a Finder window. If not, opening a folder always opens a new, separate chain of Finder windows.
After you have one Finder window open, you can open other Finder windows (either in the same chain of windows or by starting a new chain) to view the contents of a different folder, volume, disc, and so on. To view the contents of a folder, volume, or disc shown in the current Finder window, double-click the icon for the item you want to open, or select an item and select File, Open (or press ![]() -O). The contents of the item you opened replace the window’s current contents and the name shown at the top of the window becomes the name of the item you opened.
-O). The contents of the item you opened replace the window’s current contents and the name shown at the top of the window becomes the name of the item you opened.
You can also choose different views for Finder windows. When you open a new Finder window, it always assumes the view you selected the last time you viewed that item in a Finder window. You’ll learn more about Mac OS X Finder window views later in this chapter.
To reiterate this sometimes confusing behavior of Mac OS X windows, the view in which a new window opens is determined by the view you used for that window the last time you viewed it. In other words, windows retain their view settings, even if the window from which you opened a separate Finder window is different. For example, if you viewed the Applications folder in List view, it appears in List view whenever you open it in a new Finder window until you change the view in which it appears.
Note
![]()
If you select an item while a Finder window is in the Column view, its contents are displayed in a new column.
Along the left edge of every Finder window is the Sidebar. This handy tool consists of several sections. In the Devices section are all the volumes mounted on your Mac, including hard disk volumes, disk image volumes, your iDisk, CDs, DVDs, and so on. The Shared section will display icons for the servers that are available on your local area network (LAN). In the Places section of the sidebar are some of the folders in your Home folder and the Applications folder. You can add any folders, applications, documents, or other files to or remove them from this area to completely customize it. Finally, the Search For section of the sidebar allows you to quickly find content based on predetermined searches, and you can also store smart folders and Spotlight searches here. The purpose of the Sidebar is to enable you to quickly open a Finder window that displays the contents of any item it contains.
Tip
![]()
If you hold down the ![]() key while you click an item in the Sidebar, that item opens in a new Finder window chain. If you hold down the Option key when you click an item in the Sidebar, that item opens in a new Finder window and the previous window closes.
key while you click an item in the Sidebar, that item opens in a new Finder window chain. If you hold down the Option key when you click an item in the Sidebar, that item opens in a new Finder window and the previous window closes.
When you select a volume or folder in the Sidebar, its contents appear in the Finder window. The currently selected item is highlighted, so you can easily tell what is selected. (The name of the currently selected item appears at the top of the window as well.) If you select a document or application, that item opens just as it does when you double-click it.
Configuring How New Finder Windows Open
To configure how Finder windows open, perform the following steps:
1. Select Finder, Preferences or press ![]() -,. When the Finder Preferences window opens, click the General tab if it isn’t selected already (see Figure 3.2).
-,. When the Finder Preferences window opens, click the General tab if it isn’t selected already (see Figure 3.2).
Figure 3.2 Use the General pane of the Finder Preferences window to configure how new Finder windows open.

2. On the New Finder Windows Open pop-up menu, select the location where you want new Finder window chains you open to start.
On the pop-up menu, you see various volumes mounted on your Mac along with your Home and Documents folders. To choose one of these as the starting location for new Finder window chains, simply select it on the menu.
To select a location not shown on the pop-up menu, choose Other. Then use the Choose a Folder dialog box to move to and choose the folder that you want to be your starting place. Navigating such dialog boxes is very much like navigating in a Finder window in the Column view.
3. If you prefer that when you open an item, the item’s contents always appear in a new Finder window chain, activate the Always Open Folders in a New Window check box. However, because this option can lead to a proliferation of Finder windows, I recommend that you leave this option off. (Remember that you can always open a new Finder window chain by holding down the ![]() key when you double-click an item.) A better way to view content is to use the Column view, which enables you to quickly move to any location, as you will see later in this chapter.
key when you double-click an item.) A better way to view content is to use the Column view, which enables you to quickly move to any location, as you will see later in this chapter.
![]() To learn more about Mac OS X folders, see “Understanding the Standard Mac OS X Folders,” p. 71.
To learn more about Mac OS X folders, see “Understanding the Standard Mac OS X Folders,” p. 71.
Note
![]()
One of the nice features of Mac OS X is that most preference changes are made in real time—you don’t have to close the Preferences window to see the results of your changes. For example, when you make the change in the previous steps, the window-opening behavior becomes active as soon as you make a selection on the pop-up menu. A good habit is to leave preference windows open as you make changes and close the windows only when you are happy with all the changes you have made.
Working with Spring-Loaded Folders
Mac OS X Finder windows can be spring-loaded (this feature is turned on by default), meaning that they pop open when you drag an item onto a closed folder. This enables you to quickly place an item within nested folders without having to open each folder individually. Simply drag an item onto a closed folder so the folder is highlighted and “springs” open. After the delay time (which you can set) has passed, the highlighted folder opens in a separate Finder window chain (unless you are viewing the window in Column view, in which case a new column appears for the item onto which you are dragging the item). You can then drag the item onto the next folder and continue the process until you have placed it in its final destination. When you release the mouse button, what happens depends on the Finder preference you have selected. If new folders open in the same Finder window, you remain in the location in which you placed the item. If new folders always open in a new Finder window, you return to the window in which you started (however, the destination folder will remain open in its Finder window).
Tip
![]()
You can cause a folder to spring open immediately by pressing the spacebar when you drag an item onto a closed folder.
You can configure your Mac’s spring-loaded behavior by following these steps:
1. Click the General tab in the Finder Preferences dialog box.
2. Activate the Spring-Loaded Folders and Windows check box to turn this feature back on if you have turned it off (it is on by default).
3. Use the Delay slider to set the amount of delay time (the time between when you drag an item onto a folder and when that folder springs open).
Scrolling Finder Windows
When the contents of a Finder window can’t be shown in the amount of space the window currently has, you use the scrollbars to view contents that are out of sight. You have the following options:
• Drag the scrollbars.
• Click above or below or to the left or right of the bar to scroll one screen’s worth at a time.
• Click the scroll arrows.
• Press the Page Up and Page Down keys to scroll vertically.
• Press the Home key to jump to the top of the window or the End key to jump to the bottom.
• Use the arrow keys or Tab (and Shift-Tab) to move among the items in the window (which also scrolls the window when you move outside the current view).
Note
![]()
The length of the scrollbar is proportional to the amount of the window you can see in the view. For example, if most of the scrollbar is filled in with color, you can view most of the window’s contents. If the colored portion is relatively small, you can’t view very much of the window’s content.
You can modify several aspects of scrolling behavior. You can change the location of the scroll arrows. Also, rather than moving an entire page each time you click above, below, to the left, or to the right of a scrollbar, you can set the scrolling such that you move to the relative location you click instead. You can also turn on smooth scrolling, which smoothes out the appearance of a window when you scroll in it. Follow these steps to modify these scrolling features:
1. Open the System Preferences application.
2. In the Personal section, click Appearance.
3. Choose one of the following options to change the location of the scroll arrows:
• Together—Select this option to place the scroll arrows beside each other, either at the bottom of a vertical scrollbar (see Figure 3.1, earlier), or to the right of a horizontal scroll bar.
• At Top and Bottom—Select this option to place the scroll arrows above and below a vertical scrollbar (see Figure 3.3) or to the left and right of a horizontal scrollbar.
Figure 3.3 You can configure Finder to place the scroll arrows at opposite ends of a scrollbar.

Tip
![]()
This is a good chance to practice Mac OS X preference-setting techniques. Make your changes to the Appearance pane, but leave the System Preferences application open. Click in a Finder window; your changes immediately become active. If you are satisfied, jump back to the System Preferences application and quit it. If not, jump back into the Appearance pane and continue making changes until you are satisfied.
4. Choose one of the following options to change how scrolling works when you click in the scrollbar:
• Jump to the Next Page—Select this radio button to scroll a screen at a time.
• Jump to the Spot That’s Clicked—Select this radio button to move to a position in the window that’s relative to where you click in the scrollbar.
5. Activate the Use Smooth Scrolling check box to turn on smooth scrolling.
Resizing Finder Windows
To change the size of a window, drag its Resize handle (pointed out earlier in Figure 3.1) until the window is the size you want it to be.
You can also use the Zoom button to make a window large enough to display all the items it contains or until it fills the screen, whichever comes first. Click the button and the window jumps to the size it needs to be to show all the items it contains or until it fills the available screen space. Click the button again to return it to its previous size.
You can also use this button to quickly swap between two sizes for a window. Make the window a size you like. When you click the Zoom button, it expands to its maximum size. Click the button again and it returns to the previous size. Each time you click the Zoom button, the window returns to the size it was previously (either the maximum size or the size you set).
If you have a lot of Finder windows open on the Desktop, you can use this resizing behavior to make working between multiple windows more convenient. Select an open window and make it the size you want it to be so it is out of the way and you can store many windows of this size on your desktop; make it just large enough that you can see the window’s title. You can click the Zoom button to open the window to work in it. Then, click the Zoom button again to return the window to its small size. Use the button to toggle between the two sizes. When you need to work in the window, make it large by clicking the Zoom button. When you are done, click the button again to make it small. You might find this even more convenient than minimizing windows (which you’ll learn about shortly).
Resizing the Panes of Finder Windows
As you learned earlier, Finder windows have two panes. The left pane is the Sidebar, whereas the right pane is the Contents pane, which displays the contents of the item you are viewing in the Finder window. You can change the relative size of the Sidebar by dragging the line that is located between the two panes. Drag this to the left and the Sidebar takes up less room in the window. Drag it to the right and the Sidebar takes up more window space.
The Sidebar retains your settings as long as you work within the same Finder window chain. When you open a new chain, the Sidebar becomes its default size.
Closing, Minimizing, and Maximizing Finder Windows
Among the most distinctive features of Mac OS X are the three stoplight-type controls located in the upper-left corner of windows (refer to Figure 3.1). The red button (on the far left) closes the window. The gold button (in the middle) minimizes the window, which shrinks it and moves it to the right side of the Dock. The green button maximizes the window, which makes it as large as it needs to be to display all the items in the window until that window fills the screen (and returns it to the previous size, as you learned in the previous section).
![]() To learn how to use the Dock, see Chapter 2, “Getting to know the Dock,” p. 23.
To learn how to use the Dock, see Chapter 2, “Getting to know the Dock,” p. 23.
Tip
![]()
It’s also possible to configure Mac OS X to minimize a window by double-clicking in its title bar. To set this up open the Appearance pane of the System Preferences application and activate the Double-Clicking a Window’s Title Bar to Minimize check box
The Close, Minimize, and Zoom buttons work even if the window on which they appear is not active. For example, you can close a window that is in the background by clicking its Close button without making the window active first. (When you point to a button on an inactive window, the button becomes colored so that you know it is active, even though the window itself is not.)
Tip
![]()
You can close all open Finder windows by holding down the Option key while you click the Close button in one of the open windows.
Moving Finder Windows
You can move a Finder window around the desktop by dragging its title bar or its status bar.
Note
![]()
If the Sidebar is collapsed, you can’t move the window by dragging its status bar. Only the title bar is visible to be able to move the window.
Using the Finder Window Views
You can display the contents of a Finder window in four different views: Icon, List, Column, and Cover Flow.
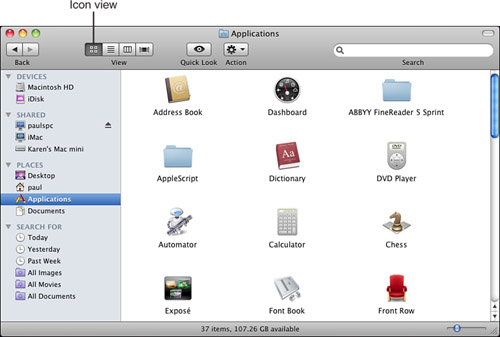
Using the Icon View
You can view Finder windows in the Icon view by clicking the Icon view button in the toolbar; by selecting View, As Icons; or by pressing ![]() -1. The objects in the window become icons, as shown in Figure 3.4.
-1. The objects in the window become icons, as shown in Figure 3.4.
Figure 3.4 A folder window in Icon view.
![]() You can customize the Icon view for Finder windows. See “Customizing Finder Windows,” p. 56.
You can customize the Icon view for Finder windows. See “Customizing Finder Windows,” p. 56.
If you find that a window in the Icon view is messy, you can use the Clean Up command (View, Clean Up) to straighten up the window for you. This command neatly arranges icons so they line up in an orderly fashion.
Tip
![]()
If you select one or more icons and open the View menu, you’ll see that the command is now Clean Up Selection. This places the selected items back in an orderly location.
To arrange icons by a specific criterion, select View, Arrange By, and then select the criterion by which you want the window’s icons ordered. Your options are the following: Name, Date Modified, Date Created, Size, Kind, or Label.
Although the Icon view is clearly the most pleasing view to look at, it is one of the least useful in terms of the information you see.
Using the List View
The List view presents more information than does the Icon view (see Figure 3.5). To switch to the List view, click the List view button; select View, as List; or press ![]() -2.
-2.
Figure 3.5 List view—At the top of the window are the same controls that are visible in the Icon view. However, the lower part of the window contains more information than is available in the Icon view.
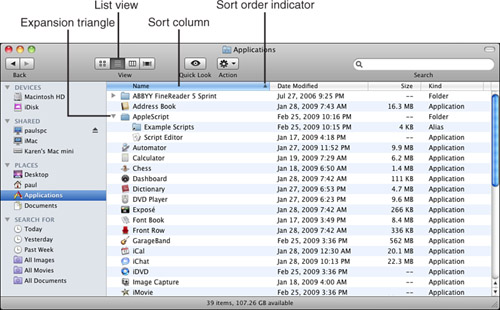
The information in the List view is organized into columns, with a header at the top of the column indicating the information in it. The information in the List view is always sorted—you can select the column that is used to sort the contents of the window. You can also determine the order in which the columns appear, change the width of columns, and expand or collapse the contents of folders. The information for each item you see in the default List view is the following:
• Name—This is the filename for files, the folder name for folders, the volume name for volumes, and so on.
• Date Modified—The most recent date and time on which the object was changed. If the date is recent, it’s indicated by a relative term, such as “Yesterday.”
• Size—The size of the item, in kilobytes (KB), megabytes (MB), or gigabytes (GB). By default, the size of folders is not calculated (you can set Mac OS X to calculate folder sizes if that information is important to you).
• Kind—The type of object it is, such as folder, document, application, volume, and so on.
![]() You can customize the List view for a single window or for all windows. See “Customizing Finder Windows,” p. 56.
You can customize the List view for a single window or for all windows. See “Customizing Finder Windows,” p. 56.
The column by which the window is sorted is highlighted with the highlight color (blue or graphite). To change the sort column, click the column heading of the column by which you want the list to be sorted. That heading is highlighted and the list is re-sorted by that criterion. At the right edge of the column heading for the column by which the window is sorted, you see the Sort order indicator. This shows you in which direction the list is sorted. For example, if the list is sorted by the Name column, an up arrow indicates that the list is sorted alphabetically and a down arrow indicates that the list is sorted in reverse alphabetical order. To change the direction of the sort, click the Column heading—the list is sorted in the opposite order (from ascending to descending or from descending to ascending).
Note
![]()
You can’t change the location of the Name column; it is always the first column in a window in List view.
You can resize a column by moving the pointer to the right edge of the column heading cell and clicking. When you do, the cursor changes from the pointer to a vertical line with outward-facing arrows on each side of it. When you see this cursor, drag the column border to resize the column.
You can change the order in which columns appear by dragging the column heading of the column you want to move and dropping it in the new location. The columns reshuffle and then appear in the order you have indicated.
Tip
![]()
When you Option-click the expansion triangle for a collapsed folder, the folder and all the folders it contains are expanded. When you Option-click the expansion triangle for an expanded folder, the folder and all its contents are collapsed again.
One of the other benefits of the List view is that you can expand the contents of a folder so you can view them without having to open the folder’s window first. To do this, click the right-facing expansion triangle next to the folder’s name (see Figure 3.5). The folder expands, and its contents are listed in the window. Click the triangle again to collapse the folder down to its icon.
Using the Column View
You can use the Coloumn view to quickly see and navigate levels of the hierarchy (see Figure 3.6). To switch to the Column view, click the Column view button on the toolbar; select View, as Columns; or press ![]() -3.
-3.
Figure 3.6 The Column view is a great way to see the hierarchical organization of folders and files.

As you might suspect, in the Column view, the window is organized into columns, with each column representing a level of the file organization hierarchy. The leftmost column shows the highest level you can see, each column to its right shows the next level down the structure, and the column on the far right shows the lowest level you can see. When you select a file, the rightmost column shows a preview of the selected file. The “path” at which you are looking is indicated by the highlighted items in each column.
Note
![]()
One reason the Column view is so important is that you use this view to navigate within Open, Save, and other dialog boxes. When you are using the Column view in dialog boxes, it works just as it does in Finder windows.
Folder icons have a right-facing arrow at the right edge of the column in which they appear, to indicate that when you select them, their contents appear in the column to the immediate right.
For example, put a Finder window in the Column view and click your Home folder on the Sidebar to see its contents. The Home folder’s contents are shown in the first column in the window. If you click one of the folders in your Home folder, it becomes highlighted and its contents appear in one of the middle columns. As you select folders within folders, their contents appear in the column to their right. This continues all the way down into a folder until it contains no more folders.
You can move down into the hierarchy by clicking the item about which you want more detail. The column to the right of the item on which you click shows the contents of what you click. If you click something in the right column and the window is not large enough to display the contents of all the columns, the view shifts and the columns appear to move to the left. You can use this approach to quickly see the contents of any folder on your Mac, no matter how far down in the hierarchy it is stored.
Tip
![]()
One of the best reasons to use the Column view is that you can move inside a window with the arrow keys on the keyboard. This is the fastest way to move among the folders and files on your Mac.
When there are more columns than can be displayed in the window, you can use the horizontal scrollbars to view all the columns. Scrolling to the left moves up the hierarchy, whereas scrolling to the right moves down the hierarchy. You can also make the window larger to view more columns at the same time.
You can resize the width of the columns in a window by dragging the resize handle located in the lower-right corner of each column. Each column in a window can have a different width.
When you click a file to select it, the far-right column shows a large icon or a preview of the file and information about that file is displayed (refer to Figure 3.6).
If you click document files for which Mac OS X can create a preview, you see the preview in the column. If the file you select has dynamic content, you can play that content in the preview that you see in the Column view. For example, if you select a QuickTime movie, you can click the play or pause button that appears over the preview when you move your mouse above it to watch the movie without opening the file. Certain types of text files are also displayed so you can read them (arrows appear on the preview to enable you to read the entire document). You can also see large thumbnail views of graphics stored in certain formats. For those items that Mac OS X cannot create previews of (an application is one example), you see a large icon instead of a preview.
Note
![]()
If you switch from the Column view to one of the other views, the contents of the folder you most recently selected are shown in the window.
If you prefer not to see the preview, there are two ways to hide it. You can hide it in individual windows or you can hide it by using View Options.
To hide the preview in specific windows, click the Expansion triangle next to the word Preview that appears just above the preview of a selected file in the Preview pane. This hides all previews for the current window and shows detailed information about the item that is selected, along with the More info button (which opens the Info window that you will learn about later).
![]() To learn about the Column view’s View Options, see “Customizing the Column View,” p. 65.
To learn about the Column view’s View Options, see “Customizing the Column View,” p. 65.
Using the Cover Flow View
Cover Flow provides a very interactive way to view previews of the files in a folder (see Figure 3.7). The Cover Flow view is especially useful if you are navigating a folder of photos or videos.
Figure 3.7 The Cover Flow view provides a very interactive way to preview photos and videos in a folder.
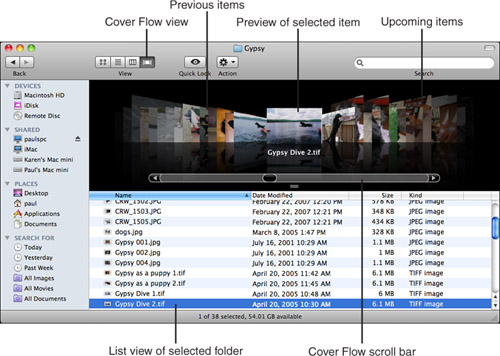
With a Finder window set to the Cover Flow view, you will see two panes. On the top is the actual Cover Flow preview of the files in the folder. The bottom pane is a list view of that same folder. Note that with the lower pane in list view, you can use the same steps to change the view as you do in a regular list view Finder window. For instance, you can sort by a different column or change the sort order.
The most noticeable feature of the Cover Flow view is the ability to scroll through the items in the folder. If you have a folder of photos, this view allows you to see a preview of each photo to find the one you are looking for. Resize the Finder window so that the Cover Flow preview area is big enough to see the preview. As you drag the Cover Flow scroll bar, the previews of the items in the folder flow in the direction you are scrolling. When you stop scrolling, the item that is selected displays at a slightly larger size than the other previews and is centered in the top pane. The name of the file is are displayed under the preview.
Browsing a folder that has QuickTime movies provides a preview of the movie. When you select a QuickTime movie and move the mouse over the preview, a play button appears on the preview. When you click the play button the movie will start to play in the Cover Flow preview pane. Move your mouse over the preview again and a stop button appears. While a movie is playing, the other files no longer show previews of those documents; once you move the Cover Flow scroll bar the previews will appear again.
Navigating Finder Windows
The chores associated with Finder—moving and copying files, creating folders, renaming items, and so on—are necessary, but are not among the more exciting features of Mac OS X. Your goal in any Finder session should be to perform your tasks as quickly as possible so that you’re soon back to more productive pursuits. One way to speed things up in Finder is to know how to navigate the interface and the contents of your Mac. The next few sections show you how to do just that.
Using the Keyboard to Select Items in a Finder Window
Although you can use the mouse to point to and click items to select them (or double-click to open them), moving to items and selecting them using the keyboard can be faster. There are two basic ways to navigate inside a window using the keyboard.
You can type an item’s name to move to and select it. The OS matches item names as you type, so most of the time you don’t need to type the item’s whole name to move to it (for example, typing mp3 moves you to the first item whose name begins with mp3). The more of the name you type, the more specific your movement becomes.
You can also move among items using the Tab and arrow keys. How this works depends on the view you are using for the windows.
Selecting Items in the Icon View
When you are in the Icon view, pressing the Tab key selects the next item according to alphabetical order. Holding down the Shift key while you press Tab moves you among the items in reverse alphabetical order.
You can also use the arrow keys to move to and select items. The keys work just as you might expect. The up-arrow key moves you up the window, the right-arrow key moves you right, and so on.
The window scrolls automatically to keep the items you select in view.
Selecting Items in the List View
When a window is shown in List view, you can use the up- and down-arrow keys to move up and down the list of items in the window.
Tip
![]()
The Option key works with the arrow keys as well. If you hold down the Option key and press the right-arrow key, all the folders within the selected folder are expanded as well.
When you select an item, you can use the right-arrow key to expand it and the left-arrow key to collapse it.
Selecting Items in the Column View
In the Column view, the right-arrow key moves you down the hierarchy, whereas the left-arrow key moves you up the hierarchy. The up- and down-arrow keys enable you to move up and down within a selected folder (which appears in a column).
Using these keys, you can move around your folders rapidly. As you move through the structure using these keys, the window scrolls so that you always see the currently selected item. It maintains your view at all times so you can quickly jump into different areas without scrolling manually.
Tip
![]()
After you have selected an item, press ![]() -down arrow to open it. For example, when you select an application and press these keys, the application launches.
-down arrow to open it. For example, when you select an application and press these keys, the application launches.
When you get used to it, using the keyboard in combination with the Column view is one of the fastest ways to navigate Mac OS X Finder windows.
Selecting Items in the Cover Flow View
Using your keyboard in Cover Flow view is very similar to List view. In fact, because the List view is present at the bottom of the Cover Flow Finder window, when you use the keyboard you will see the results in that pane as well. Using the right arrow, down arrow, or Tab key will move you to the next item. The left arrow, up arrow, and Shift-Tab will move you to the previous item. If you select a folder and hold the ![]() key while pressing the down arrow, you will move into that folder.
key while pressing the down arrow, you will move into that folder.
Selecting Items with the Search Tool
The Finder window toolbar’s Search tool transforms a folder into a smart folder. You can set the criterion used and the smart folder finds all folders and files that meet this criterion and displays them in the folder’s Finder window. To search for files or folders, perform the following steps:
1. Open a Finder window.
2. Type the text or numbers for which you want to search in the Finder window Search box. As you type, the Finder starts finding folders and files that meet your search criterion and displays them for you (see Figure 3.8).
Figure 3.8 A smart folder gets its name for good reason; as you type something in the Search tool, files and folders that match what you type are displayed in the Finder window.
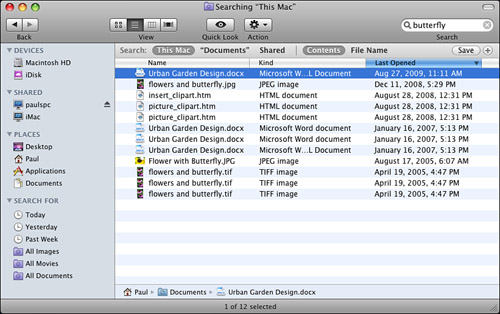
The locations of the items listed can be scoped by choosing the location in which you are interested. These are shown at the top of the window. From left to right they are This Mac, the location you were viewing when you started the search, and Shared.
3. Select the location in which you want to see items that match your search. For example, to find items anywhere on your computer, click This Mac. To narrow the search to your previous location, click its button. The window is refreshed and you will see items that match your search criterion that are in the location you selected.
4. When you find an item in which you are interested, click in the Contents pane and use the up- and down-arrow keys to select the item in the upper pane. Its location appears in the lower pane of the window (see Figure 3.8).
Tip
![]()
You can save a smart folder by clicking the Save button and using the Save sheet to name it, choose a save location, and indicate if you want it to be added to the Sidebar. After you’ve saved a search, you can run it again by opening it.
5. To add more criteria to the search, click the Add button (+) next to the Save button. Use the resulting sheet to choose and configure additional search attributes.
To clear the search and return to the previous Finder window, click the Clear Search button, which is the “x” located in the right end of the Search tool.
![]() To learn more about Smart folders, see “Searching Your Mac with Smart Folders,” p. 97.
To learn more about Smart folders, see “Searching Your Mac with Smart Folders,” p. 97.
Navigating Up and Down the Folder Structure
There are several ways to move up and down the folder structure within Finder windows. You can use the keyboard as discussed in the previous section. You can also use the icons in the Sidebar as well as the Path pop-up menu. The Go menu enables you to jump to specific folders quickly.
Changing Folders with the Sidebar
The Finder’s Sidebar is a fast way to change the folder displayed in the current Finder window. The sidebar contains icons that take you to specific folders. As mentioned earlier, the Sidebar contains several sections. In the Devices section are all the volumes mounted on your Mac, including hard disk volumes, disk image volumes, your iDisk, CDs, DVDs, and so on. The Shared section will display icons for the servers that are available on your local area network (LAN). In the Places section of the Sidebar are some of the folders in your Home folder and the Applications folder. You can add any folders, applications, documents, or other files or remove them from this area to completely customize it. Finally, the Search For section of the sidebar allows you to quickly find content base upon predetermined searches, and you can also store smart folders and Spotlight searches here. The purpose of the Sidebar is to enable you to quickly open a Finder window that displays the contents of any item it contains.
![]() To learn how to customize the sidebar, see “Customizing the Sidebar,” p. 56.
To learn how to customize the sidebar, see “Customizing the Sidebar,” p. 56.
To view the contents of an item shown in the sidebar, simply click its icon. The right pane of the Finder window shows the contents of the item you select. For example, if you click your Home folder (the icon with your user account short name as its name), you’ll see the contents of your Home folder in the Contents pane of the Finder window.
Navigating Folders Using the Back and Forward Buttons
Click the Back button on the toolbar to move back to the previous Finder window in the current Finder window chain. You can continue to click the Back button as many times as you want until you reach the first window you viewed using the current Finder window chain; at that point, the Back button is grayed out. Similarly, the Forward button moves you forward in a chain of Finder windows. You can also use the Go, Back and the Go, Forward commands to move back in the chain or forward in the chain, respectively.
![]() To learn how to customize the Finder toolbar, see “Customizing the Toolbar,” p. 59.
To learn how to customize the Finder toolbar, see “Customizing the Toolbar,” p. 59.
Tip
![]()
You can press ![]() -[ to move back and
-[ to move back and ![]() -] to move forward.
-] to move forward.
If you open a new Finder window, the Back and Forward buttons are grayed out because there is no window to move back or forward to. Opening a new Finder window starts a new chain of windows, so both buttons are disabled. As soon as you open a second window within the same Finder window chain, the Back button becomes active. If you move back along that chain of windows, the Forward button becomes active.
Changing Folders with the Path Pop-Up Menu
The Path pop-up menu enables you to quickly move up and down the folder structure of your Mac. To change folders, hold down the ![]() key and click the window name in the title bar of a Finder window. When you do so, you see all the folders from the one currently displayed in the window up to the Computer folder (where Computer is the name of your Mac; this is the highest level on your Mac). Select a folder from the menu and the Finder window displays the folder you chose.
key and click the window name in the title bar of a Finder window. When you do so, you see all the folders from the one currently displayed in the window up to the Computer folder (where Computer is the name of your Mac; this is the highest level on your Mac). Select a folder from the menu and the Finder window displays the folder you chose.
You can add the Path button to your toolbar so you can select a folder without using the ![]() key.
key.
![]() To learn how to add buttons to the Finder toolbar, see “Customizing the Toolbar,” p. 59.
To learn how to add buttons to the Finder toolbar, see “Customizing the Toolbar,” p. 59.
Tip
![]()
You can also move up the folder structure one folder at a time by pressing ![]() -up arrow, which is the keyboard shortcut for the Enclosing Folder command that moves to the folder enclosing the item you are currently viewing.
-up arrow, which is the keyboard shortcut for the Enclosing Folder command that moves to the folder enclosing the item you are currently viewing.
Changing Folders with the Go Menu
The Finder’s Go menu enables you to move into many areas of your Mac. The menu is divided into several areas that contain various kinds of options.
At the top of the menu are the Back and Forward commands, which do the same thing as the Back and Forward buttons on the toolbar.
Just under these commands is the Enclosing Folder command. When you are displaying an item in a Finder window and press ![]() -up arrow or select Go, Enclosing Folder, the folder that contains the currently selected item is shown in the Finder window.
-up arrow or select Go, Enclosing Folder, the folder that contains the currently selected item is shown in the Finder window.
Tip
![]()
Keyboard shortcuts are available for the specific folders on the Go menu. See the “Finder Window Keyboard Shortcuts” section at the end of this chapter for a list of these shortcuts.
You can also use the Finder’s Go menu to open specific folders. To do so, open the Go menu and select the folder you want to view. Its contents replace those shown in the active Finder window (if no Finder windows are active, the folder’s contents appear in a new Finder window). For example, to display your Home folder, select Go, Home.
If you select Go, Recent Folders, you can quickly move back to one of the folders you have recently viewed (you can set the number of recent folders on this list using the Appearance pane of the System Preferences application).
Tip
![]()
To clear the list of recent folders, choose Go, Recent Folder, Clear Menu.
You can also move to a folder using the Go to Folder command. Select Go, Go to Folder to see the Go to Folder dialog box (see Figure 3.9). You can type a pathname in this dialog box and click Go to open a Finder window for that folder. Following are some tips on how to type pathnames:
• Pathnames are case sensitive.
• A slash (/) separates each level in the path.
• Almost all paths should begin and end with the slash (/).
Note
![]()
Although you should be careful to use the proper case in pathnames, sometimes it doesn’t make a difference. For example, the path to the Mac OS X System folder can be /SYSTEM/, /system/, or /System/. Sometimes, however, the case of the path you type must match exactly, so it is good practice to always match the case of the folder names you type.
• The exception to the previous rule is when you want to move to a specific user’s Home folder, in which case you can just type ~username/, where username is the short name for the user’s account.
• If the path begins with the folder on which Mac OS X is stored, you can skip that folder name and start the path beginning with the next level. If it is on another volume, you can include that volume’s name at the beginning of the path.
Figure 3.9 This Go to Folder dialog box shows the path to the iTunes Music folder within my Home folder.
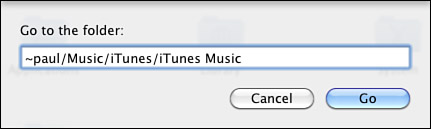
Table 3.1 provides some examples of paths you would enter in the Go to Folder dialog box to move to specific folders.
Table 3.1 Paths to Specific Folders

The following are some additional tips for the Go to Folder command:
• You can open the Go to Folder dialog box by pressing ![]() -Shift-G. Type the path and press Return to move there.
-Shift-G. Type the path and press Return to move there.
Tip
![]()
Although pathnames should end in /, you don’t really have to type the last /. If it is needed, Mac OS X adds it for you. If not, the path works without it.
• If you are patient when you type, Mac OS X will try to match the path you are typing and complete it for you. This usually takes more time than typing it yourself, but if the path is filled in for you, press Return to accept the path entered for you to move there.
Note
![]()
You can use the Connect to Server command to move to folders located on your network.
• The most recent path you have typed remains in the Go to Folder dialog box; you can modify this path to move to a different folder.
![]() To learn how to connect to servers, see “Accessing Shared Files from a Mac OS X Computer,” p. 368.
To learn how to connect to servers, see “Accessing Shared Files from a Mac OS X Computer,” p. 368.
Changing Folders with the Keyboard
One of the cool navigation features of Mac OS X is the capability to move up and down the folder structure using only the keyboard. Use the previous tips to select an item, and then press ![]() -down arrow to move into the item, such as a folder, an application, a document, and so on. For example, if you use the Tab key to select an application icon and then press
-down arrow to move into the item, such as a folder, an application, a document, and so on. For example, if you use the Tab key to select an application icon and then press ![]() -down arrow, that application opens. Similarly, if you press this key combination when you have a folder selected, the contents of that folder are shown in its previous view state.
-down arrow, that application opens. Similarly, if you press this key combination when you have a folder selected, the contents of that folder are shown in its previous view state.
Note
![]()
This technique also works in the Column view to open applications or documents. When you are viewing folders and volumes, you don’t need to hold down the ![]() key because, in the Column view, the contents of a folder or volume are displayed when you select it.
key because, in the Column view, the contents of a folder or volume are displayed when you select it.
To move up the folder structure, press ![]() -up arrow.
-up arrow.
Customizing Finder Windows
My goal in this chapter has been to get you comfortable enough with Finder that you don’t waste precious time on boring but necessary tasks such as working with files, folders, and discs. One of the best ways to become efficient with Finder is to set up the application to suit the way you work. You do that by customizing aspects of the Finder interface such as the Sidebar, the toolbar, the status bar, and the various Finder views. The next few sections take you through all of Finder’s customization options.
Customizing the Sidebar
The Sidebar provides a convenient way to access the mounted volumes on your Mac along with specific folders, documents, and applications (see Figure 3.10). As mentioned earlier, the Devices section of the sidebar shows all the mounted volumes on your Mac; the Shared section shows servers you are connected to; and the Search For section shows saved searches and smart folders. By default, the Places section of the Sidebar shows several of the folders within your Home folder and the Applications folder, but you can add or remove folders, documents, or applications to this area to customize it.
Figure 3.10 The Sidebar makes getting into any mounted volume on your Mac or into specific folders easy.
To view the contents of a volume or folder, click it—its contents appear in the Content pane of the Finder window. For volumes, a button enables you to perform an action. For example, when you have an ejectable volume, such as a disk image or DVD, you can click an Eject button. When you have inserted a blank CD or DVD, you can click the Burn button that appears next to a Burnable folder to burn the disc.
Tip
![]()
You can also store files in the Places section of the Sidebar. Clicking a file icon on the Sidebar opens the file.
Setting the Default Items in the Sidebar
Finder preferences determine which items appear in the Sidebar. To set them, follow these steps:
1. Select Finder, Preferences or press ![]() -,.
-,.
2. Click the Sidebar tab (see Figure 3.11).
Figure 3.11 Use the Sidebar pane of the Finder Preferences window to configure the default items in the sidebar.
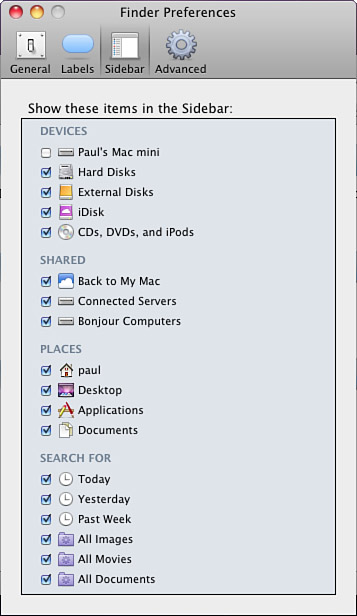
3. Activate the check box next to each item you want to appear in the Sidebar.
4. Deactivate the check box next to each item you don’t want to appear in the Sidebar.
The next time you view a Finder window, its sidebar contains the items you specified. These selections only impact default items; anything you’ve added or removed manually is not impacted.
Organizing Your Sidebar
You can further organize the Sidebar by doing the following tasks:
• You can add any folder or file to the Places section of the Sidebar by dragging it into that section.
Note
![]()
If you remove an item whose check box is checked on the Sidebar pane of the Finder Preferences window, that folder is removed and its check box becomes unchecked in the Preferences window.
• You can also add a folder or file to the sidebar by selecting it and selecting File, Add to Sidebar or pressing ![]() -T.
-T.
• You can remove folders from the sidebar by dragging them out of the sidebar. When you do, they disappear in a puff of smoke. Of course, the original item isn’t affected.
• Resize the Sidebar to make it fill up more or less of the Finder window (your change lasts only as long as the current Finder window chain).
• Show or hide the Sidebar by clicking the Show/Hide Toolbar button in the upper-right corner of Finder windows.
• Drag icons up and down within the Places section of the Sidebar to reorganize them.
Customizing the Toolbar
Along the top of Finder windows, you see the toolbar. This toolbar contains the Back and Forward buttons, the View buttons, the Action menu (covered in a later section), Quick Look button, and the Search tool. As with the sidebar, you can customize many aspects of this toolbar. You can show or hide it and customize the tools it contains.
Note
![]()
Many applications, especially those that come with Mac OS X, also provide a Mac OS X toolbar in their windows. You can use these same techniques to work with many of those toolbars.
Showing or Hiding the Toolbar
You can hide or show the toolbar in a Finder window in any of the following ways:
• Click the Show/Hide Toolbar button in the upper-right corner of the Finder window.
• Select View, Hide Toolbar or View, Show Toolbar.
• Press Option-![]() -T.
-T.
The state of the toolbar controls how new Finder windows open when they are viewed in the Icon or List view. If the toolbar is displayed, new Finder windows open according to the preferences you set using the Finder Preferences dialog box. If the toolbar is hidden, new Finder windows always open in a separate window.
When you open a new Finder window from a window in which the toolbar is hidden (for example, by holding down the Option key when you open a new Finder window), the toolbar is hidden in the new window. When you open a Finder window from a window in which the toolbar is shown, the toolbar is shown in the new window as well.
The toolbar state in currently open Finder windows is independent. For example, you can show the toolbar in one Finder window while it is hidden in another. In fact, if you have two Finder windows for the same folder open at the same time, you can hide the toolbar in one window while it is shown in the other.
Changing the Tools on the Toolbar
The default toolbar contains various useful buttons, but you can customize its content by adding tools to it or removing tools from it by doing the following:
1. Open a Finder window.
2. Select View, Customize Toolbar. The Toolbar customization sheet appears (see Figure 3.12).
Figure 3.12 You can add buttons to or remove them from the toolbar using the Customize Toolbar sheet.
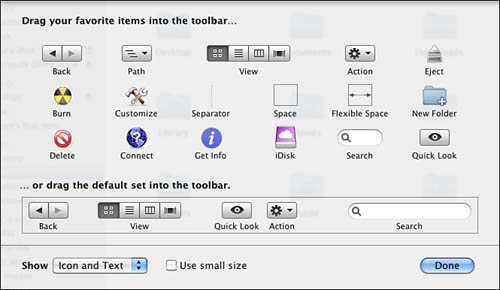
3. To add a button to the toolbar, drag it from the sheet to the toolbar, placing it in the location where you want it. (Table 3.2 lists the available buttons and what they do.)
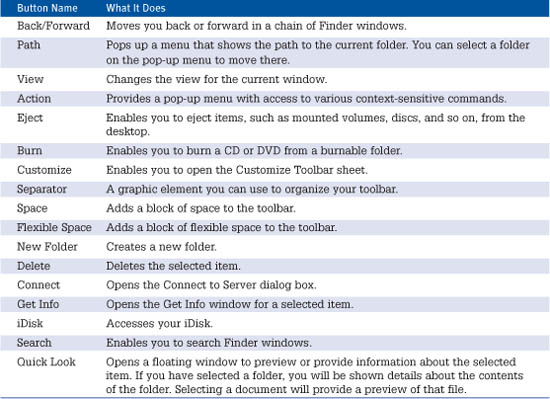
Table 3.2 Useful Toolbar Buttons
When you move a button between two current buttons on the toolbar, existing buttons slide apart to make room for the new button.
Note
![]()
If you place more buttons on the toolbar than can be shown in the current window’s width, a set of double arrows appears at the right edge of the toolbar. Click this to pop up a menu showing the additional buttons.
4. Remove a button from the toolbar by dragging it off the toolbar.
5. Change the location of the icons by dragging them. You can move buttons and menus that you add as well as those that are installed by default.
Tip
![]()
You can return to the default toolbar by dragging the default toolbar set onto the toolbar from the Customize Toolbar sheet.
6. Use the Show pop-up menu to determine whether the buttons have text and an icon, text only, or an icon only.
7. To use the small icon size, activate the Use Small Size check box.
8. Click Done.
Tip
![]()
You can rotate the toolbar among its views, such as Icon and Text, Icon Only, and so on, by holding down ![]() while you click the Show/Hide Toolbar button.
while you click the Show/Hide Toolbar button.
Customizing the Status Bar
The status bar provides status information for the current folder, volume, or whatever else is being displayed in the Finder window. Mostly, the status bar provides information about the number of items in the window and the amount of free space on the current volume.
Tip
![]()
If you add more buttons than can be displayed and then want to remove some of the buttons you can’t see (you see the double arrows instead), you have to make the window wider so that you can see the button on the toolbar to remove it; you can’t remove a button from the pop-up menu. You can also temporarily remove other buttons until you can see the one you want to remove.
Where the status bar is displayed depends on whether the toolbar is shown.
If the toolbar is shown, the status bar information is displayed at the bottom of the window. For example, if you are viewing a folder, the number of items it contains and the amount of space available on the drive on which it is stored will be shown.
If the toolbar is hidden, the status bar appears immediately under the title bar (see Figure 3.13). As with the toolbar, you can hide or show the status bar using the View menu. Unlike the toolbar, however, the contents of the status bar can’t be changed.
Figure 3.13 When the toolbar is hidden, the status bar appears immediately under the title bar.
Customizing the Finder Window Views
For each view type of Finder window view, you can set default or global view preferences that affect all windows you open using that view type. You can then set options for individual windows to override the default settings for that view type for that specific window. For example, one of the customization options for the List view is the data you see in the window. You can choose to display the Comments column for a window in List view. If you set this as a default preference, each time you open a new window in List view, you see the Comments column. If there is a window in which you don’t want to see the Comments column, you can change the preferences for that window so the Comments column is not displayed.
When you set a default preference, it affects all windows shown in that view. When you change a window’s preference, it affects only the current window.
Customizing the Icon View
Set your default preferences for the Icon view using the following steps:
1. Open a Finder window in the Icon view so you can preview the preferences you will set.
2. Select View, Show View Options or press ![]() -J. The View Options window appears (see Figure 3.14). You use this window to set both default and window settings. At the top of the window is the name of the folder you are currently viewing.
-J. The View Options window appears (see Figure 3.14). You use this window to set both default and window settings. At the top of the window is the name of the folder you are currently viewing.
Figure 3.14 The View Options window enables you to customize Finder window views.

3. Use the Icon Size slider to set the relative size of the icons you see. As you move the slider, the icons in the open window reflect the size you set. When you are happy with the size of the icons, release the slider.
4. Use the Grid Spacing pop-up menu to set the size of the grid used to keep icons organized in the window.
5. Use the Text Size pop-up menu to set the size of the icon labels.
6. In the Label Position area, select the location of icon labels: Bottom or Right.
7. Activate the Show Item Info check box to see information for the items in a window. The information you see depends on the items being displayed. For example, when the window shows volumes, you see the total space on the volume and the free space on each volume. When you view folders, you see the number of items in that folder. When you see files, information about the file is shown, such as the sizes of image files.
Note
![]()
When you select Snap to Grid, a small grid icon will appear at the bottom left corner of the Finder window.
8. Deactivate the Show Icon Preview check box if you don’t want Mac OS X to create a preview of the file in the file’s icon even if the file type doesn’t include one by default. By default, graphic file icons contain a preview of the file’s content within the icon. Some types of files don’t include this icon information and their icon doesn’t contain a preview. To see this preview, leave this check box activated.
Tip
![]()
You can also modify the view of the desktop, which is always in Icon view. Click anywhere on the desktop and open the View Options window. You can then set the icon size, text size, and other options just like a folder window (except for the folder background, which is set using the Desktop pane of the System Preferences Utility).
9. Use the Arrange By pop-up menu to select the criterion by which you want icons grouped on the pop-up menu. None is selected by default, and your other options are Name, Date Modified, Date Created, Size, Kind, and Label. Choose Snap to Grid to keep icons organized by the window’s invisible grid.
10. Select a folder background option:
• White—This options gets you the standard white background.
• Color—Use the Color placeholder to open the Color Picker to select the background color you want to use.
• Picture—To select a picture to use as the background, either drag a picture file from a Finder window and drop it on the picture placeholder, or click the picture placeholder and then use the Select a Picture dialog box to select a background image.
Note
![]()
Supported image formats for a background image include PICT, TIFF, and JPEG. The background image you choose appears in folders you view using the default icon settings. This does not affect any image you are using as a background image on your desktop.
12. Click Use As Defaults.
After you have made these settings, any window you view in Icon view is displayed using your default preferences unless you override the global settings by setting a window’s preference.
To change the preferences for an individual window, do the following:
1. Open the window you want to view and put it in the Icon view.
2. Open the View Options window by selecting View, Show View Options (or press ![]() -J).
-J).
3. Use the controls to set the Icon view preferences for the window you opened in step 1 (see the previous steps for help).
Tip
![]()
You can leave the View Options window open while you select other windows. If you do so, the name shown at the top of the dialog box changes, as do the controls you see if the window you select is in a view different from the current one.
This window uses the preferences you set for it until you change them.
Customizing the List View
Customizing List view works pretty much the same way as Icon view, except that you have different options.
Set your default List view preferences using the following steps:
1. Open a Finder window in List view.
2. Open the View Options window (![]() -J).
-J).
3. Select the radio button for the icon size you want to use.
4. Select the text size using the Text Size pop-up menu.
5. In the Show Columns area, activate the check boxes next to the data columns you want to be displayed in List view. The default data are Date Modified, Size, and Kind. The other data available are Date Created, Version, Comments, and Label.
6. Activate the Use Relative Dates check box if you want to use relative dates, which means you see date values that are relative to today (such as Yesterday or Past Week) for some dates rather than the full date for all dates.
7. Activate the Calculate All Sizes check box if you want the size of folders to be displayed in the Size column. This option uses extra computing power, especially for those folders that contain many folders and files. You should usually leave this box unchecked unless folder size information is critical to you.
8. Activate the Show Icon Preview check box to have the Finder display a preview icon of a selected item, rather than a generic icon.
9. Click Use As Defaults.
Every window you see in List view uses these options, unless you override the settings for a particular window.
Overriding the default options for a specific window is analogous to what you do for the Icon view. Open the window, open the View Options window, and use the controls to set the view options for the current window.
Customizing the Column View
The Column view has fewer customization options than the other views. The Column view preferences you set apply to all windows in the Column view. You can customize the column view by doing the following:
1. Open a Finder window in Column view.
Note
![]()
The Finder remembers the view you used the last time you opened a specific window and maintains that view each time you open that window—until you change that window’s view. If you want a specific folder to always open in a particular view, click the check box at the top of the View Options dialog box to do so.
Similarly, you can’t tell the Finder to apply the default view preferences to all windows at the same time. If you have changed the view preferences for individual windows, you have to reapply the default view preferences to that window if you want to use them (by using the View Options window).
2. Open the View Options window (![]() -J).
-J).
3. Select the text size using the Text Size pop-up menu.
4. Deactivate the Show Icons check box to hide the icons in the window.
5. Deactivate the Show Icon Preview check box to have the Finder display a generic icon instead of a preview icon of a selected item.
6. Deactivate the Show Preview Column check box if you prefer not to see the preview of a file you have selected in the window.
7. Use the Arrange By pop-up menu to select the criterion by which you want icons grouped on the pop-up menu: Name, Date Modified, Date Created, Size, Kind, or Label.
Customizing the Cover Flow View
The view options for Cover Flow windows are identical to the options you have for a List view. Because the Cover Flow view includes a list view in the bottom pane, it is beneficial to be able to set these options.
Set your default Cover Flow view preferences using the following steps:
1. Open a Finder window in Cover Flow view.
2. Open the View Options window (![]() -J).
-J).
3. Select the radio button for the icon size you want to use.
4. Select the text size using the Text Size pop-up menu.
5. In the Show Columns area, activate the check boxes next to the data columns you want to be displayed in List view. The default data are Date Modified, Size, and Kind. The other data available are Date Created, Version, Comments, and Label.
6. Activate the Use Relative Dates check box if you want to use relative dates, which means you see date values that are relative to today (such as Yesterday or Past Week) for some dates rather than the full date for all dates.
7. Activate the Calculate All Sizes check box if you want the size of folders to be displayed in the Size column. This option uses extra computing power, especially for those folders that contain many folders and files. You should usually leave this box unchecked unless folder size information is critical to you.
8. Activate the Show Icon Preview check box to have the Finder display a preview icon of a selected item, rather than a generic icon.
9. Click Use As Defaults.
Working with the Finder Window’s Action Pop-Up Menu
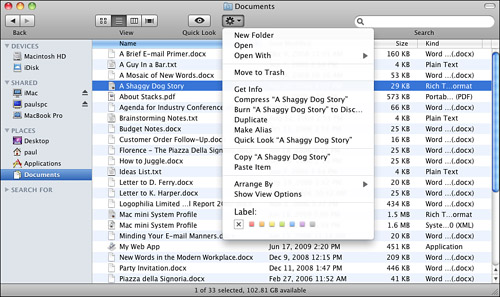
One of the default tools on the Finder window toolbar is the Action pop-up menu (see Figure 3.15). This menu provides access to context-sensitive commands, which means that commands on the menu depend on the item you have selected on the desktop. For example, when you select a file and open the menu, you see commands including New Folder, Open, Open With, Move to Trash, Get Info, Compress, Burn, Duplicate, Make Alias, Quick Look, Copy, Show View Options, and Label.
Figure 3.15 The commands on the Action pop-up menu change depending on the items you have selected.
Note
![]()
As you probably suspect, the commands on the Action pop-up menu are similar to the commands on an item’s contextual menu, which you can open by pointing to an item, holding down the Control key, and clicking the item (or right-clicking the item if you use a two-button mouse). If you do this, you’ll see a couple more options on the contextual menu that you will learn about later in this book.
To use a command on the menu, select the item on which you want to use the command, open the menu, and select the command you want to use.
Organizing Folder Items with Labels
Labels enable you to color-code and text-code files and folders as a means of identifying and organizing them. For example, you can assign all the folders for a specific project using the same label. In addition to making the relationship between these folders clearer, you can choose to group items within a window by label, which keeps them near one another as well. You can also use Smart Folders to automatically gather files and folders that have the same label.
Setting Up Labels
You can assign text to the color labels by following these steps:
1. Open the Finder Preferences window.
2. Click the Labels button to open the Labels pane, which contains the seven label colors. Next to each color is its text label, which by default is the name of the color.
3. Edit the text labels for each color to match your label needs. For example, you can replace the color with the name of a project.
Applying Labels
You can apply labels to a folder or file by following these steps:
1. Select the items to which you want to apply a label.
2. Open the Action pop-up menu or the contextual menu.
3. Select the label you want to apply to the selected labels.
When an item has a label applied to it and you view the enclosing folder in Icon view, its name is highlighted in the label’s color. When you view a window in the Cover Flow, Columns, or List view, a large dot filled with the label color appears next to the item you have labeled. If you view a window in the List view and select to show the Label column, the label text appears in the Label column for the item.
Tip
![]()
If you view a window in Icon view, you can choose to keep items grouped by label. This keeps all the files with which you have associated a specific location together in the window.
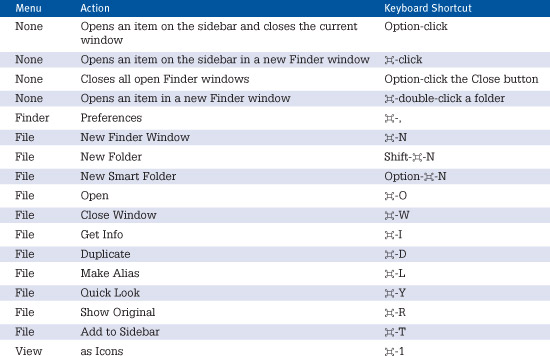
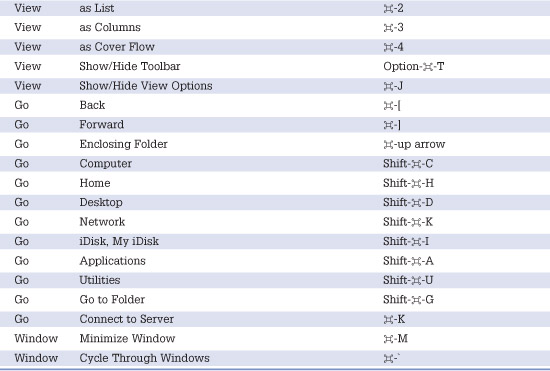
Finder Window Keyboard Shortcuts
Table 3.3 lists keyboard shortcuts for working with Finder windows.
Table 3.3 Keyboard Shortcuts for Finder Windows