36. Backing Up Your Mac
Backing Up Your System
If you use a computer, at some point, your system will crash, a disk will fail, you’ll delete files that you really didn’t intend to, or some other problem will occur and you will lose data you would rather not lose—maybe not today or tomorrow, but it is the inevitable nightmare. Think of the information you have on your Mac at this very moment that would be difficult—if not impossible—to reconstruct if your computer destroyed it. This data might be a report for work, a school project, your tax information, a complex spreadsheet, or even the great American novel on which you have been working. To be more specific, think about all the content you’ve purchased from the iTunes Store. If you lose that content and don’t have it backed up, you need to pay for the content again. Even worse, imagine that you have 5,000 photos in your iPhoto Library covering the last five years. Now imagine that the disk on which these images are stored crashes. Without a backup, there’s simply no way to recover that kind of data, and your photos are gone forever.
Whatever the information, rest assured that someday, somewhere, somehow you will suddenly lose it. When that happens, you will want to be able to restore all the information on your Mac so you can quickly re-create your data. Backing up is the means by which you ensure that you can always preserve most of your work, no matter what happens to your Mac.
Although backing up your data is strongly recommended by computer authors, experts, and support personnel, it is a task that many Mac users never do for a variety of reasons. Some people don’t back up data because they think their systems are infallible and won’t crash. Still others are confused about how to make a backup of their system, or they lack the hardware and software necessary to maintain good backups. And then there are always those who simply don’t believe that protecting their data is enough of a priority to waste their time on it. Trust me, the first time you lose something you can’t re-create, such as important photos, you’ll wish you’d backed up your Mac. Why wait for the inevitable? Better to get backed up now so you don’t have to face losing your data.
Defining a Backup Strategy
One of the first things you need to decide is what data on your machine needs to be backed up. The following list describes the three general categories of data you should consider backing up:
• Documents, photos, movies, music, and other important data you create or purchase—These items are, after all, the reason you use a Mac in the first place. You should back up all your own data because it doesn’t exist anywhere other than on your computer. If you lose important data, it might be impossible to re-create. Even if you are able to re-create it, you’ll waste a lot of valuable time redoing what you have already done. Other data, such as your photos, simply can never be re-created. Still other data, such as music you have purchased from the iTunes Store, costs money to replace.
• System files—You should have installation discs that contain your Mac OS software, so you usually don’t risk losing the Mac OS software itself. What you do risk losing is any customization you have done, updates you have installed, and so on. If you have adjusted any settings or added any third-party software, all the settings you have changed are lost in the event of a major failure.
Additionally, don’t forget about all the configuration information you have on your machine. For example, if you lose your system for some reason, you might lose all the configuration you have done to make your Mac connect to the Internet. You might also lose all the serial numbers of your software, which you have to re-enter if you need to reinstall it.
• Applications and other third-party software—As with the OS software, you probably have discs containing much of your third-party software. What you lose if you have a failure without a backup is the customization of those applications. Plus, you have to reinstall that software—not an easy task if you have a lot of applications installed on your Mac. In any case, it can be very time-consuming to reinstall your applications. Don’t forget about all the updates you have applied to these applications. If you lose your system, you have to do that all again, too.
Note
![]()
You probably obtain a lot of your software by downloading it from the Web. If you lose the installers or patches you download without having a backup, you have to download them again—assuming they are still available, of course. Sometimes, the version you want to use has been replaced by a newer version you don’t want to use or pay for. And, occasionally, software moves from shareware to commercial, in which case it becomes unavailable to download again without paying for it. You should keep backup copies of any software installers or updates you download so you can reinstall that software if you need to—whether it is still available from the original source or not.
In conjunction with the kind of files you back up, several types of backups you can make include:
• Full backup—In a full backup, you back up each and every file on your system. The advantage of doing full backups is that restoring your entire system, as well as just particular parts of it, is possible.
• Selected files only—Using this scheme, you select particular files to back up; usually these are your important data (documents, photos, music, and so on) and some of your customization files (for example, preferences files). The advantage of this scheme is that you can make a backup quickly while protecting the most important files on your computer.
• Incremental backup—This scheme combines the first two techniques in that all files are backed up the first time, but after that, only files that have changed are backed up until the next full backup. This scheme protects all your files but avoids the time and space requirements of doing a full backup each time.
What you decide about the type of data you back up and how you back it up should determine the type of backup system you develop and use. For example, if you decide that you don’t mind having to reinstall applications and reconfigure settings or you mainly use small document files, you might be able to simply copy your document files onto a DVD or other removable media drive. If you have a great deal of data to protect, you need to implement a more sophisticated system.
If you can assemble the hardware and software required to do incremental backups, you should use this approach. It is the only one that is practical for frequent backups and also protects all your data.
Ideally, you want your backup system to work without any supervision or intervention by you. This is called an unattended backup because you don’t even need to be there for the system to work. You can set the system to automatically back up during times when you are not working on your Mac. This is not only convenient, but it also means that because you don’t have to do anything, you can’t forget or be too lazy to keep your backups up to date.
Lastly, you need two basic types of backups. One is “short term,” meaning that you back up daily (or more frequently) to protect your data over the short term, which can mean from a few days to a month; you keep these backups easily accessible from your Mac so that you can quickly restore files. The other is “long term,” meaning that you capture snapshots of your data at specific points in time and store those in safe locations, preferably away from your Mac in case something really bad happens to it. You’re likely to use different hardware and software for each of these types.
Backing Up Your Mac with Time Machine
Mac OS X includes its own backup software called Time Machine. Using Time Machine, you can automate the backup process and easily restore any data included in your backups. Time Machine is designed to work with Apple’s iLife and other Mac OS X applications, so it’s ideal to back up your iTunes and iPhoto content along with your documents. It’s also smart enough to not waste backup space on files such as temporary Internet files. You can also determine how frequently backups are made and how long they are kept.
The primary limitation of Time Machine is that you can only use it to back up to a hard drive, so you must have a dedicated hard drive to be able to use it. Time Machine is also somewhat limited as backup software because you can only have one backup active at a time. However, it is very easy to use, which is important for backup software, and you can automate the backup process. Time Machine also makes restoring files very easy. For some applications, such as Address Book, you can even restore individual data records.
If you do use Time Machine, you really shouldn’t rely on it as your only backup solution. You should back up so that you can store long-term backups away from your Mac; however, for everyday, short-term backups, it’s ideal.
Configuring Time Machine
To configure Time Machine, perform the following steps:
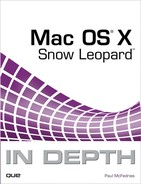
1. Open the System Preferences application and click Time Machine. The Time Machine pane opens (see Figure 36.1).
Figure 36.1 With Time Machine, backing up isn’t hard to do.
2. You can either slide the switch to turn Time Machine on, or click the Select Backup Disk button.
Caution
![]()
You’ll lose any existing data on the drive when you use it for Time Machine backups, so make sure the drive doesn’t contain any information you want to keep. If it does, copy the data to your main hard drive.
3. In the resulting sheet, select the drive you want to use to store your backup files.
4. Click Use for Backup. You return to the Time Machine Pane where the top portion allows you to modify your settings. The bottom portion of the pane notes the frequency of the backups. Time Machine creates an hourly backup for the past 24 hours, daily backups for a month, and weekly backups, assuming your backup drive has enough storage space.
5. Click on the Options button. Use the exclusion list to exclude files from the backup process. By default, the drive you are using to back up is excluded because it would make no sense to back up a drive onto itself.
In an ideal world, you’d have such a large backup disk that you could back up all of your files indefinitely, but for most Mac users, that won’t be the case. If it isn’t true for you, you need to exclude files that don’t really need to be in your short-term backups. One candidate is your Applications folder, which tends to be pretty large.
Make sure any files you exclude from your short-term backup are backed up in some way, such as on DVD or with the original installation discs.
To exclude files from the backup, click the Add button (+) and use the resulting sheet to move to and select the files you want to exclude. You can exclude entire volumes or choose specific folders to exclude the contents of those folders from the backup.
To include files in a backup again, select the folder on the exclusion list and click the Remove button (-). The folder you selected is removed from the exclusion list, which means it’s included in the backup.
You can see how large the files excluded from the backup are by looking just above the exclusion list toward the right side of the pane. The amount shown next to “Total Included” tells you how much room your back up is going to require.
Note
![]()
If the data you selected to back up doesn’t fit on the backup disk, Time Machine aborts the backup process and warns you about the situation. You need to exclude more data from the backup until it does fit. If the data you want to back up consumes a large part of the space available on the backup disk, you won’t be able to maintain backups for very long, so you should consider using a larger backup disk.
You can decide if you would like to be warned when old backups are deleted by Time Machine. It is a good idea to have your long-term backup completed before Time Machine deletes any older backup files.
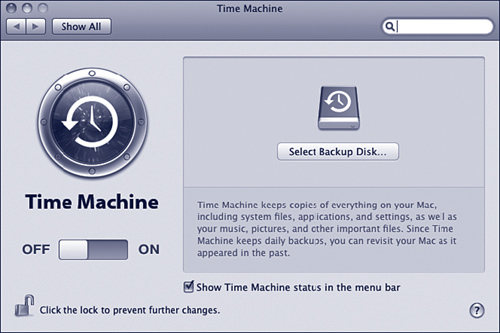
6. When you’ve excluded all the files you want to, click Done. The backup process runs at the next scheduled time (see Figure 36.2). The first time you run a backup, it takes a longer time because every file in the backup has to be copied to the backup drive. Subsequent runs will be faster because only changed files will be copied.
Figure 36.2 The Time Machine pane provides status information and the option to change the hard drive used for backup files.
When the backup process is complete, the time and date when it was completed is shown in the status area at the top of the pane.
After you’ve configured Time Machine, it handles the backup process for you and keeps your backup fresh according to the parameters you set.
Tip
![]()
If you make significant changes to your data, such as downloading photos from a camera or making purchases from the iTunes Store, and the next backup time doesn’t occur for a while, click the Time Machine icon in the menu bar and then click the Back Up Now command to immediately add the new data to your backups. If you don’t see the Time Machine icon, open System Preferences, click Time Machine, and then activate the Show Time Machine Status in the Menu Bar check box.
Restoring Files with Time Machine
A backup system is something you need to have in place but hope you never have to use. But, losing data is inevitable, so you’re going to have to use your backup system to recover the data you’ve lost. Time Machine makes restoring files relatively easy, at least when you understand its unique interface.
There are two basic sources of data you can recover with Time Machine: files in the Finder or data within applications. Time Machine works very similarly for both kinds.
Restoring Files from the Finder with Time Machine
To restore files from your backup, perform the following steps:
1. Open the Finder window showing the location of the files you want to recover (this step is optional because you can navigate the Finder from within Time Machine).
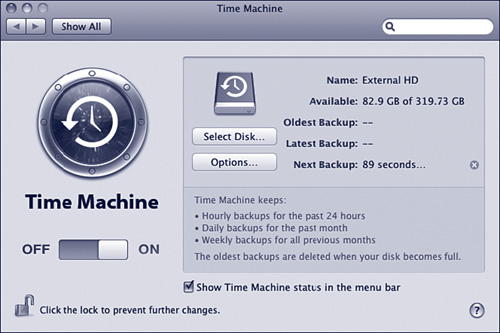
2. Launch the Time Machine application (in the Applications folder or click its icon on the Dock). Time Machine fills the entire desktop on the primary monitor and makes all other displays dark (see Figure 36.3). Depending on the desktop resolution and window size of the folder in focus, that folder might be resized in the Time Machine window, but it remains in focus. Along the bottom of the window, you see the Time Machine menu bar.
Figure 36.3 Time Machine takes a bit of getting used to, but once you do, you can quickly recover files and data.
The Time Machine interface is quite different than other applications. The general concept of how it works is that you browse through the backups for the item in focus until you get to the files you want to restore. When you see the files or folder you want to restore, select the version you want to restore and click the Restore button located at the right end of the menu bar (this button becomes active only when you’ve selected something that can be restored).
The first task is to locate the specific version of the files that you want to recover. You can do this by browsing with the browse arrows or using the backup bars along the right side of the screen to choose a specific backup (by date and time) from which you want to restore a file.
3. Browse through the backups by clicking the backward-facing arrow to move to older versions of the backup or the forward-facing arrow to move to newer versions of the backup. Or, point to the Available backups bar along the right side of the screen and click a date and time to jump to that version of the backup. As you point to versions, the magnifying effect is applied to make it easier to see the specific version you are working with.
The version of the backup that is currently in focus is shown in the center of the menu bar. When you are looking at the current files, this says Today (Now). When you are looking at a version of the backup, you see the date and time of the version in focus.
Note
![]()
To quit Time Machine without performing a restore, click the Cancel command.
4. When you’ve reached the version of the backup from which you want to restore the file, move to the file’s or folder’s location in the Finder window (see Figure 36.4).
Figure 36.4 Time Machine enables you will to move back in time to recover files and folders that have been lost.
5. Select the file or folder you want to restore and click the Restore command. The file or folder is restored to your desktop in the state it was in for the backup version you selected. Time Machine quits and you return to the Finder with the recovered files and folders available for your use.
Note
![]()
If you restore a file to a location that already has a file with that name, you will be prompted to select if you want the restored file, the existing file, or both. Selecting both keeps the existing file and saves the restored file with “(original)” added to the name.
Restoring Data from within Applications with Time Machine
With certain applications, mostly Apple applications that manage data such as iPhoto, Address Book, and so on, you can also use Time Machine to restore data within those applications. For example, if you accidentally delete photos from iPhoto, you can use Time Machine to retrieve them from one of your backups.
To restore data from within an application, perform the following steps:
1. Make the application containing the data you want to restore active.
2. Launch Time Machine. The application appears and you see the application’s window in the Time Machine space (see Figure 36.5).
Figure 36.5 Time Machine allows you to recover data that you may have deleted within Apple’s applications.

3. Move back through the available backups until you see the data that you want to restore.
4. Select the data you want to restore and click Restore. The selected data is added to the application. For example, if you select an address card, it is added to Address Book. If you select photos in iPhoto, they are added to your iPhoto Library.
Managing Your Time Machine Backups
Time Machine stores each backup on the selected backup disk. The backups are stored in a folder called Backups.backupdb. If you open that folder, you see a folder for the disks you are backing up. Open that folder to see folders for each version of the backup that Time Machine is managing (see Figure 36.6). You can open these folders to access files that are stored within them; this means that you can try to manually recover files from these folders if Time Machine loses track of them for some reason.
Figure 36.6 The various versions of your backups are stored in folders on your backup drive.

As time passes and the number of backups increases, the backup drive becomes full. When that happens, Time Machine starts dropping versions of the backups, starting with the oldest first. It attempts to keep all backups for as long as indicated on the Time Machine pane, but if your drive doesn’t have enough room, you’re prompted to let Time Machine delete versions that it doesn’t have room to store. If this happens frequently, you need to get a larger backup drive or reduce the size of the files included in the backups.
Backing Up Your Mac with Apple’s Backup
Time Machine is great for short-term backups that you want to keep active. However, you should also create backups that are more permanently stored and that you can keep in a location away from your Mac. To do that, you need a different application.
Apple’s Backup application is capable backup software that enables you to back up to various kinds of media, including hard drives, DVD, CD, and iDisk (which takes the idea of remote storage of your data to a new level). You can also automate backups, and you can even configure different backups, such as a long-term backup and a short-term backup, and Backup manages each of them for you, so you can rely on Backup as your primary backup solution. The good news is that if you are a MobileMe member, you get Backup for free. If you aren’t, you need to get a different application because Backup is not available to nonmembers.
Tip
![]()
A very good backup system is to use Time Machine for your short-term backups, because it is so easy to configure and restore files when you need them, and Backup for long-term backups because you can back up to DVD.
Obtaining and Installing Backup
To get a copy of Backup, move to the MobileMe website and log in to your account. Move to the iDisk page, select the Software folder, and then download the Backup application. Launch the installer and work through its steps to install Backup on your Mac.
Configuring Backups with Backup
To configure a backup, perform the following steps:
1. Launch Backup, found in the Applications folder.
2. The first time you launch Backup you’re presented with the welcome sheet, which includes four different backup plans with descriptions of the plans to help you select the best fit for your needs (see Figure 36.7).
Figure 36.7 Backup provides a number of templates you can use to quickly create a backup configuration.

3. Activate the check box beside the plan you want to use and click Continue. The plan is created and the options that came from the template or that you selected are shown when you double-click the plan (see Figure 36.8). At the top of the plan window, you see three tabs. The Back Up tab enables you to configure the backup. The History tab shows you when the backup has run. Use the Restore tab to restore files from previous backups.
Figure 36.8 The plan window enables you to configure and use a backup plan.

The Back Up tab has two panes. The Backup Items pane shows the items that are included in the backup. The Destination and Schedule pane shows where the backups are stored and how often the plan backs up to each location.
4. To add folders or files to the backup, click the Add button (+) at the bottom of the Backup Items pane. Use the resulting sheet to move to and select folders or files you want to include. Anything marked with a green circle and check mark is included in the backup; if a folder is included, all its contents are included too. When you’ve selected all the content you want to add to the backup, click Done.
Tip
![]()
You can also remove folders and files from the backup in the Add Item sheet by selecting them and activating the Do Not Include This Folder or the Do Not Include This File radio button.
5. To remove items from the backup, select the items you want to remove and click the Remove button (-) at the bottom of the Backup Items pane.
6. To change the location or schedule for the backup, double-click the location and schedule you want to change or to add a new location and schedule to the backup, click the Add button (+) at the bottom of the Destination and Schedule pane. The Choose a Destination and Schedule sheet appears (see Figure 36.9).
Figure 36.9 Use this sheet to choose a location and schedule for your backups.

7. Choose the volume on which you want the backup to be stored on the Destination pop-up menu. You should choose a destination different than the volume on which the information you are backing up is stored so that problems that wipe out what you are backing up don’t also destroy your backup.
8. Choose the folder in which you want the backups stored on the Folder pop-up menu. Click Choose Location and then move to and select the folder you want to store the backup in or use the New Folder button to create a new folder.
9. To enable automatic backups, activate the Automatically Back Up at the Following Times check box, choose the frequency on the Every pop-up menu, choose the day the backup runs (all options except Daily on the Every pop-up menu), and the time for the backup. Click OK to save the changes.
Tip
![]()
You can create as many backup plans as you need to protect your data. For example, you might want to have a backup that runs frequently (unfortunately, daily is as frequent as you can run backups in Backup) and stores important files on a hard drive while another stores all your files on disc and runs monthly.
10. Repeat step 9 to create as many locations and schedules for the backup that you need. For example, you might want to make a daily backup to hard drive and a monthly one to DVD.
11. If you want to run a backup immediately, select the location to which you want to back up and click Back Up Now. The configuration you selected runs and the backup is created.
12. Close the plan. Move to the Backup window in which you see all of the backup plans you’ve created (see Figure 36.10).
Figure 36.10 The Backup window shows all of the backup plans you’ve configured.

Backing Up with Backup
After you’ve configured backups, they run according to the schedules you’ve set. If a backup is stored on a CD or DVD, when it runs, you’re prompted to insert the appropriate kind of disc.
You can manually run a backup by launching the Backup application, selecting the backup plan you want to run, and clicking Back Up. If the backup has more than one location, choose the location you want to run on the location sheet.
Tip
![]()
To remove a backup plan, select it in the Backup window, open the Action pop-up menu and choose Remove. The backup is removed from the Backup application and is no longer used. If the backup is stored on a hard drive, look in the location in which it was stored and delete any files associated with the backup if you no longer need them.
After the backup runs, the time and date of its last operation are shown under the plan in the Backup window. You can also open a plan and click the History tab to see when its been run.
If a backup fails, it’s marked with an exclamation point icon in the Backup window. Click it to move to the plan’s History tab where you see the backup that failed. Select it and click View Details to open a log file. Sometimes the information you see is useful, and sometimes it isn’t. The most common cause of a failure is not having enough room on the selected destination.
Restoring Files with Backup
To restore files from a Backup backup, do the following:
1. Launch Backup.
2. Select the plan from which you want to restore files and click Restore. The Restore tab for the selected backup appears.
3. Select what you want to restore on the Previous Backups list.
4. If you want to restore the files to a location other than the one from which they were copied, check the Restore to an Alternate Location check box and choose the location to which you want the files restored.
5. Click Restore Selection. The selected files are restored from the backup to their previous location or to the location you selected.
Tip
![]()
If your Backup installation is lost (such as when a hard drive fails and you have to use a new one) such that you no longer see the plans in Backup, you can still restore files. Re-install Backup and launch it. Choose Plan, Restore from Backup. Then move to and select the backup from which you want to restore files.
Using a Backup System
I can’t emphasize enough how important it is to maintain good backups for your data. Here are a few tips to keep in mind:
• Develop your own strategy based on the hardware and software you have or plan to purchase—At the least, make sure your critical files, such as photos, iTunes content, and financial data, are protected with good backups.
• Make sure that backing up is easy—If you have to do a lot of work to back up or if it takes a lot of your time, you won’t end up keeping up-to-date backups. Ideally, you want to be able to do unattended backups; Time Machine and an external hard drive make it so.
Note
![]()
Archiving is slightly different from backing up. Backing up is done mostly for the “active” data on your Mac, whereas archiving is done with data you don’t really need to work with any more. Fortunately, you can use your backup system to archive data as well. For archiving smaller documents, a CD drive is a good choice because the media is very cheap and relatively permanent. For larger amounts of data, a DVD is a good way to archive. When you archive, you should use a solution that won’t degrade over time, which is why optical media such as CD and DVD are good choices. After you’ve archived data and checked to make sure that you can recover that data from the archive, you can delete the files from your working drive to free up some space.
• Be consistent—Whatever strategy you decide on, keep up with it. Old, out-of-date backups are not much better than no backups.
• Always refresh your backups before you install any new software or make major changes to your system—This enables you to recover data if the changes you make to your system cause problems.
• Be sure to test your backups regularly—Pretend that you’ve lost some very important files and try to restore them to ensure that everything is working properly. If you don’t, you might get a nasty surprise when you need to restore some data “for real.” You need to know your backup system has a problem before you need to use it. If you don’t regularly test your backups, you are asking for trouble.
• Maintain your equipment—Almost all equipment needs some kind of maintenance now and again, so follow the manufacturer’s guidelines to keep your system in top condition. Hard drives can fail, so check the ones you use for backing up periodically to make sure they are still working (see previous bullet).
• Maintain more than one set of backups—Create multiple copies of your backups in case something happens to one set.
• Keep a set of backups offsite—Keep a copy of your backups in a different location than your Mac is in. This saves you in the event of a catastrophic event such as fire or theft. This is especially important for data you can’t replace, such as photos and financial data.