33. Installing, Configuring, and Using Printers
Finding, Installing, and Using Printers
If you want to get your work out on paper, you can use many types of printers to get the job done. Under Mac OS X, you install and manage printers using the Print & Fax pane of the System Preferences application, the Printer Browser, and the Printer Setup Utility application. And Mac OS X includes support for a large number of printers by default.
There are two ways you can connect a printer to your Mac: directly or through a network. To connect a printer directly to your Mac, attach the printer cable to the appropriate port on your Mac (USB or Ethernet). How you connect a printer to your network depends on the type of network you are using. If you are using an Ethernet network, you can attach a cable from the nearest hub or print server to your printer. You can also choose to share either type of printer over a wired or wireless network. If your network includes an Apple AirPort Base Station or an AirPort Express Base Station, you can connect a USB printer to the base station’s USB port on either kind of base station or to one of the Ethernet ports on the AirPort Base Station.
Mac OS X supports several printer communication protocols, including, IP Printing, Open Directory, Bonjour, direct connection through USB, and Windows Printing.
Using Bonjour enables your Mac to actively seek devices to which it is networked. In the case of Bonjour printers, your Mac can discover the printers it can access and automatically configure itself to use those printers. No configuration on your part is required. However, printers have to be Bonjour-capable for this to work.
Configuring Printers
There are many types of printers you can use with Mac OS X. In this section, you learn how to work with the most common types of printers.
Configuring a Local USB Printer
Support for many USB printers is built in to Mac OS X. After you connect your USB printer, follow these steps to configure it:
1. If the printer has Mac OS X–compatible software, install it—support for many printers is built in to the operating system.
2. Open System Preferences and click Print & Fax. The Print & Fax preferences appear (see Figure 33.1).
Figure 33.1 Use the Print & Fax pane of the System Preferences application to configure the printers your Mac uses.

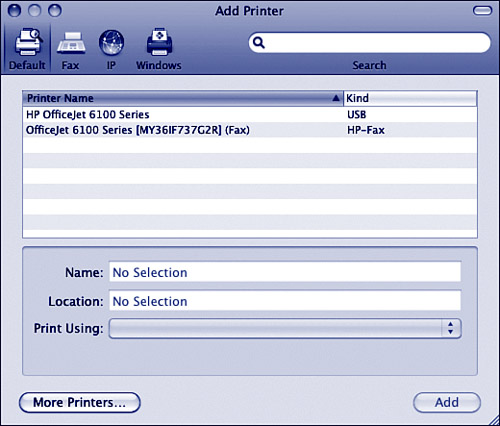
3. Click the Add Printer button (the plus sign). The Printer Browser appears and immediately seeks out all the printers it can find. At the top of the browser, you see buttons for each type of printer that Mac OS X supports, including Default, which finds all the printers your Mac can access; IP, which you use to configure printers via their IP addresses; Windows, which you select to find and configure printers on Windows PCs, and so on. When you select one of these types, the browser’s lower pane is reconfigured for the type of printer you selected.
4. For a printer connected to your Mac’s USB port, select the Default button in the toolbar. The list of printers shown in the lower pane of the browser is refreshed (see Figure 33.2).
Figure 33.2 The Printer Browser finds printers connected to your Mac.
5. Select the printer you want to configure by clicking its name in the list. Information about that printer is gathered, and Mac OS X attempts to choose the best driver software for it, which is shown on the Print Using pop-up menu (see Figure 33.3).
Figure 33.3 Mac OS X can configure most printers automatically, as it did for this one when I selected the Epson Style CX4600 on the printer list.

6. If you don’t want to use the default printer name shown in the Name box, select it and type a new name.
7. If the default location isn’t what you want, select it and change that, too.
8. If Mac OS X found a driver for your printer and selected it on the Print Using pop-up menu, leave that selection as it is; if a driver wasn’t found, open the pop-up menu and choose the appropriate driver. If you can’t find a driver for your printer, you need to get one from the printer’s manufacturer.
9. Click Add. You return to the Printer List on the Print & Fax pane and the printer you selected and configured appears on the list (see Figure 33.4).
Figure 33.4 A new printer has been installed on this Mac.

Configuring a Network Printer
Using a network printer is a good way to share a printer among multiple users; with the rise of home networks and the decrease in the cost of networkable printers, installing networked printers in a home or home office is also a practical option. Using an AirPort Base Station, any USB printer can be shared over a wireless network.
![]() To learn how to establish a wired network, see Chapter 17, “Wired Networking with Mac OS X,” p. 361.
To learn how to establish a wired network, see Chapter 17, “Wired Networking with Mac OS X,” p. 361.
![]() To learn about sharing a printer via AirPort, see Chapter 18, “Wireless Networking with Mac OS X,” p. 385.
To learn about sharing a printer via AirPort, see Chapter 18, “Wireless Networking with Mac OS X,” p. 385.
In the following example, a printer is installed on a small Ethernet network. The steps to configure such a printer are:
1. Connect power to the printer.
2. Connect the printer to an Ethernet hub.
3. If the printer has Mac OS X–compatible software, install it—support for most laser printers is built into the operating system.
4. Open the Print & Fax pane of the System Preferences application.
5. Click the Add Printer button (the plus sign). The Printer Browser appears and begins to search for printers with which your Mac can communicate. The printers it finds are shown on the printer list.
6. Select the printer you want to install. Mac OS X attempts to find the driver and configure the printer. If it can do so, you see the printer’s name, its location, and the driver Mac OS X has selected.
7. If you don’t want to use the default printer name shown in the Name box, select it and type a new name.
8. If the default location isn’t what you want, select it and change that, too.
9. If Mac OS X found a driver for your printer and selected it on the Print Using pop-up menu, leave that selection as it is; if a driver wasn’t found, open the pop-up menu and choose the appropriate driver. If you can’t find a driver for your printer, you need to get one from the printer’s manufacturer either on the disc that accompanied the printer, or on the manufacturer’s website.
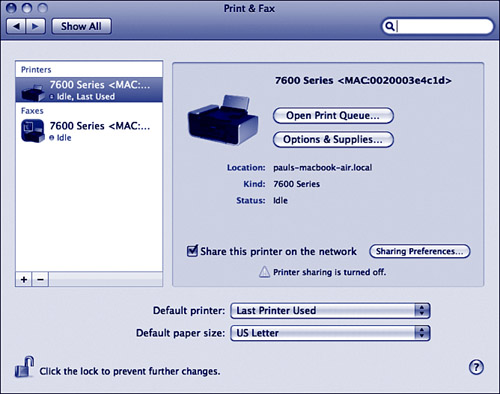
10. Click Add. You return to the Printer List on the Print & Fax pane and the printer you selected and configured appears on the list. The printer is ready to print your documents (see Figure 33.5).
Figure 33.5 This printer is connected to a hub on a local network.
Configuring Other Types of Printers
Mac OS X supports many types of printers connected in a variety of ways. Although you are most likely to use a printer connected directly to your Mac or through a network—in which case the Printer Browser likely does most of the configuration work for you—you might have a more unusual situation, such as wanting to use a Windows PC’s printer.
In the event that the Printer Browser doesn’t automatically find and configure a printer, you can use its advanced tools to do the configuring:
1. Open the Print & Fax pane of the System Preferences application and click the Add Printer button (the plus sign). The Printer Browser appears.
2. If the printer you want to install doesn’t appear in the list, click the button for the type of printer you want to configure. Commonly used options are in the following list:
• IP If a printer is installed on a network, but the browser doesn’t find it automatically, you can use this tool to configure a printer by entering its IP address on the network. The only challenge of using this option is determining the printer’s address. Most network printers have a function that prints the printer’s current configuration options, including its IP address. See your printer’s documentation to determine how to print this information.
• Windows If your Mac is connected to a Windows printer, use this tool to configure it.
• AppleTalk AppleTalk is a local network protocol that can also be used by a Mac to communicate with a printer. For you to use AppleTalk, AppleTalk services must be enabled on your Mac. When you select the AppleTalk tool, your Mac identifies all the printers with which it can communicate via AppleTalk.
After you select a tool, the browser is reconfigured with the controls you use to configure printers of the type you selected (see Figure 33.6).
Figure 33.6 Use the IP Printer tool to configure a printer based on its IP address.

3. Use the tools on the browser to configure the printer. Each offers a different tool set, but the general tasks are the same. Select the printer you want to configure, choose its driver, name it, and so on. For example, to configure an IP printer, you select the protocol on the Protocol pop-up menu, enter the IP address, and choose a queue for that printer. Then, name it, create a location name, and choose its driver. Other tools have similar tasks.
4. Click Add. The printer is installed on your Mac and you see it on the Printer List on the Print & Fax pane of the System Preferences application.
Managing Printers
Manage the printers with which your Mac can work using the Print & Fax pane of the System Preferences application (see Figure 33.7). In the left part of this pane, you see the printers installed on your Mac. For the selected printer, you see information pertaining to its location and status, and you have access to other options in the area to the right of the Printers list. At the bottom of the pane are a number of controls you can use to set your printing preferences. These include the following:
Figure 33.7 Use the Print & Fax pane to set printer preferences for your system.
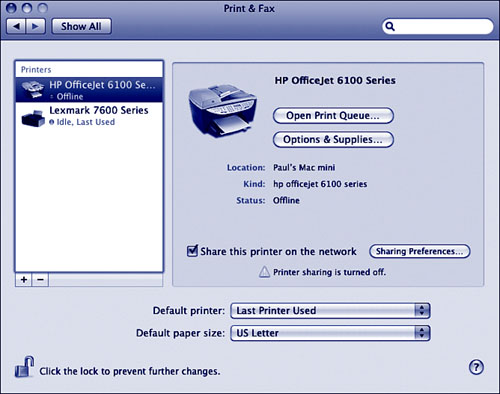
• Select a printer and click the Delete button (-) to remove the printer from the list of available printers.
• Select a printer and click Open Print Queue to open its Print Queue window (more on this later in the chapter; see “Printing Under Mac OS X”).
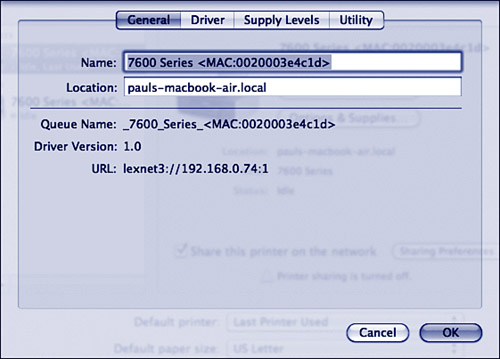
• Select a printer and click Options & Supplies to open its Info sheet (see Figure 33.8). This sheet has four tabs. Use the General tab to update the printer’s name and location information. You also see configuration information for the printer, such as the version of the driver being used, its URL, and so on. Use the Driver tab to change the driver being used for the printer and to configure additional options it supports, such as paper trays, memory configuration, and the like. The Supply Levels tab provides you with information about the consumables for your printer (if supported.) This is a handy way to find out how much ink is left in one of your printer’s cartridges. When you click the Supplies button, Mac OS X opens your default web browser and attempts to locate supplies for the printer, such as ink cartridges, in the Apple Store. In the Utility tab (not available with all printers), click Open Printer Utility to open the utility program that was installed along with the printer.
Figure 33.8 The Options & Supplies sheet enables you to configure additional options for a selected printer.
• Use the Default Printer pop-up menu to determine which printer is selected automatically in the Print dialog box. The Last Printer Used selection causes the dialog box to remember the last printer you printed with. If you choose one of the installed printers, that printer is selected each time you print (it becomes the default printer).
• Use the Default Paper Size in Page Setup to choose the default size of paper that is selected in the Page Setup dialog box for the selected printer when you print.
Working with Shared Printers
Under Mac OS X, you can share printers connected to your Mac over wired and wireless networks, as well as those connected directly to your Mac through USB or Ethernet. If your Mac can communicate with a printer, it can also share that printer with other computers with which it can communicate. You can also access printers being shared with you.
Sharing a Printer Connected to Your Mac
To share a printer, perform the following steps:
1. Install and configure the printer you want to share on your Mac.
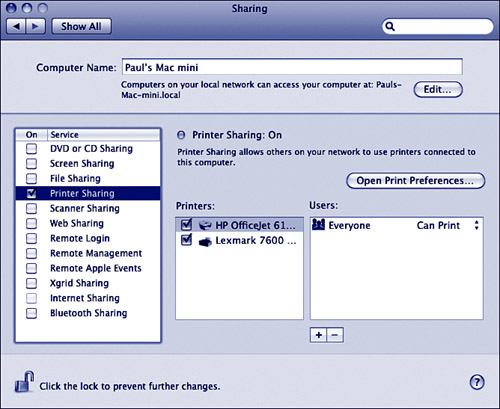
2. Open the Sharing pane of the System Preferences application. On this pane, you see the list of services you can share on your Mac.
3. Activate the Printer Sharing check box.
4. Activate the check box next to each printer you want to share (see Figure 33.9). The selected printers are now accessible to other Macs on the same network.
Figure 33.9 The printers connected to this Mac can be used by other Macs on the same network.
Note
![]()
You can also share printers that are connected to your Mac through a network connection, but you don’t need to do this. Instead, just install the network printer on each machine from which it should be available.
When you share a printer, the Mac from which it is being shared must be running for the printer to be available to other computers on the network. If it isn’t, the printer won’t be accessible to those other Macs.
Tip
![]()
If your network includes an AirPort Extreme or AirPort Express Base Station, you can connect a USB printer to the Base Station to share it.
Adding Shared Printers to Your Mac
To access printers being shared on a network, use the following steps:
1. Open the Print & Fax pane of the System Preferences application.
2. Click the Add Printer button. The Printer Browser appears and searches for printers with which your Mac can communicate. Printers that are being shared with your Mac have Bonjour Shared or Shared Printer in the Kind column (see Figure 33.10).
Figure 33.10 Shared printers show either Bonjour or Shared Printer in the Kind column.
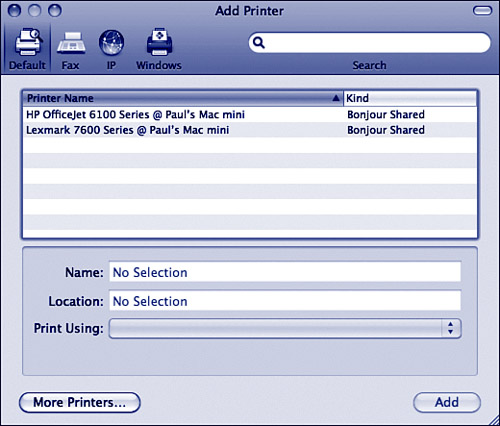
3. Select the shared printer you want to be able to access.
4. Change the name and location if you want to; in most cases, you should leave the default selections.
5. If your Mac was able to find a driver for the printer, leave the default driver as the selection on the Print Using pop-up menu. If no driver was found, use the pop-up menu to select a driver for the printer.
6. Click Add. The shared printer is added to the printer list and you are able to print with it just like the printers connected directly to your Mac or that are connected to your network.
Printing Under Mac OS X
In all Mac applications that support printing, you initiate a print job by selecting File, Print, or by pressing ![]() -P. When you print a document, you see the print dialog box for the current printer; the printer shown on the Printer pop-up menu is determined by the preference you set (either the last printer you used or the default). You can choose any other printers that are installed on your Mac or those being shared on the network by using the Printer pop-up menu (see Figure 33.11). The Print dialog box contains a variety of pop-up menus and other tools you can use to configure a print job.
-P. When you print a document, you see the print dialog box for the current printer; the printer shown on the Printer pop-up menu is determined by the preference you set (either the last printer you used or the default). You can choose any other printers that are installed on your Mac or those being shared on the network by using the Printer pop-up menu (see Figure 33.11). The Print dialog box contains a variety of pop-up menus and other tools you can use to configure a print job.
Figure 33.11 The list of printers available to your Mac, including any that are being shared with you over a network, is shown on the Printer pop-up menu.

There are two versions of the Print dialog box. The smaller version is shown in Figure 33.10. If you click the expansion triangle next to the Printer pop-up menu, the dialog box expands to the version shown in Figure 33.12.
Figure 33.12 Click the expansion triangle beside the Printer pop-up menu to expand the Print dialog box and see its extra options.
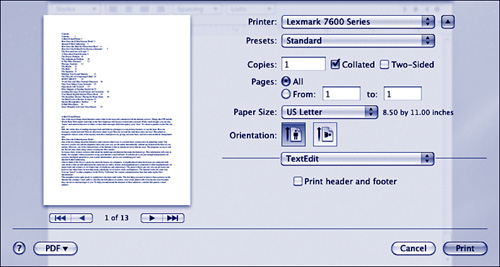
The specific options you see in the Print dialog box depend on the printer you are using and the application from which you are printing. Select the settings you want to configure from the third pop-up menu (counting the Printer and Preset pop-up menus as the first and second ones) and then configure those settings with the controls that appear in the lower part of the dialog box. Depending on the printer and application you are using, the options you have can include the following:
• Printer—You can use this pop-up menu to select a printer to which to print. You can also open the Printer Browser by selecting Add Printer. You can open the Print & Fax pane of the System Preferences application by choosing Print & Fax Preferences.
• Presets—You can switch between the standard settings for the selected printer, or you can save a custom configuration and switch to that one.
• Copies & Pages—These controls enable you to set the number of pages you want to print and choose the part of a document you want to print. Several applications also show a mini-preview of a document on the left side of the Print dialog or sheet.
• Two-Sided—If a printer is capable of duplexing, you can select the check-box to save paper when printing.
Most applications have specific print settings that you can configure, as well. A pop-up menu with the name of the current application appears on the Print dialog box or sheet and allows you to adjust the following print options:
• Layout—These commands enable you to control how many pages print per sheet of paper, the direction in which your document layout prints, and whether a border is printed.
• Scheduler—This pane enables you to schedule a print job.
• Paper Feed—These controls enable you to select a paper tray for the print job, or you can choose to do a manual feed.
• Print Settings—Controls in this pane enable you to choose a paper type and select from the print modes offered by a printer (such as color, black and white, draft, and so on).
• Image Quality—These controls enable you to determine the quality with which images are printed—to save toner, for example.
• ColorSync—This pane enables you to choose ColorSync options for the selected printer.
• Summary—The Summary area displays a description of the print job you have currently configured. This can be useful if you have configured a complex print job and want to check it before you run it.
Tip
![]()
In the Copies & Pages pane for most printers, you have the option to collate documents by checking the Collated check box. If you have ever had to hand-collate a large document, you will really appreciate this feature.
Some applications allow you to preview a print job by clicking the Preview button. The document opens in the Preview application and appears as it does in the printed version. When you’re ready to print, you can print it from that application. You can also see a preview by clicking the PDF pop-up menu and selecting Open PDF in Preview.
When you are ready to print, click Print or press Return.
After you have sent a document to a printer, the print proxy application for that printer opens. You know this because the Printer’s icon opens on the Dock and begins to bounce; you can click this to open the printer to access its queue application (see Figure 33.13). You can also monitor the status of print jobs by opening the Print & Fax pane in System Preferences and then either double-clicking the printer in the printer list or clicking the printer and then clicking Open Print Queue.
Figure 33.13 Clicking the printer’s icon on the Dock opens the queue for that printer.

With this tool, you can perform the following tasks:
• Click a print job and click Hold. The printer temporarily stops printing the current job and continues printing any other pending print jobs.
• Click Resume and the current job on hold starts printing again.
• Click Pause Printer to pause all current and pending print jobs.
• Click Resume Printer and the currently paused printer starts printing again.
• Click the Info button to open the Options & Supplies information for the printer.
• Click Printer Setup to open the printer’s utility software.
• Move print jobs up or down the list to change the order in which they print.
• Select a print job on the list and click Delete to remove the job from the queue.
Tip
![]()
Some additional actions can be useful for some printers. For example, you can click the Supply Levels button to check the amount of ink left in a printer’s cartridges if that action is supported by the printer you are using.
Sending Faxes with Mac OS X
With the rise of email, faxing documents isn’t something you are likely to need to do that often, but it can come in handy from time to time. Mac OS X has the capability to send and receive faxes. Of course, to use this capability, your Mac must have a modem installed and that modem must be connected to a working phone line. With the rise of broadband, this isn’t always the case. Modern Macs don’t include a dial-up modem by default; it is an optional device.
Note
![]()
If you’re like me and no longer have a dial-up modem, but you need to send a fax, check out the email-to-fax services that are available. These services allow you to send and receive faxes via an email application. You can find a lot of these services to choose from by doing a quick web search.
Receiving Faxes on Your Mac
To configure your Mac to receive faxes, do the following steps:
1. Connect your Mac’s dial-up modem or fax printer to a working phone line.
2. Open the Print & Fax pane of the System Preferences application.
3. Select your fax in the Printers list.
4. Enter the phone number to which you have connected your Mac’s modem in the Fax Number field.
5. Click Receive Options to open the Receive Options sheet.
6. Activate the Receive Faxes on This Computer check box, as shown in Figure 33.14.
Figure 33.14 Use the Receive Options sheet to set up your Mac to receive faxes.

7. Use the Answer After field to set the number of rings before your Mac answers the phone. Make sure this number is set before any answering machine or voice mail picks up the call.
8. If you want the fax to be saved as a file, activate the Save To check box and select the location in which you want fax files to be saved on the pop-up menu.
9. If you want the fax to be printed, activate the Print To check box and select the printer to which it should be printed on the pop-up menu.
10. If you want the fax sent via email, activate the Email To check box and type the email address (or click the Addresses icon and select the recipient from the Addresses dialog box).
11. Click OK.
12. If you want to be able to control faxing from the desktop, activate the Show Fax Status In Menu Bar check box. The Fax menu is added to the Mac OS X menu bar.
Tip
![]()
If you want to share your Mac’s faxing capability, for example when it is the only Mac connected to a phone line, activate the Share This Fax On the Network check box.
When the phone number to which your Mac is connected receives a call and the number of rings you set have occurred, your Mac answers the phone and attempts to receive a fax. If it receives one, it is saved or printed as indicated by your configuration choices.
Sending Faxes from Your Mac
You can send faxes from within any application on your Mac as easily as you can receive them.
Open the Print dialog box and then click the PDF menu. Choose Fax PDF and use the resulting tools to configure and send the fax.
Creating a PDF File
Portable Document Format (PDF) files are one of the most useful ways to output documents for electronic viewing. Any PDF document can easily be read by anyone using any computer platform. PDF documents maintain their appearance because they do not rely on fonts and other aspects of the system on which they are viewed.
Note
![]()
The free Adobe Reader application is also available for Mac OS X. This application offers more features for viewing PDFs than does Preview, but either application get the job done. To download a copy of Adobe Reader, visit get.adobe.com/reader/.
Under Mac OS X, PDFs are a native file format. You can create PDFs from within any Mac OS X application, and you can read PDF files with the Preview application.
To create your own PDF file, follow these steps:
1. Open the document for which you want to create a PDF.
2. Select File, Print, or press ![]() -P.
-P.
3. Open the PDF pop-up menu and choose Save as PDF. The Save dialog box appears.
4. Name the document and select a location in which to save it. Use the filename extension .pdf.
5. Complete the fields that appear for the PDF, which are Title, Author, Subject, and Keywords. This information is associated with the PDF file and is available to anyone who accesses the PDF.
6. Click Security Options. The PDF Security Options dialog box appears (see Figure 33.15).
Figure 33.15 You can secure a PDF you create using the Security Options dialog box.

7. To require that the viewer enter a password to be able to view the PDF, activate the Require Password to Open Document check box and enter the password in the Password and Verify boxes. In order to open the document, you need to provide the password you create to the people whom you want to be able to access it.
8. To protect content from being copied, activate the Require Password to Copy Text, Images and Other Content check box. With this box checked, viewers cannot select and copy the document’s content and paste it into other documents.
9. If you want to restrict the PDF from being printed unless the viewer has the correct password, activate the Require Password to Print Document check box and enter the password in the Password and Verify boxes. This can be the same as the open password or it can be a different one.
10. Click OK. The options you selected are set and the dialog box closes. You return to the Save dialog box.
11. Click Save. The PDF is created in the location you specified with the settings and other information you configured.
One thing to note is that creating a PDF in this way does not always create or preserve any hyperlinks in a document. For example, if you create a PDF of a web page in Safari, the links on that page will be functional. However, if you create a text document that contains a table of contents in which the entries are hyperlinked to the sections in the document, the resulting PDF may not contain active links. Being able to create a PDF from any document using the Print command is useful when you want to send your documents to other people.
Tip
![]()
Creating a PDF version of a document is also a great way to capture versions of that document at specific points in time for archival purposes.
To create PDFs that contain hyperlinks and other electronic document features, you may need to use a more sophisticated application. For example, Adobe applications can save documents in PDF format and preserve hyperlinks within those documents. Or, you can use the full Acrobat application to create more sophisticated PDFs from any application.
In addition to a standard PDF document, there are a number of other options on the Print sheet’s pop-up menu:
• Open PDF in Preview This command creates a temporary PDF of the page and opens the Preview application.
• Save as PostScript This creates a PostScript file for the document.
• Fax PDF This command presents you with the dialog boxes to specify the fax number to send the document to, as well as add a cover page. When you are ready, click Fax. Note that you must have a fax modem connected to your Mac for this option to work.
• Mail PDF This creates a PDF of the document and attaches it to an email message in your default email application.
• Save as PDF-X This commands saves the document in the PDF/X format which adds information intended to improve the reliability of printing the document. This format is intended to be used when the desired output of the document is a high-quality printed version. PDF/X files can be sent directly to a printer and be rendered more reliably than standard PDF files.
• Save PDF to iPhoto This creates a PDF version of the document and adds it to iPhoto.
• Save PDF to Web Receipts Folder This create a Web Receipts folder in your Documents directory (if it does not already exist.) This is a handy place to store all of the receipts for those late-night Amazon.com buying sprees.
• Edit Menu Use this command to edit the contents of the PDF menu. You can use the Add Command button (the plus sign) to add commands to the menu or the Remove Command button (the minus sign) to remove commands from the menu. These tools enable you to configure the menu so that it contains only those commands that you use regularly.
