5. Searching Your Mac
Looking for Things on Your Mac: A Modern Approach
It’s hard to believe that only a few years ago we spent much of our Mac time deleting or archiving unneeded or old files because we were in constant danger of running out of room on our hard disks. Now, with new Macs routinely shipping with hundreds of gigabytes of hard disk real estate, getting rid of files is no longer an issue because we have plenty of room to store everything, even things we don’t need.
Of course, this kind of digital pack rat behavior leads to a completely different problem: finding things. With a typical hard disk now home to thousands of our files, locating the document you need without wasting huge amounts of time is becoming increasingly problematic. Not only that, but these days we also have our data scattered across multiple types of information: documents, email messages, web pages, contacts, appointments, and more. Clearly, the days of locating information by browsing are long over. We need newer, faster, more efficient ways to find the data we want. Fortunately, Mac OS X includes not one, but two powerful tools you can use to find what you need on your Mac: Spotlight and Smart folders.
Searching Your Mac with Spotlight
One of the best features of Mac OS X is an amazingly powerful and yet easy-to-use tool for finding things on your Mac, regardless of what kind of “thing” it is. This tool is called Spotlight and it enables you to search your entire Mac quickly and easily.
The secret to Spotlight’s success is that it doesn’t simply examine filenames or file contents when it searches your Mac. It does those things, for sure, but it also goes a lot deeper by examining the various attributes associated with every file. These attributes include things like the email addresses and subject lines associated with email messages, the album name and song title for a music track, lens data such as aperture and exposure time for a photo, and so on. These attributes—which are also called metadata, because they’re data that describe data—enable you to perform incredibly targeted searches that help you quickly and efficiently find exactly what you’re looking for.
Best of all, Spotlight searches aren’t restricted to just your documents. A Spotlight search will also return applications, folders, email messages, bookmarks, contact information, even system preferences, so all your Mac is available for searching.
Configuring Spotlight
Although Spotlight is extremely simple to use as is, you can get more out of it by configuring Spotlight so that it works the way you prefer. Follow these steps to configure Spotlight’s preferences:
1. Open System Preferences.
2. Click Spotlight. By default, the Search Results tab is selected (see Figure 5.1).
Figure 5.1 Use the Spotlight pane to configure the items for which Spotlight will search.

3. Deactivate the check box beside each item you don’t want included in your Spotlight search results. For example, if you never search for fonts, deactivate the Fonts check box.
4. Set the keyboard shortcut you use to launch Spotlight using the Spotlight Menu Keyboard Shortcut check box and pop-up menu. The default is ![]() -spacebar, but you can change this to be a function key if you prefer.
-spacebar, but you can change this to be a function key if you prefer.
5. Use the Spotlight Window Keyboard Shortcut check box and pop-up menu to configure the keys you use to move into the Spotlight search results window. The default is ![]() -Option-spacebar, but you can use the pop-up menu to choose a function key instead.
-Option-spacebar, but you can use the pop-up menu to choose a function key instead.
6. Click the Privacy tab. You use this pane to select areas of your Mac that you don’t want Spotlight to search. For example, if you keep sensitive documents in a particular folder, you might want to block that folder from Spotlight searches.
7. Click the Add button (+) at the bottom of the pane. The Choose Folder sheet appears.
8. Move to the folder you want to shield, select it, and click Choose. That folder is added to the list and won’t be included in Spotlight searches.
9. Repeat steps 7 and 8 until you have protected all your sensitive folders.
Searching with Spotlight
With Spotlight configured to your liking, you’re ready to use it to search your Mac from the desktop.
To show you just how easy it is to use Spotlight, here’s a quick-and-dirty set of steps that you’ll use most of the time:
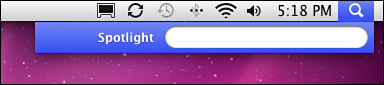
1. Click the Spotlight icon (the magnifying glass) in the upper-right corner of your desktop, or press ![]() -spacebar. The Spotlight search bar appears.
-spacebar. The Spotlight search bar appears.
2. Type your search text. Mac OS X immediately displays the matching items, organized by category.
3. If you see the item you’re looking for, click it to open it.
That’s all there is to it. Spotlight really is that easy. However, Spotlight also has hidden depths, so you should also know how to tap into its powerful features. To get started down that road, here’s a more in-depth look at the search process:
1. Click the Spotlight icon (the magnifying glass) in the upper-right corner of your desktop, or press the Spotlight menu keyboard shortcut (![]() -spacebar by default). The Spotlight search bar appears (see Figure 5.2).
-spacebar by default). The Spotlight search bar appears (see Figure 5.2).
Figure 5.2 Click the Spotlight icon to display the Spotlight search bar.
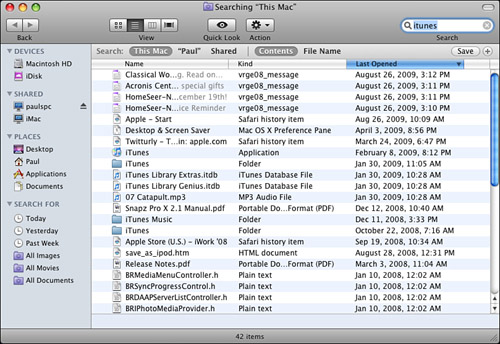
2. Type your search criterion in the search bar. As you type, Spotlight immediately begins searching your Mac and presents results in the Spotlight results window (see Figure 5.3). Here are some things to notice:
• At the top of the window is the Show All item, which you learn about in the next step.
• Just under Show All is the Top Hit, which is the item that Spotlight believes best matched your search criterion.
• Under Top Hit, the remaining results are organized by type, including Applications, System Preferences, Documents, Folders, Mail Messages, and so on.
Figure 5.3 This search has found many items that are associated with the “itunes” criterion, including applications, preferences, documents, a Dictionary definition, and so on.

Tip
![]()
You are probably used to typing a search term and then pressing the Return key. If you do this, you will be taken automatically to the Top Hit item. Try not to press the Return key, so you can see all of the matching results.
3. To open an item on the results list, select it. For example, if you select a document, it opens. If you select a folder, a Finder window opens so you can view its contents. If you select an application, it launches. When you switch to the item, Spotlight hides so you can more easily work with the result you selected.
Note
![]()
If you used the Spotlight preference pane to prevent a type from being included in Spotlight searches, that category doesn’t get searched and so won’t appear in the results window.
4. To return to the search results, click the Spotlight icon again. Your previous search results appear because Spotlight remembers your search until you indicate that you are done with it.
The results shown in the initial Spotlight window might be limited if there are a large number of them; as mentioned previously, the first item on the results list is the Show All option. This option presents every item that meets your search criterion.
5. To show all the results of a search, click Show All. The Spotlight window appears (see Figure 5.4). The Spotlight window behaves much like a Finder window, which is really what it is. For example, you can sort the window, change its view, and so on.
Figure 5.4 You can use the Spotlight window to display all of your search results and to change how they are listed.
The Spotlight window has many features, including the following:
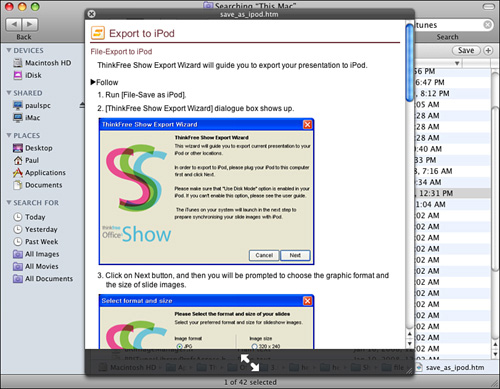
• Click the Quick Look button to display a preview of an item (see Figure 5.5). You can use the quick view area to preview some items. For example, you can listen to audio files, watch movies, and so on. Click the arrow button at the bottom of the Quick Look window to show the preview at full screen size.
Figure 5.5 Here, the Quick Look button has been clicked to see a preview of a web page.
• When you select a result, the path to it is shown at the bottom of the window.
Tip
![]()
You can move back to the Spotlight window or open it any time using the keyboard shortcut, which is Option-![]() -spacebar by default.
-spacebar by default.
• To open an item on the list, double-click it. The appropriate application or Finder window opens. You can return to the Spotlight window by moving back to the desktop.
• Minimize the Spotlight window to move it out of your way while you look at an item you found. You can jump back to the results by clicking the Spotlight menu button or using the keyboard shortcuts for the menu or window.
To clear a Spotlight search, click the “x” in the Spotlight search tool or close the Spotlight window.
Tip
![]()
Take advantage of Exposé (see Chapter 22) as you work with Spotlight results because that feature makes it easy to manage multiple open windows.
Saving Spotlight Searches
You can save Spotlight searches and run them again at any time.
1. Use the information in the previous section to perform a Spotlight search and open the Spotlight window.
2. Configure the results as you want to see them.
3. Click the Save button near the top-right portion of the Spotlight window.
4. Name the search and specify where to save it. The default is Saved Searches.
5. To add the saved search to the Sidebar, activate the Add to Sidebar check box.
6. Press Return to save it.
To run a saved search, you have two choices:
• If you activated the Add to Sidebar check box, click the search’s icon in the Search For section of the Sidebar.
Tip
![]()
To edit a saved search, first run the search as described in this section. Once the search results appear, click the Action menu and then select Show Search Criteria. The criteria for your search appear, and you can then edit those criteria (as described in the next section). When you have completed your changes, click the Save button.
• If you didn’t activate the Add to Sidebar check box, open a Finder window, select your home folder, open Library, open Saved Searches, and then launch the search icon.
When you save a Spotlight search, you save the search criterion, not the results. So, if new information that meets the search criterion has been added to your Mac, the next time you run the search, that information appears in the results.
Using Spotlight to Create Complex Searches
When you use Spotlight, you’ll probably get a lot of results. Because its searches are broad, the results are wide-ranging and might or might not be easy to work with. Perform the following steps to create and save complex searches:
1. Open a saved search.
2. Click the Action menu and choose Show Search Criteria. The search criteria bar is added to the Spotlight window (see Figure 5.6).
Figure 5.6 Use the search criteria and the search location bars to create complex Spotlight searches.

3. On the location bar, choose where the search should take place. For example, by default the search will take place across your entire Mac. To limit the search to just your Home folder, click your username in the location bar. Select whether the Spotlight should just return file names that match your search or also search the content of those files.
4. Use the search criteria bar to fine tune your search. Click the first pop-up menu to select an attribute, such as Last Modified Date. The search criteria bar will then change to show specific things to search for related to that attribute.
5. Click the Add button (+). Another search criterion appears.
6. Repeat step 4 to configure the new criterion.
7. Repeat steps 5 and 6 until you’ve added all the criteria to the search that you want it to include (see Figure 5.7).
Figure 5.7 This search looks for images in my Home folder that include text “dog.”

8. The search runs as you make the changes to the search criteria, and you see the results in the Spotlight window.
9. Click the Save button so that you can run this search again. You can rerun the search at any time by selecting it in the Search For section of the Sidebar.
Adding Spotlight Information to Folders and Files
You can use the Finder’s Info window to add metadata to files and folders so you can find them with Spotlight searches.
1. Use Finder to select an item.
2. Select File, Get Info or press ![]() -I to open the Info window.
-I to open the Info window.
3. Expand the Spotlight Comments section.
4. Use the Spotlight Comments box to type any extra information you want to associate with the file or folder. Your Mac searches the information you add when you perform Spotlight searches.
Searching Your Mac with Smart Folders
The Finder enables you to create smart folders. A smart folder displays its contents based on search criteria that you define, as opposed to a “regular” folder that displays items that have been manually placed within it. Even better, you can save smart folders so that you can repeat searches simply by refreshing the smart folders you create.
Just like Spotlight, smart folders search metadata so that there are many kinds of criteria you can use to search your Mac. Because of this, you can search by many different kinds of information, including the content of files and many attributes that aren’t even displayed in the Finder.
Smart folders, the Finder’s File, Find command (press ![]() -F), and the Spotlight window are all identical. You may get there in different ways, but the window, and the things you can do with it, are the same. As you further define your search criteria for a smart folder, you can save them to the Search For section of the Sidebar.
-F), and the Spotlight window are all identical. You may get there in different ways, but the window, and the things you can do with it, are the same. As you further define your search criteria for a smart folder, you can save them to the Search For section of the Sidebar.
Creating and Saving a Smart Folder
To search your Mac using a smart folder, perform the following steps:
1. Choose File, New Smart Folder or press Option-![]() -N. A new smart folder appears.
-N. A new smart folder appears.
2. Choose the location in which you want to search by clicking the appropriate Search location button. To search your entire Mac, click the This Mac button. To limit the search to your Home folder, click your short username. To search servers to which you are connected over a network, click Shared.
Next, you need to build the specific criteria that you want to use for the search.
3. Click the Add button (+) to show the first Search Criteria bar, which shows Kind by default.
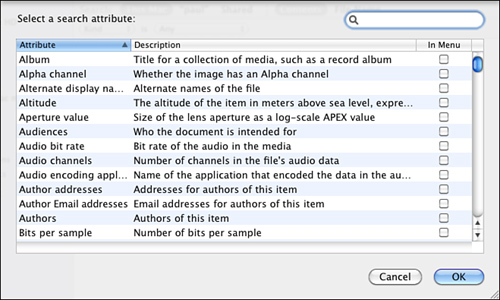
4. Choose the first criterion by which you want to limit your search. For example, to limit the search by the date something was last changed, choose Last Modified Date. If you choose the Other option, you’ll see a sheet that enables you to select from a very large number of options (see Figure 5.8). You can browse this list to see all of the criteria that are possible. A brief description is provided in the sheet for these options. To choose a criterion on this list, select it and click OK.
Figure 5.8 When you choose Other on a Search Criteria pop-up menu, you can choose from any of the possible search criteria.
After you have selected a criterion, controls appropriate for that criterion will appear. For example, when you choose a text criterion, a text box will appear. When you select a date criterion, a pop-up menu of options appears. If you choose Kind, a list of kinds of files appears as a pop-up menu.
Tip
![]()
You can search for a criterion by typing text in the Search box at the top of the Other sheet. As you type, the criteria shown in the sheet will be limited to those that match your search. To add a criterion to the Search Criteria pop-up menu, select it and check the Add to Favorites check box.
5. Configure the criterion you selected by entering text, making a choice from the pop-up menu, and so on.
In some cases, making a choice will result in additional tools you can use to configure the criterion. For example, if you choose Before for a date criterion, a date box will appear so that you can enter a date.
6. If an additional tool has appeared, such as a date box, complete the data for the criterion.
As you define criteria, the location you selected will be searched and items that meet the current search criteria will be shown in the Results section of the folder.
7. Click the Add button, which is the “+” at the end of each criterion’s row, to add another criterion to the search
8. Configure the next criterion with the same steps you did to configure the first one (steps 3 through 6).
9. To remove a criterion from the search, click the Remove button, which is the “-” at the end of each criterion’s row. That criterion is removed from the smart folder and will no longer impact the search.
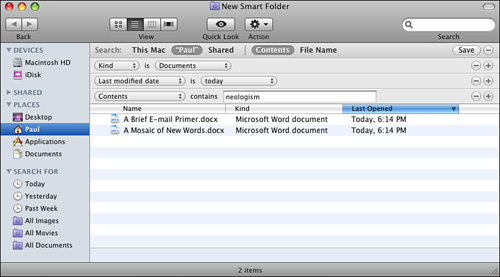
10. Continue adding, configuring, or removing criteria until you have fully defined your search (see Figure 5.9).
Figure 5.9 This search will find all documents modified today whose contents include the term “neologism.”
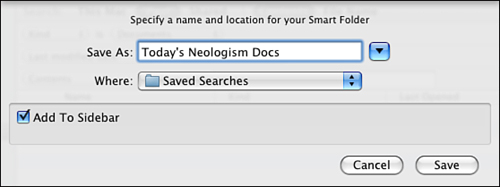
11. When the search is configured, click the Save button. You see a Save sheet.
12. Name your search, choose a location in which to save it, and determine whether it will be added to the Search For section of the Sidebar by checking or unchecking the Add To Sidebar check box, and then click Save (see Figure 5.10).
Figure 5.10 You can name and save the smart folders that you create so that you can repeat searches easily.
You return to the smart folder, which is named with the name you entered. If you opted to have the search added to the Search For section of the Sidebar, you see it there as well.
Following are some points to ponder when you are working with smart folders:
• If you don’t want to limit your search, don’t configure any search criteria. Instead just type the text or numbers for which you want to search in the Search box at the top of the smart folder’s window. This can be literally anything from text contained in documents, resolution of images, dates associated with documents, people’s names, and so on. As you start to type, your Mac begins its search and documents, folders, bookmarks, and anything else that meets your search text appear in the results section of the folder.
• You can open any item found by double-clicking on it. You can use any action or contextual commands on items as well, just as you can in a regular folder.
• If you click the Quick Look button (the “eye”) associated with an item, you see a preview of it in a new window.
• When you select an item in the results area, the path to its location is shown at the bottom of the window. You can double-click on any part of the path shown to open that part. For example, if the Pictures folder is part of the path shown, double-click on the Pictures icon to open that folder.
Tip
![]()
Want to find all the documents on your Mac that have changed recently so you can back them up? Create and save a smart folder with search criteria of Last Modified Since Yesterday and Kind Documents. The results will display all documents that have changed since yesterday.
• If you close a smart folder without first saving it, you’re prompted to do so.
• After you have saved a smart folder, when you open it again, the search tools are not visible. Use the Action menu to select Show Search Criteria to see the search parameters again.
• The default save location for smart folder searches is the Saved Searches folder located at /~username/Library/Saved Searches where /~username is your username. If you want to remove searches, open this folder and delete any smart folder files you want to remove from your computer. If you also added the smart folder to your Sidebar, you’ll need to remove its icon by dragging it off the sidebar.
Using Smart Folders
After you have created a smart folder, you can perform the search again by opening the smart folder. If you choose to add it to the Search For section of your Sidebar, click its icon. You see the current results of the search.
Note
![]()
When you save a smart folder, you save the search criteria, not the results. This means that each time you use the smart folder, the search is repeated. If something has changed such that an item now meets the search criteria, it will appear in the smart folder.
The smart folder’s window always shows the most current results of a search.
There are several ways to search with a saved smart folder:
• Place the smart folder in the Search For section of the Sidebar and click its icon.
• Drag the smart folder from its saved location onto the Dock. You can run the search by clicking the icon on the Dock.
• Select a smart folder’s icon and choose File, Open or press ![]() -O.
-O.
• Double-click the smart folder’s icon.
Tip
![]()
For immediate access to all your smart folders without cluttering up your Sidebar, store all the searches in one folder and add that folder to the Dock. Right-click the folder and you can immediately select any smart folder to open it.
Changing Smart Folders
You can change an existing smart folder, such as to change one or more of its search criteria.
1. Open the smart folder you want to change. The results are shown, but the tools to edit your search do not appear.
2. Click the Action menu and section Show Search Criteria.
3. Reconfigure the search by changing existing criteria, adding new ones, or removing them. You can also change the search location.
4. Click Save. The smart folder now contains the revised search criteria.
Keeping Your Mac Organized
You can make things easier to find on your Mac if you keep your files and information organized in logical ways and then are consistent about how you store data on your Mac. Often, this will eliminate the need to search because you’ll already know where to find what you’re looking for. Following are some pointers you might want to consider to reduce the time and effort you have to spend looking for information:
• Folders in the Finder Your Home folder includes some default folders, such as Documents, Music, and so on, that you can use to organize files and other information. These should be just a start for you; create folders within these folders to further organize your files. There’s really no limit to the number of folders you can create, and using the Column view, you can quickly get to any level of folder.
• Folders within applications Many applications, including iTunes, Address Book, iPhoto, and so on, enable you to create folders to organize data in those applications. Making good use of these tools often reduces the searches you need to do because you know where information is stored.
• Names Use meaningful names when you create files and folders. For example, when you are working on a project, apply the same prefix to all the folders and files associated with that project. When you view a Finder window in list or columns view, the files will naturally group themselves by the project prefix.
• Trash Get rid of files and folders when you are done using them. The more junk you have on your Mac, the harder it is to find things in which you are interested.