
14. Surfing the Web
Configuring Safari Preferences
The default web browser for Mac OS X is the excellent Safari application, one of the best browsers around, which may be why most Mac users stick with Safari rather than switching to a third-party browser such as Firefox. This chapter shows you how to browse the Web using Safari, but let’s first take a tour of Safari’s most useful preferences so that you can get it set up the way you want before heading out on the Web. Later sections in this chapter cover Safari’s preferences for bookmarks, RSS feeds, tabs, and the AutoFill feature.
To get started, select Safari, Preferences (or press ![]() -) to open Safari’s preferences dialog box.
-) to open Safari’s preferences dialog box.
Configuring Safari’s General Preferences
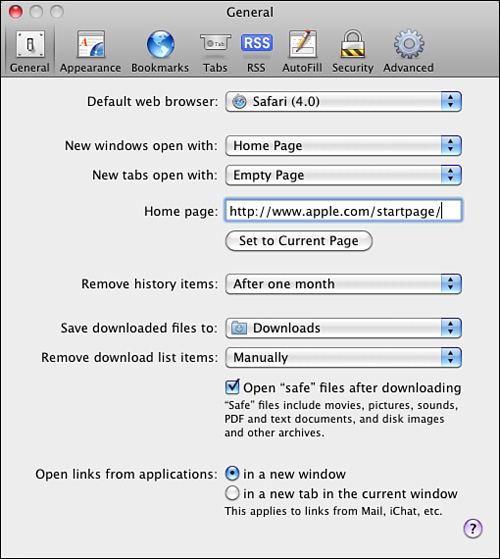
In the Safari preferences dialog box, click the General button to open the General pane (see Figure 14.1). The general preferences are explained in the following list:
• Default Web Browser—Use this pop-up menu to choose your default web browser, which is the browser Mac OS X will use to view web pages and to open web links. Initially, Safari is the option selected on the pop-up menu. However, you can choose Select and then pick another browser that you’ve installed on your Mac. This sets your browser preference for all areas of the OS.
• New Windows Open With—Use this pop-up menu to choose what happens when you open a new Safari window. The options are Home Page, Empty Page, Same Page, or Bookmarks. In most cases, Empty Page is the best choice because it doesn’t cause Safari to download a page that you probably don’t want to view anyway. However, if you frequently use bookmarks to move to a new page, that can be a useful option as well.
• New Tabs Open With—Use this pop-up menu to configure what Safari loads into a new tab: Top Sites, the Home Page; an Empty Page; the Same Page (that is, the page that’s in the current tab); or your Safari Bookmarks.
• Home Page—Type a URL in this text box to set it as your home page. Alternatively, you can move to the page you want to be your home page, open the General pane, and click Set to Current Page. The home page is displayed when you use the Home button or if you have it set to be displayed when you open a new Safari window or a new tab. If you leave the field blank, moving to the home page opens a new empty page.
• Remove History Items—Use this menu to choose when Safari deletes items from your history list, which is a log of the pages you’ve visited. The options range from one day to one year or Manually (which means you want to delete history items yourself).
Note
![]()
Setting a file download location, similar to choosing a default web browser, affects the OS—not just Safari. For example, if you use a download tool that uses your download location preference, such as Mail, that application uses the preference you set within Safari.
• Save Downloaded Files To—Use this pop-up menu to select the folder where you want Safari to save the files that you download. Mac OS X gives each user account a Downloads folder, and it’s a good idea to store your downloads there so you always know where to find them.
• Remove Download List Items—Use this pop-up menu to choose when items are removed from the Downloads window (you’ll learn about that later).
• Open “Safe” Files After Downloading—Activate this check box (it is activated by default) to allow Safari to automatically open downloaded files that can’t harm your Mac, such as images, movies, text file, sound files, and other content files. For all other files, particularly files that might cause damage to your system, such as applications, macros, and other suspicious files, you must open them manually after you download them.
• Open Links from Applications—You use these radio buttons to determine how Safari handles links in documents such as email messages. If you select the In a New Window radio button, a new Safari window opens and displays the page at which the link points; if you select In a New Tab in the Current Window, instead, the content at which the link points opens within a new tab in the current window.
Figure 14.1 The General pane enables you to configure important Safari behaviors.
Configuring Safari’s Appearance Preferences
Click the Appearance tab in the Safari Preferences dialog box to move to the Appearance pane. Here you can set the standard font, fixed-width font, and default encoding that is used when pages are displayed. (If a page uses a built-in style sheet, your options might be overridden by the style sheet, but most of the time, your preferences will be used.) To select a font, click the related Select button and use the Font panel to configure the font. To choose an encoding method, use the pop-up menu.
If you don’t want images to be displayed when a page is opened, deactivate the Display Images When the Page Opens check box. If you use a slow connection, you might want to deactivate this check box so you don’t waste time downloading images you aren’t interested in.
Configuring Safari’s Security Preferences
Safari has a number of good security features, some of which you can configure on the Security pane of the Safari Preferences dialog box (see Figure 14.2).
Figure 14.2 Use the Security pane to set how Safari manages the security of your Mac.
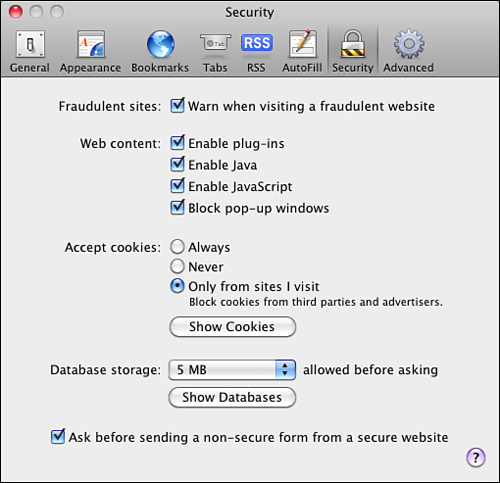
First, leave the Fraudulent Sites check box activated so that Safari will warn you if you surf to a phishing site or some other site that isn’t what it claims to be.
The Web Content controls determine whether certain types of content are enabled. These controls include:
• Enable Plug-Ins—Determines whether any Safari plug-ins, such as those for QuickTime, Flash, and so on, are enabled. If you disable the plug-ins, content that requires them is not displayed. I recommend you leave this check box activated because most content that requires such plug-ins is safe. And, except for the plug-ins installed by default, you will choose the plug-ins you want to install.
• Enable Java and Enable JavaScript—Java and JavaScript are two programming languages that can be used to execute complex operations within the Safari browser. For example, if you use a bank service, it likely uses JavaScript to deliver its functionality. Again, you should typically allow these types of content.
• Block Pop-Up Windows—If you have ever been annoyed by the numerous and obnoxious pop-up windows that appear when you visit some websites, you might think that this is the single best feature of Safari. If this option is activated, Safari does not allow a web page to open additional windows. This means that all pop-up windows that point to different URLs are blocked and you never have to see them.
Tip
![]()
If you block pop-up windows and a site that needs them doesn’t work properly, you can enable them again by selecting Safari, Block Pop-Up Windows or by pressing Shift-![]() -K. This toggles the pop-up window setting, so you can also use it to quickly allow pop-ups if you generally prevent them.
-K. This toggles the pop-up window setting, so you can also use it to quickly allow pop-ups if you generally prevent them.
Although blocking pop-up windows is mostly a good thing, some pop-up windows actually provide useful information and are necessary to get the most out of a website. If you block them, a site might not work well, or at all.
You use the Cookies radio buttons to determine how Safari deals with cookies it encounters. Typically, the Only from Sites I Visit radio button is the best setting because cookies often provide a useful service for the sites you intentionally visit, such as shopping sites. If you want to block all cookies, click Never. I don’t recommend that you use the Always option.
To see the cookies that have been accepted, click the Show Cookies button. A sheet appears that shows you all the cookies that have been downloaded to your Mac (prepare to be astounded at their number!). In addition to the information you see about the cookies, you can select cookies and either click Remove to delete them or click Remove All to delete all the cookies on your Mac. It’s not a bad idea to review this list from time to time and delete any cookies you can’t recognize (or at least recognize where they came from). If a site needs a cookie to function, it will create it again, although you might lose some of your customized information on that site.
If you want Safari to warn you when you send nonsecure information from a secure site, leave the Ask Before Sending a Non-Secure Form from a Secure Website check box activated.
Configuring Safari’s Advanced Preferences
To see Safari’s Advanced preferences, click the Advanced tab on the Safari Preferences dialog box. The Advanced preferences consist of universal access, style sheet options, and proxy settings.
Use the Universal Access controls to set a minimum font size or to control Tab key behavior.
If you have a style sheet you want Safari to use, you can add it by selecting Other on the Style Sheet pop-up menu and then selecting the sheet you want to install. If you add more than one sheet, you can select that sheet you want to use on the Style Sheet pop-up menu.
Note
![]()
Cascading style sheets can be used to determine the formatting for web pages. Many pages use these sheets. If not, a page is presented based on Safari’s own interpretation of the HTML and the other code of which the page is composed.
You can use the Proxies button to access the Proxies tab of the Network pane of the System Preferences application.
Browsing the Web with Safari
I’m going to assume that you’re comfortable with the basics of using Safari, such as using its buttons, navigating the Web by clicking links and entering URLs in the Address bar, and so on. In this section, you learn about some of Safari’s great features that might not be quite so obvious.
Configuring Safari’s Window
By default, Safari’s window is pretty standard looking. However, using the options on the View menu, you can customize the Safari browser experience to suit your preferences. On that menu, you have the following options:
• Back/Forward—The Back and Forward buttons do just what you expect.
• Top Sites—This button displays the Top Sites window.
• Home—This button takes you back to your home page.
• New Tab—This button creates a new tab.
• History—This button displays the History list.
• Bookmarks—This button displays the Bookmarks window.
• Add Bookmark—Use this to show or hide the Add Bookmark button.
• Bookmarks Bar—This button toggles the Bookmarks Bar on and off
• AutoFill—If you click the AutoFill button, a form is completed with information from your card in your Address Book (more on this feature later).
• Zoom—These buttons enable you to increase or decrease the size of text being displayed on a page (if you have ever squinted while trying to read a page designed for Windows computers, you know why increasing the size of text on a page can be a good thing!).
• Open in Dashboard—This button enables you to capture all or part of a web page as a widget on the Dashboard. More on this tool later in this chapter.
• Mail—This button creates a new Mail message with the current page title as the subject line, and a link to the page in the message body.
• Print—Use this to print the page being displayed.
• Downloads—This button displays the Downloads window.
• Report Bug—When you click this button, you can send a bug report about Safari to Apple.
• Address—This tool can be used to enter or show a URL.
Tip
![]()
Some of the optional tools are also available as commands on the View menu, such as Reload Page, Make Text Bigger, and so on.
• Google Search—The Google Search tool is a great way to search for information, as you will learn in a later section.
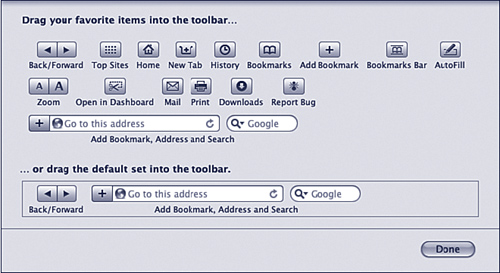
Figure 14.3 You can customize the Safari toolbar by dragging items from this sheet and dropping them on the toolbar.
Browsing and Configuring RSS Feeds
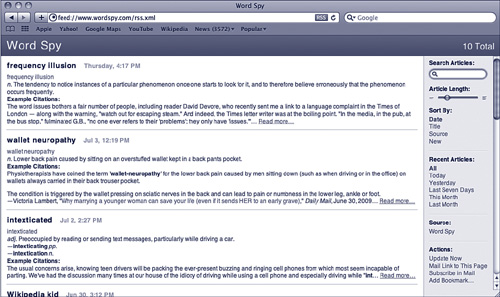
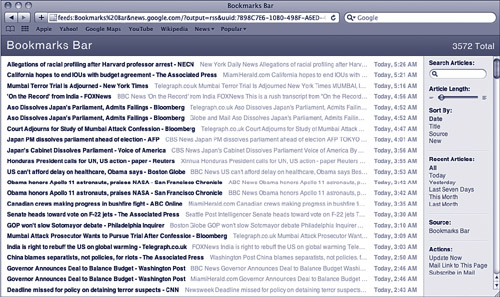
Safari supports Rich Site Summary (RSS) web feeds. RSS feeds provide a summary of articles and other information on a website so you can more efficiently browse information and then drill down into the information in which you are interested (see Figure 14.4). On an RSS feed page, you see a headline for each element on the page. You can scroll up and down the page to browse the headlines. When you find something interesting, click the headline or the Read More link. You’ll move to the article on a regular web page and can read its information. When you are done, click the SnapBack or RSS button to return to the RSS feed.
Figure 14.4 A typical RSS feed page.
Note
![]()
The articles you move to from some RSS feeds will cause the SnapBack button, RSS button, or both to appear in the Address bar. It doesn’t matter which button you use—both will return you to the RSS feed.
Browsing RSS Feeds
In addition to these handy features, there are several other things you need to know about RSS feeds:
• The URL for an RSS feed will start with feed:// rather than http://. When an RSS feed is loaded into your browser, you’ll also see the RSS button at the right end of the Address bar.
• When you view a regular website and the RSS button appears in the Address bar, an RSS feed is available for that website. Click the RSS button to view the RSS feed.
• Use the Search Articles tool to search the contents of the feed. If you enter a search term and then create a bookmark, your search will be saved as a bookmark so you can repeat it easily.
• Use the Article Length slider to set the length of the summaries you see on a feed page. With the slider all the way to the right, you see the full entry. If you move the slider all the way to the left, you only see the headline, the first few words of the entry, and the date for each story.
• Use the scope tools to configure the contents of the RSS page. For example, you can sort the articles using the Sort By options. You can choose the timeline for the articles you see with the Recent Articles options, for example, by choosing Today to see only articles that are published on the current day.
• The source of information for an RSS feed is shown in the Source area.
• Any actions available for the feed, such as a link to enable you to email it, are shown in the Actions area.
• Safari includes a number of bookmarked RSS feeds by default. To view these, choose Bookmarks, Show All Bookmarks. Then click the All RSS Feeds collection.
• Safari can automatically check for updates to RSS feeds and add them to the feed page. When new articles appear for a feed, the number of new articles is shown next to the feed’s bookmark in the Bookmarks bar.
• You can view all the RSS feeds referenced in a bookmark folder that contains them by selecting Bookmarks, Bookmarks Bar, View All RSS Articles. In the resulting page, you see all the RSS feeds from all bookmarks in that folder (see Figure 14.5).
Figure 14.5 If you choose View All RSS Articles, you see a page containing articles from all the RSS feeds in that folder of bookmarks.
![]() To learn how to read RSS feeds in Mail, see “Working with RSS Feeds,” p. 345.
To learn how to read RSS feeds in Mail, see “Working with RSS Feeds,” p. 345.
Configuring Safari’s RSS Preferences
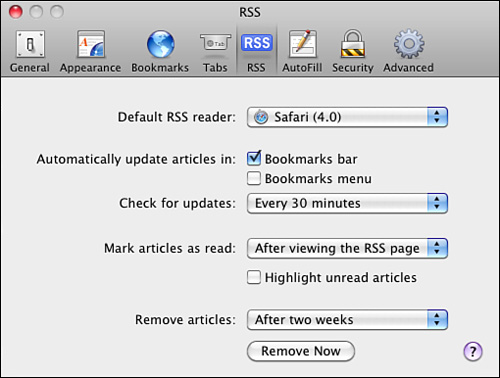
There are many aspects of working with RSS feeds that you can configure using the RSS tab of the Safari Preferences dialog box (see Figure 14.6):
• Set the default RSS reader on the Default RSS Reader pop-up menu. If you want to use something other than Safari or Mail, choose Select and then navigate to and choose the application you want to use to read RSS feeds.
• Use the Bookmarks Bar and Bookmarks Menu check boxes to tell Safari if you want the RSS feeds in these areas to be updated automatically. If you activate at least one of these, use the Check for Updates pop-up menu to set how frequently Safari updates the activated items. The options are Every 30 Minutes, Every Day, Every Hour, and Never (select Never if you don’t want articles to ever be automatically downloaded to your Mac).
• If you want new articles highlighted with a color, activate the Highlight New Articles check box.
• If you want RSS articles automatically removed after a specific amount of time, choose the time on the Remove Articles pop-up menu. The times available range from after one day to never.
• To remove all articles, click the Remove Now button. If you click Remove Now in the resulting prompt, all RSS articles that have been downloaded to your Mac will be deleted.
Figure 14.6 Use the RSS pane of the Safari Preferences dialog box to customize the way RSS feeds work.
Searching with Safari
Of course, you can use Safari to access the many web search engines available, such as Yahoo, Lycos, and so on. You do this by visiting that search engine’s site.
Note
![]()
If you don’t see the Google Search tool, make sure the Address bar is displayed and that the Google search tool has been added to the Address Bar (it is by default).
However, you can access one of the best search engines, Google, directly from the Safari Address bar. This enables some great features, most notably the SnapBack button.
To search the Web using the built-in Google search tool, do the following:
1. Type your search text in the Search tool and press Return. You jump to Google and the results of your search are displayed (see Figure 14.7).
Figure 14.7 Safari’s built-in search tool enables you to quickly search on Google.

2. Use a link on the results page to move to a page that looks promising (see Figure 14.8).
Figure 14.8 The SnapBack button enables you to return to the Google search results page.
3. To return to the results page so you can try other links, click the SnapBack button; select History, Search Results SnapBack; or press Option-![]() -S.
-S.
Performing a Google search from within Safari is fast and easy. Here are few tips:
• To repeat a previous search, click the magnifying glass icon in the search tool; then on the pop-up menu, select the search you want to repeat.
• To clear the searches you have performed, click the magnifying glass icon in the search tool; then on the pop-up menu, select Clear Recent Searches.
• To clear the current search (when the Google page is being displayed), click the x button inside the search field.
Using Safari SnapBack
Using the SnapBack button when you search with the Google search tool is great, but you can also use this feature when you are browsing. Safari marks the first page you visit on any site as the SnapBack page. As you move to other pages on the site, you can return to the SnapBack page by clicking the SnapBack button shown at the end of the URL of the page you are currently viewing. You then move back to the SnapBack page for that site.
Here are two more SnapBack tips:
• You can mark a page to be the SnapBack page for a site by either selecting History, Mark Page for SnapBack or pressing Option-![]() -K. Whenever you click the SnapBack button, you return to this page. (If you don’t set a SnapBack page, you return to the first page on the site.)
-K. Whenever you click the SnapBack button, you return to this page. (If you don’t set a SnapBack page, you return to the first page on the site.)
• You can also return to the SnapBack page by selecting History, Search Results SnapBack or pressing Option-![]() -S.
-S.
Using Safari Bookmarks
Like all other browsers, Safari enables you to bookmark web pages so you can easily return to them. And, also similar to other browsers, Safari provides tools you can use to organize your bookmarks. However, Safari’s bookmark tools are more refined and powerful than most of the browsers I’ve used.
Configuring Safari Bookmarks Preferences
Open the Bookmarks pane of the Safari Preferences dialog box to configure your bookmark preferences. On this pane, you have the following options:
• Bookmarks Bar—The three Include check boxes determine whether Top Sites, Address Book and Bonjour sites are accessible from the Bookmarks bar.
If you make your Address Book available from the Bookmarks bar, you can access any websites associated with cards in your Address Book by selecting the site you want to visit on the Address Book menu. This is a very cool way to quickly access the website for anyone or any company in your Address Book.
Similarly, you can make all the Bonjour computers that provide services Safari can access available via the Bonjour menu. This enables you to quickly move to web, FTP, or other resources on your local network.
• Bookmarks Menu—This area enables you to add your Address Book and Bonjour sites to the Bookmarks menu. Additionally, you can include all the Bookmarks bar’s bookmarks on the Bookmarks menu by activating the Include Bookmarks Bar check box.
• Collections—Safari uses the term collections for groups of bookmarks. You can use collections to organize bookmarks; a number of collections are included by default. You use the Bookmarks window to work with these (this is covered later in this section).
• Synchronize—If you use machines in different locations, you might find yourself adding bookmarks on one machine and not being able to use those bookmarks when you are working on another machine. If you have a MobileMe account, you can synchronize your bookmarks across many machines so they all have the same set. To do this, activate the Synchronize Bookmarks with Other Computers Using MobileMe check box and click the MobileMe button. The MobileMe pane of the System Preferences application opens and you can use the Sync tab to configure synchronization.
![]() To learn how to configure MobileMe synchronization, see “Using MobileMe to Synchronize Important Information on Multiple Macs,” p. 435.
To learn how to configure MobileMe synchronization, see “Using MobileMe to Synchronize Important Information on Multiple Macs,” p. 435.
Accessing Safari Bookmarks
You can use bookmarks in the following ways:
• Click a bookmark on the Bookmarks bar.
• Select a bookmark on the Bookmarks menu.
• Press ![]() -1 to move to the first bookmark on the Bookmarks bar (not counting menu items on the bar),
-1 to move to the first bookmark on the Bookmarks bar (not counting menu items on the bar), ![]() -2 to move to the second one, and so on up to
-2 to move to the second one, and so on up to ![]() -9 to move to the ninth one listed on the Bookmarks bar. This only works for bookmarks, not for folders. If an item is a folder, you must select it using the mouse.
-9 to move to the ninth one listed on the Bookmarks bar. This only works for bookmarks, not for folders. If an item is a folder, you must select it using the mouse.
• Open the Bookmarks window and double-click a bookmark.
• Open the Address Book or Bonjour menu on the Bookmarks bar and select a site to visit.
• Open a bookmark’s contextual menu and select either Open, Open in New Window or Open in New Tab.
Setting Safari Bookmarks
You can bookmark web pages with the following steps:
1. Move to the page you want to bookmark.
2. Select Bookmarks, Add Bookmark or press ![]() -D. The Add Bookmark sheet opens.
-D. The Add Bookmark sheet opens.
3. Edit the name of the bookmark. You can use the default name, change it, or replace it with one of your choosing.
4. On the pop-up menu, select the location in which you want the bookmark to be stored. You can select Bookmarks Bar to add the bookmark to the Bookmarks bar, any folder to place the bookmark in that folder, or Bookmarks Menu to place the bookmark on the Bookmarks menu.
Tip
![]()
You can add a bookmark to the Bookmarks bar by dragging across the URL in the Address bar and dropping it on the Bookmarks bar. In the resulting name sheet, edit the name of the bookmark and click OK. The bookmark will be added to the Bookmarks bar so you can access it from there.
5. Click Add or press Return. The bookmark will be added in the location you selected.
Organizing Safari Bookmarks
Use Safari’s Bookmark tools to organize your bookmarks. You can determine the location of bookmarks, place them in folders to create hierarchical bookmark menus, rename them, and so on. To do these tasks, open the Bookmarks window by clicking the Bookmarks button at the left end of the Bookmarks bar, by selecting Bookmarks, Show All Bookmarks, or by pressing Option-![]() -B. The Bookmarks window opens (see Figure 14.9).
-B. The Bookmarks window opens (see Figure 14.9).
Figure 14.9 The Bookmarks window enables you to organize your bookmarks.

In the left pane of the window is the list of collections (groups or folders of bookmarks). At the top of the list is the History collection, which contains a list of sites you have visited, followed by the Bookmarks Bar and Bookmarks Menu collections that contain the bookmarks in those areas. Under those are the Address Book and Bonjour collections. At the bottom is the All RSS Feeds collection that contains all your RSS feeds. If you create your own bookmark folders, they get added on to the bottom of this list.
To view the contents of a collection, select it. The bookmarks it contains are shown in the right pane. For each bookmark, its name and address will be shown. If an item in the collection is a folder, you will see the folder along with its expansion triangle; click this to expand the folder’s contents.
Organizing bookmarks is straightforward:
• Move bookmarks from one collection to another by dragging them onto the collection in which you want to place them. For example, to move a bookmark from the Bookmarks bar to the Bookmarks menu, drag it from the Bookmarks Bar collection to the Bookmarks Menu collection.
• Create new collections by clicking the New Collection button (the +) at the bottom of the Collections pane.
• Create a new folder in a collection by clicking the New Folder button (the “+”) at the bottom of the Bookmarks pane.
• Rename a collection, folder, or bookmark by selecting it, opening the contextual menu, and selecting Edit Name.
• Change the URL for a bookmark by selecting it, opening the contextual menu, and selecting Edit Address.
• Move to a URL by double-clicking it or opening its contextual menu and choosing Open, Open in New Window, or Open in New Tab at the end of this sentence.
• Add a folder to the Bookmarks Bar or Bookmarks Menu collections by selecting Add Bookmark Folder from the Bookmarks menu. Then place bookmarks in the folder you created. When you select the folder in either location, a pop-up menu appears to enable you to quickly select any bookmarks in that folder.
• If you activate the Auto-Click check box for a folder, all the bookmarks in that folder will open, with each bookmark appearing in a separate tab, when you click the folder’s button on the Bookmarks bar or choose it on a menu.
• Search your bookmarks using the Search tool at the top of the Bookmarks pane. Using the Magnifying Glass pop-up menu, you can choose to search in the selected collection or in all collections. After you’ve searched, you can scope the results by clicking the button with the name of the collection you are searching or All to show the bookmarks in all collections.
Tip
![]()
Put the bookmarks you use most often on the Bookmarks bar or Bookmarks menu because you can get to them most quickly there (if you have so many that they become cluttered, use folders to keep them organized). In the next section, you learn a technique that enables you to open an entire folder of bookmarks with a single click.
• Delete a collection, folder, or bookmark by selecting it and pressing Delete or by opening its contextual menu and choosing Delete. If you delete a folder or collection, you will also delete any bookmarks contained in those items.
Using Safari Tabs
If you have spent any time on the Web, you have no doubt seen the benefits of having many web browser windows open at the same time. Of course, you can do this with Safari by selecting File, New Window or pressing ![]() -N. If you have done this, you also know that after opening more than a couple of windows, moving back to specific windows can be cumbersome. That is where Safari’s Tabs feature comes in. You can open many pages within the same window; each web page appears as a tab. You then select the tab to view that page.
-N. If you have done this, you also know that after opening more than a couple of windows, moving back to specific windows can be cumbersome. That is where Safari’s Tabs feature comes in. You can open many pages within the same window; each web page appears as a tab. You then select the tab to view that page.
Configuring Tabs
First, configure the Tab feature by opening the Tabs pane of the Safari preferences dialog box (see Figure 14.10).
Figure 14.10 Configure tabs to open many windows on the Web in a single Safari window.

To configure tabbed browsing, follow these steps:
1. To open a new tab when you ![]() -click a link, activate the
-click a link, activate the ![]() -click Opens a Link in a New Tab check box. As you come across links on pages, you can open the link in a new tab by holding down the
-click Opens a Link in a New Tab check box. As you come across links on pages, you can open the link in a new tab by holding down the ![]() key when you click the link.
key when you click the link.
Tip
![]()
The previously mentioned preference affects what the tab keyboard shortcuts do. If you don’t enable this preference, you have to physically select a tab after you create it to view it. I have assumed that this preference is enabled for the rest of this section.
2. If you want new tabs to be selected, so the page on the tab is displayed, as soon as they are created, activate the When a New Tab or Window Opens, Make It Active check box.
3. If you want to confirm when you close multiple pages at the same time, activate the Confirm Before Closing Multiple Tabs or Windows check box. If this isn’t activated, you can close multiple pages without being prompted to confirm that action.
Tip
![]()
Notice the keyboard shortcuts at the bottom of the Tabs pane. These are important tips that help you work with tabs effectively. If you can’t remember them, they are listed in the next section and in Table 14.1 at the end of this chapter. The keyboard shortcuts you see depend on the check boxes that are activated. For example, if you unactivate the first check box, you see a different set of actions for the keyboard shortcuts than you do with it activated.
Using Cool Safari Tab Tricks
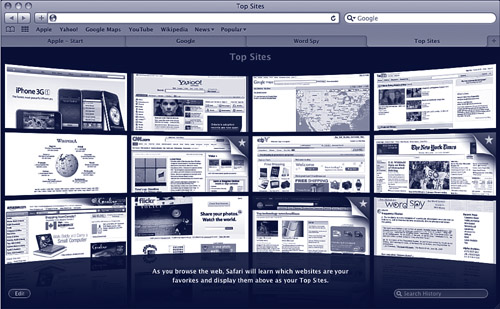
After you have enabled tabs, the Safari window contains a tab for each web page you have opened. To open a new tab, select File, New Tab, or press ![]() -T.Safari displays the Top Sites page by default, as shown in Figure 14.11.
-T.Safari displays the Top Sites page by default, as shown in Figure 14.11.
Figure 14.11 Safari 4 displays the Top Sites page when you open a new tab.
Following is a list of tab tricks:
• Click a tab to view its web page. The tab currently being displayed is highlighted.
• To close a page, click the x button in its tab. The tab and page close.
• To open a page in a new tab and move to it, ![]() -click a link or bookmark.
-click a link or bookmark.
Note
![]()
The previous four actions are reversed if you deactivate the When a New Tab or Window Opens, Make It Active preference. For example, you would ![]() -Shift-click a link or bookmark to open it in a tab and view it.
-Shift-click a link or bookmark to open it in a tab and view it.
• To open a new tab without viewing it, ![]() -Shift-click a link or bookmark.
-Shift-click a link or bookmark.
• To open a link or a bookmark in a new window and view it, ![]() -Option-click it.
-Option-click it.
• To open a link or a bookmark in a new window but move the new window to the background, ![]() -Option-Shift-click it.
-Option-Shift-click it.
• To move into the next tab, choose Window, Select Next Tab or press Shift-![]() -].
-].
• To move into the previous tab, choose Window, Select Next Tab or press Shift-![]() -[.
-[.
Tip
![]()
If you don’t enable Auto-Click for a folder of bookmarks, you can open all the bookmarks it contains in tabs by opening its menu on the Bookmarks bar and choosing the Open in Tabs command. Also, you can open individual bookmarks within an Auto-Click collection by opening the collections menu on the Bookmarks bar and choosing the page you want to open.
Okay, I have saved the coolest thing about Safari for this moment: Safari enables you to open as many pages as you want by clicking a single bookmark for a collection. Each page included in the group opens in a new tab. If you frequently open the same set of pages, you can click a single bookmark to open them all at the same time.
First, create the group of bookmarks you want to open:
1. Open the Bookmark window and create a folder in the Bookmarks Bar collection.
Tip
![]()
To make moving bookmarks into folders within collections easier, open a second Safari window and view the Bookmarks window. You can drag bookmarks from the first window onto the second to move them among collections.
2. Activate the Auto-Click check box for the folder you created.
3. Place bookmarks for all the sites you want to open simultaneously in the folder you created in step 1.
Close the Bookmarks window and click the button on the Bookmarks bar for the folder you created in the previous steps. Every page opens in its own tab. Working with a set of web pages has never been so easy.
![]() To learn how to use the Automator, see Chapter 25, “Making Your Mac Do the Work for You with the Automator,” p. 515.
To learn how to use the Automator, see Chapter 25, “Making Your Mac Do the Work for You with the Automator,” p. 515.
Tip
![]()
You can use Automator to create an application that will open websites for you. You can add this application to your Login Items so they automatically open for you each time you log in.
Using Safari AutoFill
If you access services on the Web, such as travel planning, shopping, banking, and so on, you no doubt have a lot of experience filling out the same information time and time again. Completing a web form is fun the first time, but after completing your address, phone number, username, and password a few dozen times, it gets old. This is where Safari’s AutoFill feature comes in. It enables you to complete various kinds of information automatically or at the click of the AutoFill button.
Using AutoFill, Safari can enter the following types of information for you:
• Your Address Book information—Safari can access the information stored on your card in your Address Book. This can include your address, phone number, website, and so on.
![]() To learn how to configure the information on your card in your Address Book, see “Editing Your Own Address Card,” p. 221.
To learn how to configure the information on your card in your Address Book, see “Editing Your Own Address Card,” p. 221.
• Usernames and passwords—Safari can capture your username and password at many websites. When you return to those sites, your username and password are entered for you automatically.
• Information entered on various websites—As you provide information in other types of websites, Safari can gather this data and remember it so that the next time you visit a site, you can complete any information by clicking the AutoFill button.
Configuring AutoFill
First, you need to tell Safari which AutoFill features you want to use by configuring your AutoFill preferences:
1. Press ![]() -, to open the Preferences dialog box.
-, to open the Preferences dialog box.
2. Click the AutoFill tab to open the AutoFill pane (see Figure 14.12).
Figure 14.12 Using Safari’s AutoFill feature saves you a lot of typing.

3. If you want Safari to be able to enter the information from your Address Book card, activate the Using Info from My Address Book Card check box.
4. If you want Safari to capture usernames and passwords at various websites you use, activate the User Names and Passwords check box.
Tip
![]()
If you click any of the Edit buttons, you can edit the AutoFill information for that area. For example, if you click the Edit button for the Address Book, the Address Book application will open and you will see your Address Book card in the edit mode so you can make changes to it. If you click Edit for user names and password, a sheet appears on which you see the websites for which Safari has remembered this information. You can remove individual sites by selecting them and clicking Remove.
5. If you want Safari to capture other types of information you enter on the Web, activate the Other Forms check box.
6. Close the Preferences dialog box.
Using AutoFill
Using AutoFill is straightforward.
To enter your personal information from your Address Book card, use the following steps:
1. Move to a web page that requires your personal information, such as name, address, and so on.
2. Click the AutoFill button on the Address Bar; select Edit, AutoFill Form; or press Shift-![]() -A. Safari will transfer the information from your card in your Address Book and place it in the appropriate fields on the web form.
-A. Safari will transfer the information from your card in your Address Book and place it in the appropriate fields on the web form.
Tip
![]()
If you find AutoFill consistently not entering specific information, add that information to your card in your Address Book.
3. Review the information that was entered to ensure that it is correct. AutoFill isn’t perfect and sometimes web forms use slightly different terms for data.
To use the username and password feature, do the following steps:
1. Move to a website that requires a username and password.
2. Enter your username and password on the page.
Caution
![]()
The username and password feature is convenient, but you shouldn’t use it unless you are the only one who uses your Mac OS X user account or the people who share your Mac OS X user account are very trustworthy. Because the usernames and passwords for your accounts are entered automatically, anyone who uses your Mac OS X user account and moves to the related websites can log in to your account on that website.
3. Click Login. You will be prompted about whether you want Safari to capture the username and password for this site.
4. In the prompt, make one of the following choices:
• Click Yes if you want the information to be added to AutoFill.
• Click Not Now if you don’t want the information to be captured at this time but want to be prompted the next time you access the site.
• Click Never for This Website if you don’t want the information captured and never want to be prompted again.
If you click Yes, the next time you visit the website, your username and password will be filled in automatically. All you have to do to log in to the site is click the Login button or link.
If you decide you don’t want to provide automatic access to a specific website, you can remove that site’s username and password:
1. Open the AutoFill pane of the Safari Preferences dialog box.
2. Click the Edit button next to the text User Names and Passwords. A sheet appears that lists each website and username you have captured in Safari.
Tip
![]()
Click Remove All to delete all the websites for which you have captured usernames and passwords.
3. Select the website you want to remove.
4. Click Remove. Continue removing websites until you have removed all the sites you no longer need.
5. Click Done and close the Preferences dialog box.
Using the AutoFill feature for other kinds of forms is similar to the first two. When you enable the Other Forms feature and enter information in websites, that information is captured. When you return to those sites in the future, you can enter the information again by clicking the AutoFill button; selecting Edit, AutoFill Form; or pressing Shift-![]() -A. You can edit the list of websites for which information is remembered by clicking the Edit button next to the Other Forms check box on the AutoFill pane of the Safari Preferences dialog box.
-A. You can edit the list of websites for which information is remembered by clicking the Edit button next to the Other Forms check box on the AutoFill pane of the Safari Preferences dialog box.
Note
![]()
If you don’t turn off the username and password feature by deactivating the User Names and Passwords check box, you will be prompted by AutoFill the next time you visit any websites you deleted from the list.
Creating Web Widgets
Mac OS X’s Dashboard feature is a great way to quickly get to specific information and tools. You can use Safari to add websites or parts of websites as widgets on your Dashboard so you can work with your custom web widgets just like other widgets on your Dashboard.
To create a web widget, do the following steps:
1. Move to the webpage you want to capture.
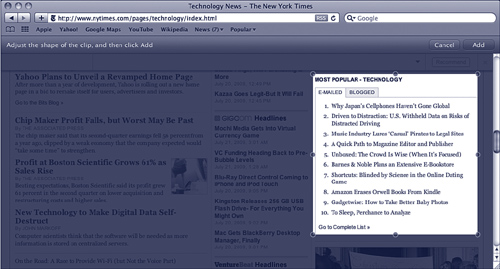
2. Select File, Open in Dashboard. The Dashboard capture bar appears along with the selection box that jumps to an element of the page that can be captured as a unit. The rest of the page is darkened to show it is not part of the capture (see Figure 14.13).
Figure 14.13 You can capture part of a web page and place it on your Dashboard with just a couple of mouse clicks.
3. If the selected portion of the page is not the part you want, move the mouse pointer around the page. As you do, other sections of the page are highlighted.
The capture tool is designed to capture specific document object model (DOM) elements of a page. As you move the pointer, the next closest DOM element is highlighted. These elements are rectangular boxes of various sizes; some will have content, others may not.
4. After the element you want to capture is selected, click it. Resize handles appear around the selection box, as shown in Figure 14.13.
5. Change the size of the selection box to include only the portion of the page you want to capture.
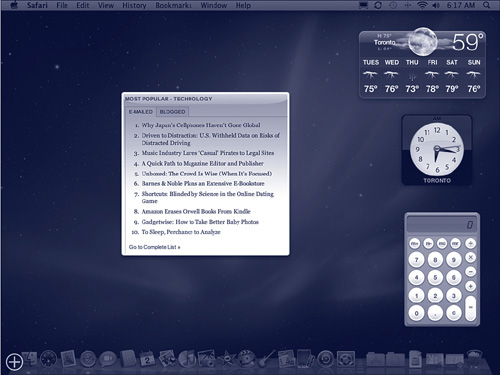
6. When the selection box reflects the widget you want to create, click the Add button. The widget is created, the Dashboard opens, and you see the widget you created (see Figure 14.14).
Figure 14.14 A section of a web page added to a widget on the Dashboard.
7. Click the info button (the lowercase “i”) on the widget you created. The configuration controls appear.
8. Choose a theme for the widget by clicking it; themes change the borders of the widget.
9. If the widget includes audio, activate the Only Play Audio in Dashboard check box so that its audio only plays while the Dashboard is active. Otherwise, the widget’s audio might play all the time, which is probably not what you want.
10. To change the size of the widget, click Edit and then resize it. Click Done.
11. When you’re happy with the changes you made, click Done to save your changes and return to the widget.
![]() To learn about the Dashboard, see Chapter 28, “Working with the Dashboard and Widgets,” p. 561.
To learn about the Dashboard, see Chapter 28, “Working with the Dashboard and Widgets,” p. 561.
Here are some tidbits about creating web widgets:
• Each time you open a web widget by opening your Dashboard, its content is refreshed.
• If changes are made to the layout or other aspect of a website on which you captured content, your widget may no longer work.
• To remove a web widget from your Dashboard, click the Manage Widgets button and click the x button on the widget. After you remove it, it is deleted and you have to re-create it to add it to your Dashboard again.
• Web widgets work best for viewing information that doesn’t require authentication or for which a cookie stores any personalization information. Most sites that require secure logins can’t be accessed using a web widget you create. To see if a site can be captured in a widget, try capturing its login box as a widget and then try to log in. If it works, you can log in into the site quickly by opening the widget and logging in. In most cases, you’ll move to an error page or the actual login page, in which case you should just delete the widget.
• Most links in a web widget should take you to the appropriate place on the related web page. Some links might not work; it depends on how the page is built and how the widget was captured.
• Getting a web widget just right can be tricky. The only way to tell is to try capturing the widget you want. If it doesn’t work the way you expect, try capturing more of the web page (remember you can use the widget’s Edit button to change the size of the widget). For information pages, you’ll usually get what you want on the first try. For pages with which you interact, a bit more experimentation may be required. In some cases, you won’t be able to capture the part of a page that you want to be able to use, but at least it won’t take very much work to find out.
Using Safari’s Activity Viewer
As you move around the Web, Safari tracks the sites you have visited. You can view this information on the Activity window. To do so, select Window, Activity or press Option-![]() -A. The Activity window appears. In this window, you will see a list of the sites you have visited during the current browsing session. You can expand each site to see the individual pages you have visited and double-click any of these to return to that page.
-A. The Activity window appears. In this window, you will see a list of the sites you have visited during the current browsing session. You can expand each site to see the individual pages you have visited and double-click any of these to return to that page.
Browsing Privately
As you travel around the Web, Safari helpfully tracks where you have been, usernames and passwords, cookies, AutoFill information, and other items to make using the Web more convenient. However, sometimes you might not want all this information recorded and would instead prefer to browse without any sort of record keeping on Safari’s part. For example, you might be using a public Mac or be logged in under someone else’s user account. In Safari terminology, this is called private browsing. When you browse privately, web pages you visit are not tracked in the History folder, items you download are removed from the Downloads window, any cookies stored on the Mac are deleted, information isn’t retained for AutoFill, and your searches aren’t saved.
To browse privately, choose Safari, Private Browsing. Click OK in the resulting prompt and private browsing will be in effect. When you are ready to resume normal browsing, choose Safari, Private Browsing again. Safari will clear any cookies and downloads stored during the private browse session and return to normal browsing mode.
Emailing Web Pages
When you surf, you’ll likely encounter web pages you’d like other people to view. If you have Apple Mac configured as your default email client, then you can use Safari’s built-in web page emailing ability, to easily send information about web pages to other people via email:
1. View the web page you want to send to someone else.
2. Choose File, Mail Contents of This Page or press ![]() -I if you want to send the actual contents of the web page to someone; choose File, Mail Link to This Page or press Shift-
-I if you want to send the actual contents of the web page to someone; choose File, Mail Link to This Page or press Shift-![]() -I if you want to send a link to the page. Your default email application opens, a new message is created, and the web page contents or a link to the page is inserted into the new message.
-I if you want to send a link to the page. Your default email application opens, a new message is created, and the web page contents or a link to the page is inserted into the new message.
3. Address the email message, add any information you want, and send it.
Using Safari Keyboard Shortcuts
Table 14.1 lists keyboard shortcuts for Safari.
Table 14.1 Keyboard Shortcuts in Safari


Downloading and Preparing Files
One of the best things about the Web is that you can download files from it. These files can be applications, graphics, audio files, text files, updaters, or any other file you can think of. Downloading files is simple; the only two areas that might give you some trouble are finding the files you download and preparing them for use.
The general process for downloading and preparing files is the following:
1. Locate the file you want to download.
2. Download the file to your Mac.
3. Prepare the file for use by decoding and uncompressing it.
There are two basic ways to download files. You can use a web browser to download files, or you can use an FTP client (or the Finder) to download files from FTP and other sites. Using a web browser to download files is simpler, but it is also slower. A dedicated FTP client can dramatically speed up file downloading.
Note
![]()
Because a directory is modified when you store files in it, you must use a directory that you have permissions to write to. On your Mac OS X startup volume, you are limited to downloading files to a directory within your Home directory. However, you can choose a location outside your Mac OS X startup volume if you want.
If you want other users of your machine to be able to access the files you download, you can use your Public folder as your downloads folder.
Configuring a Downloads Folder
By default, your web browser stores files you download in the Downloads folder in your Home directory. If this isn’t where you want downloaded files to be stored, you should create a folder into which your web browser will always download files. That way, you will always know where to find the files you download and they won’t clutter your desktop.
After you have created your downloads folder, open the General pane of the Safari Preferences dialog box and use the Save Downloaded Files To pop-up menu to choose that folder.
Downloading Files Using Safari
Downloading files is as simple as anything gets. Safari uses its Downloads window to show you information about the files you are downloading. To start the download process, just click the download link for the file you want to download.
Tip
![]()
You can download multiple files at the same time. Start one; then, move back to a web window, move to the next, and start it downloading.
You can also continue to browse the Web while your files are downloading. The speed decreases a bit, but at least you can do something while the file is downloading. If you use a fast connection, you probably won’t notice the slowdown.
Some sites simply provide the file’s name as its link, whereas others provide a Download button. Whichever way it is done, finding the link to click to begin the download process is usually simple.
After you click the link to begin the download, the Downloads window opens showing the progress of the file you are downloading (see Figure 14.15). As a file is downloaded, you see its name, the download progress, and the file size. During the download process, you see the stop button for the files you are downloading; you can stop the process by clicking this button.
Figure 14.15 The Downloads window provides the information and tools you need to manage your downloads.
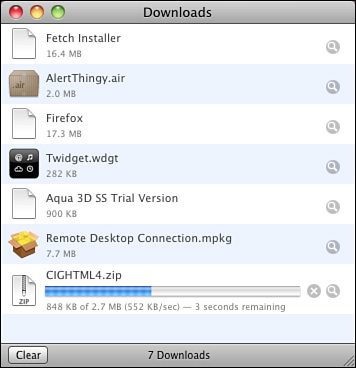
When the download is complete, you will see the file’s icon in the Downloads window. Also, the Stop button becomes the Find in Finder button, which contains a magnifying glass. Click this button to move to the file you downloaded in the Finder.
Tip
![]()
If the download process is interrupted for some reason (such as a connection problem or if you clicked the Stop button), the Stop button becomes the Retry button, which contains a circular arrow. Click this button to try to download the file again.
As you download files, Safari continues to add them to the list in the Downloads window. You can clear them manually by clicking the Clear button. You can have Safari remove them automatically by selecting either When Safari Quits or Upon Successful Download on the Remove Download List Items pop-up menu on the General pane of the Safari Preferences dialog box.
After the download is complete, Safari tries to prepare the file that downloaded so you can use it. Most of the time, this works automatically, but in some situations, you must perform this task manually. This process can be somewhat complicated depending on the file you download. If the file you are downloading contains an application, you may be warned about this and prompted to verify that you want to complete the download.
Preparing Files for Use
Most files you download are encoded and compressed. Encoding is the process of translating an application or other file into a plain-text file so it can be transferred across the Internet. Compressing a file is a process that makes the file’s size smaller so it can be transferred across the Internet more quickly.
Before you can use a file you have downloaded, it must be decoded and it might also need to be uncompressed. Depending on the type of file it is, these two actions might be done at the same time or might have to be handled separately. An application is required for both tasks; a single application can usually handle them, but occasionally the file might need to be uncompressed with one application and decoded with another.
Understanding File Extensions for Compressed Files
Knowing what will happen in any situation requires that you understand the types of files you are likely to download. You can determine this by the filename extension. The most common extensions with which you will have to deal are listed in Table 14.2.
Table 14.2 Common File Extensions for Compressed or Encoded Mac Files

If the file you download is in the .bin, .hqx, .img, or .pkg format, you don’t need to do anything to prepare the file for use. Safari will handle that for you. Some of the other formats, however, will require some manual intervention to prepare the file for use.
Manually Preparing a File for Use
Although you can usually rely on Safari’s preconfigured helper applications to handle most of the files you download, it is useful to know how to manually decode and uncompress files you download so you can handle them yourself and better understand how to configure a helper application to do it for you.
By default, Safari attempts to launch the appropriate helper application to handle files you download. If a file you download can be handled successfully by the helper application, it is prepared and a usable version of it is placed in the same folder into which it was downloaded.
If you download a .zip file, double-click it to uncompress it. A file or a folder containing usable files (if the .zip includes more than one file) will be created.
If you download a .sit or other file type, you’ll need to also download and install a copy of the freeware StuffIt Expander to be able to expand and then use the file.
Working with Plug-Ins and Helper Applications
Many file types are available on the Internet. In addition to HTML, JSP, GIF, JPEG, and other files that are used to present a web page, there are graphics, movies, sounds, PDFs, and many other file types you can open and view. Safari can’t work with all these file types directly, and fortunately, it doesn’t have to. Safari and other web browsers use plug-ins and helper applications to expand their capabilities so they can work with files they don’t natively support.
Working with Plug-Ins
Plug-ins are software that can be incorporated into a web browser when it opens (thus, the term plug-in). Internet plug-ins enable applications to display files that are of the specific types handled by those plug-ins. For example, the QuickTime plug-in enables web browsers to display QuickTime movies.
Installing Internet Plug-Ins
As you travel around the Web, you might encounter file types for which you do not have the required plug-in. In that case, you must find and install the plug-in you need. Usually, sites have links to places from which you can download the plug-ins needed for the file types on the site. There are a couple of places in the system where plug-ins can be stored.
Plug-ins that are available to all user accounts are stored in the folder Mac OS X/Library/Internet Plug-Ins/, where Mac OS X is the name of your startup volume.
You must be logged in under an Administrator account to store a plug-in in this directory.
Internet plug-ins can also be stored in a specific user account, in which case they are available only to that user. A user’s specific plug-ins are in the location shortusername/Library/Internet Plug-Ins/, where shortusername is the short name for the user account.
Note
![]()
Some plug-ins are installed using an installer application, in which case you don’t need to install the plug-in manually.
To install a plug-in, simply place it in the directory that is appropriate for that plug-in (to be available either to all users or to only a specific user). Quit the web browser and then launch it again to make the plug-in active.
If you open the Internet Plug-Ins directories, you will see the plug-ins currently installed. Any plug-in installed in these folders can be used by a supported web browser.
Many plug-ins are available for web browsers. The QuickTime plug-in is installed by default so you can view QuickTime movies in web browsers. Additionally, the Shockwave Flash plug-in is installed by default, as is the Java Applet plug-in. There are many other plug-ins you might want to download and install.
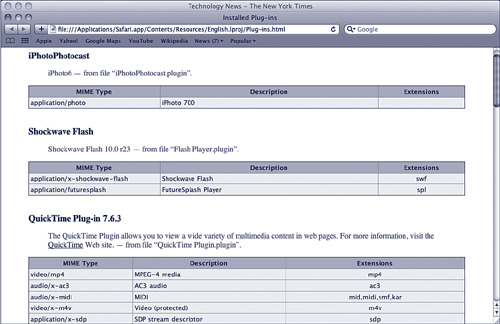
You can see the plug-ins installed for Safari by selecting Help, Installed Plug-ins. A new window opens displaying all the installed plug-ins (see Figure 14.16).
Figure 14.16 Safari’s Installed Plug-ins window shows you all the plug-ins to which Safari has access.
When you attempt to view a file for which you do not have the appropriate plug-in, you see a warning dialog box that tells you what to do. Usually, you see instructions to help you find, download, and install the plug-in as well.
Using Internet Plug-Ins
After a plug-in is installed in the appropriate folder, it works with a web browser to provide its capabilities. When you click a file that requires the plug-in to be used, the appropriate plug-in activates and enables you to do whatever it is designed to do. For example, when you open a QuickTime movie, you see the controls that enable you to watch that movie within the web browser.
Working with Helper Applications
Although plug-ins provide additional capability by “plugging in” to a web browser, helper applications are standalone applications web browsers can use to work with files of specific types. Any application on your Mac can be used as a helper application.
Safari determines the helper applications it uses to open files based on the file type and filename extensions with which specific applications are associated via the Finder. For example, if PDFs are set to open in Preview, Safari launches Preview when you download a PDF file (assuming that the Open “Safe” Files After Downloading preference is enabled).
![]() To learn how to associate files with applications, see “Determining the Application That Opens When You Open a Document,” p. 138.
To learn how to associate files with applications, see “Determining the Application That Opens When You Open a Document,” p. 138.