
25. Making Your Mac Do the Work for You with Automator
Getting to Know Automator
If there were such a thing as a Most Underrated Player award for Mac OS X utilities, Automator would win it hands down. Most Mac users barely even know the application exists, and the rest shudder at the very thought of actually using it. However, Automator is actually one of the most useful of the Mac OS X utilities. And, as an added bonus, it’s also quite easy to use. In fact, in just a few minutes you’ll have learned enough to have Automator performing tasks that duplicate some fancy utilities from third-party vendors (programs that other less adventuresome folks are shelling out big bucks for). This chapter explores Automator by showing you how to create and run your own workflows, and by giving you a lot of examples that put your newfound knowledge to good use.
Understanding Automator’s Workflows
Besides the proverbial paperless office, the other thing we were supposed to have by now (at least according to the so-called “futurists” of 50 years ago) was an automated home where little Robbie-the-Robot types would whisk around taking care of all our dirty work.
Well, although we’ve actually seen some progress on that front (see the Roomba vacuum cleaner), we’re still a long way from that pipe dream. However, you can get one step closer by automating your Mac house by creating workflows that whittle long-winded, repetitive tasks down to a single action. For example, suppose you regularly send files to another person via email. To perform that task, you probably use the following general steps:
1. Select the files you want to send.
2. Archive the selected files into a Zip file.
3. Open Mail.
4. Create a new message.
5. Add the recipient’s address.
6. Type a subject line.
7. Attach the Zip file to the email.
8. Type some text into the message.
9. Send the message.
Running through all those steps is fine every once in a while, but if you do this several times a week or more, it gets old pretty fast. However, you can combine all these steps into a single workflow file, and then run the whole thing at once whenever you need to. (In fact, I show you how to build this workflow later in this chapter; see “Sending Files via Email.”)
The secret to creating these Mac robots is the Automator utility. The idea is that, using a simple drag-and-drop interface (no programming!), you can add and configure each step in the process, until your workflow is complete. Then, later, you can double-click the resulting workflow file to run the entire sequence with little or no intervention on your part.
Understanding the Automator Utility
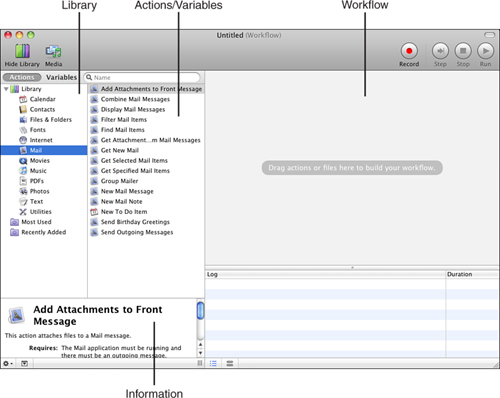
Before getting to the specifics of building your own workflows, let’s take a second to look around the Automator window. First, launch the program by selecting Finder, Applications, Automator, and then click Choose to select the Workflow starting point. The Automator window has several panes (see Figure 25.1):
• Library—This is the pane for the Library of applications that Automator can work with.
• Actions/Variables—This is the pane to the right of the Library. When you click the Actions button, this pane shows the functions that the selected Library application can run; when you click the Variables button, this pane shows a list of information items that you can pass from one application to another.
• Information—When you click an action or variable, this pane shows a description of that item.
• Workflow—You use this pane to build and configure your workflow.
Figure 25.1 Automator makes creating complex programs easy because you can drag steps onto the Workflow area of the Automator window.
Understanding how Automator works requires that you understand the following concepts:
• Actions—These are the basic building blocks of any automated workflow. An action is a single step that is performed when your automated tasks run. Actions can be relatively simple, such as asking the user to input text, or complex, such as applying photo editing tools to a series of files. Each application supported by Automator supports a number of individual actions.
• Input—Some steps require input, which is something that is needed for the action to be performed. For example, if an action applies to a file, that file is the input of the action. Different actions require different kinds of input. Automator helps you understand what kind of input an action requires.
• Output—Most actions end up providing output, which is the result of that action. For example, if an action makes a change to a file, that changed file becomes the output of the action. When actions are linked together, the output of one action becomes the input to the next one.
• Workflow—A workflow is a series of actions you save to automate work, i.e. a script of actions that you want to be able to run easily. A workflow consists of one or more steps that are linked together and result in something you would normally do by manually performing each step. You can save workflows so you can run them from within Automator, edit them, and so on.
• Variables—Variables represent attributes that are part of a workflow. You use a variable when the attribute changes. For example, if you want to perform an action based on today’s date, you can include the Today’s Date variable when configuring a workflow.
• Application—You can also save a workflow as an application. You can run the applications you create with Automator just like other applications on your Mac. When you run an application you have created, the actions you programmed are performed.
Knowing When to Automate Tasks
Using Automator is relatively easy given how powerful it is. Still, it does require some learning, so you need to balance the time and effort required to learn to use Automator to create workflows against the time you save by automating your Mac. In the beginning, while you are learning how to use Automator, it might take more time to create a workflow than it would to perform tasks manually. As you get more proficient with Automator, though, you’ll be able to create workflows more quickly, which in turn will improve your overall efficiency in getting things done on your Mac.
Note
![]()
Automator can record what you are doing on your Mac and create a workflow from those steps. To do this you must first access the Universal Access pane of the System Preferences application and activate the Enable Access for Assistive Devices check box so that Automator can record what you do with the mouse and keyboard. When the steps have been recorded, you see a new Action called Watch Me Do that you can incorporate into a workflow.
Good candidates for automation with Automator are any series of steps you find yourself performing repeatedly. The steps you perform manually can be exactly the same, or you might perform the same series of steps but use different files or folders each time. In such cases, the time you invest in creating an Automator workflow can pay off because you can have your Mac repeat those steps for you.
Perhaps the most important consideration when deciding to automate is that the applications you use during the steps you are automating must be supported by Automator and, more specifically, the individual actions you perform must be available in Automator for that application.
Understanding Actions That Are Supported by Automator
Each application supported by Automator has one or more actions that you can use in your workflows. Some applications, such as the Finder, support many actions, whereas others support only a few. If all the steps you need to perform to complete a task are available as actions, you can automate a task. You can also create actions by recording them. If neither of those approaches work, you need to use a different automation tool.
To see which actions are supported, select an application on the Library list. The actions supported for that application will be shown in the Action pane (see Figure 25.1, which shows the actions supported by Mail).
When you select an action on the Action pane, information about the action is shown in the Information pane located at the bottom of the Action pane of the Library window. This information includes a summary of what the action does along with its input and output. For example, when you select the Finder’s Create Archive action, you see that this action creates a zip format archive (.zip) from the files specified. Its input is the files to be archived. The output, called result, is the archived file.
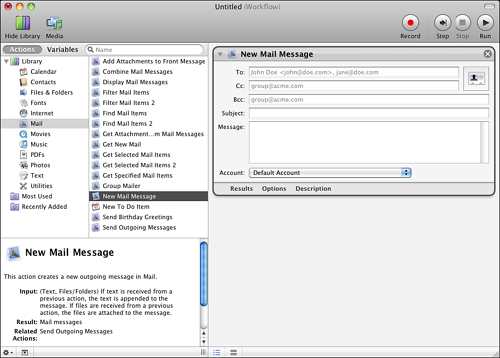
To understand an action in more detail, drag it from the Action pane and drop it onto the Workflow area (see Figure 25.2). The action is added to the workflow, and you see its details. The action’s title bar has the expansion triangle at the far left to show or collapse the detail of the action, the action’s title is in the center, and the delete button is on the right side. In the action’s window, you see the tools you use to configure the action; these depend on the specific action you are using. These tools can include text boxes, check boxes, and pop-up menus.
Figure 25.2 Drag an action into the workflow area to see its details.
Understanding Action Inputs and Outputs
Some actions are self-contained and require no input when you run the workflow. For example, if you use the New Mail Message action and fill in all the fields in the workflow area, Automator uses that data each time you run the workflow.
However, many actions accept input, so you can customize an action by sending it the output of some other action. For example, you can see in the Information pane shown in Figure 25.2 that the New Mail Message action takes two types of input: Text and Files/Folders. Text input goes into the message itself, so you could use the Ask for Text action to prompt for some text, and then have that text output sent to the New Mail Message action.
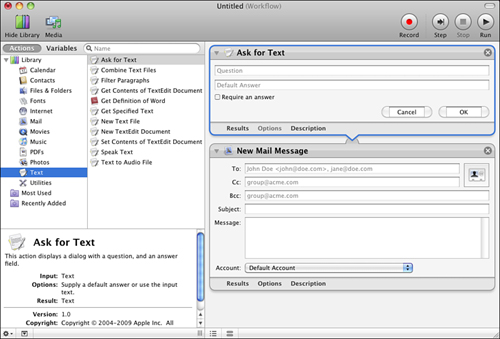
This is what I’ve done in Figure 25.3. You can see that I’ve added the Ask for Text action above the New Mail Message action. Notice that Automator connects the two actions using a downward-pointing arrow to indicate output and a semicircle to indicate input.
Figure 25.3 To build a workflow, you drag actions onto it.
Understanding Variables That Are Supported by Automator
Some applications can use variables to represent attributes that are used in a workflow. To see the list of available variables, click the Variables button at the top of the Library pane. The Library pane will display different categories of variables, such as Date & Time, System, User, and Utilities. Clicking on a category will display the variables that are available. Select a variable to see more information about it in the bottom of the Library window. Variables allow you to use their values in your workflow.
Creating Your Own Workflows
Any type of programming, which is what you are doing when you use Automator, requires that you follow a logical path (well, logical to your Mac anyway) that ends up in the result you want. This isn’t always easy to do. For best results, you should tackle any automation project by performing a series of steps, as you will learn in the following sections.
Designing a Workflow
The first step when creating any workflow is to determine the tasks you want to automate. You need to identify the applications those tasks involve and the specific steps that are required. For best results, you should manually perform each step that is required to complete these tasks and document what you do during each one. Create a list of specific applications the tasks involve and the specific steps performed in that application. This might seem tedious, but creating a workflow that actually does what you expect will be much easier if you take the time to design it before you jump into Automator and start dragging steps into a workflow.
A less systematic approach is to just use trial and error. You can sometimes develop workflows effectively by just adding an action at a time running the workflow after each to make sure it does what you expect.
A third approach is to try to record a workflow. Even if this doesn’t result in the end product, it will often add most of the actions you need so that you can just refine them to complete the workflow.
Building a Workflow Manually
To build your workflow, perform the following general steps:
1. Use your design document to identify the first step that needs to be done.
2. In the Library pane, select the application you use to perform that step. Then select the specific action that should occur during the step.
3. Drag the action into the Workflow area.
4. Configure the action for the workflow.
5. Refer to the next step in your workflow design document.
6. Repeat step 2.
7. Drag the action into the Workflow area. The output of the previous step will be become the input of the step you just placed in the workflow.
8. Check the output/input connection to ensure they match. For example, if the previous step outputs a file or folder, the input of the next step should be a file or folder.
9. Repeat steps 5–8 to systematically create the workflow to match your design.
10. Select File, Save to open the Save As sheet, type a name for the file, make sure that Workflow is selected in the Type pop-up menu, and then click Save.
Recording a Workflow
You can also build a workflow by recording actions you perform. When viewing a workflow, click the Record button and then perform the steps you want to record. As you perform them, they are added to the workflow. After the steps have been added, you can configure them and refine the workflow by recording more tasks or adding and configuring actions manually.
Testing and Editing a Workflow
After you have created the workflow, you should go through a testing process to ensure that the workflow works as you expect it to. It is typical that it won’t work quite right at first, so plan on needing to edit it a few times before you get it working properly. The general steps to test and edit a workflow are the following:
1. Click the Step button. The workflow executes the next action.
2. Check the results of the action. Did the action perform as you expected? Do you see a green checkmark beside the Results area of the action?
3. If the action didn’t work properly, edit the action to fix the problem, then perform steps 1 and 2 again.
To help in the troubleshooting process, click an action in the workflow and select Show Results from the Action menu, or click the Results button on the action. The action’s tools are replaced by the results of the action. This can be extremely useful when troubleshooting a workflow.
4. Repeat steps 1–3 top step through the entire workflow.
5. Click the Run button to test the entire workflow. If it works properly, you are done.
6. If the workflow doesn’t result in what you expect, repeat steps 1–5 until it does.
Note
![]()
If a step fails, you’ll usually see an error message that should help you figure out what went wrong.
You should expect to spend some time testing and editing a workflow until it does just want you want it to. You can increase the odds of your workflow working right the first time by designing it in a good amount of detail before you start creating it. Generally, the more prep work you do designing and documenting your workflow, the less time you will have to spend testing and editing it.
Saving a Workflow as an Application
After your workflow does what you want it to, you can save it as an application. You can then run the workflow by launching the application, which you do just like other applications on your Mac, such as by double-clicking it, putting it on the Dock and clicking its icon, adding it to your Login Items so it runs when you log in, and so on.
To save a workflow as an application, follow these steps:
1. Open the workflow you want to save as an application.
2. Choose File, Save As. The Save As sheet appears.
3. Name the application (you can use the same name as the workflow if you want because they are different types of files, so you don’t have to worry about replacing the workflow).
4. Choose the location in which you want to save the application you are creating. Consider creating a folder in which to store all your applications so you can locate them easily. For example, you might want to create a folder called My Applications within the Applications folder.
5. On the Type pop-up menu, select Application.
6. Click Save. An application is created from the workflow.
Learning How to Automate Your Mac by Example
When you understand the general way Automator works and how you should go about building workflows, the only way to really learn how to create your own workflows is to start creating them. The first few you create might take a while, but as you gain more experience with Automator, you’ll become more proficient creating new workflows. To get started, you’ll find two sample workflows in this section that you can re-create on your Mac. Doing this will give you some experience using Automator; you will then be ready to start designing and creating your own workflows.
Opening Websites
If you visit the same websites regularly, you can create a workflow and application that opens Safari for you and takes you to as many websites as you’d like. To create this workflow, perform the following steps:
1. Launch Automator and select Workflow as the starting point.
2. In the Library list, click Internet. Automator displays a list of Internet-related actions.
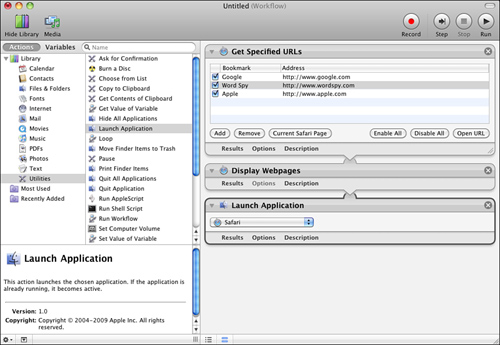
3. Double-click the Get Specified URLs action. Automator adds the Get Specified URLs action to the workflow pane on the right side of the window.
4. Click Add to add a new URL.
Tip
![]()
You can also add a website by opening it in Safari and clicking the Current Safari Page button. The URL of the current web page is added to the URL list.
5. In the new URL, double-click the URL name text, type the name of the site, and then press Tab to select the text in the Address column.
6. Type the address of the site and then press Return.
7. Repeat steps 4–6 to add all the sites you want to open.
Tip
![]()
To remove a URL, such as the Apple home page, select it from the list of URLs and click the Remove button.
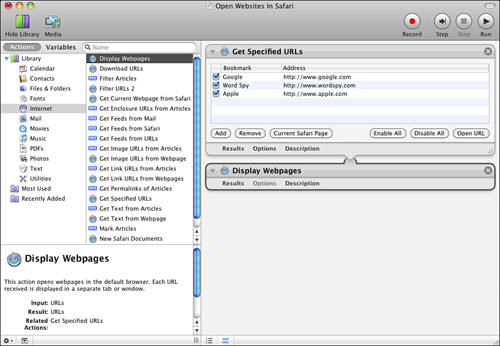
8. Double-click the Display Webpages action. Automator adds the Display Webpages action to the workflow pane, as shown in Figure 25.4. This action takes the addresses in the Get Specified URLs action and displays them in Safari.
Figure 25.4 Automator passes the Get Specified URLs addresses to Display Webpages to open the sites in Safari.
9. In the Library, click Utilities.
10. Double-click the Launch Application action.
11. In the list, click Safari. This ensures that Safari becomes the active window when you run the workflow.
12. Select File, Save, type a name in the Save As box, and then click Save. Automator saves your workflow file. Figure 25.5 shows the completed workflow.
Figure 25.5 The final workflow.
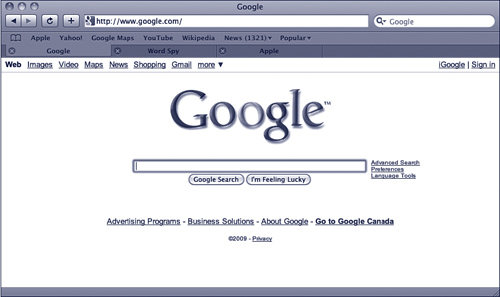
When you run this workflow, Safari launches and opens each URL in a separate window. Chances are this isn’t the behavior you want; that is, you’re more likely to want to open each URL to appear in a separate tab in a single window. That’s easy to fix with a single Safari tweak:
1. Start Safari.
2. Select Safari, Preferences.
3. Select the General tab.
4. In the Open Links from Application section, click the In a New Tab In the Current Window radio button.
Quit Safari and then run your workflow again. This time you see the sites open in tabs, as shown in Figure 25.6.
Figure 25.6 Run the workflow, and you now see each site appear in its own tab.
Sending Files via Email
For this example, suppose that you regularly send files to someone via email (maybe you are an author and you send your chapters to your editor). You can create a workflow that will archive files you select into a Zip file, create and address an email, and attach the Zip file to the email. Here’s how to create this workflow:
1. Launch Automator and select Workflow as the starting point for a new workflow. (If you already have Automator running, select File, New—or press ![]() -N click Custom, and then click Choose.)
-N click Custom, and then click Choose.)
2. In the Library pane, click Files & Folders.
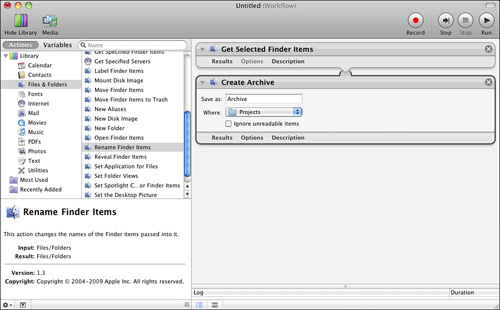
3. Drag the Get Selected Finder Items action onto the workflow or double-click it to add it to the workflow. This action gets items you have selected in the Finder and passes them to the following action.
4. Add the Create Archive action (which creates a Zip archive of files or folders) to the workflow. (If you’re clicking and dragging, be sure to place it after the Get Selected Finder Items action.) Notice that the Get Selected Finder Item output type (Files/Folders) matches the Create Archive input type (also Files/Folders).
Tip
![]()
Check out the Options for actions by clicking the Options button. There are a number of useful selections on the resulting menu, such as Show This Action When the Workflow Runs.
5. In the Save As box of the Create Archive, enter a name for the archive file that will be created.
6. Use the Where pop-up menu to choose the location in which the archive file will be saved (see Figure 25.7).
Figure 25.7 So far, this workflow takes selected Finder items and saves them in a Zip file called “Archive” in the folder called “Projects.”
7. Add the Rename Finder Items action to the workflow and place it after the Create Archive action. (A warning sheet appears, explaining that this action will change the name of the Finder Items, and presents you with an option to add a copy action; click Don’t Add.) Because you’re going to be using this workflow many times, you don’t want each file to have the same name or they’ll get replaced each time the workflow runs. This is why you need to add an action to rename the file.
8. Use the tools in the Add Date or Time to Finder Item Names action to configure the name of the archive file created. For example, you can add the date or time to it, make it sequential, and so on. Choose Make Sequential on the top pop-up menu; the tools in the action change to reflect the selection you made. To have a sequential number added after the name separated by an underscore, choose Underscore on the Separated By pop-up menu. Enter the first sequential number you want to be used in the Start Numbers At box (see Figure 25.8).
Figure 25.8 To give each Zip file a unique name, add a sequential number to the default file name.

Tip
![]()
You can double-click an action’s title bar to collapse or expand it.
It’s a good idea to test workflows as you create them, so test what you’ve done so far.
9. Move to the Finder and select a couple of files.
10. Move back to the workflow and click the Run button. The workflow runs. If it can’t complete for some reason, you see information about what happened. If it does complete, you hear the whistle tone. Look in the save location you configured. You see the file the workflow created (see Figure 25.9).
Figure 25.9 This file was created by an Automator workflow and saved in the designated location.
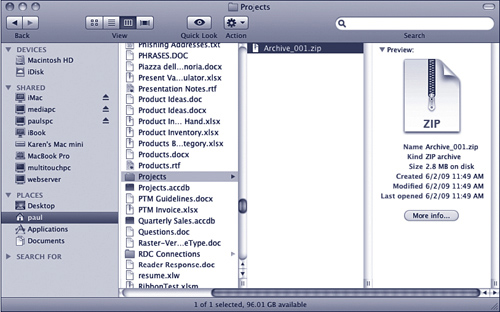
The file that was created is a .zip file containing the files that were selected when you ran the workflow.
Now, add the actions to send the archived file.
11. Move back to the workflow.
12. Select the Mail application and then drag the New Mail Message action into the workflow and place it below the Rename Finder Items action. Notice that the output of the Make Finder Item Names Sequential action (Files/Folders) fits with the input of the New Mail Message action.
13. Enter the email address for the person to whom you want to send the file in the To box or click the Address Book icon to select an address in your Address Book.
14. Type a subject for the message in the Subject field.
15. If you want some text to appear in the message every time, enter it in the Message box.
16. Choose the email account that should be used to send the message on the Account pop-up menu.
17. Review the workflow to see whether the actions you need it to run are available, configured, and in the correct order (see Figure 25.10).
Figure 25.10 This workflow creates an archive of selected files and emails them.

Caution
![]()
You should always save a workflow before you run it. If it doesn’t work properly, Automator might quit, in which case you could lose your workflow.
Now that you have created the workflow, it is time to test it by performing the following steps:
1. Move to the Finder and select one or more files.
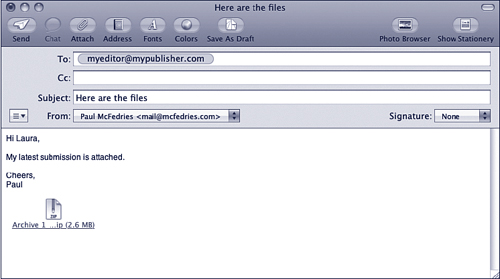
2. Move back into Automator and click Run to run the workflow. The workflow runs; when it completes, you see a new email message with the default text entered and the archive file attached (see Figure 25.11).
Figure 25.11 The workflow took selected files, created a .zip file containing them, and then attached that file to a new Mail message.
3. If the result is correct, you can save the workflow as an application. If not, you need to troubleshoot it until it does work as you want.
After the workflow creates the email message and attaches the file to it, you can edit the message as needed before you send it. The workflow won’t actually send the message, so you need to click Send to send it.