
28. Working with Dashboard and Widgets
Using Dashboard and Widgets
Your Mac comes equipped with about 20 or so mini-applications called widgets that perform very specific tasks such as showing the weather, displaying stock quotes, or making simple calculations. Instead of cluttering your desktop with these widgets, Mac OS X gives you a separate layer of screen real estate called Dashboard. When you invoke Dashboard, your Mac sends your desktop and its windows into the background, and brings Dashboard and its widget collection into the foreground.
Activating and Deactivating Dashboard
Mac OS X gives you three main ways to activate Dashboard:
• Press F4. (On older Mac keyboards you can usually invoke Dashboard by pressing either F12 or Fn+F12).
Tip
![]()
If you’re having trouble launching Dashboard via the keyboard on your mobile Mac, you can find out which key or key combination your Mac uses. Run System Preferences, click Exposé & Spaces, and select the Exposé tab. In the Dashboard section, check the key listed on the Hide and Show pop-up menu to determine what the default Dashboard activation key is on your Mac.
• Click Dashboard icon on the Dock.
• Click the scroll ball on Apple’s Mighty Mouse.
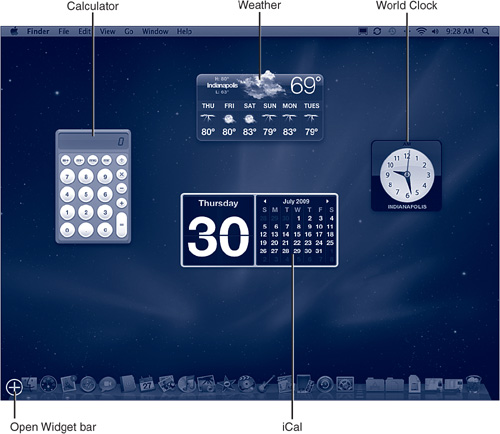
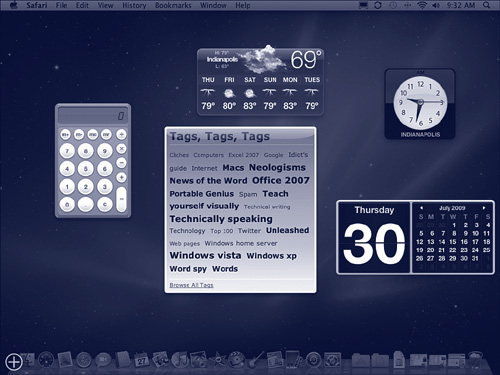
Whichever method you use, Dashboard appears and it displays its open widgets, as shown in Figure 28.1.
Figure 28.1 When you activate Dashboard, you see the widgets that are configured to open with it.
When you are done using the widgets, you deactivate Dashboard by pressing the default hot key (usually F12), by clicking the desktop outside of any open widget, or by clicking the Mighty Mouse scroll ball. All the widgets disappear and you return to your Mac’s desktop.
Configuring the Widgets That Open When You Activate Dashboard
By default, on most Macs you see the Calculator, Weather, iCal, and World Clock widgets when you activate Dashboard. However, as mentioned earlier, Mac OS X comes with more than 20 widgets, so you can configure which widgets open when you activate Dashboard. Here are the steps to follow:
1. Activate Dashboard.
2. Click the Open Widget bar button (pointed out in Figure 28.1). The Widget bar opens and you see some of the widgets that are currently installed on your Mac (see Figure 28.2). The Widgets appear in alphabetical order from left to right (with the exception of the Widgets widget, which is always the first one in the list).
Figure 28.2 The Widget bar shows the widgets that are currently installed on your Mac.
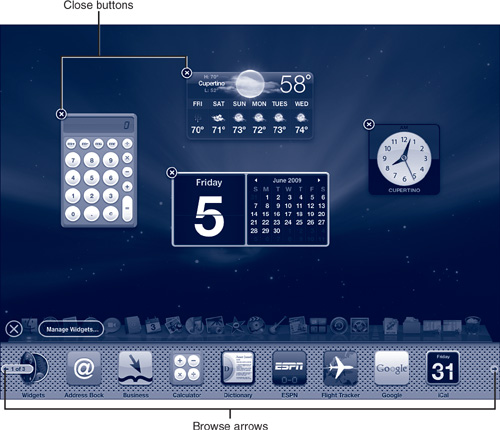
3. Scroll through the installed widgets using the Browse arrows. At the bottom of each widget’s icon, you see the widget’s name.
Tip
![]()
You can open multiple instances of the same widget at the same time by continuing to click its icon or dragging it from the Widget bar onto Dashboard. Each time you do so, a new version of that widget appears. This is useful for some widgets such as the Weather widget if you are interested in information about the weather in more than one area.
4. To have a widget open when you activate Dashboard, click its icon on the Widget bar or drag it from the Widget bar onto the screen and then drop the widget where you want it to appear.
5. If the widget isn’t in the right location, drag the widget to your preferred spot on the screen.
6. To close a widget that you don’t want to open when you activate Dashboard, click the widget’s Close button, which is the “X” located in the upper-left corner of each widget’s window.
7. Repeat steps 3–6 to configure Dashboard to your liking.
Tip
![]()
You can close a widget whenever Dashboard is active by holding down the Option key and then hovering the mouse pointer over the widget to display the Close button. Click the button to close the widget.
8. Close the Widget bar by clicking the Close button, which is the X located just above the Widget bar. The next time you activate Dashboard, you will see and can use the widgets as you configured them.
Using and Customizing Useful Widgets
Mac OS X includes a number of useful widgets along with some that aren’t so useful. In this section, you’ll find a mini-review of some of the default widgets I think are worth using.
![]() To learn how to remove widgets that you don’t use, see “Removing Widgets from Dashboard,” 572.
To learn how to remove widgets that you don’t use, see “Removing Widgets from Dashboard,” 572.
![]() To learn how to install widgets in Dashboard, see “Finding and Installing More Widgets,” 572.
To learn how to install widgets in Dashboard, see “Finding and Installing More Widgets,” 572.
Tip
![]()
You don’t need to close the Widget bar. When you deactivate Dashboard, the Widget bar is closed automatically. The next time you activate Dashboard, the Widget bar remains closed.
Using the Widgets Widget
The Widgets widget, which is the first one on the Widget bar even though it isn’t the first one alphabetically, enables you to use a widget to manage the widgets on your Dashboard (see Figure 28.3).
Figure 28.3 You can use the Widgets widget to manage your widgets.

Here are some notes to bear in mind about this widget:
• The widget’s list shows all of the widgets installed under the current user account. You can scroll the list or resize the widget to see more or fewer of the available widgets.
• Choose how you want the list sorted by choosing Sort by Name or Sort by Date on the drop-down list at the top of the widget.
• You can disable a widget by deactivating its check box. Dashboard closes the widget if it’s currently open, and removes it from the Widget bar. However, this doesn’t actually remove the widget from your computer. You can restore a widget by activating its check box again.
• Widgets marked with a red circle with a line in it (see Figure 28.3) are available only under the current user account.
• You can look for more widgets on Apple’s website by clicking the More Widgets button (see “Finding and Downloading Widgets,” later in this chapter).
Using the Address Book Widget
The Address Book widget enables you to access information in your Address Book more quickly than by using the Address Book application itself. The Address Book widget provides a number of useful tools as you can see in Figure 28.4 and in the following list:
• View a contact’s information in the Address Book widget’s window. If not all of a contact’s information fits in the window, use the scroll arrows that appear to move up and down in the contact’s information.
• Browse contact information by clicking the Previous or Next buttons.
• Search for a contact by typing the name of the contact in the Search tool. As you type, the contacts in the window are reduced to include only those that meet your search text. You can only search by name. When the list contains the contact whose information you want to view, click it and the contact’s information fills the widget.
• Use the linked information for a contact to perform an action. For example, click an email address to send an email to the contact (when you do this, Mail opens and a message to the recipient is created). Similarly, if you click an address, your web browser opens and the address appears on a Google map.
• To view unlinked information (such as a telephone number) at a larger size, click it. Dashboard magnifies the information on the screen.
Figure 28.4 The Address Book widget is a quick way to view and work with a contact’s data.

Using the Calculator Widget
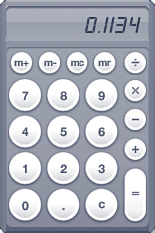
The Calculator widget is simple, but useful. When it appears on the screen, you can use it to perform basic calculations (see Figure 28.5). You can “press” the Calculator’s keys using the mouse or the keyboard.
Figure 28.5 Use the Calculator widget to make simple calculations.
Using the iCal Widget
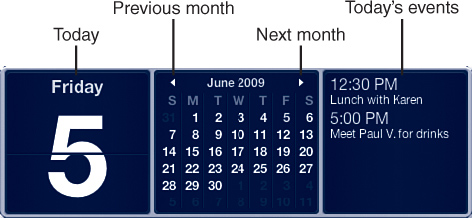
The iCal widget presents an onscreen calendar that you can use to view dates, such as today’s date or any date in the past or future (see Figure 28.6). You can see the iCal events you’ve scheduled for today when you click the date on the left side of the widget.
Figure 28.6 You can view today’s iCal events by clicking a date in the iCal widget.
Here are some iCal widget pointers:
• Click the date shown on the left side of the widget to expand it to show the month and click again to show the iCal events pane. Keep clicking to collapse the widget again.
• Move ahead or back by a month in the calendar using the Next or Previous buttons or the left and right arrow keys.
• When you expand the widget to see all three panes, the iCal events for the selected date are shown in the far right pane. Unfortunately, only events on the current date are displayed; you have to go into the iCal application to look at events for future dates.
Using the Dictionary Widget
The Dictionary widget is a handy way to access the Mac OS X Dictionary application. You can use the widget both for its dictionary and thesaurus functions. You can also search Apple resources with it. To use this widget, perform the following steps:
1. Activate Dashboard, open the Widget bar, and click Dictionary to open the widget.
Tip
![]()
The Dictionary widget is one of the few whose window you can resize by dragging its Resize handle.
2. Use the pop-up menu to choose the mode you want to use: Dictionary, Thesaurus, or Apple.
3. Use the Search box to type the word you want to look up. As you type, the widget finds words that match your search text.
4. If a list of words appears, click the word you want to look up. The word’s definition (or synonyms) and other information appears in the widget window, as shown in Figure 28.7.
Figure 28.7 Type a word to look it up in the Dictionary widget.

5. To move back to the list of words, click the Back button. Your original search term appears in the Search box again.
Tip
![]()
To see which dictionary is being used, click the Info button, which is the “i” that appears in the lower-left corner of the widget.
6. If the Scroll bar appears instead, use it to move up and down the window to view the entries that meet your search criteria.
Using the iTunes Widget
You can use the iTunes widget to view and control music playback via iTunes. To use it, open iTunes. When iTunes is running, you can use the iTunes widget to select and play music (see Figure 28.8).
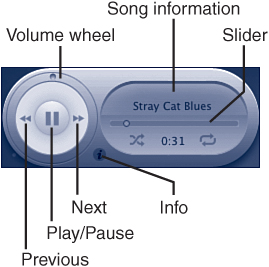
Figure 28.8 Use the iTunes widget to take control of your music.
To use the iTunes widget, bear in mind the following notes:
• To choose a playlist, click the Info button. The Select Playlist pop-up menu appears. Use this to choose the playlist you want to hear. Click Done to move to the widget’s controls.
• Use the Play/Pause, Previous, and Next buttons to control the music.
• View the song currently playing in the Song information area.
• Adjust the volume by dragging the Volume wheel clockwise to increase it or counterclockwise to decrease it.
• Drag the slider to fast forward or rewind in a song.
Using the Unit Converter Widget
If you ever need to convert from the English system to the metric or vice versa or perform other such unit conversions, such as among different currencies, the Unit Converter widget can take all the work out of the process for you. To use this handy widget, perform the following steps:
1. Activate Dashboard, open the Widget bar, and click Unit Converter to open the widget.
2. Choose the type of unit you want to convert on the Convert pop-up menu. There are many options from which you can choose, including Area, Currency, Energy, and Time.
3. Use the lower-left pop-up menu to choose the specific unit you want to convert. The options you see depend on what you selected on the Convert pop-up menu. For example, if you choose Temperature, the options on this menu are various units of temperature, including Fahrenheit, Celsius, and so on.
4. Use the lower-right pop-up menu to choose the unit into which you want to convert the measurement.
5. Type the data you want to convert in the lower-left box. The converted measurement is shown in the lower-right box (see Figure 28.9).
Figure 28.9 Use the Unit Converter widget to convert weights, measures, and many other units.

Using the Weather Widget
The Weather widget displays current weather conditions and temperature forecasts for a location you select. To use it, perform the following steps:
1. Activate Dashboard and, if the Weather widget isn’t already displayed, open the Widget bar, and click Weather to open the widget.
Tip
![]()
If you choose a conversion for which data is provided by a third-party, such as Currency, click the Info button to see who is providing the data.
2. Move the pointer over the widget. When you do, the Info button appears in the lower-right corner.
Note
![]()
Many widgets, such as the Weather and World Clock widgets, require an Internet connection to work.
3. Click the Info button to display the widget’s configuration tools.
4. Use the text box to enter the city or ZIP code for which you want to see weather information. The simplest approach is to enter the ZIP code, but you can enter the city and state if you don’t know the ZIP code. When you enter a city’s name, a list pops up that shows you all the cities that might match your search. Click the city you want to use.
5. Choose the unit of temperature you want to be displayed on the Degrees pop-up menu. The options are Fahrenheit and Celsius.
6. If you want lows to be included in the 6-day forecast, activate the Include Lows in 6-Day Forecast check box.
7. Click Done. You’ll see the city you selected and an icon representing the current weather conditions in that area. Also displayed are the current temperature and the current day’s temperature forecast (see Figure 28.10).
Figure 28.10 The Weather widget supplies forecasts for places large and small, such as Pigeon Forge, Tennessee.

Here are a few tips to help you make the most of the Weather widget:
• To hide or show the 6-day forecast, click the widget’s window.
• You can track the weather in multiple areas at the same time by opening multiple Weather widgets and configuring each one for the location you’re interested in.
• Click the city shown in the Weather widget window to open the Yahoo! Weather site.
Using the World Clock Widget
This simple widget displays the current time in a city of your choice.
1. Activate Dashboard and, if the World Clock widget isn’t already displayed, open the Widget bar, and click World Clock to open the widget.
2. Move your mouse pointer over the widget and then click the Info button that appears in the lower-right corner of the widget.
3. Choose the continent in which you are interested on the Region pop-up menu.
4. Choose the city on the City pop-up menu.
5. Click Done. The World Clock widget displays the current time in the city you selected (see Figure 28.11).
Figure 28.11 Use the World Clock widget to keep track of the time in your favorite cities.

Configuring Widgets
In a couple of the previous examples, you saw a step to click a widget’s Info button. Some widgets have configurable options, such as setting a location or information source, configuring the information displayed in the widget’s window, and so on. Not all widgets have the Info option, but many do. The button is located in various places on different widgets, so there’s really no way to know where to look for it on any given widget.
To see if a widget has options, move the pointer over the widget in which you are interested. If it has options, you see the Info button appear; this button is usually a lowercase “i” sometimes inside a circle, sometimes not (see Figure 28.12).
Figure 28.12 This Twitter widget has options.
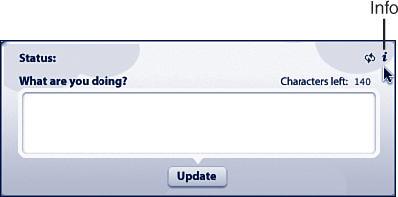
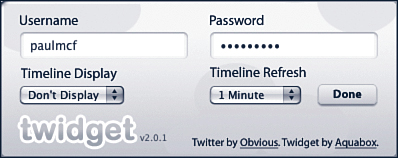
When you click the Info button, the widget’s configuration tools appear (see Figure 28.13). You can use those tools to make the widget work or look the way you want it to. When you’re finished making changes, click the Done button and the widget is updated accordingly. You should always check out the Info options for any widgets that you use often because they usually provide options to make widgets even more useful to you.
Figure 28.13 Check out the options for any widgets you use regularly.
Configuring Dashboard
There are a couple of things you can do to configure Dashboard itself. You can change its hot key and active screen corner and you can remove any widgets you never use.
Setting Dashboard’s Hot Key and Active Screen Corner
You can change the default hot key and active screen corner for Dashboard by following these steps:
1. Open System Preferences and then click Exposé and Spaces. The Exposé and Spaces preferences appear.
2. Click the Exposé tab.
3. In the Dashboard section, use the Hide and Show pop-up menu to choose the new hot key.
4. Use the second Hide and Show pop-up menu to choose which mouse button controls Dashboard (if you have a multi-button mouse connected to your Mac, of course).
5. In the Active Screen Corners section, select Dashboard in the pop-up menu that corresponds to the screen corner you want to use to invoke Dashboard. For example, to invoke Dashboard when you move the mouse pointer to the lower-right corner of the screen, select Dashboard in the lower-right pop-up menu.
Removing Widgets from Dashboard
Some of the widgets that come with Mac OS X probably won’t be useful to you. You can remove any widgets you won’t use by performing the following steps:
1. Open the Widgets folder that is located in Library folder of your startup drive.
Note
![]()
You have to authenticate yourself as an administrator to be able to remove widgets. And if you remove them, no one who uses your Mac can use the widgets you remove. If you think you might use a widget someday, just remove it from Dashboard instead of deleting it from your Mac.
2. Drag the widget you don’t want to use out of the Widgets folder. If you might want to install it again sometime, save the widget file. If not, you can delete it.
3. Restart your Mac. The undesirable widget no longer appears in Dashboard.
Caution
![]()
There’s no easy way to recover a built-in Mac OS X widget if you delete its file, so it really is best to save the file in some other location just in case you need it later.
Finding and Installing More Widgets
Some of the default widgets are more useful than others. The good news is that your Dashboard isn’t limited to just these widgets. You can add widgets to your Mac in three ways. The first is by capturing sections of web pages as a widget. The second is to download widgets from the web and install them on your Mac. The third is to program your own widgets. In the remaining sections of this chapter, you learn about the first two options. The third one is beyond the scope of this chapter, but if you search the web, you’ll find a lot of information about how to create your own widgets.
Building Your Own Widgets with Web Clips
What do you do if you come across a chunk of a web page that you want to save for later use? For example, you find a compelling YouTube video, an engaging Flickr photo, an important craigslist ad, a funny cartoon, or a useful list of links. Saving bits of web pages for easy reuse has never been easy, but Safari offers a method that makes saved web page parts just a click or two away.
The feature that accomplishes this is Safari’s Open in Dashboard feature, which can save part of a web page to Dashboard’s Web Clip widget. You can then access the page piece at any time just by opening Dashboard.
First, here are the steps to follow to add part of a web page to Dashboard’s Web Clip widget:
1. From the web page with the content you want to save, choose File, Open in Dashboard. Safari grays out all of the page except for a small selection window.
2. Click the part of the page that contains the content you want to save:
• To save an image, click the image and Safari automatically selects the entire image.
• To save a video, click the video playback window and Safari automatically selects the window.
• To save any other content, click anywhere within the content (see Figure 28.14).
Figure 28.14 This tag cloud will make a handy widget.
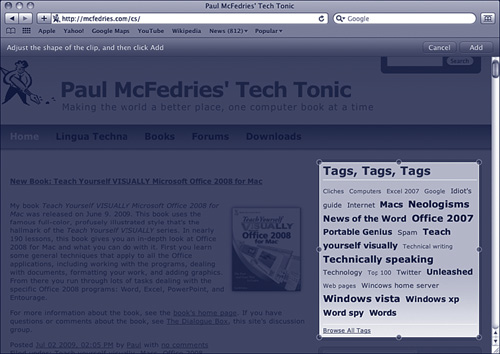
3. Use the handles that appear around the clip to adjust the size and shape of the clip, if necessary.
4. Click Add. Safari opens Dashboard and loads the clip, as shown in Figure 28.15.
Figure 28.15 Here’s the tag cloud as a Web Clip in Dashboard.
After you’ve created a Web Clip widget, you can use that widget just like other widgets—well, mostly anyway. The links in the widget take you to the related information on the source web page.
Some notes about this feature follow:
• The Web Clip captures a static portion of the web page based on what you select. If the information changes on the source web page, it might shift what’s shown in the widget you create.
• Capturing part of a web page can be complicated. It works fine with some parts of some pages, but might not work with everything you try. It depends on how the page is configured, the part you select, and so on. Don’t be too surprised if a widget you create doesn’t work exactly as you expect. If not, just delete it and try again.
• Widgets that you create have an Info button. Click this button to change the theme for the widget (which changes how the widget is framed) or to edit it by changing the part of the page that is selected.
Finding and Downloading Widgets
Dashboard can also be expanded with new widgets that you download from the Internet.
1. Activate Dashboard and open the Widget bar.
2. Click the Widgets widget.
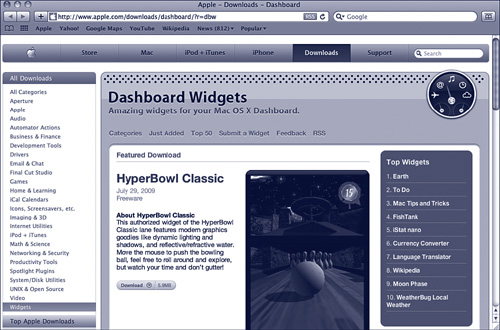
3. Click the More Widgets button. Your default web browser opens and you see Apple’s Dashboard Widgets web page (see Figure 28.16).
Figure 28.16 Apple’s Dashboard Widgets page is home to hundreds of widgets.
4. Browse or search until you find a widget you want to try.
5. Download the widget. In most cases, you’re prompted to install the widget after it has been downloaded.
6. Click Install at the prompt. Move to Dashboard to see the new widget that you installed.
7. Click Keep to keep the widget or Delete to get rid of it. If you click Keep, the downloaded widget is installed on your Dashboard.
Installing Third-Party Widgets
If you download a widget from the Apple Dashboard website, you don’t need to do any installation as it is automatically recognized and installed, as you learned in the previous section. However, you’ll find widgets in other locations as well.
There are two ways widgets from other sources can be installed. One is to use an installer if one was provided with the widget. Otherwise, just place the widget file in the Widgets folder that is in the Library folder on your startup disk or in the Library folder in your Home folder; restart your Mac and then use the Widget bar to open and use the new widget. If it is installed in the startup disk’s Library folder, the widget is available to everyone who uses your Mac. If it is installed in the Library within a user’s Home folder, it is only available to that user.
Tip
![]()
When you install a widget from the Apple website, it is installed only in the current user’s Widgets folder. To make it available to all your users, move it from the Widgets folder in the user’s Home folder to the Widgets folder in the startup disk’s Library folder.