
6. Setting System Preferences
Taking a Tour of the System Preferences
If you want to learn Mac OS X in depth, as I hope to show you in this book, you have to go beyond the superficial features and tools that the interface provides and get under the hood to tinker with the non-obvious settings and options. In Mac OS X, this means (at least in part), tackling the System Preferences application, which is a powerful and important tool that you use to control how your Mac OS X system works and looks. With a thorough understanding of what you can do with System Preferences, you’ll be in great shape not only to learn Mac OS X in depth, but also to fully customize and configure Mac OS X to suit the way you work and your personal tastes. This chapter gives you that thorough understanding.
To open System Preferences, you have two choices:
• Click the System Preferences icon in the Dock.
• Pull down the Apple menu and select System Preferences.
Figure 6.1 shows a default System Preferences window, which on this Mac displays 26 total preferences icons.
Figure 6.1 The default System Preferences window is home to more than two dozen preference panes.

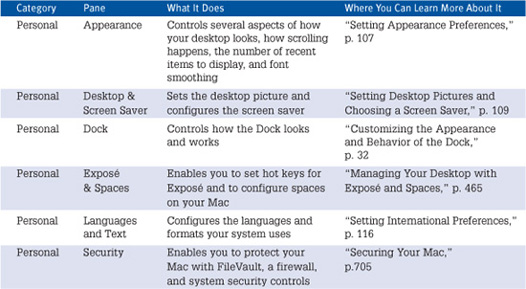
Table 6.1 provides a summary of each pane and tells you where in this book you can learn more about it.
Table 6.1 System Preferences Application Panes
The following are some tips to work with the System Preferences application:
• You can open a pane by selecting it on the application’s View menu.
Note
![]()
You might see more or fewer panes in the System Preferences application than are listed in Table 6.1 depending on the hardware and software you have installed. For example, if your Mac doesn’t support Bluetooth hardware, you won’t see the Bluetooth pane.
• Right-click on the System Preferences application’s icon on the Dock and choose a pane on the pop-up menu to work with it.
• To see all the panes again, select View, Show All Preferences; press ![]() -L; or click the Show All button on the System Preferences application’s toolbar.
-L; or click the Show All button on the System Preferences application’s toolbar.
• You can search for a pane by typing text in the System Preferences application’s Search tool. (You can move into the tool by clicking in it; selecting View, Search; or pressing ![]() -F.) As you type, the panes that meet your search will become “spotlighted” and the rest of the panes will be darkened.
-F.) As you type, the panes that meet your search will become “spotlighted” and the rest of the panes will be darkened.
• If you prefer that the panes be listed alphabetically rather than by category, select View, Organize Alphabetically. The System Preferences application will be reorganized and the panes will appear alphabetically from the upper left to the bottom right.
• Use the toolbar’s Back and Forward buttons to move among panes you have opened.
Setting Appearance Preferences
How your Mac’s desktop looks is likely an important thing; because you are going to be looking at it so much, it should look as pleasing to you as possible. Likewise, it should work in the way that makes the most sense to you. You can use the Appearance pane of the System Preferences application to configure certain aspects of how Mac OS X looks and works. And if the default colors provided in the pane aren’t to your liking, you can use the Color Picker to add colors you’d like to see.
Using the Appearance Pane
Use the Appearance pane of the System Preferences application to control several basic settings for your system. This pane is organized into four sections. From top to bottom, they control basic appearance settings, scroll behavior, the number of recent items tracked, and font smoothing (see Figure 6.2).
Figure 6.2 The Appearance pane can be used to configure several different aspects of how Mac OS X looks and works.

The Appearance pop-up menu includes these options:
• Select Blue if you want color in the buttons, menus, and windows.
• Select Graphite if you want to mute the color so the color elements are gray instead.
• Use the Highlight Color pop-up menu to select the highlight color. You can choose one of the default colors on the pop-up menu or choose Other to open the Color Picker, which is described in the next section.
Use the Place Scroll Arrows radio buttons to set the following scrolling behaviors:
• Choose the Together radio button to place the scroll arrows together.
• Choose the At Top and Bottom radio button to have a scroll arrow placed at each end of the scrollbar.
• Select Jump to Here to cause a window to jump to the relative position in the scrollbar on which you click or Jump to the Next Page to scroll a page at a time when you click above or below the scroll box.
• If you want scrolling to be smooth (instead of jumping when you scroll, your Mac kind of strolls to the new location), check the Use Smooth Scrolling check box.
• Activate the Double-Click a Window’s Title Bar to Minimize check box if you want to be able to minimize a window by double-clicking its title bar.
Set the number of recent items tracked on the Apple menu for applications, documents, and servers using the Number of Recent Items pop-up menus. You can track as few as none or as many as 50 recent items with a number of choices in between.
The bottom section of the pane provides the controls you use to configure how font smoothing is enabled on your Mac. Font smoothing (known as antialiasing for graphics) reduces the jaggies that occur when you view certain fonts onscreen; this is most noticeable when you use larger sizes or thick fonts or when you apply bold or other formatting. Font smoothing is always turned on, but you can configure it specifically for your system:
1. Open the Appearance pane of the System Preferences application.
2. Activate the Use LCD Font Smoothing When Available check box.
3. Because the effect of smoothing is less noticeable at small font sizes, your system can save some wasted processing power by not smoothing fonts displayed at small sizes. Select the font size at or below which text smoothing is disabled, using the Turn Off Text Smoothing for Font Sizes X and Smaller pop-up menu. The default value is 4 points, but you might not even notice if you increase this value slightly.
Using the Color Picker to Choose Colors
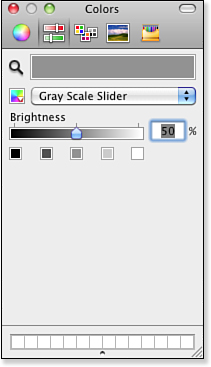
There are many areas in which you choose to use colors for certain things, such as when you apply colors to text or apply a color to the background of a Finder window. To apply colors, you use the Color Picker, which you can open by choosing Other on the Highlight Color pop-up menu on the Appearance pane (see Figure 6.3). Within applications, you use the Colors panel to apply colors to text and images, and it works in the same way as the Color Picker.
Figure 6.3 The Color Picker enables you to create and apply custom colors to selected elements, such as to the background of a Finder window or the color your Mac uses to highlight interface elements.
Tip
![]()
How you open the Colors panel depends on the application you are using. However, in some applications, such as TextEdit, you can open it by pressing Shift-![]() -C.
-C.
The five modes in the Color Picker are represented by the five buttons along the top of the window. From left to right they are the Color Wheel, Color Sliders (including Gray Scale, RGB [Red Green Blue], CMYK [Cyan Magenta Yellow Black], and HSB [Hue Saturation Balance], Color Palettes, Image Palettes, and Crayons. Each of these modes work similarly. Select the mode you want to use, and the controls in the Color Picker window change to reflect the mode you are in. Use the mode’s controls to select or configure a color to apply. When you want to apply the color to the selected object, click it.
Tip
![]()
You can add the configured color to the list of favorite colors at the bottom of the window by dragging the color from the top of the dialog box to the boxes at the bottom so you can easily apply the color again in the future.
If you click the Magnifying Glass icon, the pointer turns into a magnifying glass. If you move this over an area and click, the color in that area appears in the current color box of the Color Picker.
Setting Desktop Pictures and Choosing a Screen Saver
Setting a desktop picture is a great way to personalize your Mac and make it more pleasing to look at; using a screen saver is a good way to protect your screen from damage that can be caused by a static image being displayed on it for a long period of time. You can use the Desktop & Screen Saver pane of the System Preferences application to configure both these aspects of your system.
Note
![]()
The Colors panel you see within particular applications might have the same or slightly different modes.
Choosing Desktop Pictures
You use the Desktop tab of the Desktop & Screen Saver pane of the System Preferences application to configure a desktop picture (see Figure 6.4). You can choose to use one of Mac OS X’s default images, any image or folder of images in your Pictures folder, any image or folder of images located elsewhere, or any photos you have in your iPhoto Library. You can use images in just about any image format as desktop pictures, such as TIFF, JPG, and so on.
Figure 6.4 Although you probably won’t see your desktop picture all that much if you have a lot of windows open, it’s nice to have something pleasant to look at from time to time.

Configuring desktop pictures is easy:
1. Select the Desktop tab. At the top of the tab, you see the current desktop picture in the Image well and the name of the image next to the Image well. Beneath that on the left side of pane is the list of available sources of pictures. On the right side of the pane are the pictures in the source that is selected on the left side of the pane.
Tip
![]()
If your Mac is connected to multiple displays, the desktop on each display can have its own desktop picture. When you open the Desktop tab, a pane will appear on each display. Use each screen’s pane to configure its desktop picture; the desktop picture on each display is independent so you can have the picture on one display be dynamic while the picture on the other is static.
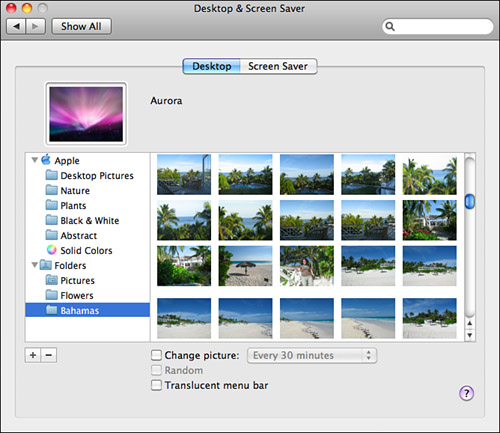
2. Choose the image source that you want to use on the desktop by selecting it on the Source list. There are a number of default sources including Desktop Pictures, Nature, Plants, and so on. Choose Folders, Pictures to use the Pictures folder in your Home folder as the source. You can add any other folder as a source by clicking the Add Source (+) button at the bottom of the pane. After you select a source, its images appear in the right part of the pane (see Figure 6.5).
Figure 6.5 Here I’ve selected a folder with photos from a recent vacation.
3. To use one of the images being shown, select it. The image you select will be placed on the desktop.
Tip
![]()
You can also place a single image on the desktop by dragging it from Finder onto the Image well.
4. To have your Mac rotate the desktop picture among those in the selected source, activate the Change Picture check box and choose the amount of time each picture should be displayed on the pop-up menu; there are many options including each time you log in, when waking up from sleep, and various times from every five seconds to every day. If you want the images to be selected at random, activate the Random check box; if you leave this deactivated, the images will be used in the same order as they are in the source. When you do this, the Image well will be filled with an icon that indicates that images will be rotated. The first image is selected and placed on the desktop and is changed according to the timing you selected.
Tip
![]()
To remove an image source from the list, select it and click the Remove Source button (-).
Configuring a Screen Saver
Mac OS X was the first version of the Mac OS that included a built-in screen saver. Many Mac users enjoy having a screen saver, and Mac OS X’s version provides the features you would expect. The quality and style with which the screen saver displays images are quite nice. It can be especially nice when you use your own images.
You use the Screen Saver tab of the Desktop & Screen Saver pane of the System Preferences application to configure a screen saver for your computer (see Figure 6.6).
Figure 6.6 You can use one of Mac OS X’s built-in screen saver modules, create your own screen saver, or add a screen saver that someone else created.

Along the left side of the pane, you see two general categories of screen saver modules you can use. The Apple group includes modules provided by Apple, such as Flurry or iTunes Artwork. The Pictures section includes sources of photos that can be used as a screen saver module, including photos from your iPhoto Library. The Preview pane shows a preview of the selected module and you see various controls you can use to configure and test the module you select; these work similarly for all the modules.
Using a Built-in Screen Saver Module
The general steps for using one of Mac OS X’s built-in modules are the following:
1. Display the Screen Saver tab.
2. If you want your Mac to randomly select and use a screen saver, activate the Use Random Screen Saver check box and skip to step 9. Each time the screen saver activates, your Mac will select a different module to use.
3. Select the screen saver module you want to use from the Screen Savers list; you see a preview in the Preview window.
Note
![]()
Most of the default Mac OS screen saver modules use standard images Apple has provided. One of them—the iTunes Artwork module—is more interesting, however. It creates a screen saver using the artwork associated with albums in your iTunes Music Library. When you select this module, the artwork is gathered from iTunes automatically and the album covers appear in a large square consisting of subsquares, each of which rotates through various album covers.
4. Click the Options button to set various parameters for the screen saver you select. The options that are available depend on the specific module you select. Some modules don’t have options and the Options button will be disabled.
5. If you select a module that uses photos, use the Display Style buttons to choose how the photos are displayed. You can choose a Mosaic style, Collage style, or you can have each image presented using transition effects to create a slideshow.
6. If you want the clock to be displayed along with the screen saver, activate the Show with Clock check box. The time will appear on screen along with the screen saver images.
7. If your Mac is connected to multiple displays, but you want the screen saver to be shown only on the main display, activate the Main Screen Only check box. The images will be displayed on the display with the Mac title bar; other displays will be blank.
Note
![]()
If you use multiple displays, a different image from the selected screen saver module is shown on each display.
8. Test the screen saver by clicking the Test button. The images that are part of the screen saver are rendered and displayed with the configuration options you selected.
9. Use the Start Screen Saver slider to set the idle time that must pass before the screen saver is activated.
10. Click the Hot Corners button.
11. On the resulting sheet, select the corners to which you can move the mouse to manually start or disable the screen saver. Select the action you want to occur on the pop-up menu located at the corner you want to configure and click OK. For example, if you select Start Screen Saver on the pop-up menu located in the upper-left corner of the sheet, you can start the screen saver by moving the cursor to the upper-left corner of the display. The default is to have no action occur at any corner.
Note
![]()
If the display sleep time set on the Energy Saver pane is less than the time you set in step 9, you will never see the screen saver because the display will sleep before the screen saver is activated. If this is the case, a warning appears on the Screen Saver tab pane and a button enables you to jump to the Energy Saver pane. You can either decrease the time for the screen saver to activate or increase the time for Display sleep.
Creating a Custom Screen Saver Module
Some of the built-in modules are pretty cool (I especially like iTunes Artwork), but you can have even more fun by creating or using a custom module. There are several ways to do this:
• Create a screen saver from a folder of pictures.
• Create a screen saver from a MobileMe member’s gallery.
• Create a screen saver that displays an RSS feed.
• Use a screen saver you download from the Internet.
The next four sections take you through the details.
Creating a Screen Saver from a Folder of Pictures
To create a screen saver from your own images, use the following steps:
1. Create a folder containing the images you want to use. The images can be in the standard image formats, such as JPG or TIFF.
2. Open the Screen Saver tab and select the Add icon (+).
3. Select Add Folder of Pictures.
3. Use the Choose Folder sheet to move to and select the folder containing the images you want to use.
4. Click Choose.
5. Use the other controls on the tab to configure the screen saver. You have the same display options as for the built-in screen saver modules.
You can choose to use the images within your Pictures folder by selecting it on the list of screen savers. Only the images located in the root folder (not within folders that are inside the Pictures folder) are used. You configure the screen saver using the same steps you use for other options.
If you have installed and use iPhoto, you can choose any images in your iPhoto Photo Library as a screen saver by selecting Library, which is located under the Choose Folder module. You can also select any photo album you have created in iPhoto as a screen saver by selecting it on the list that appears under the Photo Library on the screen saver list.
Creating a Screen Saver from a MobileMe Gallery
To create a screen saver from a MobileMe gallery, follow these steps:
1. Open the Screen Saver tab and select the Add icon (+).
2. Select Add MobileMe Gallery. System Preferences prompts you for a MobileMe member name.
3. Type the member name and click OK. System Preferences retrieves a list of albums, as shown in Figure 6.7.
Figure 6.7 You can create a screen saver from the image in a MobileMe gallery.

4. Activate the check boxes beside each gallery you want to use.
5. Use the other check boxes to set the slide show options.
6. Click OK.
7. Use the other controls on the tab to configure the screen saver. You have the same display options as for the built-in screen saver modules.
Creating a Screen Saver from an RSS Feed
If you know of an RSS feed that includes pictures, you can uses the feed images for your screen saver. Here are the steps to follow:
1. Open the Screen Saver tab and select the Add icon (+).
2. Select Add RSS Feed. System Preferences prompts you for the RSS feed address.
3. Type the feed URL and click OK. System Preferences retrieves the feed images.
4. Use the other controls on the tab to configure the screen saver. You have the same display options as for the built-in screen saver modules.
Using Screen Savers Acquired from the Internet and Other Sources
You can also download screen savers from the Internet or obtain them from other sources. Screen saver modules have the .saver filename extension. To do this, follow these steps:
1. Download the screen saver you want to use and prepare it for use.
2. Place the .saver file in the directory Mac OS X/Library/Screen Savers, where Mac OS X is the name of the startup volume.
3. Use the Screen Saver tab to choose and configure the screen saver you added.
Note
![]()
You can browse Apple’s screen savers from the Screen Saver tab. Click the Add icon (+) and then select Browse Screen Savers.
Setting International Preferences
Mac OS X includes support for a large number of languages; language behaviors; and date, time, and number formats. You control these properties through the Language & Text pane of the System Preferences application (see Figure 6.8).
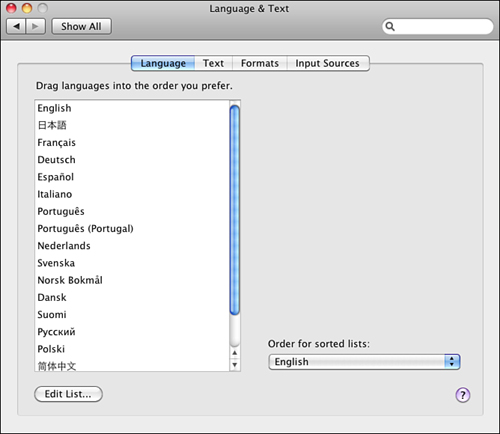
Figure 6.8 You can use the Language & Text pane of the System Preferences application to control various language and format properties based on a language and the conventions of particular nations.
Setting the Language Tab Options
Use the Language tab to configure the languages you want to use. The Languages list shows the languages that are currently active. You can drag these languages up and down in the list to set the preferred order in which you want to use them on menus and in dialog boxes. If you click the Edit List button, a sheet will appear on which you can choose the languages that appear in the Languages list by unchecking the Show check boxes for the languages you don’t want to use (the languages on this list are those that were installed when you installed Mac OS X). After you click OK, the languages whose check boxes you unchecked will no longer appear on the language list. Use the Order for Sorted Lists pop-up menu to choose the language by which lists will be sorted.
Note
![]()
Changes you make to language settings will become active in the Finder the next time you log in.
Setting the Formats Tab Options
Use the Formats tab to configure the format of the dates, times, and numbers used on your Mac. When you open this tab, you see a section for each of these areas along with the Region pop-up menu (see Figure 6.9).
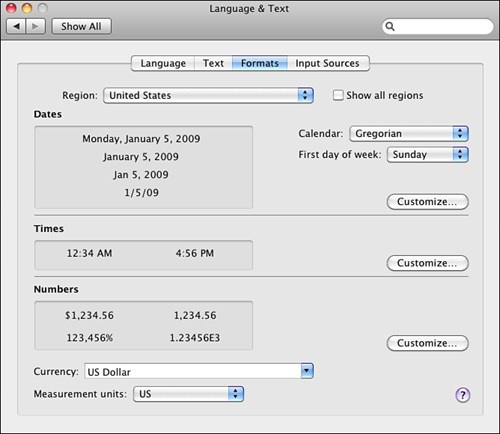
Figure 6.9 Use the Formats tab of the International pane to set the format of dates, times, and numbers for your system.
Choosing a Region
Select the region setting for your Mac on the Region pop-up menu. By default, you see region choices that relate to the languages you have installed. If you want to see all possible region options, check the Show All Regions check box. When you make a selection, default formats for the region you selected are applied to each setting area (dates, times, and numbers).
Note
![]()
The options described in the following paragraphs are for the United States region. If you choose a different region, different options might be available to you, but they can be set using similar steps.
After you have set general format preferences via the Region pop-up menu, you can customize the format in each area.
Customizing Date Options
In the Dates section, click the Customize button. The Customize Dates sheet will appear. Use the controls on this sheet to set the date formats displayed in Finder windows and other locations. There are four general date formats: Short, Medium, Long, and Full. Use the pop-up menus, check boxes, and text fields to set the format for each type of date. Choose the date format you want to configure on the Show pop-up menu. The default format will be shown in the box below the pop-up menu. Click each element, such as the month, to customize it. For example, you can customize the month format by selecting the abbreviated form. Drag the elements around to change the order in which they appear. If you want to add more elements to the default format you selected, drag them from the Date Elements section of the sheet to the location in which you want the elements to appear. Repeat these steps to configure each of the date format options (such as for the Short format). Click OK to save your settings and close the sheet. On the Calendar pop-up menu, choose the calendar you want to use, such as Gregorian or Japanese.
Tip
![]()
To remove an element from the date or time customization, select it and press the Delete key.
Customizing Time Options
In the Times section, click the Customize button. The Customize Times sheet will appear. Choose the time format you want to configure on the Show pop-up menu. The default format will be shown in the box below the pop-up menu. Click each element, such as the minute, to customize it. For example, you can customize the minute display by choosing to show the leading 0 or not. Drag the elements around to change the order in which they appear. If you want to add more elements to the default format you selected, drag them from the Time Elements section of the sheet to the location in which you want the elements to appear. Repeat these steps to configure each of the time format options (such as for the Short format). To determine the modifier that is displayed when the time is before or after noon, enter the modifier in the Before Noon and After Noon boxes. Click OK to save your settings and close the sheet.
Note
![]()
The settings you make in the Dates and Times sheets affect the format of these values in the Finder and other locations. They do not affect the clock display; you control the format of the clock using the Time & Date pane.
Is time really important to you? With Mac OS X, you can choose to display milliseconds by adding the Milliseconds element to one of the standard time formats.
Customizing Number Formats
You can see the format of numbers using the region you have selected in the Numbers section. You can click Customize to configure your own number and currency separators, or you can select default formats using the following two controls.
• Use the Currency pop-up menu to choose the currency format you want to use, such as US Dollar or Euro.
• Use the Measurement Units pop-up menu to select the default measurement units used (U.S. [aka English] or Metric).
Note
![]()
When you make changes to a standard format, the selection on the Region pop-up menu becomes Custom to indicate that you have customized your settings.
Setting the Input Sources Tab Options
Use the Input Sources tab to control and configure the Input menu that can appear on the menu bar.
![]() To learn how to configure the Character Palette, see “Working with the Character Viewer,” p. 491.
To learn how to configure the Character Palette, see “Working with the Character Viewer,” p. 491.
![]() To learn how to configure a keyboard for different languages, see “Configuring a Keyboard,” p. 593.
To learn how to configure a keyboard for different languages, see “Configuring a Keyboard,” p. 593.
Setting Default Disc Behaviors
Use the CDs & DVDs pane of the System Preferences application to determine your Mac’s default behaviors when you insert a disc (see Figure 6.10).
Figure 6.10 The CDs & DVDs pane of the System Preferences application enables you to determine what your Mac does when you insert a disc into it.
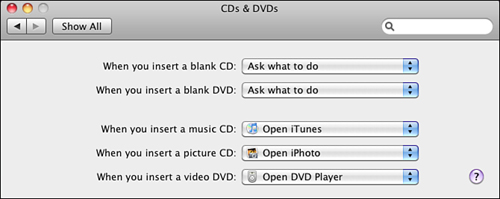
You set a behavior for your Mac when you insert a music CD, picture CD, or video DVD. On the pop-up menu for each of these, you’ll see a similar set of commands. At the top of the menu is a list of all applications that Mac OS X thinks might be suitable for the type of disc you insert. Choose the application that you want to be used by default; for example, you can choose DVD Player or Front Row for video DVDs. To select an application not on the list, choose Open Other Application and then choose the application you want to be used. To have an AppleScript run, choose Run Script and then select the script you want to be used. To have your Mac do nothing, choose Ignore.
The next time you insert a disc, your Mac will take the default action that you set.
Configuring Your Mac’s Date and Time
The Date & Time pane of the System Preferences application enables you to set and maintain your system’s time and date (see Figure 6.11). You can set the time and date manually, or you can use a network timeserver to set and maintain your system’s time and date for you.
Figure 6.11 The Date & Time pane enables you to determine how your Mac keeps track of time.
To set your system’s date and time, do the following:
1. Open the Date & Time pane.
2. Click the Time Zone tab.
3. Use either of the following methods to set the time zone:
• Activate the Set Time Zone Automatically Using Current Location to have Mac OS X do all the work for you.
Note
![]()
If you specified a MobileMe account when you installed Mac OS X, the time zone information has been configured for you.
• Use the map to set your time zone (see Figure 6.12). Drag the highlight bar over your location to select the correct time zone. Then use the Closest City pop-up menu to select the specific time zone for the area in which you are located.
Figure 6.12 Use the Time Zone tools to set the time zone in which you and your Mac are currently located.

4. Click the Date & Time tab.
5. Choose how you want to set the time:
• If you are going to use a network timeserver to maintain the time and date for your machine, activate the Set Date & Time Automatically check box and select the timeserver you want to use on the drop-down list. The options you see depend on where you are. Apple provides three primary timeservers, one for the Americas, one for Asia, and one for Europe. Select the server that is appropriate for your location.
Note
![]()
You have to be connected to the Internet to use one of Mac OS X’s built-in timeservers. Similarly, you must be connected to a local network to use a timeserver located on that network.
• If you want to set the time and date manually, deactivate the Set Date & Time Automatically check box. There are easy-to-understand controls that you use to set the date and time. You can use the Calendar tool to choose a date, type a date in the date box, or use the arrows next to it to select a date. You can then use similar controls to set the time.
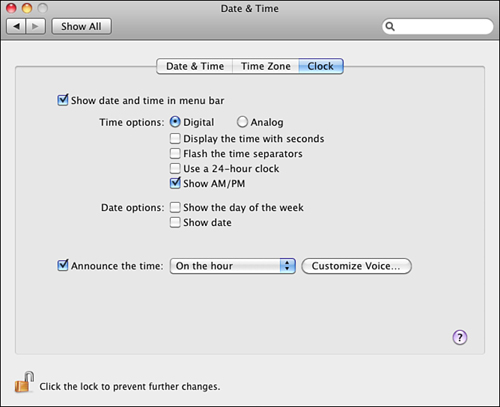
![]() To learn how to use the Clock tab to configure the desktop clock, see “Changing the Clock Display,” p. 15.
To learn how to use the Clock tab to configure the desktop clock, see “Changing the Clock Display,” p. 15.
Note
![]()
You can find the official time for any time zone in the United States at www.time.gov. Of course, this is useful only if you live in the United States and can handle the time being off by as much as 0.1 seconds.
Controlling System Startup
Under Mac OS X, there are several ways to configure and control the startup process. The most straightforward way is to use the Startup Disk pane of the System Preferences application to select a startup volume. There are other ways you can control system startup as well, such as selecting a startup volume during the startup process, starting up in the single-user mode, and starting up in the verbose mode.
Choosing a Startup Volume with System Preferences
The Startup Disk pane of the System Preferences application enables you to select a startup volume (see Figure 6.13). Open the pane to see a list of the valid startup volumes on your machine. Select the volume from which you want to start up and click Restart. You are prompted to confirm this action by clicking the Restart button. Your selection is saved and your Mac restarts from the volume you selected.
Figure 6.13 The Startup Disk pane allows you to select a startup volume for your Mac.
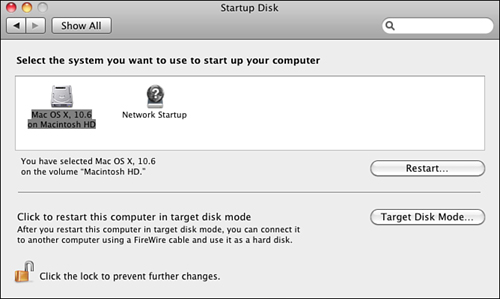
If you want your Mac to start up in Target Disk mode so it acts as if it is only a hard disk, click Target Disk Mode and then click Restart at the prompt sheet.
![]() To learn more about Target Disk Mode, see “Starting Up in Target Disk Mode,” p. 125.
To learn more about Target Disk Mode, see “Starting Up in Target Disk Mode,” p. 125.
Tip
![]()
For troubleshooting purposes, it’s a good idea to install Mac OS X on more than one volume. Use one of these as your working startup volume. Don’t use the other one except for troubleshooting purposes. This can be a great help when you are having trouble with your Mac.
Choosing a Startup Volume During Startup
During the startup process, you can select the startup volume by holding down the Option key while the machine is starting up. As the Mac starts up, you see icons for each of the valid startup volumes on your machine. The currently selected startup volume is highlighted. You can select a startup volume by clicking the arrow below the volume’s icon. The Mac will then start up from the volume you selected.
Note
![]()
Single-user mode is also called Console mode.
Caution
![]()
When you start up in single-user mode, you will be using the root account. Under this account, you can do anything to the files on your Mac. Some actions you perform under the root account can’t be undone, so be careful that you don’t do something you didn’t mean to do.
Starting Up in Single-User Mode
The single-user mode starts up your Mac in a Unix-like environment. In this environment, you can run Unix commands outside of Mac OS X. This can be useful in a couple of situations, mostly related to troubleshooting problems.
To start up in single-user mode, hold down ![]() -S while the machine is starting up. Many system messages appear and report on how the startup process is proceeding. When the startup is complete, you will see the
-S while the machine is starting up. Many system messages appear and report on how the startup process is proceeding. When the startup is complete, you will see the root# Unix prompt. This means you can start entering Unix commands.
Note
![]()
During the startup process, you are likely to see some information that doesn’t make a lot of sense to you unless you are fluent in Unix and in the arcane system messages you see. You might also see some odd error messages, but typically I wouldn’t worry about them too much. However, if you have particular problems you are trying to solve, some of these messages might provide valuable clues for you.
One of the more useful things you can do is to run the Unix disk-repair function, which is fsck. At the prompt, type
/sbin/fsck –y
and press Return. The utility checks the disk on which Mac OS X is installed. Any problems it finds are reported and repaired (if possible).
You can use many other Unix commands at this prompt, just as if you were using the Terminal application from inside Mac OS X.
![]() To learn more about using Unix commands, see Chapter 26, “Working with the Mac OS X Command Line,” p. 531.
To learn more about using Unix commands, see Chapter 26, “Working with the Mac OS X Command Line,” p. 531.
Note
![]()
If the startup disk is Journaled, type /sbin/fsck -yf to force the utility to run.
To resume the startup process in Mac OS X, type the command reboot and press Return. Additional, even more arcane Unix messages appear and then the normal Mac OS X startup process continues. When that process is complete, you end up at the Login window or directly in the Mac OS X desktop, depending on how your Login preferences are configured.
Tip
![]()
If you want to eject a disc when you restart your Mac, hold down the mouse button while you restart.
Starting Up in Verbose Mode
If you hold down ![]() -V while your Mac is starting up, you start up in the verbose mode. In this mode, you see all sorts of system messages while the machine starts up. The difference between verbose mode and single-user mode is that the verbose mode is not interactive. All you can do is view the system messages; you can’t control what happens. Many of the messages you see will probably be incomprehensible, but some are not (particularly messages about specific system processes starting up). This mode is likely to be useful to you only in troubleshooting. And even then, the single-user mode is probably more useful because it gives you some control over what is happening.
-V while your Mac is starting up, you start up in the verbose mode. In this mode, you see all sorts of system messages while the machine starts up. The difference between verbose mode and single-user mode is that the verbose mode is not interactive. All you can do is view the system messages; you can’t control what happens. Many of the messages you see will probably be incomprehensible, but some are not (particularly messages about specific system processes starting up). This mode is likely to be useful to you only in troubleshooting. And even then, the single-user mode is probably more useful because it gives you some control over what is happening.
Starting Up in Safe Mode
If you are having trouble starting up your Mac, try starting in Safe mode. When you do this, you’ll start up in a basic system where many features and peripherals are disabled. However, this can be useful when you are troubleshooting problems. To start up in Safe mode, start or restart your Mac. When the startup sound plays, hold down the Shift key. When you see the spinning progress indicator underneath the Apple logo, release the Shift key. You will then start up in Safe mode.
Starting Up in Target Disk Mode
If you’d like to connect two computers together so you can easily move files between them, you can use FireWire to have one computer act like a mounted volume on another. The computer you want to use as a disk must be started up in Target Disk mode.
Note
![]()
Target Disk Mode is different than networking computers because the computer that is operating in Target Disk mode works like a hard drive instead of like a computer. You can’t use it to do anything beyond what an external drive can do.
First, configure the Mac you want to use as a disk to start in Target Disk mode. Open the Startup Disk pane of the System Preferences application, and click the Target Disk Mode button located at the bottom of the pane. Click Restart at the prompt. When the Mac restarts, you’ll see a FireWire symbol on its screen. This indicates that it is in Target Disk mode.
Connect the Mac to another one using a FireWire cable. The Target Disk Mac will appear as a mounted disk on the second Mac. You can then use its hard drive just like one installed on the second machine. For example, you can move files to it, install software on it, and so on.
To return the Mac to normal condition, press and hold the Power button until the Mac shuts down. Disconnect the FireWire cable and then press the Power button again to restart it normally.
Tip
![]()
Using Target Disk mode can be an easy way to back up all the files on a mobile Mac. Restart the mobile Mac in Target Disk mode and connect it to a desktop machine with some free hard drive space. Drag all the files from the mobile Mac onto the disk on which you want to store the backed-up files.
Using Other Startup Options
Table 6.2 lists various startup options and their keyboard shortcuts.
Table 6.2 Mac OS X Startup Options
