1. Working on the Mac OS X Desktop
The Mac OS X Desktop
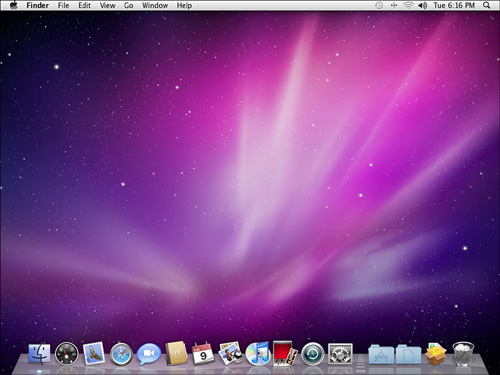
When you start your Mac and log on to your user account, the first thing you will see is the Mac OS X desktop, which takes up the entire screen as shown in Figure 1.1. The default desktop is fairly sparse with only the Dock at the bottom of the screen and the menu bar at the top. This relative emptiness won’t last long, however, because as you use Mac OS X, the desktop gets populated with icons, Finder windows, other application windows, dialogs, and the other objects that are part of day-to-day life in the Mac universe.
Figure 1.1 The Mac OS X desktop is where you’ll do almost all of your work on your Mac.
This chapter introduces you to all the main features of the Mac OS X desktop, so you’ll have a solid base from which to explore the rest of the system in the chapters that follow.
![]() Because the Dock is such an important part of Mac OS X, it has a chapter dedicated to it; see Chapter 2, “Getting to Know the Dock,” p. 23.
Because the Dock is such an important part of Mac OS X, it has a chapter dedicated to it; see Chapter 2, “Getting to Know the Dock,” p. 23.
![]() For information on viewing and using Finder windows, see Chapter 3, “Getting to Know Mac OS X Finder Windows,” p. 37.
For information on viewing and using Finder windows, see Chapter 3, “Getting to Know Mac OS X Finder Windows,” p. 37.
Working with Mac OS X Menus
One of the features that makes Mac OS X so easy to learn and use is the menu system. The menu bar that runs across the top of the desktop never moves, and the vast majority of the time it remains visible no matter how you move or size your open windows, so you always know where to find the menus. And although the left side of the menu bar changes depending on which application you’re currently using, Mac OS X and its applications offer a remarkably consistent set of menus. This will help reduce the learning curve in all your OS X applications.
The next few sections take you on a tour of some of these common menus.
The Mac OS X Apple Menu
The Apple menu—marked by the apple icon in the top-left corner of the screen—is a crucial part of the Mac OS X interface, not only because of the familiarity of the apple icon, but also because this menu provides you with continuous access to a specific set of commands that doesn’t change whether you are working on the desktop or within an application. The Mac OS X Apple menu contains the commands listed in Table 1.1.
Table 1.1 Commands on the Mac OS X Apple Menu

Mac OS X Application Menus
The menu items on the left side of the Mac OS X menu bar (except for the Apple menu) change depending on which application currently has the focus. For example, if you’re working in Finder you see seven menus: Finder, File, Edit, View, Go, Window, and Help, as shown in Figure 1.2.
Figure 1.2 When you’re working in Finder, the menu bar displays the seven menu items shown here.

If you then switch to, say, Safari, the menu bar changes to show the eight menus associated with the Safari web browser: Safari, File, Edit, View, History, Bookmarks, Window, and Help, as shown in Figure 1.3.
Figure 1.3 If you switch to Safari, the menu bar changes to display the eight menu items shown here.

These menu sets are called application menus. The application menus provide the commands you use to control the application in which you’re working. A standard set of commands is consistent among all Mac OS X applications—such as Cut, Copy, and Paste on the Edit menu—but specific applications can have additional commands on their Application menu. Every Mac OS X program has its own application menu located immediately to the right of the Apple menu. This Application menu always uses the name of the application itself. For example, Finder’s Application menu is called Finder (see Figure 1.2), while Safari’s Application menu is called Safari (see Figure 1.3).
The following commands are standard on every Application menu:
• About Application—This command, where Application is the name of the active application, displays version information about the application. Some About windows also provide links to support sites, the publisher’s website, and so on. The About Finder command displays the version of Finder you are using.
Tip
![]()
The keyboard shortcut for the Preferences command is ![]() -, and this shortcut works for all Apple applications and for most third-party programs.
-, and this shortcut works for all Apple applications and for most third-party programs.
• Preferences—You use the Preferences command to set the preferences for an application. For example, you can use Finder’s Preferences command to control specific properties of the desktop.
![]() To learn about Finder Preferences, see “Changing the Desktop’s Appearance,” p. 17.
To learn about Finder Preferences, see “Changing the Desktop’s Appearance,” p. 17.
• Hide Application—This command (where Application is the name of the running application) hides the current application.
Note
![]()
Hiding an application removes its windows and its menu bar from the desktop. The application continues to run and any processes that are under way continue. You can also minimize application windows, which places open windows on the Dock; the application’s menu bar continues to appear while the application is active, even if its windows are minimized.
• Hide Others—This command hides all the running applications except the current one. This is useful if your desktop is cluttered with other application windows and you’d like to clean things up a bit to help you concentrate on the current application.
• Show All—This command unhides all previously hidden applications.
The Application menu of every program (except Finder) also contains the following commands:
• Services—This command provides commands that enable you to work with other applications from within the current application. For example, if you’re using the TextEdit word processing application, its Services menu contains several commands that use the Grab application to capture something on the screen. After you capture the image, it’s automatically pasted into the current TextEdit document. The commands available on the Services menu depend on the applications installed on your Mac and how those applications support the Services menu.
![]() To learn more about using the Services command with Mac OS X applications, see “Working with Mac OS X Application Menus,” p. 132.
To learn more about using the Services command with Mac OS X applications, see “Working with Mac OS X Application Menus,” p. 132.
• Quit Application—This command (where Application is the name of the current program) shuts down the application.
![]()
Tip
The keyboard shortcut for the Quit command is ![]() -Q. When you are working on the desktop,
-Q. When you are working on the desktop, ![]() -Q doesn’t do anything because you can’t quit Finder. However, you can relaunch Finder using the Force Quit command.
-Q doesn’t do anything because you can’t quit Finder. However, you can relaunch Finder using the Force Quit command.
Finder’s Application menu (Finder menu) also has the Empty Trash and Secure Empty Trash commands, which are unique to its Application menu:
• Empty Trash—This command deletes any files or folders located in the Trash.
• Secure Empty Trash—This command deletes files located in the Trash and overwrites the disk space where those files were stored, so they can’t be recovered. Because the Secure Empty Trash command overwrites disk space, it takes much longer to execute than does the Empty Trash command (however, because it works in the background, it shouldn’t slow down your work).
Note
![]()
The Mac OS X Compress command is one of the most useful Finder commands. This command enables you to create compressed files from any folders and files on your Mac. Even better, Mac OS X supports the ZIP compression format, which is the standard, native compression format on Windows computers. You no longer need a separate application to compress files. You can also expand any Zip file from the desktop by opening it.
Mac OS X File Menus
The File menu contains commands that enable you to work with files, folders, and discs. The specific commands you see on an application’s File menu depend on the application. Most File menus have the New, Open, Save, Save As, Print, and Page Setup commands. Many other commands might appear on the File menu as well.
Finder’s File menu offers the commands listed in Table 1.2.
Table 1.2 Commands on Finder’s File Menu

Mac OS X Edit Menus
The Edit menu contains commands for working with data. When you’re using most applications other than Finder, the commands that appear on the Edit menu are Cut, Copy, and Paste. Most applications also provide many more commands on this menu, such as Undo, Redo, Select All, and so on.
Finder’s Edit menu is a bit different because you don’t use Finder to edit documents. Its commands apply to files and folders instead. For example, when you select a file and choose Edit, Copy, the file is copied. You can move to a different location and choose Edit, Paste to place a copy of the selected item in the new location. Finder’s Edit menu also has the Select All command, which selects everything in the active window; the Show Clipboard command, which shows what has been copied to the Clipboard; and the Special Characters command, which opens the Character palette.
Finder’s View Menu
Finder’s View menu contains the commands you use to view Finder windows.
![]() To learn about using Finder’s View commands, see Chapter 3, “Getting to Know Mac OS X Finder Windows,” p. 7.
To learn about using Finder’s View commands, see Chapter 3, “Getting to Know Mac OS X Finder Windows,” p. 7.
Finder’s Go Menu
Finder’s Go menu contains commands that you use to navigate your system. Using the Go menu, you can navigate to the following locations:
• Back or Forward—Moves you through the windows in a chain of open Finder windows.
• Enclosing Folder—Moves you to the folder that contains the currently selected item.
• Frequently Used Folders—Commands such as Computer, Home, Applications, and Utilities move you to the specified folder.
• Recent Folders—Displays a list of the most recent folders you’ve used, and lets you select a folder to return to it. You can clear the Recent Folders menu by selecting Clear Menu.
• Specific Folder—Use the Go to Folder command to enter the path to a specific folder to open it.
• Server—Use the Connect to Server command to open a server on your network.
![]() To learn how to use the Go menu to navigate folders, see “Changing Folders with the Go Menu,” p. 54.
To learn how to use the Go menu to navigate folders, see “Changing Folders with the Go Menu,” p. 54.
![]() To learn how to connect to servers, see “Accessing Shared Files from a Mac OS X Computer,” p. 368.
To learn how to connect to servers, see “Accessing Shared Files from a Mac OS X Computer,” p. 368.
Mac OS X Window Menus
The Window menu provides commands you use to work with windows that are currently open. Common choices on the Window menu include the following:
• Minimize—This does the same thing as clicking the Minimize button in a window: It moves a window onto the Dock.
• Zoom—This does the same thing as the Maximize button: It makes the active window as large as it needs to be to display all the window’s contents or to fill the desktop, whichever comes first. Choosing it again toggles the window back to its previous size.
• Cycle Through Open Windows—This moves you among the open windows, one at a time.
• Bring All to Front—This command brings all open windows to the front. For example, if you have a lot of open Finder windows and then switch to an application and then back to Finder, you might not see all your open Finder windows. If you use this command, they all come to the foreground so you can see them.
• List of Open Windows—The Window menu always displays a list of the windows open for the application providing that menu. You can switch to an open window by selecting it on the menu.
On the Window menu, the active window in the application you are currently using is marked with some sort of icon. The active Finder window is marked with a check mark; other applications might use a different indicator (for example, a diamond). Be aware that a window can be both active and minimized, in which case the active icon on the Window menu can help you identify the active window even if you can’t see that window (because it’s on the Dock).
If you hold the Option key down while you open the Window menu, you see two additional commands that replace default commands:
• Minimize All—This command replaces Minimize and it causes all open windows in the application, such as Finder, to be minimized and moved to the Dock.
• Zoom All—This command replaces the Zoom command and it makes all the active windows as large as they need to be to display the windows’ contents or to fill the desktop, whichever comes first.
You might see more or fewer commands on the Window menu when you are working in specific applications.
Mac OS X Help Menus
Most applications provide a Help menu that enables you to open their help system. And, most applications provide help through the standard Mac OS X Help application. You can also use Spotlight to search your Mac for specific information.
Finder’s Help menu contains two commands—Search and Mac Help.
You can use the Search box to use Spotlight to quickly search Finder and the Mac’s Help for information in which you might be interested. To use this tool, select Help and type a search term in the Search box. As you type, the Help command is replaced by the results of the search, which appear in two groups:
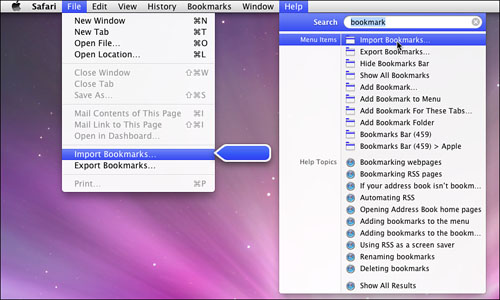
• Menu Items—This is a list of commands in the menu system that match your search text. When you hover the mouse pointer over a command, the Help system opens the corresponding menu and points out the command, as shown in Figure 1.4. Click the command to run it.
Figure 1.4 Hovering the mouse over a menu item in the search results opens the menu and a large floating arrow points out the item.
• Help Topics—This is a list of Help system topics that match your search text. Click a topic to open it in a Help window.
To clear a search so you see the original two commands, click the Clear button (X) in the Search tool.
In Finder’s Help menu, the Mac Help command opens the Mac Help application, which provides extensive help for many areas of Mac OS X. Even better, many applications you install integrate their help systems into the Mac OS X help system. This enables you to access plenty of help using the same tool.
The Help application is based on HTML, so it works the same way web pages do. You can search for help and click links and buttons to access information and move around.
Tip
![]()
When you search for help, you frequently see the Tell Me More link. This link opens other pages that contain topics related to the one for which you searched.
The Home button in the Help Center’s toolbar takes you back to the current help’s home page. If you click and hold the Home button, you see a list of all areas in which you can access help, such as AirPort Help, Mail Help, and so on. You can also view and choose these areas on the Help application’s Library command.
When you have the Mac Help window open, there are a couple of tools you can use to help you find what you are looking for: the Index link and the Search box.
The Index link takes you to an index of topics listed alphabetically. From here you can click on a letter of the alphabet to move to a certain term or phrase.
Tip
![]()
You can also browse most help systems from their home pages. This is often an even better way to find a specific topic because you don’t have to be concerned about using specific words as you do when you search for help.
The Search box invites you to Ask a Question; click inside the box, type a search term, and press Return to see the results that match your search text. The results window is organized into two areas, Help Topics and Support Articles:
• Help Topics—This area lists each help topic within the Help system that matches your search. By default, Help sorts this area by the Rank column, which is the Help system’s judgment of how well a topic addresses your search criterion. Open a topic by double-clicking it or by selecting it and clicking Show. The topic appears in the window for viewing.
• Support Articles—This section lists the articles on the application’s support website that the Help application has found for you (assuming your Mac can connect to the Internet to search for this information). Just like topics, you access an article by double-clicking it or by selecting it and clicking Show. The article is downloaded from the Web and appears within the Help window.
Note
![]()
Articles on the Web are marked with the plus icon (+), and topics within the Help system are marked with the application’s icon. For example, Mac OS X help topics are marked with the OS X icon (the “X”).
Some help topics assist you in performing the action about which you are asking by providing hyperlinks that open the related application or resource.
The Spotlight Menu
The Spotlight menu, which is always located at the far right end of the menu bar, enables you to search for information on your Mac.
![]() To learn how to use the Spotlight, see “Searching Your Mac with Spotlight,” p. 89.
To learn how to use the Spotlight, see “Searching Your Mac with Spotlight,” p. 89.
Menu Extras
The menu extras are the icons that appear on the right side of the menu bar. The number of icons you see depends on the configuration of your Mac. (As you see throughout this book, there are many icons you can display here.) You use these icons to see the status of certain Mac features (such as your wireless network connection) and to configure other features. For example, you can use the volume icon to adjust the Mac’s sound volume.
Mac OS X Contextual Menus
Mac OS X supports contextual menus. Contextual menus are pop-up menus that appear in various locations and contain commands specifically related to the context in which you are working. You can access contextual menus by pointing to an object that provides a contextual menu and clicking the right mouse button or holding down the Control key and clicking the left (or only, on a one-button mouse) mouse button. The contextual menu appears and you can select a command on it.
Tip
![]()
Mac OS X supports a two-button mouse by default. You can open an item’s contextual menu by right-clicking it. You can also program most multi-button input devices to perform a right-click. I strongly recommend that you use a mouse or trackball that has at least two buttons, if for no other reason than the convenience of opening contextual menus with one hand.
The desktop and Finder provide contextual menus, as do many applications, including those not provided by Apple. For example, the Microsoft Office application provides excellent support for contextual menus.
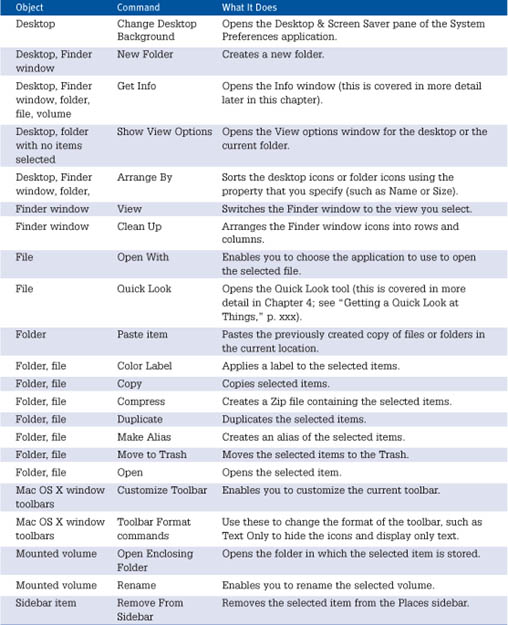
Table 1.3 provides a summary of a few of the more useful Finder contextual menu commands.
Table 1.3 Useful Finder Contextual Menu Commands
Finder’s Action Menu
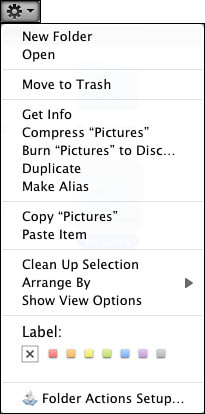
Every Finder window toolbar includes the Action menu, represented by a gear. This menu provides contextual commands that are similar to those you see on the contextual menus. When you select an item or view a folder, commands appropriate to that object appear on the menu (see Figure 1.5).
Figure 1.5 The Action menu provides contextual commands; in this case, the commands are for the selected folder.
Note
![]()
Some applications, especially Apple applications, also provide an Action menu that is marked with the same gear icon.
Working with the System Preferences Application
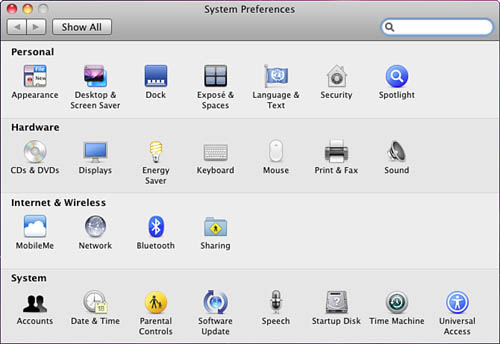
The System Preferences application enables you to configure options and settings for many areas of Mac OS X and some third-party applications and peripheral devices (see Figure 1.6). You can open the System Preferences utility in various ways, but the following two methods are the easiest:
• Select Apple, System Preferences.
• Click the System Preferences icon on the Dock.
Figure 1.6 The System Preferences application enables you to configure and customize Mac OS X to suit your needs and personal preferences.
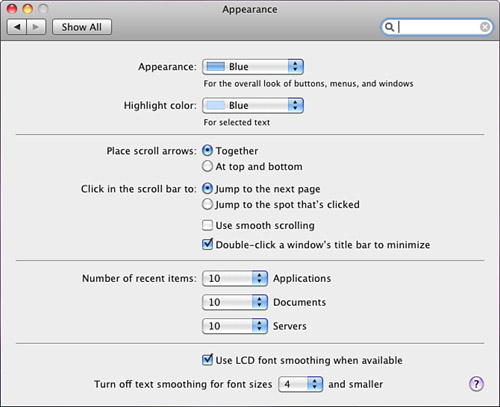
The System Preferences window displays a collection of icons. To access the preferences for a specific area, click its icon. The System Preferences window changes to show a pane containing controls for that area. For example, if you click the Appearance icon, you see the Appearance preferences, as shown in Figure 1.7.
Figure 1.7 The Appearances pane of the System Preferences application enables you to customize various aspects of your system’s visual appearance.
By default, the System Preferences icons are organized into four categories: Personal, Hardware, Internet & Wireless, and System. (If a third-party application or device has added icons, they appear in a fifth category called Other.) The Personal panes configure aspects of the user account that is currently logged in. The panes in the other three categories make system-wide changes (and so they require that you are logged in under or authenticate yourself as an administrator account).
Note
![]()
Specific panes are covered in the parts of this book that explain the features they are related to. For example, the Accounts pane is explained in Chapter 21, Working with User Accounts.”
If you prefer to display the icons in alphabetical order, select View, Organize Alphabetically. The categories disappear and the icons appear in alphabetical order (from left to right, top to bottom).
After you have opened a pane, you can show all the panes of the window again by clicking the Show All button or by selecting View, Show All Preferences (![]() -L).
-L).
Some panes appear only when your Mac has specific capabilities, such as the Bluetooth pane, which appears only if your Mac is Bluetooth capable. When you add hardware or software to your system, additional panes can appear to enable you to configure the device or software you added. One example is the Ink pane, which appears when you attach a handwriting recognition device (such as a tablet) to your Mac.
Panes added by Apple-produced tools, such as the Bluetooth pane, appear within the related categories, such as Hardware. Panes added by third-party tools, such as keyboard customization panes, appear in the Other category.
Managing Open Windows with Exposé
As you work on the desktop, you’ll open a lot of windows in Finder. Plus, each time you work with an application, you’ll open at least one window, and usually more than one. All those windows add up to a lot of desktop clutter. Mac OS X’s Exposé helps you manage open windows by being able to move them out of the way quickly so that you can easily focus on the specific windows you’re interested in.
![]() To learn about Exposé, see “Managing Open Windows with Exposé,” p. 468.
To learn about Exposé, see “Managing Open Windows with Exposé,” p. 468.
Managing the Desktop with Spaces
The Mac OS X Spaces feature enables you to create sets of applications and related windows and switch among those sets easily and quickly. Spaces are a great way to manage your desktop because you can work with groups of windows at the same time and change the context in which you are working by simply changing your space.
![]() To learn about Spaces, see “Creating, Using, and Managing Spaces,” p. 471.
To learn about Spaces, see “Creating, Using, and Managing Spaces,” p. 471.
Customizing the Mac OS X Desktop
Although the default Mac OS X desktop is very nice to look at, you may want to customize it to suit your preferences. You can customize the appearance of your desktop in many ways, including the following:
• Change the clock
• Change mounted disk behavior
• Change the desktop icon size
• Change the desktop icon arrangement
• Set desktop pictures
Note
![]()
You can also change the Finder menu bar by adding menu extras to it, such as Displays, Volume, AirPort, and others. These menus are discussed in the related sections of this book. For example, you learn about the Displays menu in the section on configuring monitors using the Displays pane of the System Preferences application.
Changing the Clock Display
By default, Mac OS X provides a clock in the upper-right corner of the desktop. You can also configure the clock to be shown in a window that floats on the desktop if you prefer. You can control the appearance of the clock by using the System Preferences application:
1. Open the System Preferences application.
Tip
![]()
A faster way to open the Date & Time pane is to click the menu bar clock and then click Date & Time Preferences.
2. Click the Date & Time icon. The Date & Time pane appears.
3. Click the Clock tab (see Figure 1.8).
Figure 1.8 The Clock tab of the Date & Time pane of the System Preferences application enables you to customize the clock on the desktop.

4. To hide the clock, deselect the Show the Date and Time in Menu Bar check box. Mac OS X removes the clock and disables all the clock options.
5. Select how you want the clock to be displayed:
• Digital—Select this option (it’s the default) to see the time displayed as hh:mm AM/PM (where hh is the current hour and mm is the current minute).
• Analog—Select this option to display this time as a clock icon. Selecting this option disables most of the remaining clock check boxes, so skip to step 12.
Tip
![]()
You can switch between the digital and analog clocks by clicking the menu bar clock and then clicking either View as Digital or View as Analog.
6. Select the Display the Time With Seconds check box to include the seconds in the display, so your digital display changes to hh:mm:ss AM/PM (where ss is the current second).
7. If you want the colon between the hour and minutes (and seconds, if you activated them in step 6) to blink on and off (somewhat like a real digital clock), select the Flash the Time Separators check box.
8. If you want to use a 24-hour clock, select the Use a 24-hour Clock check box. This means that a time such as 2:34 PM now appears as 14:34. (The Show AM/PM check box gets disabled if you select this option.)
9. If you want the AM/PM indicator to be shown when you use the 12-hour clock, select the Show AM/PM check box.
10. Select the Show the Day of the Week check box to include the day in the clock display.
Tip
![]()
You can also display the date by clicking the menu bar clock.
11. Select the Show Date check box to include the date in the clock display.
12. If you want Mac OS X to announce the time, select the Announce the Time check box. Then select the time interval on the pop-up menu. Finally, click the Customize Voice button to select the voice used to announce the time.
Changing the Desktop’s Appearance
You can customize other aspects of the appearance of the desktop using the following steps:
1. Click an empty section of the desktop. This automatically switches you to Finder.
2. Select Finder, Preferences or press ![]() -, to open the Finder Preferences window.
-, to open the Finder Preferences window.
3. Click the General tab.
4. Select the check boxes for the mounted items you want to appear on the desktop. Your choices are Hard Disks, External Disks, CDs, DVDs, iPods, and Connected Servers. If you deselect the check boxes, you don’t see the items on your desktop; you can access these items through the Computer folder or within any Finder window. If you select the check boxes, the items appear on the desktop.
5. Close the Finder Preferences window.
6. Select View, Show View Options (or press ![]() -J) to open the Desktop dialog, which displays the view options window for the desktop.
-J) to open the Desktop dialog, which displays the view options window for the desktop.
7. Use the Desktop controls to configure how icons on the desktop appear. For example, click and drag the Icon Size slider to change how big the icons appear on the desktop.
![]() To learn the details of these options, see “Customizing the Finder Window Views,” p. 62.
To learn the details of these options, see “Customizing the Finder Window Views,” p. 62.
8. Close the Desktop dialog.
9. Right-click the desktop and then click Change Desktop Background to open the Desktop & Screen Saver pane of the System Preferences application. This pane has two tabs. The Desktop tab enables you to set your desktop picture; the Screen Saver tab enables you to configure the screen saver.
10. Click the Desktop tab (see Figure 1.9). The Image well shows the desktop picture currently being used. In the left pane of the window, the Source pane shows the available image collections. The right pane shows the images contained in the selected source.
Figure 1.9 Use the Desktop tab to choose a picture or color to display on the Mac OS X desktop.

Tip
![]()
If you just want to replace the current image with another one, drag the image you want to use onto the well. It replaces the image currently shown there and appears on the desktop immediately.
11. Select the source containing the image you want to apply to the desktop. You have the following options:
• By default, Mac OS X includes several image collections (Desktop Pictures, Nature, Plants, Black & White, Abstract, and Solid Colors); these appear in the Apple collection at the top of the Source pane.
• Select the Solid Colors source to apply a color to the desktop.
• The Folders source contains the Pictures folder from your Home folder. Click the Choose Folder option (+ sign at the bottom of the Source pane) to select another folder to use as a source of images.
• When you select a source, the images contained in the location appear in the preview pane in the right part of the window.
• When you select a folder, including the predefined ones, only the images at the root level of that folder are available on the preview pane. For example, if you select your Pictures folder, only the images that are loose in that folder are available. Any images contained within folders that are inside the Pictures folder are not available.
12. Apply the image to the desktop by clicking it on the preview pane. It appears in the Image well and on your desktop.
13. If you want to change desktop pictures automatically, select the Change Picture check box. The image in the well becomes the “recycle” icon to show that you have selected to have the system change images periodically. The images contained in the source selected in the Source pane will be applied to the desktop based on the criteria you configure.
14. Use the pop-up menu to select the time at which you want the images to be changed. The options include When Logging In, When Waking from Sleep, and a time interval from every five seconds to every day.
15. To have the images selected at random, select the Random Order check box. If you deselect this option, the images appear in the same order as they appear in the selected source (for example, alphabetically).
16. If you want the desktop image or color to show under the OS X menu bar, select the Translucent Menu Bar check box.
You can use just about any graphic file as a desktop image, such as JPEG, TIFF, and PICT files.
If you want to install images in the Apple collection in the Source pane so they appear by default, place them in the location Macintosh HD/Library/Desktop Pictures.
This folder contains the image sources that appear on the Desktop tab. You can add your images to the default folders, and they will appear in those sources. For example, if you add an image to Macintosh HD/Library/Desktop Pictures/Nature/, the image will appear when you click the Nature source in the Desktop tab. Unfortunately, you can’t add sources to the Desktop tab by creating folders within the Desktop Pictures folder.
Note
![]()
If you use more than one monitor, each monitor has its own desktop picture. A Desktop Picture pane appears on each desktop. You use that pane to configure the desktop images on each monitor.
Restarting Your Mac
Although Mac OS X is very stable and you can generally leave it running for long periods, there are occasions when you need to restart your Mac to correct some problem. Also, occasionally, you’ll need to restart your Mac after making system changes or installing new software.
You can restart Mac OS X in a couple of ways:
• Select Apple menu, Restart.
• On a notebook Mac, press the Power button briefly
Either way, select Restart in the resulting dialog box.
If Fast User Switching is enabled when you restart a Mac and other user accounts are logged in, you will see a warning dialog box. To be able to restart, you need to input an administrator user name and password and then click the Restart button.
![]() To understand more about Fast User Switching, see “Enabling and Using Fast User Switching,” p. 459.
To understand more about Fast User Switching, see “Enabling and Using Fast User Switching,” p. 459.
Shutting Down Your Mac
There isn’t really much reason to turn a Mac off. Using the Energy Saver settings, you can configure your Mac to sleep when you aren’t actively using it; this saves wear on the Mac’s moving parts and theoretically saves energy (but I doubt it will make any difference in your electric bill!). Most of the time, when you’re done working with your computer and you want to secure it, you should simply log out. This stops all the processes that are running and puts your Mac in a safe condition. Logging in is much faster because you don’t have to wait for your computer to start up. Even better, select Login Window on the Fast User Switching menu to keep your account logged in and protected.
Still, if you are leaving your Mac for a long time, you might want to shut it down. You can do so in the following ways:
• Select Apple menu, Shut Down.
• On a notebook Mac, press the Power button briefly.
Either way, select Shut Down in the dialog box that appears.
If your Mac doesn’t respond to any commands, you might need to perform a hard shutdown. Do so by pressing the Power key and holding it down until the Mac turns off. You won’t have a chance to save any open files, so you should use this method only when all other options have failed and your Mac is locked up. A hard shutdown is definitely a last resort option, so use it only when you really need to.
Using Desktop Keyboard Shortcuts
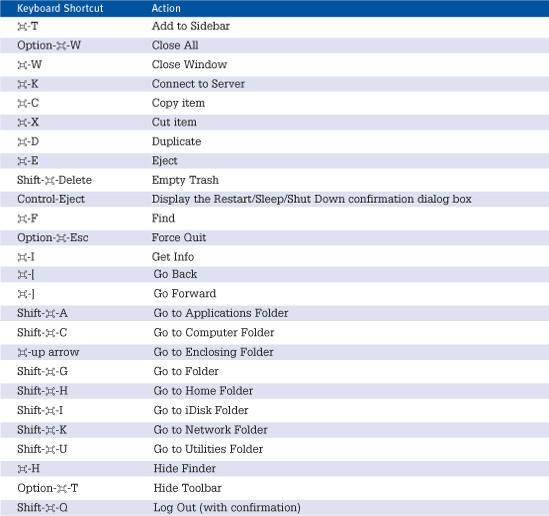
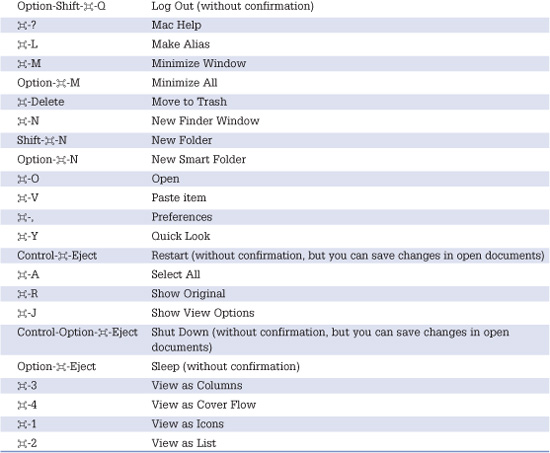
Table 1.4 lists a few keyboard shortcuts that you may find useful when you’re working with Finder.
Table 1.4 Keyboard Shortcuts for Finder